
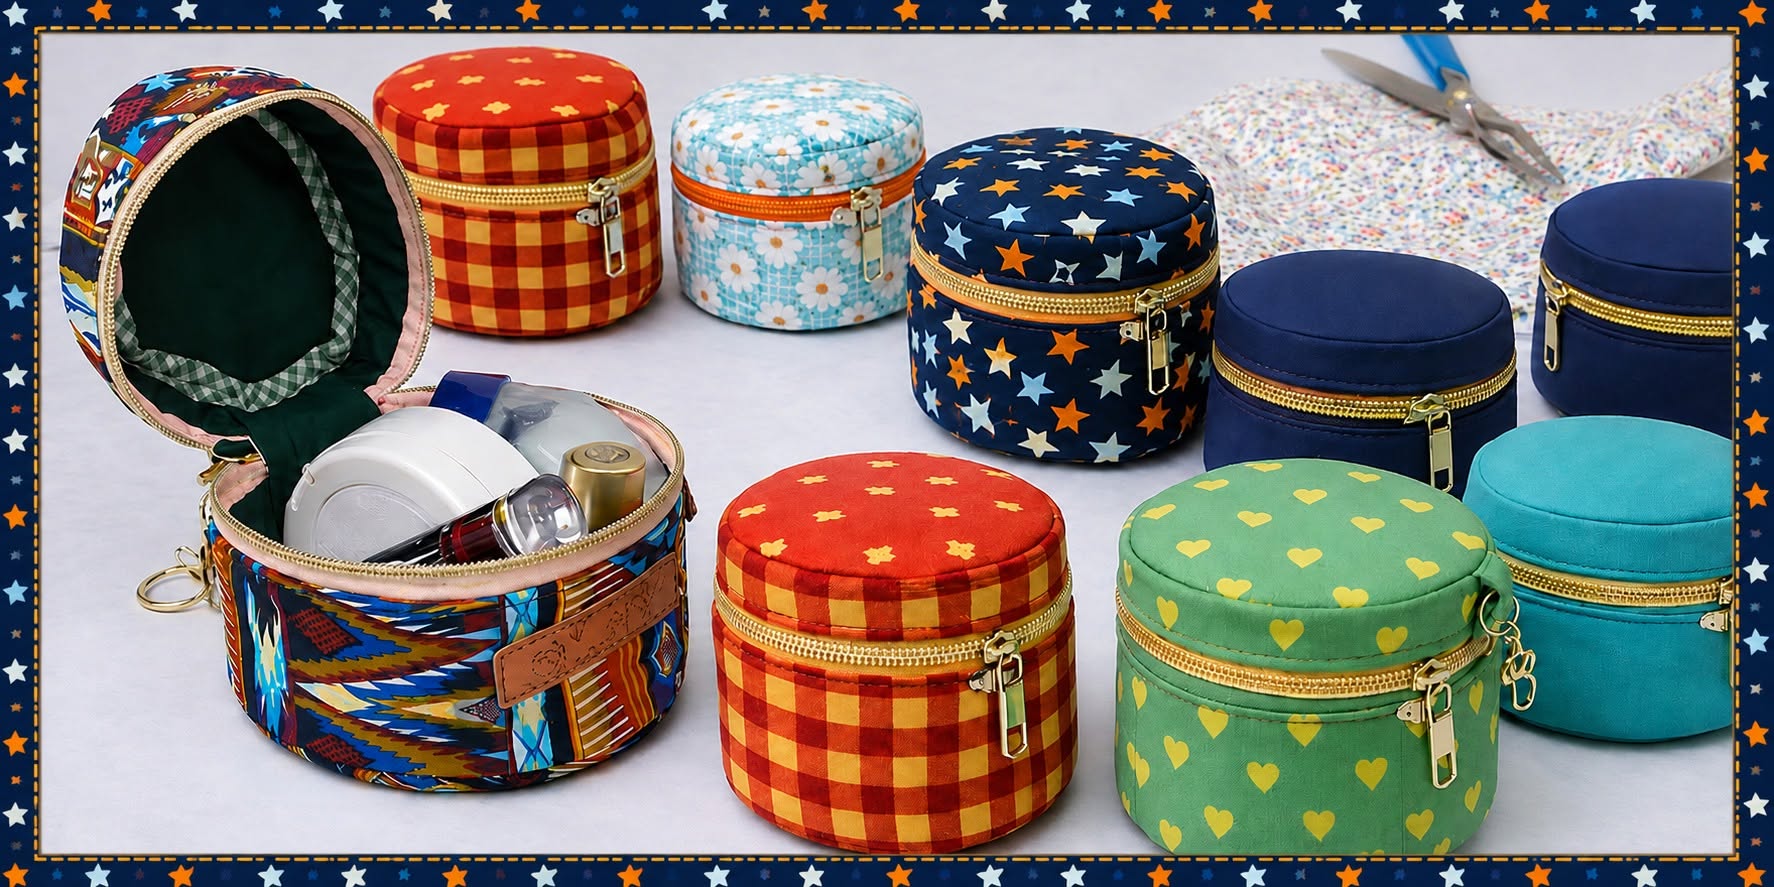
The Round fabric cases or toiletry bags Pattern is a charming sewing project that combines organization, practicality, and creative fabric design in one compact accessory. Inspired by the round zippered cases shown in the reference image, this type of handmade bag can be used to organize cosmetics, toiletries, sewing notions, small accessories, jewelry, charging cables, or other everyday essentials. The cylindrical silhouette gives the project a distinctive appearance while also providing more internal space than many traditional flat zipper pouches. With colorful cotton fabrics, neat topstitching, structured interfacing, and a well-installed zipper, the finished case can look polished enough for gifting while remaining useful for daily life.
One of the most enjoyable aspects of making a Round fabric cases or toiletry bags Pattern is the freedom to personalize nearly every part of the design. The exterior can feature gingham, floral prints, stars, hearts, solids, patchwork-inspired motifs, or coordinated fabric collections. The lining can be made in a contrasting color, while the zipper can become an attractive decorative element instead of simply serving a functional purpose. Although the rounded construction may appear complicated at first, the project becomes much easier when it is divided into simple stages: choosing the dimensions, preparing the circular pieces, creating the side panel, adding structure, installing the zipper, sewing the cylinder together, and finishing the interior.
This tutorial is designed to explain those stages clearly so that even someone who has never sewn a cylindrical toiletry bag can understand the basic construction method. Exact dimensions may be adjusted depending on the desired finished size, but a practical medium case can be made with circles approximately 17 cm in diameter and a finished height of about 14 cm. These measurements create a useful storage case similar in proportion to the examples in the photograph. The most important principle is accuracy: carefully measuring the circular pieces, matching the circumference of the side panel, and distributing the fabric evenly around each curve will help the finished round fabric case remain symmetrical and professional-looking.
Materials, Measurements, and Preparing the Round Fabric Case Pattern
Begin by choosing a medium-weight cotton fabric for the exterior. Quilting cotton is especially convenient because it is easy to cut, press, and sew, while still offering thousands of decorative prints. For one medium Round fabric cases or toiletry bags Pattern, approximately 40 to 50 cm of exterior fabric and the same amount of lining fabric should be sufficient. You will also need fusible interfacing or another stabilizer, a zipper approximately 45 to 50 cm long, coordinating thread, pins or sewing clips, scissors, a marking tool, an iron, and a sewing machine.
DISCOVER MORE FREE PATTERNS HERE!
For a sample case measuring approximately 17 cm wide by 14 cm high, draw two circles with a diameter of 17 cm for the top and bottom panels. Remember that the final size depends on your seam allowance, so add approximately 1 cm seam allowance around the pattern pieces if it is not already included. Cut two circles from the exterior fabric, two from the lining, and two from the stabilizer. Keeping the pieces identical is essential because even a small difference between circles can cause puckering when the side panel is attached.
Next, calculate the side panel. A 17 cm circle has a circumference of approximately 53.4 cm, so a rectangular side section around 55 cm long gives a little extra room for joining and seam allowances. For a finished case around 14 cm tall, you can divide the side construction into an upper zipper band and a lower body panel. For example, the main lower rectangle can measure approximately 55 cm × 12 cm, while two narrower strips measuring approximately 55 cm × 4 cm can be used along the zipper area. Adjust these dimensions if you prefer a taller or shorter case.
Cut matching pieces from the lining and interfacing. The interfacing is especially important because it gives the cylindrical case its recognizable structured form. Without enough support, the fabric may collapse inward when the case is empty. Medium fusible interfacing works well for a softer toiletry bag, while foam stabilizer can create a firmer container-like shape. Always test the stabilizer on a small fabric scrap before applying it to the entire project.
Fuse the stabilizer to the wrong side of the exterior pieces according to the manufacturer’s general pressing method, avoiding excessive heat that could distort the fabric. Keep the circles as flat as possible while pressing. If you are using foam rather than fusible interfacing, baste the fabric and foam together around the edges using a long machine stitch. This temporary stitching will make the layers behave like a single piece during assembly.
Before moving to the zipper, mark quarter points around both circular panels. Fold each circle gently in half and mark the two opposite points, then fold it in half again in the opposite direction to create four evenly spaced reference marks. Repeat the same process on the long side section once it has been joined into a loop. These markings become valuable alignment guides and help distribute the fabric evenly around the curved edges of your round toiletry bag.
Installing the Zipper and Creating the Cylindrical Side Panel
The zipper is one of the most visible details in the Round fabric cases or toiletry bags Pattern, so take your time during installation. Place one zipper strip right side up on your work surface. Position the zipper along its long edge with the zipper teeth facing the fabric. Place the corresponding lining strip over it, right side facing the exterior strip, creating a fabric-zipper-fabric sandwich. Clip or pin the layers carefully.
Using a zipper foot, stitch along the zipper tape while keeping the seam approximately 6 to 8 mm from the zipper teeth. Fold the exterior and lining fabrics away from the zipper and press them gently. Add topstitching close to the folded edge. This topstitching keeps the fabric away from the zipper teeth and creates the crisp decorative finish commonly seen on professionally made toiletry bags.
Repeat the same procedure with the strip on the other side of the zipper. After sewing and pressing, test the zipper several times. It should open and close without catching the fabric. If you notice resistance, check whether the fabric has folded too close to the teeth. Correcting the problem now is much easier than attempting to repair the zipper after the case has been fully assembled.
Attach the larger lower side panel to the zipper section if your pattern uses separate pieces. Sew the exterior pieces together first, then join the corresponding lining pieces so that the seam allowances remain hidden inside. Press the seams carefully and add topstitching if desired. Decorative topstitching can reinforce the structure while giving the project the polished appearance visible on many handmade fabric cases.
Join the short ends of the complete side panel to form a cylinder. Before stitching, confirm that the circumference closely matches the circumference of your prepared circles. A small amount of adjustment is normal, but a large difference will make the curved seams difficult to sew. If the side loop is slightly too long, deepen the joining seam by a few millimeters. If it is too short, reduce the seam allowance where possible.
At this stage, open the zipper at least halfway. This detail is extremely important because the zipper opening will later allow you to turn the project right side out. Many sewing projects become unexpectedly difficult simply because the zipper was accidentally left closed before the final seams were completed. With the zipper open, you are ready to transform the flat components of the Round fabric cases or toiletry bags Pattern into the recognizable cylindrical shape.
Sewing the Circular Top and Bottom for a Smooth Professional Finish
Start with the bottom circle because it is usually easier to sew than the upper section near the zipper. Place the exterior circular bottom against the lower edge of the cylindrical side panel with right sides together. Align the quarter marks on the circle with the quarter marks on the side panel. Secure those four points first, then gradually add clips between them.
Avoid stretching either fabric piece while clipping. Instead, gently ease the straight side panel around the circular edge. Using many small clips rather than a few widely spaced pins can make the curve much easier to control. If the fabric begins to wrinkle heavily before sewing, remove several clips and redistribute the fullness until the fabric lies more evenly.
Sew slowly around the circle using approximately a 1 cm seam allowance. Stop occasionally with the needle down and adjust the fabric before continuing. The goal is to prevent folds from becoming trapped underneath the presser foot. After completing the seam, inspect the stitching from both sides. If you find a small tuck, remove only that section of stitching and resew it rather than undoing the entire seam.
Before turning the seam, make small clips into the seam allowance around the curve, being careful not to cut through the stitching. These clips allow the seam allowance to spread naturally when the cylindrical shape is formed. If the fabric is particularly thick, you can trim the seam allowance slightly after confirming that the stitching is secure. Reducing excess bulk helps the round bottom sit flatter.
Repeat the same process with the upper circular panel. Pay special attention to the section where the zipper begins and ends because that area often contains several layers of fabric and zipper tape. Sew slowly over thicker sections and avoid pulling the fabric behind the machine. If your machine struggles with the bulky area, use the handwheel for a few stitches until the presser foot returns to a level surface.
The lining can be constructed using a similar method. Depending on your preferred sewing technique, the lining circles may be sewn separately and inserted into the case, or the exterior and lining can be assembled together using enclosed seam methods. For an accessible beginner-friendly version of this round zipper pouch, sewing the lining separately and then securing it neatly around the zipper area by machine or small hand stitches can provide an attractive interior without making the curved construction unnecessarily complicated.
Finishing, Customizing, and Using the Round Toiletry Bag
Once the main construction is complete, turn the project right side out through the open zipper. Work gradually and avoid pulling aggressively on the zipper opening. Use your fingers to gently push out the circular edges and smooth the cylindrical walls. The stabilizer should begin supporting the case immediately, creating the rounded container-like shape shown in the reference design.
Press only where appropriate for your chosen stabilizer. If foam is used, avoid flattening it excessively with a very hot iron. Instead, smooth the seams with your fingers and use gentle steam if the materials allow it. If fusible interfacing was used, a careful final press can sharpen the top and bottom edges. A row of decorative topstitching around the circular panels can also help define the shape.
Inspect the inside carefully and trim loose threads. If any raw seam allowances remain visible, they can be covered with bias binding for a very clean finish. Bias binding bends naturally around curves and works particularly well on circular seams. Choose binding that matches the lining for a subtle appearance or use a contrasting color to turn the interior construction into an additional decorative feature.
You can personalize the Round fabric cases or toiletry bags Pattern with handles, tabs, key rings, labels, embroidered initials, or decorative zipper pulls. A small fabric loop inserted near the zipper can make the case easier to carry. For travel use, consider adding a washable or water-resistant lining. For sewing storage, small internal pockets can organize buttons, clips, needles, or measuring tools.
Fabric choice can completely change the personality of the same basic pattern. Warm gingham fabrics create a cozy handmade appearance, small floral prints feel soft and traditional, star patterns can look playful, and solid fabrics create a more contemporary style. Coordinating the zipper with one color from the print is an easy way to create visual harmony without making the design overly complicated.
After completing one case successfully, the pattern can easily be resized. Smaller circles can produce jewelry or accessory cases, while larger circles can create spacious cosmetic organizers. The construction sequence remains essentially the same: prepare two circles, calculate the side circumference, create the zipper section, form the side loop, attach the circular panels, and finish the lining. Understanding that construction logic makes the Round fabric cases or toiletry bags Pattern highly adaptable.
FAQ About Round Fabric Cases or Toiletry Bags Pattern
What fabric is best for a Round fabric cases or toiletry bags Pattern?
Medium-weight cotton and quilting cotton are excellent beginner-friendly options because they are stable, easy to sew, and available in many prints. Canvas can create a firmer bag, while lightweight fabrics normally require stronger interfacing. For a toiletry case that may encounter moisture, a wipe-clean lining can be helpful, provided it is suitable for your sewing machine and intended use.
What size zipper should I use for a round toiletry bag?
The zipper length depends on the circumference of the case and how wide you want the opening to be. For a case approximately 17 cm in diameter, a zipper around 45 to 50 cm long can work well depending on the construction method. A longer zipper can usually be shortened during sewing, making it easier to position accurately.
How do I calculate the side panel length?
Multiply the diameter of your circle by approximately 3.14 to estimate the circumference. For example, a 17 cm diameter multiplied by 3.14 equals approximately 53.4 cm. Add the necessary seam allowance before cutting the side panel. This simple calculation allows you to resize your Round fabric cases or toiletry bags Pattern without needing an entirely new design.
Why does my round fabric case look wrinkled around the bottom?
Wrinkles usually occur when the circle and side panel were not distributed evenly, when the fabric was stretched while sewing, or when the pieces had slightly different circumferences. Marking quarter points, using plenty of clips, and sewing slowly can significantly reduce puckering.
Do I need interfacing for this project?
Interfacing is strongly recommended if you want a structured cylindrical shape. A case made only from quilting cotton may become soft and collapse when empty. Medium fusible interfacing offers moderate support, while foam stabilizer produces a fuller and more dimensional result.
Can beginners sew this pattern?
Yes. The zipper and circular seams require patience, but the project does not rely on highly advanced sewing techniques. Beginners can improve their results by making a simple cotton version first, using a moderate amount of stabilizer and avoiding extremely thick fabrics.
How can I make the circular seams easier to sew?
Mark four or even eight equally spaced reference points around both the circle and the side panel. Match those marks before clipping the remaining fabric. Sew slowly, keep the needle down when repositioning, and avoid pulling the fabric. These techniques help maintain an even curve.
Can this pattern be used for something other than toiletries?
Absolutely. The Round fabric cases or toiletry bags Pattern can become a sewing organizer, jewelry case, medication-free travel accessory organizer, craft supply container, cable pouch, hair accessory case, or small gift box made from fabric. Changing the size and fabric makes the pattern suitable for many purposes.
How do I make the bag more professional-looking?
Consistent seam allowances, careful pressing, smooth topstitching, coordinated fabrics, and a neatly installed zipper make the greatest visual difference. Finishing internal seams with bias binding can also give the project a polished appearance.
Can I wash a handmade round toiletry case?
That depends on the fabrics, stabilizer, zipper, and decorations used. If all components are washable, gentle cleaning may be possible. Prewashing cotton fabric before construction can help reduce later shrinkage, but always consider the care requirements of every material included in the finished bag.
Conclusion
Creating a Round fabric cases or toiletry bags Pattern is an enjoyable way to practice several useful sewing techniques while producing an attractive and practical organizer. Throughout this project, we covered how to select suitable cotton fabric, prepare the circular top and bottom pieces, calculate the circumference for the cylindrical side panel, reinforce the fabric with interfacing, install a zipper, join curved seams, construct the lining, and finish the case neatly.
The most important lessons are to measure carefully, use accurate seam allowances, mark matching points around the circles, and work slowly when sewing curved sections. Once these fundamental techniques become familiar, the same Round fabric cases or toiletry bags Pattern can be adapted into many sizes and styles. Colorful printed cotton creates a playful result like the cases shown in the inspiration image, while solid fabrics can give the same pattern a cleaner and more modern appearance.
This project also demonstrates why handmade sewing can be both creative and practical. A relatively small amount of fabric can become a useful storage accessory that can be customized for travel, cosmetics, craft supplies, sewing notions, jewelry, or gifts. Experimenting with different prints, zipper colors, linings, handles, and decorative details allows every finished case to have its own personality. If you make your own version of this Round fabric cases or toiletry bags Pattern, leave your sincere opinion about the project and share your suggestions. It would be wonderful to know which fabrics, colors, sizes, or finishing details you would choose for your own round fabric case.