
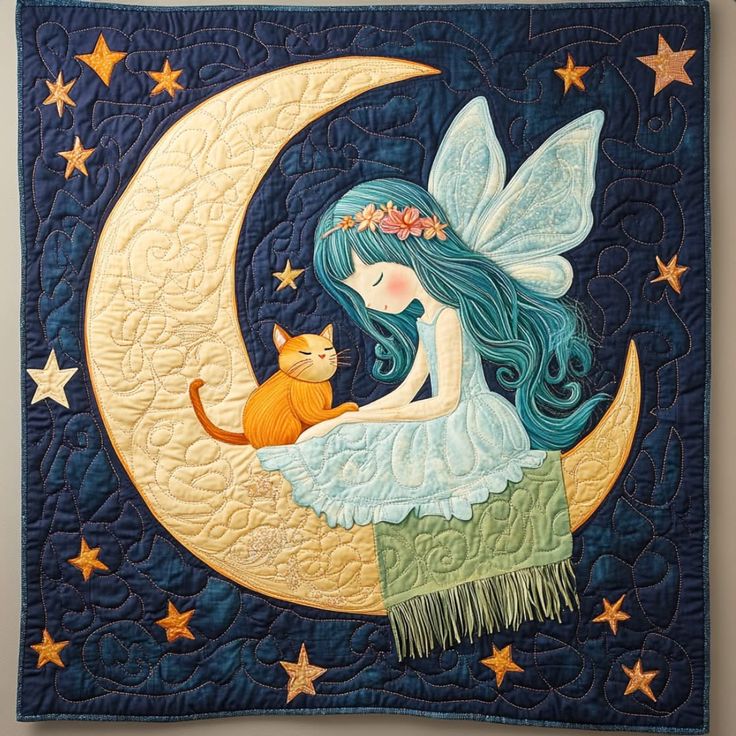
Moon Fairy and Cat Print Bedspread Pattern is a charming textile project that combines fantasy, companionship, and the peaceful beauty of a starry night. Inspired by the image, the design features a delicate fairy sitting on a large crescent moon while sharing a quiet moment with an orange cat. The dark blue background, golden stars, flowing turquoise hair, translucent wings, and richly quilted textures transform the composition into an enchanting decorative piece. Although the artwork looks highly detailed, it can be recreated by dividing the project into manageable stages and completing one section at a time.
This Moon Fairy and Cat Print Bedspread Pattern can be adapted into a bedspread, wall quilt, decorative blanket, nursery panel, or large fabric artwork. The project uses techniques such as fabric appliqué, layered assembly, decorative stitching, free-motion quilting, and optional fabric painting. Beginners may simplify the smallest details, while experienced quilters can add embroidery, complex quilting motifs, and dimensional embellishments. The most important part is preserving the peaceful relationship among the moon, fairy, and cat while choosing fabrics that create clear contrast and visual balance.
Before cutting any fabric, study the proportions and color placement in the reference image. The crescent moon occupies much of the left side, while the fairy and cat form the main focal point near the center. Stars are distributed around the background to guide the viewer’s eye without making the composition feel crowded. Creating a full-size paper template before sewing will help you control these proportions. It also reduces fabric waste, improves the accuracy of each appliqué piece, and makes the final assembly of the fantasy quilt pattern much easier.
Planning the Moon Fairy and Cat Print Bedspread Pattern
Begin by deciding the finished dimensions of your project. A decorative wall quilt may measure approximately 28 by 32 inches, while a bedspread will require the central image to be enlarged or surrounded by coordinating borders and patchwork blocks. Write down the desired measurements and add seam allowances where necessary. For a large bedspread, consider making the fairy scene as a central medallion and expanding it with navy, cream, gold, turquoise, and green fabric borders.
DISCOVER MORE FREE PATTERNS HERE!
Prepare a full-size sketch of the Moon Fairy and Cat Print Bedspread Pattern on paper. You can draw the composition freehand or trace the principal shapes individually, including the crescent moon, fairy’s body, dress, hair, wings, cat, stars, blanket, and background panel. Keep the outlines clean and avoid adding tiny details at this stage. Small elements such as facial features, hair strands, flower centers, and quilting lines will be added later with thread or fabric paint.
Choose a strong but comfortable base fabric for the dark night background. Deep navy cotton is an excellent option because it provides contrast against the pale moon, light blue wings, and orange cat. Prewash and press all fabrics before cutting to prevent shrinkage and color transfer. Select tightly woven materials that will remain stable during appliqué and quilting, especially when working on a large bedspread pattern.
Create a coordinated fabric palette before beginning the construction. Use cream, pale gold, or soft yellow fabric for the moon; orange and golden brown for the cat; turquoise and teal for the hair; light aqua for the dress and wings; and olive or sage green for the hanging blanket. Choose several shades within each color family. These subtle variations will help produce depth without requiring complicated painting techniques.
Gather the essential tools, including sharp fabric scissors, small detail scissors, a rotary cutter, cutting mat, quilting ruler, washable fabric marker, pins, clips, fusible web, embroidery needles, and coordinating thread. A sewing machine with an appliqué foot and free-motion quilting foot will be helpful. However, the complete fabric appliqué pattern can also be sewn by hand using a small blanket stitch or invisible appliqué stitch.
Decide which appliqué technique you will use. Fusible appliqué is usually the easiest choice for this project because it keeps curved pieces stable and allows the complete composition to be positioned before permanent stitching. Turned-edge appliqué provides a softer and more traditional finish but requires additional preparation. Raw-edge appliqué creates an artistic appearance and works especially well when each edge is secured with dense decorative stitching.
Creating the Crescent Moon, Stars, and Night Background
Cut the dark blue background slightly larger than the required finished size. The extra fabric will make quilting and squaring easier later. Place the background on a flat surface and mark the approximate positions of the moon, fairy, cat, stars, and blanket. Do not draw permanent lines. Use a removable marker or small reference pins so that adjustments can be made before fusing or stitching the pieces.
Trace the large crescent moon onto the paper side of the fusible web. Remember to reverse the drawing if the direction of the moon is important. Fuse the web to the back of the selected golden fabric according to the manufacturer’s instructions, then cut around the outline carefully. Position the crescent on the left side of the panel, checking that enough space remains for the fairy’s wings, flowing hair, cat, and surrounding stars.
To give the moon a softer and more dimensional appearance, divide it into two or three fabric sections using related shades of cream and gold. A lighter fabric can be placed near the inner curve, while a darker golden section can define the lower tip. After fusing the pieces, stitch around the edges with a narrow zigzag, satin stitch, blanket stitch, or free-motion line. Matching thread will create a subtle finish, while darker thread will emphasize the shape.
Create several stars in different sizes to make the night sky quilt feel natural and lively. Use warm gold, orange, pale yellow, and cream fabrics. Avoid arranging every star at the same distance or angle because slight variation makes the scene more interesting. Place larger stars near the corners and use smaller stars around the moon and fairy. Leave some empty navy areas so the composition can breathe.
Add decorative quilting to the moon before assembling the most delicate appliqué elements. Swirls, leaves, flowers, curls, and small feather-like shapes will recreate the richly stitched texture visible in the reference image. These motifs do not need to be identical. Draw a few guidelines with a removable marker and fill the remaining spaces intuitively. Use light gold thread to create visible texture without overpowering the fairy and cat.
Quilt the dark blue background with flowing lines that suggest wind, clouds, vines, or magical movement. Work around the areas reserved for the main characters, or add the background quilting after all appliqué pieces have been secured. Dark navy thread will produce a discreet texture, while medium blue thread will make the pattern easier to see. Keep the quilting density relatively even to prevent the panel from becoming distorted.
Assembling the Fairy, Wings, Dress, and Flowing Hair
Construct the fairy in layers, beginning with the pieces that must appear behind the others. The wings should be positioned first, followed by the back section of the hair, body, dress, arms, front hair sections, floral crown, and facial details. Numbering the paper templates will prevent confusion. Before fusing anything permanently, arrange all the pieces on the moon to confirm that the proportions and posture look balanced.
Cut the wings from pale aqua, mint, or translucent-looking fabric. Two shades can be layered to create depth, with darker fabric near the base and lighter fabric toward the outer edges. Stitch the wing outlines using silver, pale blue, or white thread. Add curved interior lines, small swirls, veins, and teardrop shapes to imitate the delicate structure of fairy wings. A thin layer of sheer organza may be added for a subtle luminous effect.
For the fairy’s skin, select a soft cream, peach, or light beige fabric. Cut the face, neck, arms, and visible hand sections with smooth edges. Use minimal facial features to preserve the gentle storybook style. A closed eye can be embroidered with one curved line, the nose with a tiny stitch, and the cheek with a small amount of washable fabric pigment or textile paint. Test every coloring product on scrap fabric first.
The dress should be made from pale blue or aqua fabric that contrasts with the fairy’s darker hair. Separate the bodice, skirt, and ruffled lower edge into individual pieces to create a layered appearance. Decorative quilting can suggest folds, petals, and soft movement. Add a narrow gathered strip, scalloped appliqué, or embroidered loops along the hem to reproduce the delicate ruffle seen in the original fairy quilt pattern.
The flowing turquoise hair is one of the most recognizable parts of the design. Build it from several appliqué sections in dark teal, medium turquoise, and lighter blue-green. Start with one large underlying shape, then add smaller curved sections over it. Secure the edges with coordinating thread and sew long, wavy lines through the fabric to represent individual strands. Allow some curls to overlap the dress, arm, moon, and blanket.
Complete the fairy with a small floral crown made from tiny fabric flowers, embroidery, or simple appliqué shapes. Use peach, coral, yellow, cream, and orange accents to connect the fairy visually with the golden stars and orange cat. Add leaves or small stitches between the flowers. Keep the crown lightweight and relatively narrow so it enhances the face rather than covering the detailed turquoise hair.
Sewing the Cat, Blanket, Quilting Layers, and Final Border
Create the orange cat using one main body shape and separate pieces for the head, front leg, tail, and visible markings. Choose orange fabric with subtle tonal variation or add darker stripes using embroidery thread. Position the cat so that it appears to be resting comfortably beside the fairy. The raised face and gently curved tail are important because they communicate the calm connection between the two characters.
Embroider the cat’s closed eyes, mouth, whiskers, paws, and striped markings after securing the appliqué. Brown or dark orange thread will look softer than black and will blend naturally with the warm fabric. Add a small cream section to the muzzle if desired. The facial expression should remain peaceful and content, reinforcing the comforting atmosphere of the Moon Fairy and Cat Print Bedspread Pattern.
Cut the small green blanket from sage, olive, or moss-colored fabric and position it beneath the fairy. Add quilting motifs such as leaves, curls, or abstract vines. To form the fringe, sew narrow strands of embroidery floss or yarn along the lower edge. Another option is to cut a separate strip of fabric into thin sections, leaving the top edge intact before attaching it beneath the blanket.
Once every appliqué shape is secured, assemble the quilt sandwich with the completed top, batting, and backing fabric. Smooth each layer carefully and baste with safety pins, temporary spray, or long hand stitches. Begin quilting near the center and gradually move outward. Stitch around the moon, fairy, cat, stars, wings, and blanket to define each shape before filling the larger background spaces with decorative quilting.
Square the quilt only after all quilting is complete. Measure from several points and trim the edges carefully using a rotary cutter and long ruler. Add a narrow dark blue binding for a seamless appearance, or select a golden binding to frame the night scene more strongly. For a larger bedspread, attach additional borders before quilting, ensuring that every border remains straight and evenly measured.
Finish by checking the entire Moon Fairy and Cat Print Bedspread Pattern for loose threads, unsecured appliqué edges, marking lines, or uneven stitching. Remove washable guidelines according to the product instructions and press the piece gently from the reverse side. Add a hanging sleeve if it will be displayed as wall art. When used as bedding, choose washable materials and secure every decorative element firmly.
Frequently Asked Questions
What is a Moon Fairy and Cat Print Bedspread Pattern?
A Moon Fairy and Cat Print Bedspread Pattern is a decorative sewing or quilting design featuring a fairy and cat arranged around a crescent moon. The design may be used for a bedspread, wall hanging, quilt panel, nursery decoration, or fantasy-themed textile artwork. It usually combines appliqué, quilting, embroidery, and layered fabrics.
Is this project suitable for beginners?
A simplified version is suitable for confident beginners who already understand basic cutting and machine stitching. Beginners can use fusible appliqué, reduce the number of hair sections, simplify the wing details, and use straight or zigzag stitches. More experienced quilters can add intricate free-motion quilting, turned-edge appliqué, hand embroidery, and fabric painting.
What is the best fabric for this bedspread pattern?
Quilting cotton is the most practical option because it is stable, washable, widely available, and easy to sew. Small amounts of organza, satin, velvet, or textured fabric can be added as accents. However, mixing many fabric weights may make quilting more difficult, so beginners should use mostly cotton.
How can the pattern be enlarged for a full-size bedspread?
The central design can be enlarged by printing or drawing the templates across multiple sheets of paper. Another approach is to keep the fairy panel at a manageable size and surround it with wide borders, patchwork blocks, stars, moons, or coordinating fabric strips. This method preserves the detail while creating the dimensions needed for a bed.
Should seam allowance be added to appliqué pieces?
It depends on the appliqué method. Raw-edge and fusible appliqué pieces generally do not need seam allowance because they are cut to the exact finished shape. Turned-edge appliqué usually requires approximately 1/8 to 1/4 inch around the templates so that the edges can be folded under before stitching.
How can I make the fairy wings appear translucent?
Use pale aqua cotton as the base and add a layer of sheer organza or tulle. Stitch both layers together using pale blue, white, or metallic thread. Decorative vein lines and lightly quilted swirls will enhance the illusion of transparency without making the wings too stiff.
What thread should be used for decorative quilting?
High-quality cotton or polyester quilting thread works well for most sections. Rayon or metallic thread may be used sparingly on the stars, wings, and moon for additional shine. Always test specialty thread with the selected needle, tension setting, batting, and fabric before quilting the finished project.
Can the project be sewn entirely by hand?
Yes. The appliqué can be attached using invisible hand stitches or blanket stitches, and the details can be embroidered by hand. Hand quilting will take longer, particularly on a bedspread, but it can create a beautiful traditional texture. Working one small section at a time makes the process more comfortable.
How should the completed bedspread be washed?
Use gentle washing methods based on the most delicate material included in the project. If the bedspread contains only prewashed cotton, it may usually be washed on a delicate cycle with mild detergent and cold water. Pieces containing organza, hand-painted details, metallic thread, beads, or delicate fringe may require careful hand washing.
How can puckering be prevented during quilting?
Prewash the fabrics, press each piece carefully, baste the quilt sandwich thoroughly, and begin quilting near the center. Avoid pulling the fabric while stitching. Maintain balanced quilting density throughout the panel, because heavily quilting one section while leaving another section unquilted can cause distortion.
Can the colors be changed?
The colors may be personalized without changing the basic composition. Purple or black can replace the navy background, silver can replace the golden moon, and the fairy’s hair can be pink, violet, brown, or multicolored. Maintain strong contrast among the background, moon, fairy, and cat so that each element remains easy to recognize.
Conclusion
The Moon Fairy and Cat Print Bedspread Pattern is a rewarding project that transforms a peaceful fantasy illustration into detailed textile art. The complete process includes planning the dimensions, preparing full-size templates, choosing coordinated fabrics, creating the crescent moon and stars, assembling the fairy in layers, shaping the flowing hair and wings, sewing the orange cat, adding the fringed blanket, and finishing the design with decorative quilting and binding.
By dividing the artwork into separate sections, even its most detailed features become easier to manage. Fusible appliqué offers a practical construction method, while embroidery and free-motion quilting provide texture, expression, and personality. The pattern may be simplified for a beginner-friendly wall panel or expanded with borders and additional blocks to produce a complete fantasy-themed bedspread.
EASILY FIND THE PDF FOR THIS PATTERN HERE!
This design celebrates creativity, gentle companionship, and the handmade beauty of quilting. Please leave your sincere opinion about the project and share suggestions for colors, fabrics, quilting motifs, or other details that could make this Moon Fairy and Cat Print Bedspread Pattern even more magical.