
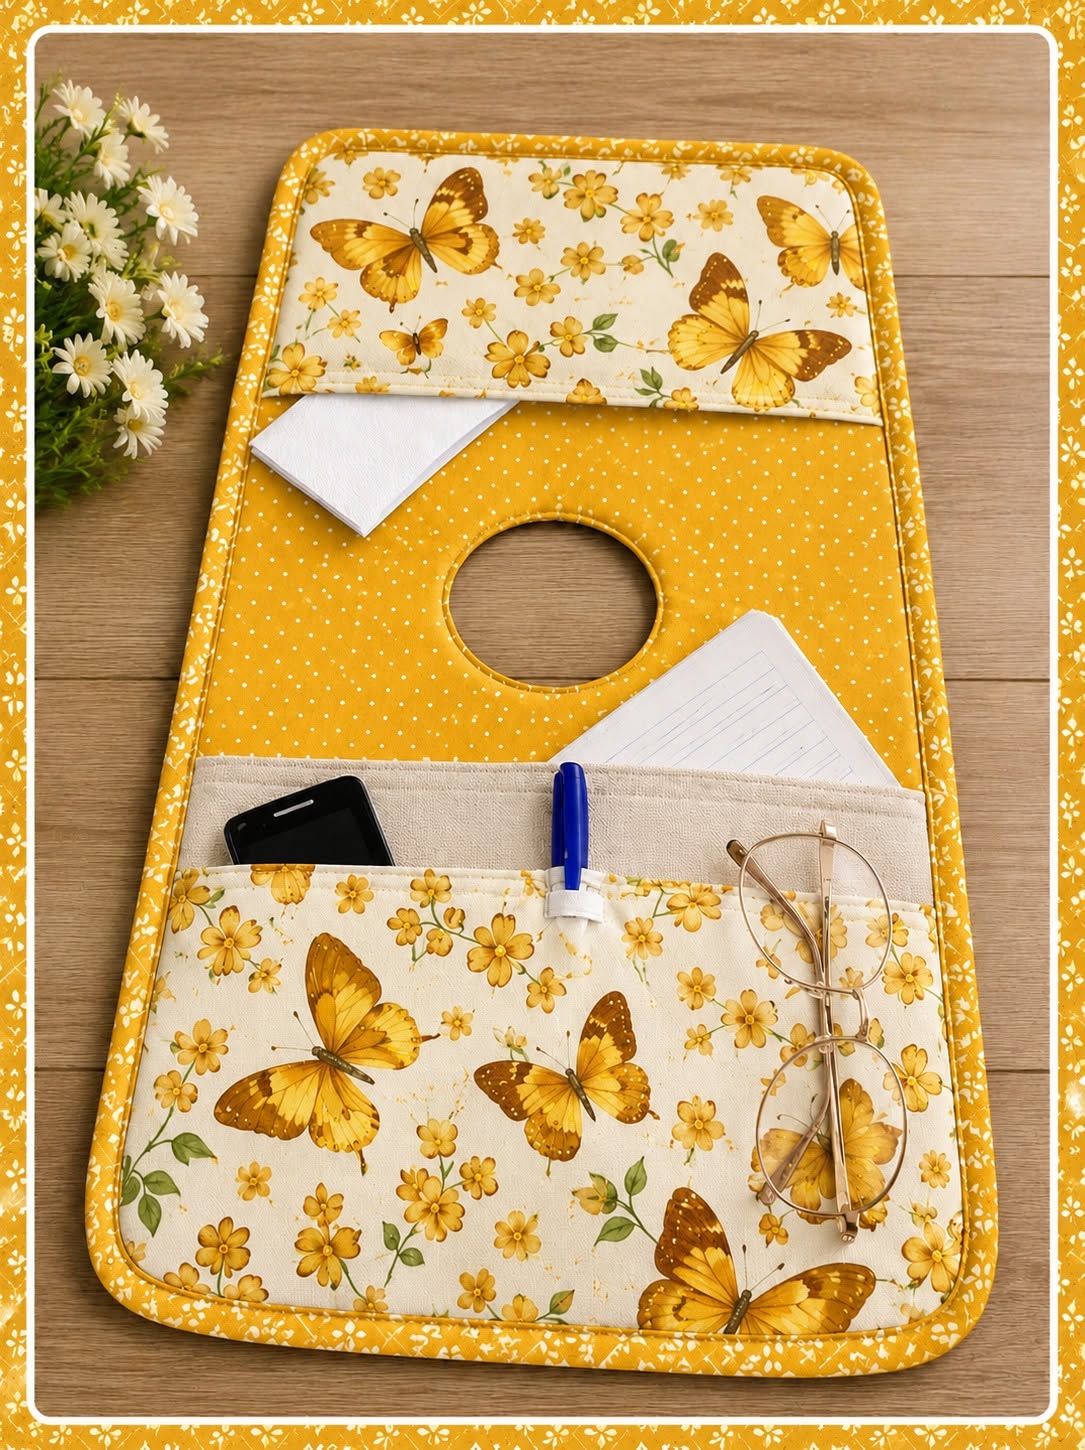
Car Fabric Organizer Pattern is a practical sewing project designed to keep everyday items organized, protected, and easy to reach inside a vehicle. Inspired by the project shown in the photo, this handmade organizer combines a large fabric base, several useful pockets, a central opening, decorative binding, and soft padding. It can be placed over the center console, attached near a seat, or adapted to suit another convenient area of the car. The finished piece offers designated spaces for a phone, eyeglasses, pens, tissues, notes, receipts, and other small accessories that might otherwise become lost between the seats. Besides improving organization, the butterfly and floral fabrics transform a functional accessory into a charming decorative item.
The term Car Fabric Organizer Pattern refers to the measurements, shapes, cutting instructions, and assembly sequence used to create a fabric storage accessory for a vehicle. A good pattern helps the maker plan the main body, pocket placement, opening size, seam allowances, padding, and finishing details before sewing begins. Although the organizer in the image looks elaborate, it is built from simple fabric rectangles with rounded corners and carefully layered pockets. This makes the project suitable for confident beginners as well as experienced sewing enthusiasts. The design can be customized with different fabrics, extra compartments, reinforced stitching, or alternative dimensions depending on the vehicle and the objects that need to be stored.
Creating your own fabric car organizer also gives you control over quality and appearance. Store-bought organizers are often made from dark synthetic materials, while a handmade version can feature cotton prints, quilted fabric, canvas, denim, or any combination that reflects your personal style. The example shown uses coordinated blue fabrics, butterfly prints, delicate flowers, and cream-colored pocket details. Its padded construction helps the organizer maintain its shape, while the bound edges produce a clean and professional finish. In this guide, you will learn how to plan the dimensions, prepare the layers, construct each pocket, create the center opening, assemble the organizer, and finish the entire project neatly.
Materials, Measurements, and Pattern Preparation
Begin the Car Fabric Organizer Pattern by deciding where the finished organizer will be used. Measure the available length and width carefully, especially if it needs to fit over a console, between seats, or behind a seat. A practical starting size is approximately 60 centimeters long by 36 centimeters wide, but these dimensions should be adjusted to your vehicle. Add a seam allowance of about 1 centimeter around all pieces unless your preferred sewing method requires a different allowance.
DISCOVER MORE FREE PATTERNS HERE!
For the main body, cut one rectangle from the front fabric, one matching rectangle from the backing fabric, and one from medium-weight batting or foam stabilizer. Round all four corners using a plate, bowl, or curved ruler as a template. The rounded shape is important because it makes the binding easier to apply and gives the organizer the soft appearance seen in the photo. Mark the top, bottom, and center points on each layer with a removable fabric marker.
Choose durable materials for this car sewing project. Quilting cotton works well for decorative areas, but the base benefits from additional stability. Canvas, denim, upholstery fabric, fusible fleece, foam stabilizer, or firm batting can prevent the organizer from folding when pockets are filled. For the backing, consider a fabric with a slightly textured surface so the organizer does not slide easily during use. Always prewash washable cotton fabrics before cutting to reduce the risk of later shrinkage.
The photographed organizer has an upper pocket, a spacious lower pocket, and a narrow divided section for smaller accessories. To recreate this layout, cut an upper pocket piece about 24 centimeters high and as wide as the main body. Cut the lower printed pocket approximately 25 centimeters high. For the cream-colored inner compartment, cut another strip around 14 centimeters high. These measurements are flexible, so place paper templates on the base first and check whether your phone, glasses, tissues, and notepad will fit comfortably.
The central opening is another important feature of this Car Fabric Organizer Pattern. It may be used to fit the organizer around a support, cup holder, console component, or another fixed part of the vehicle. Measure the object before cutting the hole. A circular opening of approximately 13 to 15 centimeters may work for some applications, but accuracy is essential. Draw the circle on paper first, place it on the main body, and verify the position before transferring the shape to the fabric.
Prepare matching or contrasting bias binding for the outer edge and center opening. You can purchase ready-made binding or cut your own strips on the bias. Homemade binding allows you to coordinate it perfectly with the fabrics. A finished width of approximately 1 centimeter creates a delicate edge, while wider binding may be easier for beginners. You will also need coordinating thread, scissors or a rotary cutter, clips, pins, a sewing machine, an iron, and a removable marking tool.
Sewing the Main Body and Central Opening
Place the backing fabric wrong side up, position the batting over it, and add the front fabric right side up. Smooth the three layers carefully and secure them with safety pins, clips, or temporary basting spray. This layered unit forms the foundation of the fabric organizer pattern. Check that all edges align and trim any excess batting. Do not attach the outer binding yet because the pockets must first be sewn onto the base.
Quilt the main body to hold the layers together. You may stitch parallel lines, a grid, gentle curves, or simply sew around the outer edge within the seam allowance. In the photographed project, the construction appears softly padded without heavy quilting, so minimal stitching can preserve a smooth surface. Begin from the center and work outward to reduce shifting and puckering. Use a longer stitch length when sewing through thick batting or foam.
Transfer the circular opening mark to the center area of the layered base. Before cutting, confirm that the opening is not too close to the upper or lower pockets. It should have enough surrounding fabric to remain strong after repeated use. Stitch directly on the marked circle or sew a second line just outside it for reinforcement. Carefully cut away the center, leaving a small seam allowance inside the stitched line if required by your binding method.
To bind the opening, open one folded edge of the bias tape and align it with the raw circular edge. Sew slowly, easing the tape around the curve without stretching the base fabric. Clip the seam allowance at regular intervals if necessary, taking care not to cut through the stitching. Fold the binding over the raw edge toward the opposite side, press it gently, and secure it with clips. Topstitch close to the folded edge to complete the circle.
A smooth circular finish can be challenging, so work patiently. Shorter sections of stitching and frequent adjustments will produce a cleaner result than trying to sew quickly. If the binding begins to wrinkle, stop with the needle down, lift the presser foot, and reposition the tape. The central opening is a focal point of the Car Fabric Organizer Pattern, so careful stitching here significantly improves the overall appearance.
After binding the hole, lay the organizer flat and inspect the base. The layers should remain even, the circle should look symmetrical, and the outer edges should still align. Press only with a temperature appropriate for the fabrics and stabilizer. Some foam products can be damaged by high heat. At this stage, you have completed the structural foundation and can begin constructing the practical storage pockets.
Creating and Attaching the Storage Pockets
Prepare the upper butterfly pocket by folding its top edge to the wrong side twice, pressing each fold, and topstitching it securely. For a softly padded pocket, add a thin layer of fusible fleece before hemming. Place the pocket near the top of the base, keeping its side and upper curved edges aligned with the organizer. The lower edge remains open to create the pocket entrance, while the sides will eventually be enclosed by the outer binding.
The upper pocket in the photo has a gently curved lower edge, which makes it easier to insert tissues or folded papers. To achieve this shape, draw a shallow curve across the lower part of the pocket template before cutting. Finish the curved edge with narrow binding or a neatly turned facing. Pin the pocket to the base and stitch along the sides and top within the seam allowance. Reinforce both lower corners because these areas receive pressure during daily use.
For the bottom section, first prepare the narrow cream-colored pocket. Fold and stitch the top edge, then place it over the lower printed pocket piece. Sew along the lower and side edges to connect the two pieces. Add vertical stitching lines to divide the cream section into smaller compartments. One space can hold a phone, another can hold pens, and a wider area can store small notebooks or receipts. Test the objects before sewing the divisions permanently.
Finish the top edge of the large butterfly pocket with a double-fold hem, facing, or matching binding. Place this pocket over the lower part of the cream compartment so that part of the cream fabric remains visible. The layered construction creates multiple storage levels without making the organizer unnecessarily bulky. Align the sides and bottom of both pocket pieces with the main body, then baste them together close to the raw edge.
Consider adding pocket reinforcement stitching to improve durability. Sew a small triangle, rectangle, or bar tack at the upper corners of frequently used compartments. These reinforcements help prevent the fabric from tearing when a phone or pair of glasses is removed repeatedly. Avoid making the compartments overly tight. Objects should remain secure, but there should also be enough room to reach inside without pulling aggressively on the seams.
Before finishing the organizer, place several typical items in the pockets to evaluate the layout. Check whether the upper pocket stays flat, whether the lower compartments are deep enough, and whether the central opening remains accessible. This fitting stage is one of the most valuable parts of making a custom Car Fabric Organizer Pattern. Adjusting a pocket now is much easier than removing stitches after the binding has been attached.
Finishing, Installing, and Customizing the Organizer
Baste around the entire outside edge to secure the main body and all pocket layers. Trim uneven fabric and batting, preserving the rounded corners. The edge may be thick where several pockets overlap, so use strong thread and a suitable needle. A size 90/14 or 100/16 needle may work well for multiple cotton and batting layers. Sew slowly through bulky intersections and avoid pulling the organizer from behind the machine.
Attach the outer bias binding using the same general method applied to the center opening. Begin along a straight section rather than at a corner. Align the open edge of the binding with the raw edge, stitch around the organizer, and gently shape the tape around each curve. Join the binding ends with a diagonal seam for a clean finish. Fold the binding over the edge and topstitch it carefully from the front.
Inspect both sides as you sew the final binding line. Make sure the stitching catches the folded edge on the back. Clips are often more effective than pins when holding thick layers, especially around rounded corners. If necessary, hand-stitch missed areas with small invisible stitches. The coordinated blue binding shown in the image frames the entire design and visually connects the floral border, dotted base, and butterfly pockets.
Depending on the intended position, add straps, elastic loops, ties, hook-and-loop tape, or nonslip backing. A car seat organizer used behind a seat may require adjustable webbing straps around the headrest and seat base. A console organizer might need elastic attachments that hold it against a fixed support. Keep all attachments clear of seat belts, controls, air vents, pedals, airbags, and any moving vehicle component.
Personalize the Car Fabric Organizer Pattern by changing the number and style of pockets. Add a zippered section for coins, a transparent vinyl pocket for documents, an elastic loop for a charging cable, or a flap with a snap closure. Decorative labels, appliqué, embroidery, or simple quilting can make the project unique. When adding embellishments, keep the surface comfortable and avoid hard decorations that could scratch personal items.
To care for the organizer, remove all contents and follow the washing recommendations for the materials used. Cotton versions with polyester batting may often be washed gently, while foam stabilizers or specialty backing fabrics may require hand cleaning. Air-dry the piece flat to preserve its shape. Regularly check the straps, binding, and pocket corners for wear. Timely repairs will extend the life of your handmade organizer and keep it looking attractive.
Frequently Asked Questions About the Car Fabric Organizer Pattern
What is the best fabric for a Car Fabric Organizer Pattern?
Medium-weight cotton, canvas, denim, and upholstery fabric are excellent options. Decorative quilting cotton can also be used when supported with batting, fusible fleece, or foam stabilizer. The best choice is a fabric that is durable, washable, and easy to sew.
Does the organizer need batting or stabilizer?
Yes, some form of stabilization is strongly recommended. Batting creates softness, while foam stabilizer provides more structure. Fusible fleece offers a balance between the two. Without support, the organizer may sag when the pockets contain heavier objects.
How can I resize the organizer for my vehicle?
Measure the intended installation area and create a paper template before cutting fabric. Adjust the length, width, pocket depth, and central opening while preserving seam allowances. Test the template inside the stationary vehicle to ensure it does not interfere with controls or safety equipment.
Why does this pattern include a circular opening?
The opening allows the organizer to fit around a fixed component, support, cup holder, console feature, or mounting point. Its exact purpose depends on the vehicle and placement. It can also be removed from the design when it is not needed.
Can beginners sew this car organizer?
A patient beginner can complete the project, especially with basic experience in straight stitching, hemming, layering, and attaching binding. The circular opening and rounded outer binding are the most challenging sections. Practicing bias binding on scrap fabric first can make the process easier.
How many pockets should a fabric car organizer have?
There is no fixed number. The photographed design includes multiple layered compartments, but the ideal layout depends on what you plan to store. Two large pockets and three smaller divisions provide a useful balance between capacity and accessibility.
How do I prevent the pockets from stretching?
Use stable fabric, interface the pocket pieces, reinforce the upper corners, and avoid making compartments too narrow. A line of topstitching along the pocket opening also helps maintain its shape. Heavy objects should be placed in lower pockets whenever possible.
Can I use leftover fabric scraps for this project?
Yes. This is an excellent scrap fabric sewing project, particularly for the pockets, binding, and decorative panels. Make sure all scraps are large enough for the pattern pieces and have similar care requirements.
Is handmade bias binding necessary?
No. Ready-made bias tape can save time and is convenient for beginners. Handmade binding offers more control over the width, fabric quality, and color coordination. Both options can produce a polished result when sewn carefully.
How should the organizer be secured inside the car?
The safest method depends on its location. Straps, elastic, nonslip backing, and hook-and-loop fasteners may be appropriate. The organizer must never block the driver’s visibility, interfere with the pedals, obstruct seat belts, cover airbags, or restrict access to important controls.
Can this pattern be used outside a vehicle?
Certainly. The same Car Fabric Organizer Pattern can be adapted as a bedside organizer, sewing-room storage panel, wheelchair accessory, desk organizer, or hanging pocket system. Changing the attachment method is usually enough to give the project a new purpose.
How long does it take to complete the organizer?
The project may take several hours, depending on sewing experience, pocket complexity, and finishing choices. Preparing accurate templates and pressing each section carefully may require extra time, but these steps usually lead to a better final result.
Conclusion
The Car Fabric Organizer Pattern combines organization, creativity, and practical sewing in one attractive project. By measuring the installation area, preparing a padded main body, binding the central opening, constructing layered pockets, and finishing the outside edge carefully, you can recreate the charming organizer shown in the photo. The design provides useful spaces for a phone, glasses, pens, tissues, notes, and other daily essentials while adding a personalized fabric detail to the vehicle.
EASILY FIND THE PDF FOR THIS PATTERN HERE!
This project can be adapted through fabric selection, dimensions, pocket placement, and attachment methods. Coordinated prints create a polished appearance, while strong stabilizer and reinforced seams ensure that the organizer remains functional. Always install it in a safe location that does not interfere with driving or vehicle safety systems. After completing your own fabric car organizer, please leave your sincere opinion and share any suggestions, color combinations, or useful pocket ideas that could inspire future versions of this pattern.