
The Complete Step-by-Step Clown Quilt Tutorial Pattern is a cheerful sewing project that combines appliqué, patchwork, decorative quilting, and playful fabric details in one colorful wall hanging.
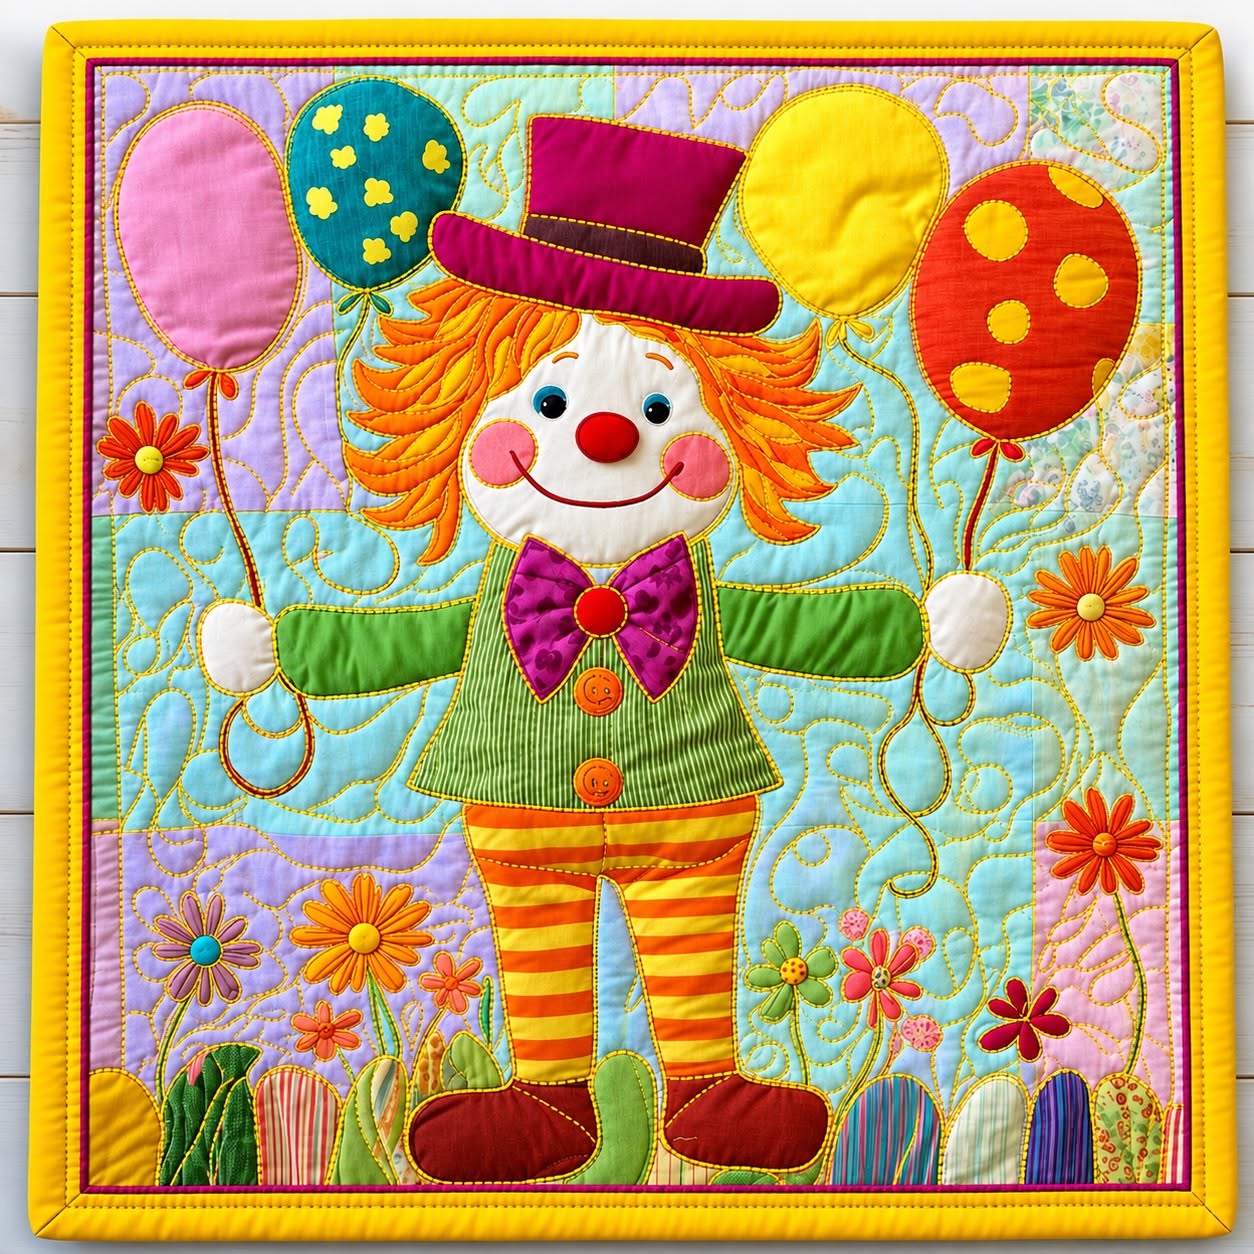
The design features a smiling clown surrounded by balloons, flowers, grass, and small decorative shapes that make the finished quilt feel lively and welcoming.
Although the project looks detailed, it becomes much easier when each element is prepared and sewn separately.
You can complete the quilt using cotton scraps, leftover batting, colorful threads, and basic sewing supplies already found in many craft rooms.
This tutorial explains how to organize the fabrics, create the clown pieces, assemble the background, and finish the quilt neatly.
By following each stage carefully, you can produce a charming handmade decoration for a child’s room, nursery, play area, classroom, or craft space.
One of the most enjoyable parts of this clown quilt pattern is the freedom to personalize every detail.
The hat can be purple, blue, red, or any color that matches your chosen fabric collection.
The clown’s clothing may be created with stripes, small prints, solids, or textured fabrics to give the design more visual interest.
Balloons can be made from bright scraps, while flowers and leaves are ideal for using very small pieces that might otherwise be discarded.
The facial expression can also be adjusted by changing the shape of the eyes, cheeks, mouth, or hair.
These creative options make every finished clown appliqué quilt unique, even when the same basic pattern and construction method are used.
Before starting the Complete Step-by-Step Clown Quilt Tutorial Pattern, read through the entire process and organize the materials by color and purpose.
Preparing the pieces in advance will help prevent confusion when several appliqué shapes are being arranged on the quilt background.
It is also important to test your sewing machine settings on a fabric scrap before stitching the final pieces.
A short, narrow zigzag stitch works well for many appliqué edges, while a blanket stitch creates a decorative handmade appearance.
If you prefer a softer and more artistic result, free-motion stitching can be added around selected elements after the quilt sandwich is assembled.
Work slowly, check the placement often, and remember that small handmade differences add personality to the finished project.
Materials, Fabric Selection, and Pattern Preparation
Begin by gathering quilting cotton, lightweight fusible web, batting, backing fabric, coordinating thread, pins, fabric scissors, paper scissors, a marking pencil, an iron, and a sewing machine. Choose fabrics with enough contrast so the clown remains easy to see against the background.
DISCOVER MORE FREE PATTERNS HERE!
For the background, use pale blue, lavender, mint, or another soft color. A calm background allows the brighter clothing, balloons, flowers, and hair to become the main focus of the clown quilt design without making the composition look too crowded.
Select white or cream fabric for the face and hands. Orange, yellow, or red fabrics work especially well for the hair, while purple, pink, burgundy, or blue can be used for the hat and bow tie. Striped fabric is an excellent choice for the clown’s trousers.
Create the pattern pieces by drawing the main shapes on paper or printing a personal template at the desired size. You will need separate pieces for the head, ears or cheeks, nose, eyes, hair sections, hat, bow tie, body, arms, hands, trousers, shoes, balloons, flowers, stems, leaves, and grass.
Add approximately ¼ inch around pieces that will be turned under. When using raw-edge appliqué with fusible web, cut the pattern pieces at their finished size. Remember to reverse directional pieces when tracing them onto the paper side of the fusible web.
Label every template before cutting. Write simple descriptions such as left arm, right shoe, hat brim, balloon string, and front hair section. This small preparation step makes the assembly process faster and helps maintain the correct position of symmetrical pieces.
Building the Background and Appliqué Clown
Cut the background fabric slightly larger than the planned finished quilt size. Press it carefully to remove wrinkles, then place it on a flat surface. Lightly mark the center using a removable fabric pencil so the clown can be positioned evenly.
Fuse the clown’s body pieces to the selected fabrics according to the fusible web manufacturer’s instructions. Allow the fabric to cool before cutting each shape. Use sharp scissors to create smooth curves around the face, hands, shoes, balloons, and flower petals.
Arrange the body first, beginning with the trousers, torso, arms, and shoes. Position the head above the body, then add the hands at the ends of the sleeves. Step back and check whether the figure appears balanced before pressing anything permanently.
Add the hair around the sides of the head. Individual curved locks create the lively appearance shown in the project, but the hair may also be made as two larger shapes for a simpler version. Layer several shades of orange for additional dimension.
Place the hat above the hair, overlapping the crown and brim slightly. Add the bow tie below the face and position the buttons down the center of the shirt or vest. These layered details are essential parts of the Complete Step-by-Step Clown Quilt Tutorial Pattern.
When you are satisfied with the arrangement, fuse the pieces gradually rather than pressing the whole design at once. Begin with the shapes underneath and continue with the top layers. This prevents accidental shifting and keeps the appliqué pieces correctly aligned.
Adding Facial Details, Balloons, Flowers, and Quilting
Create the clown’s face by positioning the eyes, nose, cheeks, and mouth. Small black circles may be used for the pupils, while white highlights can be added with tiny fabric pieces or embroidery. A curved stitched line creates a friendly smile.
The nose can be made from red fabric, felt, or a lightly padded circle. For a raised effect, place a small piece of batting behind the nose before stitching. Keep decorative additions securely attached, especially when the quilt will be displayed near young children.
Cut several balloon shapes in different colors and sizes. Arrange them around the clown’s head and hands, leaving enough space between each shape. Add thin fabric strips, embroidery, or decorative stitching to represent the balloon strings.
Create flowers from small circles and petal shapes. Position them near the lower corners and along the sides of the quilt. Add green stems, leaves, and grass shapes to connect the flowers visually and create a colorful garden-like setting.
After all appliqué pieces are fused, stitch around their edges. Use a narrow zigzag, satin stitch, blanket stitch, or straight stitch approximately ⅛ inch from the edge. Match the thread to each fabric or use a neutral thread for a consistent appearance.
Prepare the quilt sandwich by placing the backing fabric right side down, the batting in the middle, and the appliquéd quilt top right side up. Smooth every layer carefully, then baste with safety pins, temporary spray, or long hand stitches before quilting.
Finishing, Binding, Care, and Creative Variations
Quilt around the main clown figure first to secure the central design. Stitch close to the appliqué edges, then add curved lines, loops, spirals, or gentle waves in the background. These free-motion details create movement and help fill the open spaces.
Avoid making the background quilting too dense around raised or padded elements. Slightly wider spacing will allow the face, bow tie, nose, and balloons to stand out. Dense quilting can be added around the outer areas to create a framed effect.
Once the quilting is complete, trim the edges so all three layers are even. Use a ruler and rotary cutter to create straight sides and square corners. Check that no important flower, balloon, or decorative detail is too close to the trimmed edge.
Prepare the binding by joining fabric strips with diagonal seams. Fold the strip in half lengthwise and press it. Sew the binding to the front of the quilt, fold it around the raw edge, and finish it by hand or machine.
Add a hanging sleeve to the back when the quilt will be displayed on a wall. A fabric label can also be included with the maker’s name, completion date, and project title. These details give the handmade clown quilt pattern a professional finish.
To personalize the design, change the clown’s colors, add a child’s name, include stars instead of flowers, or create seasonal balloons. The same construction method can be adapted for birthday decorations, nursery art, circus-themed rooms, and handmade gifts.
Frequently Asked Questions
Is the Complete Step-by-Step Clown Quilt Tutorial Pattern suitable for beginners?
Yes. A beginner can complete this project by working on one section at a time. The most important skills are basic cutting, pressing, straight stitching, and simple appliqué. Beginners may simplify the hair, flowers, and facial features by using larger shapes with fewer small details.
What is the best fabric for a clown appliqué quilt?
Good-quality cotton quilting fabric is the easiest material to cut, press, fuse, and stitch. Cotton also provides a stable surface for decorative quilting. Felt may be used for tiny details, but cotton is usually better for the main pieces because it produces a smoother and more durable finish.
Should I use raw-edge or turned-edge appliqué?
Raw-edge appliqué is faster and works well with fusible web. The pieces are fused directly to the background and stitched around the edges. Turned-edge appliqué requires more preparation but creates a traditional finish with no exposed fabric edges.
How can I prevent the fabric from fraying?
Apply fusible web to the back of each appliqué fabric before cutting. Stitch around all raw edges using a zigzag, satin, or blanket stitch. A shorter stitch length usually provides better coverage, especially around tight curves and small pieces.
Can the clown quilt be washed?
Yes, provided all materials are washable and every appliqué piece is securely stitched. Wash the finished quilt gently in cold water with mild detergent. Avoid harsh bleach, and dry it flat or on a low-temperature setting to protect the decorative stitching.
How large should the finished quilt be?
The size depends on its intended use. A wall hanging may measure approximately 24 by 30 inches, while a larger nursery quilt can be made by increasing the background and enlarging the pattern pieces proportionally. Always leave enough space around the clown for quilting and binding.
How do I enlarge the clown quilt pattern?
Divide the design into sections and enlarge each section by the same percentage. The pieces can be traced onto a grid, copied using a printer enlargement setting, or redrawn on larger paper. Maintaining the same proportions will keep the character balanced.
Can I sew the design without fusible web?
Yes. The pieces may be attached with needle-turn appliqué, glue-basted appliqué, freezer-paper appliqué, or temporary fabric adhesive. Fusible web is recommended for beginners because it holds the shapes securely while the edges are being stitched.
What quilting design works best for the background?
Loops, spirals, gentle curves, clouds, and meandering lines complement the playful theme. You can also quilt around balloons, flowers, or small circles to create a festive atmosphere. Practice free-motion quilting on a fabric sandwich before working on the final project.
How long does this clown quilt take to complete?
The time depends on the size, number of details, and appliqué method. A simplified version may be completed during a weekend, while a detailed design with individual hair sections, flowers, decorative stitching, and dense quilting may require several days.
Can I use fabric scraps for this project?
Absolutely. The Complete Step-by-Step Clown Quilt Tutorial Pattern is ideal for using colorful scraps. Small pieces can become flower petals, buttons, cheeks, hair sections, balloons, leaves, or clothing details. Coordinating the colors before cutting will help the final design look intentional.
How can I make the clown look more three-dimensional?
Add small pieces of batting behind the cheeks, nose, bow tie, balloons, or hat. Use darker fabrics for shadows and lighter fabrics for highlights. Quilting close to the outer edges of padded pieces will also help them rise slightly above the background.
Conclusion
The Complete Step-by-Step Clown Quilt Tutorial Pattern combines colorful appliqué, creative fabric selection, decorative stitching, and simple quilting techniques in a joyful handmade project. The process begins with preparing the templates and selecting contrasting fabrics, continues with assembling the clown and surrounding decorations, and finishes with quilting, trimming, and binding. By completing each section separately, even a detailed design can become manageable and enjoyable. The clown’s expressive face, bright clothing, playful balloons, and garden-inspired decorations offer many opportunities for personalization. You can simplify the shapes for a beginner-friendly quilt or add embroidery, padding, and free-motion quilting for a more advanced finish.
EASILY FIND THE PDF FOR THIS PATTERN HERE!
This project is also an excellent way to use leftover fabrics while creating a memorable decoration or handmade gift. Please leave your sincere opinion about this tutorial and share your suggestions, color ideas, or creative changes that could make the clown quilt pattern even more inspiring.