
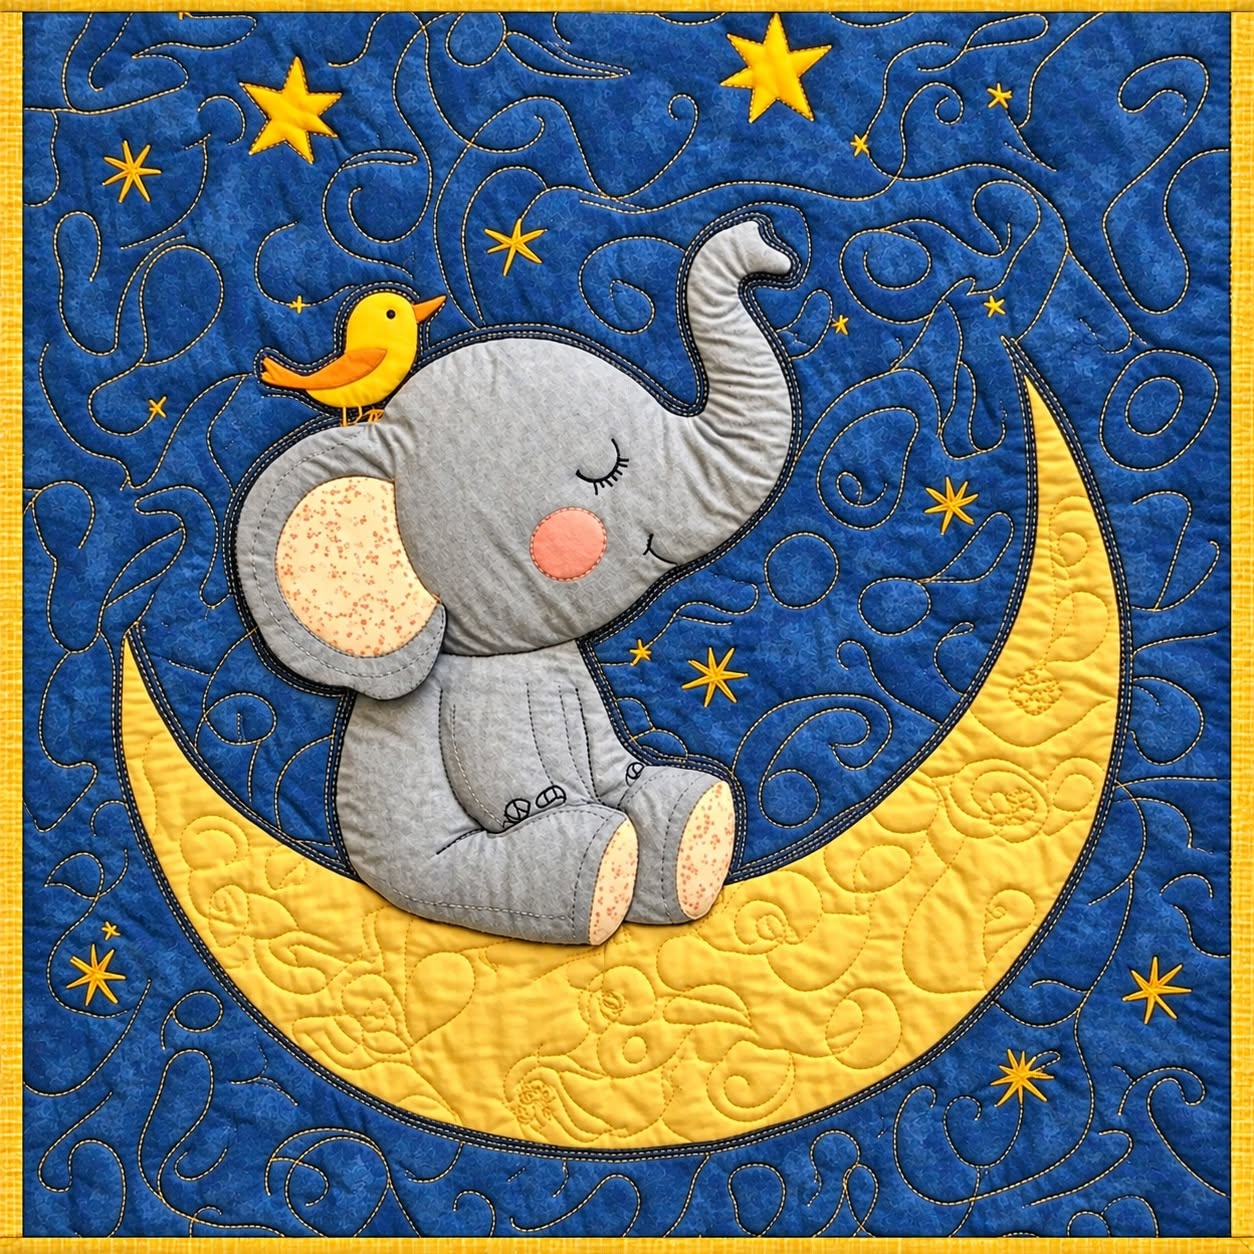
The “Little Elephant on the Moon” Quilt Tutorial Pattern is a charming sewing project that combines appliqué, patchwork, embroidery, and decorative quilting in one delightful design. Inspired by the peaceful image of a little elephant resting on a golden crescent moon, this quilt is perfect for decorating a nursery, children’s bedroom, reading corner, or handmade gift collection. The dark blue background creates the feeling of a quiet night sky, while the yellow moon and stars add warmth and brightness. A small bird placed on the elephant’s back gives the scene even more personality, making the finished piece look like an illustration from a beloved bedtime story.
Although the design contains several decorative details, the project can be completed successfully by patient beginners as well as experienced quilters. The main technique is fabric appliqué, which allows each part of the elephant, moon, bird, and stars to be prepared separately before being attached to the background. The project does not require every shape to be perfectly identical to the reference image. In fact, handmade variations can make the quilt feel more personal. By choosing soft fabrics, coordinating colors, and secure stitching methods, you can create a durable wall quilt or small blanket that maintains its beauty for many years.
This tutorial explains how to plan the design, select materials, prepare the Little Elephant on the Moon quilt pattern, assemble the appliqué pieces, quilt the background, and finish the borders neatly. The instructions are designed to be practical and adaptable because the final measurements may vary according to the intended use of the project. You can create a small decorative panel, a cushion front, a crib quilt, or a larger children’s quilt by enlarging or reducing the templates. The most important goal is to preserve the gentle composition: a sleepy gray elephant sitting comfortably on a bright crescent moon beneath a sky filled with stars.
Materials and Preparation for the Little Elephant on the Moon Quilt
Begin by choosing a dark navy or deep blue cotton fabric for the background. This fabric represents the night sky and should be large enough to include the complete appliqué scene, quilting allowance, and outer finishing margin. A solid fabric makes the decorative stitching easy to see, but a subtle tonal print can also work beautifully. Wash, dry, and press the fabric before cutting so that unexpected shrinkage does not distort the finished quilt pattern.
DISCOVER MORE FREE PATTERNS HERE!
For the crescent moon, select a warm yellow or golden cotton fabric. A solid yellow emphasizes the moon’s shape, while a lightly printed fabric can introduce additional texture. In the photographed project, the moon includes dense decorative quilting, so avoid very busy prints that could hide the stitched details. Prepare a slightly larger piece than the final moon template because trimming may be necessary after the appliqué is secured.
The elephant requires several coordinating fabrics. Use medium gray for the body and head, a slightly darker or lighter gray for the ear, and pale patterned fabric for the inner ear and foot pads. A small piece of peach or soft pink fabric can be used for the cheek. Black embroidery thread is suitable for the closed eye, eyelashes, mouth, toes, and other delicate facial details.
Prepare yellow and orange scraps for the little bird. The bird can have a golden body, an orange wing or tail, and a tiny black embroidered eye. Small amounts of yellow fabric will also be needed for the stars. Consider using two or three yellow tones so the moon, bird, and stars remain coordinated without appearing completely identical.
You will also need paper or template plastic, a pencil, fabric scissors, paper scissors, pins, removable fabric marker, fusible web, matching sewing thread, embroidery floss, batting, backing fabric, and binding strips. A sewing machine with a free-motion quilting foot is useful for creating the swirling night-sky texture. However, the background can also be quilted with gentle curves, loops, or hand-stitched patterns.
Before cutting the fabric, draw the complete composition on paper. Mark the approximate position of the moon, elephant, bird, and main stars. This full-size layout becomes your placement guide and helps prevent proportion problems. Remember to leave enough open space around the design for quilting and binding. Numbering the individual template pieces is also helpful, especially when several shapes overlap.
Creating the Moon, Elephant, Bird, and Star Appliqué Pieces
To create the crescent moon, draw a large circle on paper and place a second, slightly smaller circle over it. Move the smaller circle toward one side until the remaining visible area forms a balanced crescent. Trace the final outline and cut out the paper template. The upper point should rise beside the elephant, while the lower curve should be wide enough to support its seated body.
Trace the moon template onto the paper side of the fusible web. Cut around it, leaving a small margin outside the traced line. Fuse the adhesive to the wrong side of the yellow fabric according to the product instructions. Once cool, cut directly on the marked outline. Remove the backing paper only when you are ready to position the moon on the background.
Draw the elephant as several manageable sections rather than one complicated shape. Create separate templates for the head and trunk, body, front leg, back leg, ear, inner ear, and two foot pads. The trunk should curve upward gently, creating the peaceful silhouette seen in the “Little Elephant on the Moon” Quilt Tutorial Pattern. Keep the body rounded and slightly tilted so that the elephant appears relaxed rather than stiff.
Trace each elephant section onto fusible web and remember that the pieces may appear reversed after fusing. For a directional design, trace from a reversed copy of the finished drawing. Fuse the templates to the wrong sides of the selected fabrics, cut them carefully, and arrange them on your paper placement guide. Check that the ear overlaps the head and that the legs connect naturally to the body.
Create the bird using simple shapes: a small oval or rounded body, a wing, a pointed beak, and a short tail. The bird should be small enough to rest comfortably near the top of the elephant’s head or back without distracting from the main character. Add the eye and leg details with embroidery after the fabric pieces have been attached.
Prepare several star templates in different sizes. Five-pointed stars can be cut from yellow fabric, while smaller sparkling stars may be embroidered directly onto the background. Combining fabric stars with stitched stars adds depth to the night scene. Keep the arrangement irregular, leaving some open areas for the decorative swirling quilting that will later represent movement in the sky.
Step-by-Step Assembly and Appliqué Stitching
Press the navy background fabric and place it on a flat work surface. Position the crescent moon first, using your full-size drawing as a reference. The moon should occupy the lower half of the panel, with both pointed ends curving upward. Do not permanently fuse it until you are satisfied with its position and have checked that sufficient space remains around the edges.
Place the elephant pieces over the moon. Begin with the pieces that will sit underneath, such as the body and rear leg, before adding the head, front leg, ear, and foot pads. Adjust the shapes until the elephant looks balanced and comfortably seated. The lower part of the body may overlap the upper edge of the moon, helping the two main elements appear connected.
Add the bird near the elephant’s head, then arrange the larger stars across the upper portion of the night sky. Stand back and study the composition before fusing anything. Make sure the stars are not too evenly spaced, and avoid placing every decorative element at the same height. A varied arrangement makes the appliqué quilt design feel more natural and visually interesting.
When the placement is correct, fuse the moon and appliqué pieces according to the adhesive manufacturer’s instructions. Use a pressing cloth to protect the fabrics and avoid sliding the iron, as movement can shift or stretch the pieces. Allow each section to cool before checking the edges. If an area has not bonded properly, press it again briefly rather than applying excessive heat.
Stitch around the moon with a narrow blanket stitch, satin stitch, or small zigzag stitch. Continue by stitching around the elephant, working from the lower layers toward the upper layers. Choose thread that matches each fabric for a soft finish, or use darker thread to create an illustrated outline. Sew slowly around the curved trunk, ear, feet, and small bird pieces to maintain smooth edges.
Complete the elephant’s expression with embroidery. Stitch a gently curved closed eye, several eyelashes, a small mouth, and curved toes. Add the round cheek using a small fabric circle or carefully filled embroidery. Embroider the bird’s eye, legs, and any tiny feather details. These features should remain simple because the peaceful character of the design depends on a soft and uncluttered expression.
Quilting, Finishing, and Personalizing the Project
After completing the appliqué, prepare the quilt sandwich by placing the backing fabric right side down, the batting in the middle, and the appliqué top right side up. Smooth each layer carefully and secure them with quilting pins, safety pins, or temporary basting spray. Begin basting near the center and work toward the edges to reduce wrinkles and shifting.
Quilt around the outside edges of the moon, elephant, bird, and large stars. This technique, often called outline quilting, helps the appliqué stand out and gives the design a slightly raised appearance. Stitch close to each appliqué edge without sewing directly over the decorative border stitches. Work slowly around small curves and pivot carefully at sharp star points.
Fill the navy background with free-motion swirls, loops, curls, and gentle waves. These lines can resemble clouds, wind, dreams, or magical movement across the night sky. Practice the pattern on a fabric scrap before quilting the main panel. The lines do not need to be identical; variation is part of the handmade charm of free-motion quilting.
Add decorative quilting inside the golden moon. Floral shapes, leaves, circles, feathers, or loose spirals can be used to create rich texture. To keep the design balanced, use slightly larger motifs inside the moon and smaller swirls in the surrounding sky. The elephant can be quilted more lightly so that its soft, rounded shape remains prominent.
Square the quilt by trimming the outer edges carefully. Measure from several points to ensure the panel remains straight and the main design is centered. Prepare binding strips from navy, gray, yellow, or another coordinating fabric. Join the strips, press them in half lengthwise, sew the binding to the quilt edge, and finish the folded side by machine or hand.
Personalize the finished Little Elephant on the Moon quilt with embroidered initials, a child’s name, a meaningful date, or a short bedtime message. Place personalization in a quiet corner so that it complements rather than competes with the central scene. A hanging sleeve can be added to the back for wall display, while a soft label can record the maker’s name and care instructions.
Frequently Asked Questions About the Little Elephant on the Moon Quilt Tutorial Pattern
Is the Little Elephant on the Moon quilt suitable for beginners?
Yes. A beginner can complete the project by working slowly and dividing the design into simple appliqué shapes. The most advanced element is the free-motion quilting, but it is optional. Beginners may use straight lines, gentle waves, or simple machine quilting instead.
What is the best fabric for this quilt pattern?
Quilting cotton is the easiest option because it is stable, widely available, and simple to stitch. Soft flannel may be used for selected elephant pieces, but thicker fabrics can make small appliqué curves more difficult. Avoid very stretchy materials unless they are stabilized.
How large should the finished quilt be?
The size depends on its purpose. A decorative wall panel may be approximately 18 to 30 inches wide, while a baby or children’s quilt can be larger. Enlarge the templates proportionally and add extra background space around the design when creating a full-size quilt.
Do I need fusible web for the appliqué?
Fusible web is highly recommended because it holds the pieces in position while they are stitched. Traditional needle-turn appliqué can also be used, but it requires additional seam allowance around each template and more advanced hand-sewing skills.
Which stitch is best for appliqué edges?
A blanket stitch gives the project a traditional handcrafted appearance. A narrow zigzag stitch is secure and easy to control, while satin stitching produces a bold outlined finish. A straight stitch placed close to the edge can be used for raw-edge appliqué when slight fraying is acceptable.
Can the design be sewn entirely by hand?
Yes. The appliqué, embroidery, quilting, and binding can all be completed by hand. Hand sewing will require more time, but it can create a beautifully soft and traditional result. Use small, consistent stitches and secure every thread end carefully.
How can I prevent the appliqué pieces from lifting?
Follow the fusible web instructions carefully and ensure the iron temperature is suitable for the fabric. Stitch around every appliqué edge even when the adhesive appears strong. Fusible web is intended to assist with placement, while the stitching provides lasting security.
Can I replace the bird with another detail?
Certainly. The bird can be replaced with a small star, heart, cloud, flower, butterfly, or tiny stuffed toy shape. Choose an element that matches the theme and remains small enough to preserve the elephant as the main focus.
How should the finished quilt be washed?
Wash the quilt gently in cool water with mild detergent. Avoid harsh bleach or strong cleaning products that could fade the navy and yellow fabrics. Dry it flat or use a low-temperature setting, then reshape it while it is slightly damp.
How do I make the elephant look soft and dimensional?
Use gentle curves, rounded body pieces, subtle fabric shading, and light quilting inside the elephant. Quilting densely around the outer silhouette while leaving the elephant less densely stitched can make the character appear slightly raised from the background.
Conclusion
The “Little Elephant on the Moon” Quilt Tutorial Pattern brings together simple appliqué shapes, expressive embroidery, colorful fabric selection, and imaginative quilting. By preparing a full-size placement guide, cutting each section carefully, building the design in layers, and finishing every edge securely, you can transform ordinary fabric pieces into a peaceful nighttime scene.
Throughout this tutorial, you learned how to create the crescent moon, assemble the elephant, add the little bird and stars, fuse and stitch the appliqué, build a stable quilt sandwich, quilt decorative textures, and complete the project with neat binding. The same instructions can be adapted to wall hangings, cushions, nursery quilts, personalized gifts, and other fabric projects.
EASILY FIND THE PDF FOR THIS PATTERN HERE!
The most meaningful part of this design is the opportunity to make it your own. Different fabrics, embroidered details, star arrangements, quilting patterns, and personalized messages can give every version a unique character. Please leave your sincere opinion about this Little Elephant on the Moon quilt pattern and share any suggestions, color combinations, or creative details you would add to the project.