
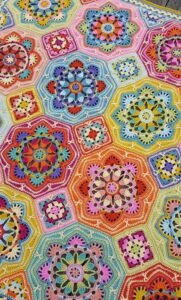
Crochet patterns come in a wide variety of styles, but few can match the intricate beauty of the Persian Tiles Blanket pattern.
Known for its rich colors and geometric designs, this blanket pattern is inspired by the breathtaking architecture of Persian palaces and mosques. In this article, we’ll walk through the step-by-step process of creating your very own Persian Tiles Blanket, with a detailed stitch guide and exact quantities.
Whether you’re a beginner or an experienced crocheter, this project is sure to become a favorite in your collection of crochet patterns.
Materials and Tools You’ll Need
Before we dive into the details of the Persian Tiles Blanket pattern, it’s essential to gather all the materials and tools you’ll need. For this project, you’ll need multiple colors of yarn, a crochet hook, and other standard crochet tools.
First, choose a lightweight or medium yarn for this project, preferably in at least five colors to mimic the traditional Persian Tiles’ vibrancy. Most crafters prefer using a combination of jewel tones like deep blues, emerald greens, and golds, but the choice is entirely up to you. Next, you’ll need a 4mm or 4.5mm crochet hook, depending on your yarn weight. This will ensure the stitches are tight enough to form clear, defined patterns.
In addition to yarn and a hook, you’ll also need stitch markers, a yarn needle for weaving in ends, and a pair of sharp scissors. Once you have all your supplies ready, you can start working on your Persian Tiles Blanket.
Understanding the Persian Tiles Blanket Layout
The Persian Tiles Blanket pattern is made up of individual motifs that are later joined together to form the entire blanket. Each motif consists of a combination of basic crochet stitches, such as chains, single crochets, double crochets, and trebles, along with more advanced techniques like the puff stitch.
The motifs are generally hexagonal in shape, giving the blanket its signature tiled appearance. The motifs are surrounded by smaller filler squares that help even out the edges, giving the blanket a rectangular or square shape once assembled. Understanding this layout is essential, as it will guide you through the stitch and join process.
One of the unique aspects of this pattern is the color changes that occur throughout each motif. Switching colors strategically between rows will help you achieve the beautiful, multi-dimensional look that Persian tiles are famous for.
Step-by-Step Guide: How to Crochet the Motifs
Step 1: Start with the Center of the Motif Begin with a magic circle and crochet 12 double crochets (DC) into the center. Pull the magic circle tight and join with a slip stitch (SS) to form a small, tight circle. This forms the core of the Persian tile motif.
In the next round, you’ll alternate between chain spaces and double crochets to create the first layer of the tile. Chain three to begin the round, then DC into each stitch around, adding chain spaces where indicated in your pattern. This will allow for smooth transitions between color changes.
Step 2: Building the Layers For the second round, you’ll begin increasing your stitches and adding your second color. Chain three and DC into each stitch, but in the corner sections, you’ll crochet three DCs together (3DC cluster), separated by chains to allow for the hexagonal shape to take form.
Continue alternating colors every few rows, building out the pattern to its full size. Use a mix of single crochets, half-double crochets, and double crochets as the pattern dictates. This variety adds texture and depth to the tiles, ensuring the blanket’s motifs stand out beautifully.
Step 3: Final Round of the Motif In the final round of the motif, add decorative puff stitches or treble crochets, depending on your preference. These give the motif a sense of completion and mimic the intricate carvings found in traditional Persian architecture. Once you complete the motif, fasten off your yarn and weave in any ends.
Joining the Motifs Together
Once you’ve crocheted all your motifs, the next step is joining them together to form the blanket. There are several methods for joining motifs, but for the Persian Tiles Blanket pattern, the recommended technique is the “join-as-you-go” (JAYG) method.
To use this technique, begin by placing two motifs side by side. Insert your hook into one corner of each motif and join them with a slip stitch. Continue slip stitching through both motifs along their edges until they are fully joined. Repeat this process until all the motifs are connected.
Another option is to crochet a border around each motif and then sew them together using a tapestry needle. This method allows for a cleaner edge and gives the blanket additional structure. Whichever joining method you choose, make sure to use a yarn color that complements the overall design of your blanket.
Adding the Filler Squares and Border
Once all the motifs are joined, it’s time to fill in the gaps with smaller squares or triangles. These fillers are necessary to even out the edges of the blanket. Typically, these are made using simple crochet stitches like double crochets and chains to form small square or triangular shapes.
After completing the filler pieces, you can start adding the blanket’s border. For the Persian Tiles Blanket pattern, a simple border of single crochets or shell stitches works beautifully. Start by crocheting around the entire blanket, making sure to evenly space your stitches, especially around the corners.
Adding a border not only gives the blanket a finished look but also helps to secure the motifs and prevent the blanket from curling at the edges.
Final Touches and Care Instructions
Once your Persian Tiles Blanket is complete, it’s important to block it to ensure that all the motifs lie flat and the stitches are evenly spaced. To block the blanket, gently dampen it with water and pin it to a flat surface. Let it dry completely before removing the pins.
When it comes to caring for your Persian Tiles Blanket, be sure to follow the yarn manufacturer’s washing instructions. Most yarns can be hand-washed in cold water and laid flat to dry. Avoid machine washing or drying, as this could cause the yarn to stretch or become misshapen.
By following these instructions, your Persian Tiles Blanket will remain a stunning and cherished piece for years to come, showcasing your crochet skills and the timeless beauty of Persian-inspired designs.
Mastering the Persian Tiles Blanket
The Persian Tiles Blanket pattern is a rewarding project that combines intricate crochet techniques with vibrant colorwork. Whether you’re a seasoned crocheter or looking for a new challenge, this pattern is a great way to expand your skills. The detailed motifs, combined with a strategic use of color and texture, make this blanket a show-stopping piece for any home.
By using quality materials, carefully following the step-by-step guide, and incorporating exact stitch counts, you can create a work of art that reflects the rich cultural heritage of Persian designs. So grab your hook, choose your favorite crochet patterns, and start crafting your Persian Tiles Blanket today!