
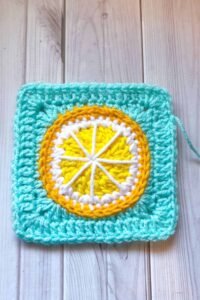
The Lemon Granny Square is a delightful variation of the traditional granny square, featuring a citrus-inspired motif perfect for brightening up your crochet projects. Whether you want to create a vibrant blanket, cushion cover, or decorative table mat, this pattern adds a refreshing twist to classic crochet patterns. With its textured stitches and playful color scheme, the Lemon Granny Square is a fun and rewarding project for crocheters of all skill levels.
In this step-by-step tutorial, we will guide you through the process of making your own Lemon Granny Square. From choosing the right yarn colors to mastering each stitch, you will have a complete guide to successfully completing this beautiful design. This pattern includes detailed stitch counts and instructions to ensure clarity and precision in your work.
By following this tutorial, you will not only enhance your crochet skills but also create a cheerful and unique piece. Let’s dive into the Lemon Granny Square Crochet Pattern and bring a touch of citrus charm to your handmade collection!
Materials and Tools Needed
To begin, gather all the materials necessary for this project. Using the right type of yarn and hook size will ensure that your Lemon Granny Square turns out just as intended.
- Yarn: Choose yellow and green yarn for the lemon motif and a neutral shade like white or cream for the granny square border.
- Crochet Hook: A 4.0 mm (G-6) crochet hook works best for medium-weight yarn.
- Scissors and Yarn Needle: Essential for cutting and weaving in ends neatly.
Having these materials ready will make the crocheting process smooth and enjoyable. Now, let’s proceed to the first steps of creating the lemon motif!
Step 1: Creating the Lemon Motif
The lemon-shaped centerpiece is the highlight of this granny square. It is made using basic crochet stitches to form an oval shape.
- Start with a Magic Ring: Using yellow yarn, create a magic ring and secure it with a slip stitch.
- Round 1: Chain 2 (counts as first half double crochet), work 10 half double crochets into the ring, and pull tight. Join with a slip stitch. (10 stitches)
- Round 2: Chain 2, work 2 half double crochets in each stitch around, join with a slip stitch. (20 stitches)
This forms the base of the lemon. Ensure that your stitches are tight and even to create a well-defined shape.
Step 2: Adding Dimension to the Lemon
To give the lemon a realistic appearance, we add shaping rounds with slight increases.
- Round 3: Chain 2, (1 half double crochet in the next stitch, 2 half double crochets in the next stitch) repeat around. Join. (30 stitches)
- Round 4: Chain 1, single crochet around without increasing. Join. (30 stitches)
- Round 5: Switch to green yarn, slip stitch around to form a subtle border. Fasten off.
With the lemon shape complete, we can now move on to placing it within the granny square background.
Step 3: Attaching the Lemon to the Granny Square
Before crocheting the square, attach the lemon securely to a fabric base.
- Position the Lemon: Place it in the center of a white crochet circle (optional) or directly onto the granny square base.
- Sew or Crochet Attach: Use a yarn needle to sew the lemon onto the base with matching yellow thread.
- Secure the Ends: Weave in all loose ends to ensure a neat appearance.
Once the lemon is secured, it’s time to crochet the granny square base.
Step 4: Crocheting the Granny Square Base
The classic granny square provides a structured background for the lemon motif.
- Foundation Round: With white yarn, chain 4, join to form a ring. Chain 3 (counts as first double crochet), work 2 double crochets, chain 2, (3 double crochets, chain 2) repeat 3 more times. Join. (12 stitches)
- Round 2: Slip stitch to the next chain space, chain 3, 2 double crochets, chain 2, 3 double crochets in the same space. Repeat in each corner. Join. (24 stitches)
- Round 3-5: Continue working granny square rounds by adding 3 double crochets into each space and chaining 2 in the corners.
Now, your Lemon Granny Square has taken shape!
Step 5: Finishing Touches
The final touches will ensure a polished and professional look.
- Block the Square: Lightly steam block your square to even out the stitches.
- Weave in Loose Ends: Use a yarn needle to secure any remaining tails.
- Combine Squares: If making a larger project, join multiple squares using a slip stitch or whip stitch method.
Your Lemon Granny Square is now complete and ready to be used in your crochet projects!
Ideas for Using Lemon Granny Squares
These cheerful squares can be used in various creative ways to add a citrus touch to your projects.
- Blankets and Throws: Combine multiple squares to make a full-sized blanket.
- Cushions and Pillow Covers: Sew squares together for a bright and playful cushion cover.
- Coasters and Placemats: A single square makes a beautiful coaster or table mat.
No matter how you use them, these squares will add a refreshing and unique charm to your handmade collection.
Final Thoughts on the Lemon Granny Square Pattern
Crochet patterns like the Lemon Granny Square allow for endless creativity and personalization. By following this tutorial, you have learned how to craft a fun and vibrant design that is both beginner-friendly and visually striking. The combination of textured stitches and bright colors makes this pattern a standout choice for crochet enthusiasts.
We hope this tutorial has inspired you to incorporate the Lemon Granny Square into your next crochet project. Don’t hesitate to experiment with different color variations and creative arrangements to make each square uniquely yours. Happy crocheting!