
The Christmas fabric pouches Pattern brings together festive cotton prints, soft gathered edges, and cream drawstrings to create charming reusable gift bags.
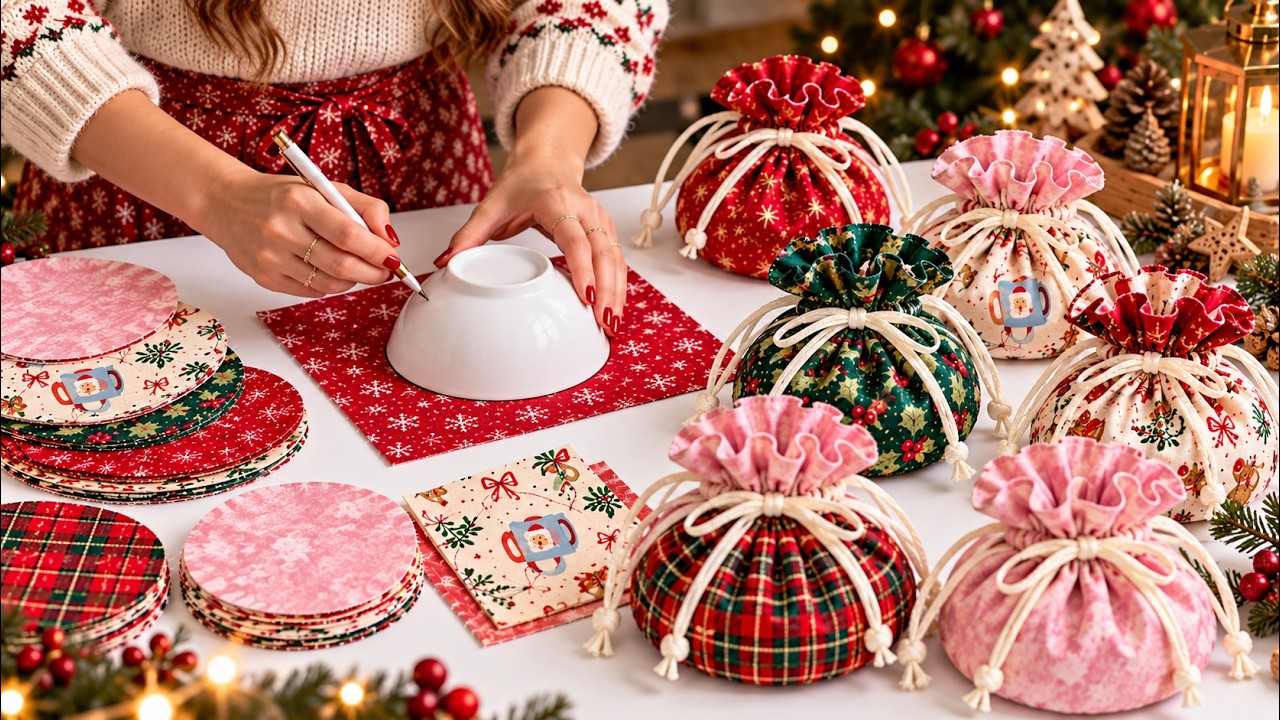
Inspired by the photograph, these pouches have rounded bodies and contrasting fabric that peeks out around the ruffled opening.
Red snowflakes, green holly, cheerful Santa prints, pink cotton, and traditional plaid all suit this project beautifully.
Each pouch starts with two fabric circles, making the basic shape approachable even if you have limited sewing experience.
The lining finishes the inside neatly while adding the contrasting color visible at the top.
In this tutorial, you will learn how to cut, sew, thread, and finish a circular fabric pouch using measurements in centimeters.
One appealing feature of these Christmas fabric gift pouches is how easily they adapt to different holiday occasions.
You can fill them with small wrapped gifts, sewing supplies, jewelry boxes, or individually packaged treats.
Their soft construction allows them to fold flat for storage and return to use the following holiday season.
Choosing coordinating fabrics also makes it possible to create a collection that feels varied but visually connected.
For example, a plaid exterior with a pink lining echoes one of the combinations shown in the photograph.
A cream Christmas print paired with a red lining creates another cheerful version with the same basic construction.
This Christmas fabric pouches Pattern provides a practical interpretation of the photographed project, rather than an exact reproduction of an unavailable original pattern.
The instructions use a lined circular construction with a stitched drawstring channel positioned below the outer edge.
That extra fabric above the channel becomes the decorative ruffle when you pull the cords.
All measurements are in centimeters, and the sewing methods include straight stitching, clipping curves, topstitching, and making reinforced buttonholes.
Start with one sample pouch to check the size against the gift you intend to place inside.
Once you understand the process, you can repeat it with coordinating prints to build a complete holiday gift collection.
1. Choose Materials and Prepare the Circular Pattern
For one pouch, gather two pieces of quilting cotton, each approximately 40 × 40 cm: one for the exterior and one for the lining. You will also need matching polyester thread, two lengths of smooth drawstring cord, fabric scissors, pins or clips, a removable fabric marker, a ruler, and a sewing machine. A safety pin or bodkin will help thread the cords through the finished channel.
DISCOVER MORE FREE PATTERNS HERE!
Choose lightweight or medium-weight woven cotton fabric that gathers easily. Quilting cotton works particularly well because it holds a crisp seam without creating an excessively bulky opening. The photograph features holiday prints in several color combinations, so feel free to mix red, green, cream, and pink. Small, scattered motifs generally look more balanced on gathered fabric than large designs that depend on a particular orientation.
For the sample size, draw a 36 cm diameter circle on paper. Fold the paper into quarters and measure 18 cm from the folded center point at several positions, then connect those marks with a smooth arc. Cut along the arc and unfold the paper. Check that the resulting circle measures 36 cm across through its center in several directions.
The 36 cm cutting diameter includes a 0.6 cm seam allowance around the entire circle. After sewing and turning, the finished fabric disk will measure approximately 34.8 cm across. The pouch does not have a separately sewn flat base; its rounded shape develops as the circle gathers around the contents. Its usable capacity therefore depends on the size and shape of the gift.
Prepare two cords measuring approximately 110 cm each for this sample. Smooth cotton or braided cord around 0.2–0.3 cm thick is a useful starting point. Very thick rope can resist sliding through a narrow channel and make the opening bulky. Before cutting both lengths, check that your chosen cord fits comfortably through a test buttonhole sewn on layered fabric scraps.
Wash and dry the cotton according to its care instructions, then press it flat before cutting. This helps prevent uneven shrinkage during later cleaning. If the print has a strong upright direction, remember that a circular pouch displays its fabric from several angles. A scattered holiday design, small plaid, or allover floral usually makes this reusable Christmas gift bag easier to arrange attractively.
2. Cut and Sew the Lined Fabric Circle
Place your paper template on the wrong side of the exterior fabric and trace around it with a removable marker. Repeat on the lining fabric, then cut out both circles carefully. Keep the scissors upright so the edges remain smooth and accurate. Avoid stretching the curved edges while handling them, since parts of a circle naturally fall on the fabric’s bias.
Lay the circles right sides together, matching their edges all the way around. Pin or clip at opposite points first, then fill in the spaces between them. Mark a 5 cm turning opening along one section of the perimeter. This opening allows you to pull the fabric through after sewing without forcing the whole pouch through a tiny gap.
Sew around the circle with a 0.6 cm seam allowance, leaving the marked opening unstitched. Use a straight stitch approximately 2–2.5 mm long, and backstitch at both ends of the seam. Guide the fabric gently around the curve, keeping the seam allowance consistent. Stop with the needle down whenever you need to lift the presser foot and adjust the fabric’s position.
Reduce bulk by trimming the seam allowance slightly where necessary and cutting small, shallow notches around the curved edge. Leave the allowance at the turning opening intact so it remains easy to fold inward. Keep every notch clear of the stitching. These small cuts help the seam allowance spread and settle smoothly when the circular piece is turned right side out.
Turn the circle through the opening and gently work the seam outward with your fingers or a blunt turning tool. Press the entire perimeter so the lining and exterior meet neatly at the edge. At the opening, fold both raw edges inward by 0.6 cm, following the surrounding curve. Pin or clip this section before taking the circle back to the machine.
Topstitch approximately 0.2 cm from the finished edge around the entire disk, closing the turning opening as you sew. This stitching also keeps the lining from rolling outward unevenly. Inspect both sides for caught folds or gaps before continuing. You now have a neatly finished, double-sided fabric circle that forms the foundation of the Christmas fabric pouches Pattern.
3. Make the Drawstring Openings and Sew the Channel
Place the finished disk flat with the exterior facing upward. Mark two concentric guidelines: the first 3 cm inward from the finished edge, and the second 4 cm inward from the finished edge. Measure from the perimeter at frequent intervals and connect the marks smoothly. The space between these lines becomes the 1 cm drawstring channel, while the fabric outside it forms the ruffled top.
Before sewing the channel, mark two opposite cord openings, each centered 3.5 cm inward from the finished edge. To locate opposite positions accurately, fold the disk in half, mark both ends of the fold, and unfold it. At each position, mark a short radial buttonhole, pointing toward the center. A finished opening approximately 0.7 cm long should remain entirely between the channel guidelines.
Sew a reinforced buttonhole through both fabric layers at each marked location, keeping the rest of the disk flat. Test the settings on scraps first, especially if your machine makes dense buttonholes. If the fabric needs support, baste a small piece of removable stabilizer behind the area and remove it afterward as appropriate. Open each buttonhole carefully without cutting its stitched ends.
The two buttonholes provide access to the channel from opposite sides of the pouch. Because they pass through both layers, take care during threading to guide the cord into the space between the exterior and lining. A narrow, securely stitched hand-worked eyelet can serve the same purpose if you do not have a machine buttonhole function. Avoid leaving plain cut slits, which can fray with repeated use.
Sew around the disk on the first marked circular guideline, then repeat on the second. These two rows enclose the channel without crossing the buttonholes. Keep both fabric layers smooth beneath the presser foot and backstitch briefly where each circle begins and ends. Use matching thread for a subtle finish, or choose a coordinating thread that complements the holiday fabric.
Check the full channel before inserting the drawstrings. It should remain approximately 1 cm wide, with no accidental folds or stitching connecting its two boundaries. Remove the visible marking according to the marker manufacturer’s instructions. At this stage, the piece will still lie flat; the rounded pouch and decorative ruffle appear only after the cords are threaded and tightened.
4. Thread the Cords and Shape the Christmas Pouch
Attach a safety pin or bodkin to the first 110 cm cord. Insert it through one buttonhole and guide it between the fabric layers into the channel. Work it around the complete circle until it returns to the same opening. Pull both ends outward, keeping them approximately equal in length. The cord should travel around the entire channel without emerging through the opposite buttonhole.
Thread the second cord through the opposite buttonhole in the same way, making another complete circuit and bringing both ends back out through their starting opening. You now have two independently looped drawstrings, with one pair of ends on each side. This arrangement allows the pouch to close when you pull the opposing pairs away from each other.
Tie the two ends of each cord together with a secure knot. Pull the cord pairs gently in opposite directions and watch the circle gather into a pouch. If one section bunches more heavily than another, loosen the opening slightly and redistribute the gathers by hand. Do not force a resistant cord; check for a caught safety pin, crossed seam, or overly tight opening.
Place a small gift inside and adjust the gathers around it. The pouch in this tutorial has a soft, unstructured bottom, so a compact box or lightweight bundle helps create the plump shape seen in the photograph. Keep the contents below the channel so the opening can close properly. Smooth the exterior downward while gently lifting the fabric above the cords into a ruffle.
For a decorative finish, arrange the loose cords into a bow near one opening or add a lightweight paper gift tag. The photograph shows generous cream cord accents, which you can echo by leaving the tails relatively long. Check that the pouch still opens easily before trimming anything. Keep loose cords and gift packaging away from babies and young children.
Finish your Christmas fabric pouches Pattern project by inspecting the perimeter, buttonholes, and channel stitching. Remove stray threads and press only where needed, avoiding flattened gathers if you prefer a softer appearance. For later cleaning, empty the pouch, loosen the cords, and follow the fabric’s care instructions. Reshape it while drying so it is ready for another season of holiday gifting.
Frequently Asked Questions
What fabric works best for Christmas fabric pouches?
Lightweight or medium-weight quilting cotton is a practical choice because it is easy to cut, press, and gather. Choose a lining with a similar weight so both layers move together smoothly. Heavy upholstery fabric, stiff canvas, or thick fleece will require changes to the channel and cord size and may produce a much bulkier opening.
Does this Christmas fabric pouches Pattern include seam allowance?
Yes. The 36 cm diameter cutting circle includes a 0.6 cm seam allowance around its perimeter. Do not add another allowance unless you intentionally want to enlarge the project. Measure the channel placement from the finished, turned edge, rather than from the original cutting line.
How large will the finished pouch be?
The flat sewn disk measures approximately 34.8 cm across, but its dimensions change when gathered. The final width and height depend on how tightly it closes and what you place inside. Test it with your intended gift before making several matching pouches, since a circular construction does not produce a fixed rectangular capacity.
Can I make a larger or smaller fabric gift pouch?
Yes. Change the circle diameter to adjust the overall size. For a larger sample, try a 42 cm cutting circle, then measure the finished channel path before cutting the cords. You can retain the same ruffle depth for a similar appearance, but make a sample first to confirm that the proportions suit your gift.
Why does my drawstring feel difficult to pull?
The cord may be too thick, the buttonholes may be too small, or part of the channel may have narrowed during sewing. Open the pouch and inspect each section before pulling harder. Smooth braided cord usually slides more easily than rough or loosely twisted material. Also check that the cord travels between the two fabric layers.
Can these pouches hold cookies or candy?
They can hold individually wrapped treats or a small food-safe package. Ordinary craft cotton is not automatically suitable for direct contact with unwrapped food. Packaging the treats separately also protects the pouch from crumbs, grease, and moisture, making it easier to clean and reuse.
Do I need interfacing or batting?
Neither is necessary for this version. Two layers of cotton create a soft pouch that gathers readily. Batting and firm interfacing can make the upper edge bulky and interfere with the drawstring action. If you want more structure, first experiment with firmer quilting cotton rather than adding thick layers.
Is this a beginner-friendly sewing project?
Yes, provided you are comfortable sewing a curved seam and practicing buttonholes on scraps. The project introduces several useful skills without requiring zippers or complicated pattern pieces. Take your time marking the channel accurately, and complete one sample before cutting fabric for a larger batch.
Conclusion
The Christmas fabric pouches Pattern turns two simple fabric circles into a festive lined gift bag with a gathered body, contrasting ruffle, and practical double drawstrings. You have learned how to prepare the circular template, sew and turn the layers, make reinforced openings, stitch the channel, and shape the finished pouch around a small gift. Coordinating prints make each version feel personal while keeping the construction consistent.
Try your favorite combination of plaid, snowflakes, holly, or cheerful Christmas motifs, then adjust the circle size as needed for future projects. Please leave your honest opinion about this tutorial and share any suggestions for improving the instructions. Your ideas for fabric combinations, useful sizes, and finishing details can help inspire the next handmade holiday project.