
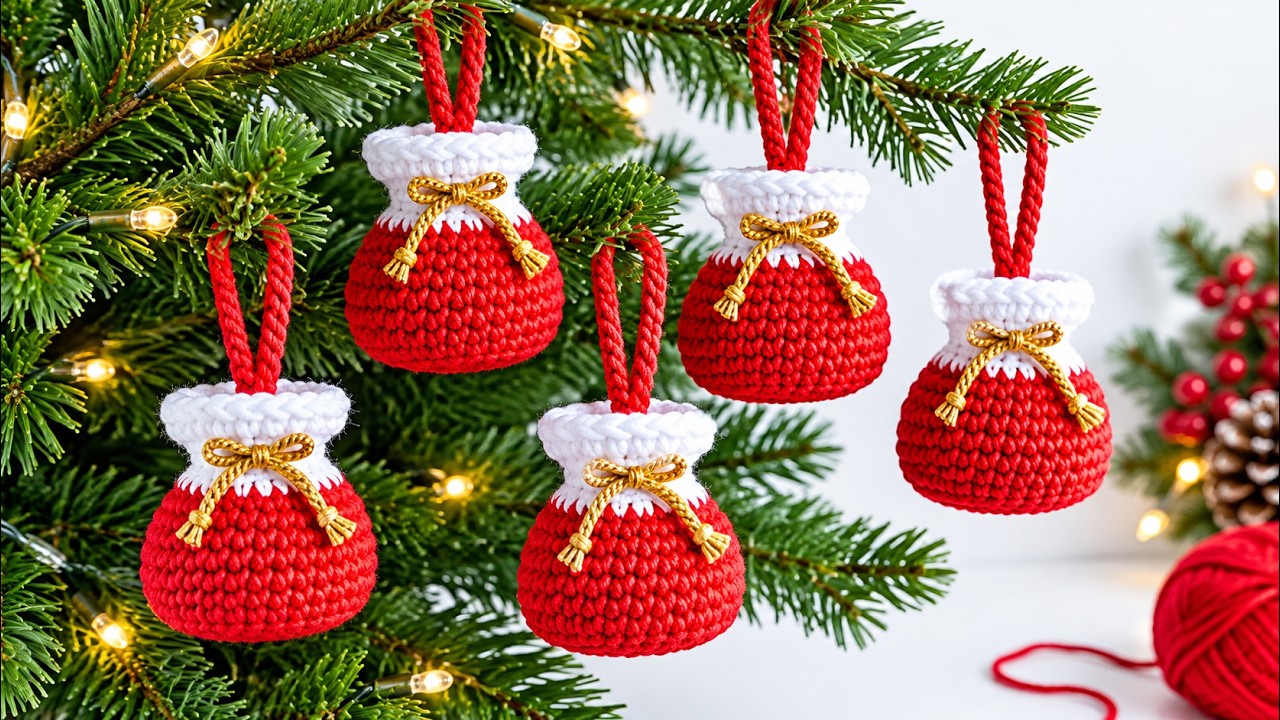
The Crochet Christmas pouch ornaments Pattern brings together a rounded red pouch, a snowy white cuff, and a delicate gold bow for a cheerful handmade decoration.
Inspired by the ornaments in the reference photo, this project captures the familiar look of miniature Santa gift sacks hanging among evergreen branches.
The rounded base gives each ornament its soft shape, while a narrow neck helps the white opening flare outward.
A crocheted hanging loop makes the finished pouch easy to display on a Christmas tree, garland, or decorative hook.
You can leave the pouch empty or tuck a small paper message inside for a thoughtful seasonal detail.
This tutorial explains an original interpretation of the photographed design using US crochet terms, clear stitch counts, and practical finishing instructions.
One of the most enjoyable features of this Christmas crochet pattern is the combination of simple stitches and attractive shaping.
Most of the ornament is worked in single crochet, which creates a firm fabric with small, closely spaced stitches.
Regular increases form the circular bottom, and a few carefully placed decreases create the gathered silhouette above the rounded body.
The white cuff adds contrast without requiring complicated colorwork, making this a manageable project for a confident beginner.
A gold cord threaded through a row of small openings provides both the decorative bow and an adjustable closure.
Because the exact yarn, gauge, and construction of the photographed ornaments are unknown, your finished version will have its own handmade character.
Throughout this Crochet Christmas pouch ornaments Pattern, you will find instructions for preparing materials, crocheting the pouch, shaping the cuff, and adding the finishing details.
The pattern uses joined rounds so that round beginnings and color changes are easier to identify.
Finished measurements depend on your yarn and tension, but the suggested materials produce a small ornament approximately 8–10 cm tall, excluding its hanging loop.
You can adjust the overall scale by changing yarn thickness and using a hook that produces a dense, flexible fabric.
Make one ornament first to check the proportions before preparing a coordinated collection for your tree.
Take your time with the stitch counts, especially around the neck and drawstring openings, because these details help the pouch hold its recognizable shape.
1. Gather Materials and Understand the US Crochet Stitch Key
For this Crochet Christmas pouch ornaments Pattern, gather smooth red and white worsted-weight yarn, a 3.5 mm crochet hook, a yarn needle, scissors, and a stitch marker. Have approximately 20–30 g of red yarn and 5–10 g of white yarn available, although actual use will vary. You will also need about 40 cm of thin gold cord for the drawstring and bow. Choose a soft cord that passes easily through the crocheted openings.
DISCOVER MORE FREE PATTERNS HERE!
A smooth yarn makes the individual stitches easier to see and gives the red pouch a clearly defined texture. Cotton offers a firm finish, while acrylic usually produces a lighter, softer ornament. Use red and white yarns of the same weight so the cuff stays in proportion to the body. If your stitches leave large gaps, try a slightly smaller hook. The goal is a dense crochet fabric that remains flexible enough to gather at the neck.
The US crochet abbreviations used here are ch = chain, sl st = slip stitch, sc = single crochet, inc = increase, dec = single crochet two stitches together, st = stitch, and MR = magic ring. An increase means working 2 sc into the same stitch. A decrease combines two neighboring stitches into one. Instructions inside parentheses are repeated the stated number of times, and the final number identifies the round’s stitch count.
To make a single crochet, insert the hook into the indicated stitch, yarn over, and pull up a loop. Yarn over again and pull through both loops on the hook. For a standard sc decrease, insert the hook into the next stitch and pull up a loop, then repeat in the following stitch. Yarn over and pull through all three loops. Keep decreases snug without pulling so tightly that the next round becomes difficult to work.
Work the pouch in joined rounds. At the end of each round, join with a sl st into the first sc, then ch 1 to begin the next round. The joining slip stitch and beginning chain do not count as stitches. Work the first stitch of the new round into the same stitch that received the join. Mark that first stitch and count only the actual pattern stitches to avoid accidentally increasing at the seam.
Treat the stated finished size as an estimate rather than an exact measurement. For a useful tension check, crochet the first seven rounds and measure the base; approximately 6–7 cm across is a reasonable starting point for this version. A larger or smaller base will produce a proportionally different ornament. Record your yarn, hook size, and base measurement if you want several crochet Christmas pouch ornaments to match.
2. Crochet the Red Base and Rounded Pouch Body
Begin the crochet pouch base with red yarn. Round 1: Make an MR, ch 1, and work 6 sc into the ring; pull the ring closed and join. [6 sts] Round 2: Ch 1, work inc in every stitch, and join. [12 sts] Leave a starting tail long enough to weave securely through the underside of the base later. If you prefer an alternative to the magic ring, ch 2 and work the six starting stitches into the second chain from the hook.
Continue expanding the circle evenly. Round 3: Ch 1, work (sc 1, inc) 6 times, and join. [18 sts] Round 4: Ch 1, work (sc 2, inc) 6 times, and join. [24 sts] Spread the work gently between your fingers to check that the increases are distributed around the circle. Avoid stretching it forcefully; the bottom will begin to curve as the pouch walls develop.
Finish the base increases with three more rounds. Round 5: Work (sc 3, inc) 6 times. [30 sts] Round 6: Work (sc 4, inc) 6 times. [36 sts] Round 7: Work (sc 5, inc) 6 times. [42 sts] Begin each round with ch 1 and finish with the established slip-stitch join. Count after every round, since an unnoticed extra stitch can make the later shaping uneven.
Build the rounded red body without adding more stitches. Rounds 8–13: Ch 1, work sc in each stitch around, and join. [42 sts in each round] These six rounds create the pouch walls and give the ornament its plump silhouette. Keep the right side facing outward. If the work initially curls in the opposite direction, gently turn the small bowl so the preferred outside surface faces you.
Before narrowing the opening, check the height against the width. The pouch should resemble a small rounded sack with enough depth to support a visibly narrower neck. For a slightly taller version, add one or two extra rounds of 42 sc here. This is the simplest place to adjust the body length because it does not change any later stitch counts. Use the same number of added rounds for every ornament in a matching set.
Shape the upper body with three decrease rounds. Round 14: Work (sc 5, dec) 6 times. [36 sts] Round 15: Work (sc 4, dec) 6 times. [30 sts] Round 16: Work (sc 3, dec) 6 times. [24 sts] Continue chaining and joining as established. These gradual reductions create the gathered appearance seen in the reference. On the final single crochet of Round 16, complete the last pull-through with white yarn, then join with white.
3. Create the White Neck, Drawstring Openings, and Flared Cuff
Begin the white crochet cuff with a plain foundation round. Round 17: Ch 1, work sc in each stitch around, and join. [24 sts] Leave sufficient red and white tails to weave in securely, and avoid tying a bulky knot at the color change. The white neck should sit neatly above the red body. Keep this round relaxed enough that the opening remains accessible for threading the drawstring.
Make the drawstring openings next. Round 18: Ch 1, work (sc in the next 2 sts, ch 1, skip the next st) 8 times, then join to the first sc. You now have 16 sc and 8 ch-1 spaces, equivalent to 24 positions around the round. Each chain replaces one skipped stitch. These evenly spaced eyelets allow the gold cord to gather the neck while leaving the upper cuff free to flare.
Reinforce the eyelet row before widening the rim. Round 19: Ch 1, repeat (sc in the next 2 sc, sc into the next ch-1 space) 8 times, and join. [24 sts] Work into each chain space rather than trying to locate an individual chain loop. This gives the upper edge of every opening a clean finish. Check that you have filled all eight spaces and still have exactly twenty-four stitches.
Add the flared shape with a controlled increase round. Round 20: Ch 1, work (sc 3, inc) 6 times, and join. [30 sts] Round 21: Ch 1, work sc in each stitch around, and join. [30 sts] Fasten off and weave the white tail through the inside of the cuff. The increase round creates a modest outward flare, which becomes more noticeable when the drawstring gathers the neck below it.
Thread approximately 40 cm of gold cord through the eight eyelets using a blunt yarn needle. Start at the front of the pouch, pass alternately inward and outward through the openings, and bring both ends out at the front. Gently draw the neck inward and tie a small bow. Leave enough slack to open the pouch if you want it to remain functional. Trim the cord ends only after checking the finished bow proportions.
To echo the photographed ornaments, leave short gold tails beneath the bow. If the cord naturally separates into strands, you can carefully untwist a small section at each end to suggest miniature tassels. Test this on a spare piece first, since some metallic cords unravel extensively. The gold drawstring bow should sit just below the flared white rim, creating a clear transition between the snowy cuff and rounded red pouch.
4. Add the Hanging Loop and Finish Your Christmas Pouch Ornament
Make a red crochet hanging loop by leaving a starting tail of approximately 15 cm, then chaining until the chain measures about 14–16 cm without stretching. Fasten off with another 15 cm tail. Fold the chain in half to form a loop. Its finished drop will be roughly half the chain length, allowing the ornament to hang below a branch while keeping the pouch comfortably within view.
Attach both chain ends beside each other at the back of the pouch, immediately below the drawstring row. Use the yarn tails to sew through several firm red stitches, securing each end with multiple passes. Weave the remaining tails through the inside of the body. Anchoring the loop below the white cuff helps the red body support the ornament’s weight and keeps the decorative rim from being pulled upward.
Shape the pouch gently with your fingers. Push the base outward, smooth the sides, and adjust the gold drawstring until the body looks rounded. The ornament can remain empty, which preserves its use as a miniature pouch. For a fuller display, tuck a small piece of tissue paper inside. Remove that insert whenever you want to place a lightweight note in the pouch, and avoid heavy contents that stretch the stitches or hanging loop.
Inspect the finished Crochet Christmas pouch ornaments Pattern project from the front and back. Check that the bow is centered, the white cuff flares evenly, and the loop attachment feels firm under a gentle pull. Weave in any remaining ends without drawing them so tightly that the fabric puckers. Trim yarn only after securing it through several stitches in different directions. A careful finish makes a noticeable difference on such a small decoration.
For coordinated variations, keep the white cuff and change the pouch body to cranberry, forest green, or a soft neutral shade. Maintain the same yarn weight and stitch counts if you want consistent proportions. You can also replace the metallic cord with a narrow satin ribbon that fits through the eyelets. The classic red and white Christmas ornament palette most closely reflects the reference photo, especially when paired with a small gold bow.
Store the ornaments clean and dry, with the cuffs loosely arranged so they do not become flattened. Follow the yarn manufacturer’s care instructions, and remove a removable drawstring before washing if the cord requires different care. These pouches are intended as decorations; their cords and small finishing details should be kept away from babies and pets. Once your sample is complete, repeat the same rounds and measurements to create a balanced handmade collection.
FAQ: Crochet Christmas Pouch Ornaments Pattern
Is this pattern suitable for beginners?
Yes, it is suitable for a confident beginner who can make chains, single crochet stitches, and slip-stitch joins. The main skills to practice are working into a magic ring, counting joined rounds, and making decreases. Crocheting one sample before making a full set will help you become comfortable with the shaping and drawstring construction.
Does this reproduce the exact pattern used in the photo?
This is an original pattern inspired by the visible features of the reference image: a rounded red body, narrow white neck, flared cuff, gold bow, and red hanging loop. A photograph does not reveal the original stitch counts, yarn, or hidden construction, so the instructions provide a practical interpretation rather than a verified reproduction.
Why is my pouch wider or taller than the suggested size?
Yarn thickness, hook size, and personal tension all affect the finished measurements. Even yarns carrying the same weight label can differ noticeably. Measure your base after Round 7 and compare the proportions as you work. For a smaller ornament, try thinner yarn with a suitable smaller hook while retaining the same stitch counts.
Why do I keep gaining stitches near the join?
The most common cause is accidentally crocheting into the joining slip stitch or beginning chain. Neither counts as a pattern stitch in this tutorial. Mark the first single crochet of each round, join directly into it, and count the actual stitches before continuing. Correct the count as soon as you notice a discrepancy.
Can I make the pouch without a magic ring?
Yes. Chain 2 and work the six stitches of Round 1 into the second chain from the hook. Continue with the remaining rounds as written. This method may leave a slightly more visible center opening. Use the starting yarn tail to close that opening neatly from the inside before weaving the tail securely through the base.
Why is the white cuff not flaring outward?
Check that Round 20 contains 30 stitches, including all six increases. Also check whether the gold drawstring is gathering the neck beneath the rim. If the cord is completely loose, the flare will appear less pronounced. Gently arrange the cuff with your fingers; avoid pulling it sharply, which can distort the eyelets.
Can these ornaments hold small gifts?
They can hold lightweight items such as a folded message or a small wrapped treat, provided the contents fit without stretching the pouch. Keep food wrapped, and check that the hanging loop can support the contents. For heavier gifts, use the pouch as a tabletop presentation rather than suspending it from a tree branch.
Can I use plush or velvet yarn?
You can, but the ornament will usually become larger and the stitches may be harder to identify. Thick plush yarn also changes the appearance of the small eyelets and cuff. Smooth yarn is a useful choice for your first sample because it makes the shaping, stitch counts, and finishing details easier to check.
Conclusion
This Crochet Christmas pouch ornaments Pattern teaches you how to crochet an expanding circular base, build a rounded red body, narrow the upper opening, and create a white cuff with functional drawstring eyelets. A gold bow and securely attached red hanging loop complete the festive design. By keeping your stitch counts consistent and checking the proportions as you work, you can create a coordinated collection of charming handmade Christmas decorations.
EASILY FIND THE FREE VIDEO FOR THIS PATTERN HERE!
After making your first pouch, please leave your honest opinion about the pattern and share any suggestions. Let us know which colors you chose, whether you adjusted the size, and which details helped you most. Your feedback can offer useful ideas for future projects and inspire other crocheters to try their own seasonal variations.