
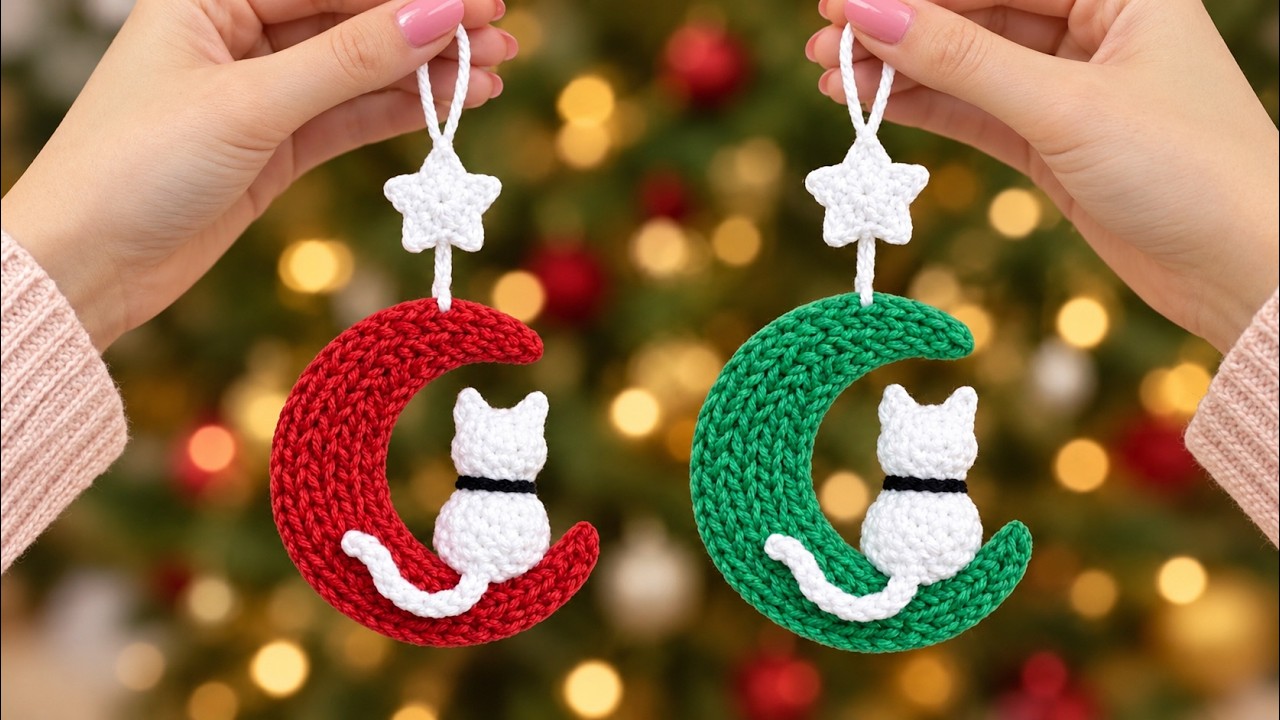
The Crochet Christmas ornament Pattern below combines a colorful crescent moon, a tiny white cat, and a hanging star.
Inspired by the photograph, this decoration brings together simple crochet textures and a charming Christmas palette.
The cat sits inside the lower curve of the moon, with its tail following the crescent’s rounded edge.
A small white star connects the ornament to its hanging loop and completes the arrangement.
Choose traditional red or green yarn for a look similar to the reference, or select colors that suit your tree.
Each component is made separately, giving you time to shape and position the pieces before sewing them together.
This Christmas crochet ornament uses US crochet terminology, with all measurements given in centimeters.
You will practice working into a foundation chain, increasing stitches, crocheting small rounds, and joining separate pieces.
The crescent is made from two matching curved panels, while the cat has a lightly stuffed body and head.
Its ears and tail are added separately so their placement can be adjusted to create the silhouette shown in the photograph.
The instructions describe an original interpretation of the pictured ornament, rather than an exact reconstruction of its unseen pattern.
Your finished size and proportions will vary with yarn thickness, hook size, tension, and the shaping used during assembly.
For an enjoyable result, read through the Crochet Christmas ornament Pattern before starting and keep a stitch marker nearby.
Counting carefully matters most when increasing the crescent and closing the small amigurumi pieces.
Smooth cotton yarn makes the stitches easy to see and helps the star and moon hold their outlines.
Use gentle stuffing, secure seams, and patient shaping to give the decoration a neat handmade finish.
The project is suitable for a confident beginner who understands basic stitches and is ready to try small three-dimensional details.
Work one complete ornament first, then use its measurements and yarn choices as a guide for a coordinated collection.
1. Gather Materials and Understand the US Crochet Stitches
For this Crochet Christmas ornament Pattern, gather smooth cotton yarn in red or green, white yarn of the same thickness, and a small amount of black yarn. You will also need a crochet hook appropriate for your yarn, a yarn needle, scissors, stitch markers, and polyester fiberfill. A hook around 2.5–3 mm can be a useful starting point for fine or light cotton, but adjust it to produce firm stitches.
DISCOVER MORE FREE PATTERNS HERE!
Aim for a finished crescent approximately 11–14 cm tall, with the completed hanging decoration measuring roughly 18–23 cm, including the star and loop. These are suggested dimensions rather than guaranteed measurements. Make the crescent first, measure it after shaping, and check that the cat fits comfortably inside its opening before completing all the assembly.
The US crochet abbreviations are: ch means chain, sl st means slip stitch, sc means single crochet, hdc means half double crochet, and dc means double crochet. St means stitch, inc means work two single crochets into one stitch, and dec means decrease two stitches into one. Instructions in parentheses followed by a repeat count are worked that many times.
For single crochet, insert the hook into the indicated stitch, yarn over, and pull up a loop; yarn over and pull through both loops. For half double crochet, yarn over before inserting the hook, pull up a loop, then yarn over and pull through all three loops. For double crochet, yarn over, insert the hook and pull up a loop, then pull through two loops twice.
The cat begins with a magic ring, an adjustable loop into which you work the first round. Pull the starting tail to close its center, then secure that tail when finishing. Use an invisible decrease for a smoother surface: insert the hook through the front loops of the next two stitches, yarn over and pull through those loops, then complete a single crochet.
Work the cat’s body and head in continuous rounds, without joining at the end of each round. Move a stitch marker to the first stitch of every new round. The crescent uses turned rows, and its turning chain does not count as a stitch. Keep slip stitches relaxed enough that you can work into them on the following row.
2. Crochet and Shape the Crescent Moon
The crochet crescent moon is a tapered curved strip made wider along its outer edge. Make two identical panels in red or green. Begin with ch 31, leaving a starting tail long enough to weave in securely. Work the first row into the back bumps of the chain if comfortable; this leaves a tidy foundation edge for joining the panels later.
Row 1: Beginning in the second chain from the hook, work sl st in the next 2 chains, sc in the next 3, hdc in the next 4, dc in the next 12, hdc in the next 4, sc in the next 3, and sl st in the final 2 chains. You have 30 stitches. The short stitches taper both ends, while the taller middle stitches create the broad center.
Row 2: Ch 1 and turn. Work sl st in the next 2 stitches, sc in the next 3, hdc in the next 4, 2 dc in each of the next 12 stitches, hdc in the next 4, sc in the next 3, and sl st in the final 2 stitches. You now have 42 stitches. The additional double crochets lengthen the outer edge and encourage the piece to curve.
Row 3: Ch 1 and turn. Work sl st in the next 2 stitches, sc in the next 3, hdc in the next 4, (dc in the next stitch, 2 dc in the next stitch) 12 times, hdc in the next 4, sc in the next 3, and sl st in the final 2 stitches. You have 54 stitches. Fasten off, then repeat the three rows for the second panel.
Lay both panels flat and gently arrange them into matching C shapes, with the opening facing right. The foundation chain forms the shorter inner curve, while Row 3 forms the longer outer curve. Lightly dampen the panels, pin them into matching crescents, and let them dry completely. The curvature will depend on your tension; avoid stretching the points so hard that the stitches distort.
Place the panels together with their neatest sides facing outward. Using matching yarn, whipstitch around the inner and outer edges, matching corresponding stitches and row ends. Add small wisps of fiberfill before closing the final opening, keeping the moon relatively flat. Shape the crescent with your fingers and leave a clear gap between its points for the cat.
3. Make the White Cat, Ears, Tail, and Collar
Begin the crochet cat body with white yarn. Round 1: Work 6 sc into a magic ring—6 stitches. Round 2: Inc in every stitch—12. Round 3: (Sc in the next stitch, inc) 6 times—18. Round 4: (Sc in the next 2 stitches, inc) 6 times—24. Rounds 5–7: Sc in every stitch—24 stitches per round. This forms the rounded lower body.
Shape the top of the body with Round 8: (Sc in the next 2 stitches, dec) 6 times—18 stitches. Add a little fiberfill, spreading it evenly. Round 9: (Sc in the next stitch, dec) 6 times—12. Round 10: Dec 6 times—6. Fasten off with a long tail, pass it through the front loops of the remaining stitches, and pull the opening closed.
Make the cat head separately. Round 1: Work 6 sc into a magic ring—6 stitches. Round 2: Inc in every stitch—12. Round 3: (Sc in the next stitch, inc) 6 times—18. Rounds 4–6: Sc in every stitch—18 stitches per round. Round 7: (Sc in the next stitch, dec) 6 times—12. Lightly stuff, then work Round 8: dec 6 times—6. Close as for the body.
For each cat ear, ch 2. Row 1: Work 2 sc into the second chain from the hook—2 stitches. Ch 1 and turn. Row 2: Inc in both stitches—4 stitches. Fasten off, leaving a sewing tail. Make two ears. Position each with the narrow starting end pointing upward and the wider final row against the head, then sew the bases securely in place.
To make the curved cat tail, ch 16. Beginning in the second chain from the hook, work sl st in the next 3 chains and sc in the remaining 12 chains. Fasten off with a long sewing tail. This creates a slim strip with a tapered tip. Curve it gently with your fingers; its final sweeping shape will be held by a few small stitches during assembly.
Sew the head firmly to the top of the body, hiding the closed openings where the pieces meet. For the black collar, make a chain long enough to sit comfortably around the neck, checking the fit directly on the cat. Join its ends by sewing and tack it to the neck in several places. Keep the face blank to resemble the rear-facing cat in the reference image.
4. Crochet the Star and Assemble the Christmas Ornament
For the crochet star, use white yarn and make a magic ring. Round 1: Work 10 sc into the ring, pull the center closed, and sl st into the first sc. Check that you have exactly 10 stitches, since each star point uses two stitches from this round. Keep the center flat and leave the ring tail available for securing later.
Round 2: Repeat the following sequence five times: ch 4; sl st in the second chain from the hook, sc in the next chain, hdc in the next chain; skip the next stitch of Round 1 and sl st into the following stitch. Each repeat makes one point and uses two base stitches. After the fifth point, fasten off and weave in the tails without pulling the points inward.
Make a second matching star if you want a firmer decoration with a tidy appearance from both sides. Place the stars together, align all five points, and sew around their edges with white yarn. Leave the star unstuffed so its outline stays crisp. Lightly dampen and shape the points if needed, allowing the star to dry before adding the hanging cord.
Place the cat inside the lower opening of the crescent, with its back facing outward. Sew the bottom of its body to the lower inner curve using several small stitches. Add a discreet attachment between the cat’s side and the moon if needed for stability. Sew the tail base to the lower body, curve the tail toward the left, and tack its middle and tip along the moon.
Create a white chain connector approximately 2–3 cm long and sew it between the top of the moon and the bottom of the star. Attach it near the crescent’s balance point, testing the arrangement by holding it up before making the final knots. Add a separate chain loop above the star, approximately 8–10 cm long before folding, and secure both ends to the star’s upper point.
Finish the Crochet Christmas ornament Pattern by checking every attachment and weaving in all remaining yarn ends. Hang the ornament briefly to see whether it tilts, then adjust the connector position if necessary. Smooth the cat’s ears, shape the tail, and arrange the star points. Treat the finished piece as a decorative ornament, and keep its hanging loop away from young children and pets.
Frequently Asked Questions
What yarn works best for this Crochet Christmas ornament Pattern?
Smooth cotton yarn is a useful choice because it gives clear stitch definition and helps small shapes retain their outlines. Acrylic can also work, although a soft or fuzzy yarn may produce a less defined star and crescent. Use similar yarn thicknesses for the moon and cat so their proportions remain balanced.
Is this Christmas ornament suitable for beginners?
It suits confident beginners who can chain, work basic stitches, count increases, and sew crochet pieces together. The small size requires patience, especially when making the ears and star. Practice the star separately if working back along a short chain feels unfamiliar.
Why does my crescent look different from the photograph?
The photograph does not reveal its original construction, yarn, gauge, or internal shaping. This pattern uses a curved, tapered strip to create a similar arrangement. Differences in tension and materials change the curve, so blocking and careful joining are important parts of achieving a pleasing crescent.
What should I do if the moon becomes wavy?
First check the stitch counts: the three rows should contain 30, 42, and 54 stitches. Extra increases can create unwanted ruffling. If the counts are correct, dampen and shape the panels before joining them. Gentle waves may settle during blocking; pronounced ruffling may require trying a different hook and making a fresh panel.
Can I make the ornament larger or smaller?
Yes. The simplest approach is to change the yarn thickness and hook size together while keeping the stitch counts unchanged. Make all the components with compatible materials. Changing only the crescent’s chain length requires recalculating its stitch groups and increases, so it is less straightforward.
Does the cat need eyes or a nose?
No. The reference shows the cat from behind, so a blank head with two ears creates the intended silhouette. If you prefer a front-facing version, embroider small facial details before closing the head. Embroidery allows you to add features without attaching beads or plastic eyes.
How can I keep the ornament from twisting?
Use a short connector, attach it near the moon’s balance point, and secure the cat at more than one position. A loosely attached cat can shift its weight and rotate the crescent. Test the entire decoration while hanging before fastening off the final assembly threads.
How should I clean and store the finished decoration?
Follow the care instructions for your yarn and stuffing. Gentle spot cleaning is usually practical for an assembled ornament. Avoid wringing or pulling the star points. Let every component dry completely, then store the decoration flat in a clean container where heavier ornaments cannot crush its shape.
Conclusion
This Crochet Christmas ornament Pattern explains how to make a shaped crescent, a small white cat, triangular ears, a curved tail, and a five-point star using US crochet stitches. Careful counting builds the individual pieces, while gentle stuffing, blocking, and secure sewing bring the arrangement together.
Try red and green versions for a coordinated Christmas display, or personalize the colors to match your seasonal decorations. Please leave your honest opinion about the project and share any suggestions, favorite color combinations, or details you would like to adapt.