
A Patchwork Wall Hanging for Home Decor Pattern brings color, texture, and a welcoming handmade touch to your favorite room.
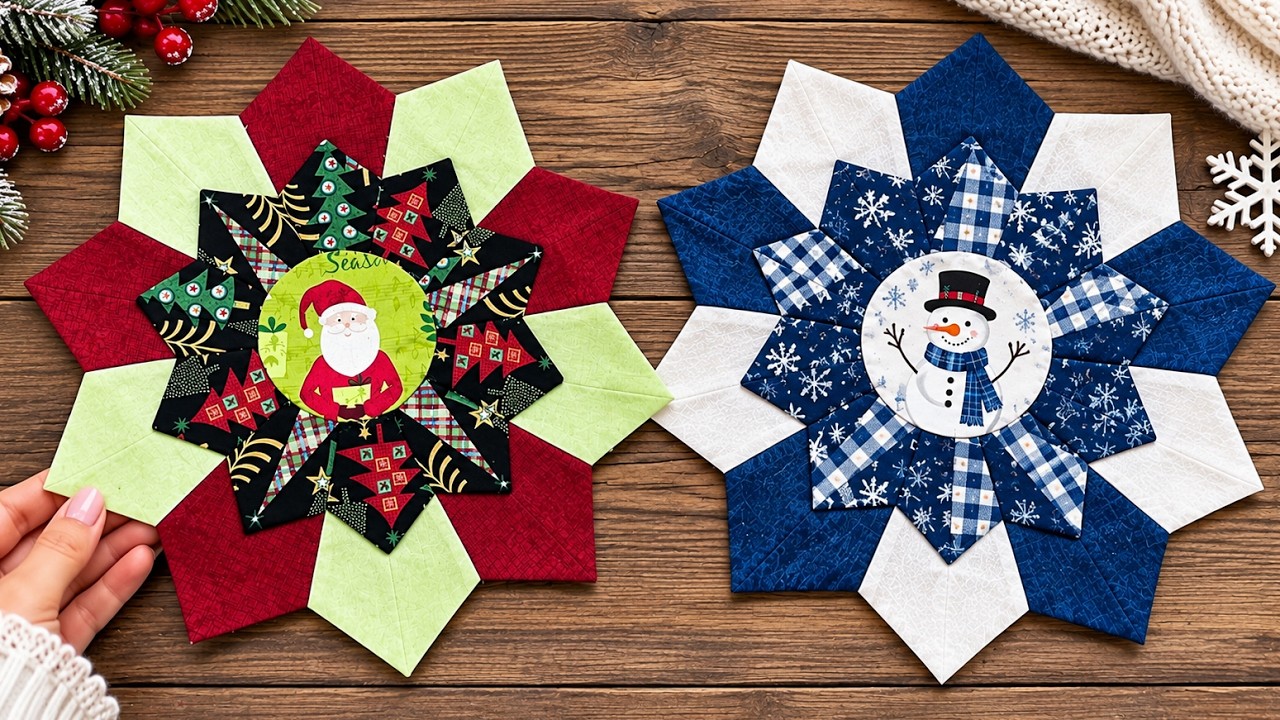
The projects in the reference photo feature pointed fabric sections arranged around cheerful circular centers.
One combines deep red, light green, and Christmas prints, while the other pairs navy blue with snowy white.
Their layered shapes resemble a mixture of a star, a flower, and a traditional Dresden quilt block.
This tutorial explains an approachable way to create a similar decoration using pointed fabric blades and a quilted backing.
You can display your finished piece on a wall, incorporate it into a seasonal arrangement, or give it as a thoughtful handmade gift.
The charm of this patchwork wall hanging comes from the relationship between its two decorative layers.
A larger ring establishes the outline, while a smaller ring adds contrast and frames the central picture.
Alternating light and dark fabrics helps the individual points remain visible, even when viewed across a room.
A carefully selected center motif gives the project its personality without requiring complicated piecing or detailed embroidery.
Although the photograph does not reveal the original construction or measurements, the method below offers a practical interpretation of its appearance.
The suggested dimensions produce a decoration approximately 38–40 cm across, with slight variation depending on sewing and pressing.
This Patchwork Wall Hanging for Home Decor Pattern uses woven quilting cotton, lightweight batting, and familiar sewing techniques.
All measurements are provided in centimeters, and the instructions follow common American quilting practices.
You will learn how to draft templates, sew pointed blades, assemble two rings, and finish the back neatly.
The process also introduces useful skills such as fussy cutting, accurate seam allowances, and securing layered appliqué.
Work slowly through the first few pieces, checking their size before cutting all your chosen fabrics.
Once you understand the construction, you can adapt the colors and center image for winter, spring, or everyday home decor.
1. Choose Fabrics and Prepare Your Patchwork Templates
Gather your supplies. For the larger ring, prepare two contrasting quilting cottons, approximately 30 × 110 cm each. For the smaller ring, gather two coordinating prints, approximately 20 × 110 cm each. You will also need a center motif at least 13 × 13 cm, backing fabric approximately 45 × 45 cm, and low-loft batting of the same size. Have matching thread, paper, a ruler, fabric scissors or a rotary cutter, pins, a marking tool, an iron, and a sewing machine ready.
DISCOVER MORE FREE PATTERNS HERE!
Plan the color arrangement. To echo the red version in the photograph, choose six deep-red blades and six pale-green blades for the outside ring. Use dark Christmas prints for the smaller ring, alternating them with a contrasting print if desired. For the winter version, alternate navy and white on the outside, then snowflake fabric and blue gingham inside. Contrast means the visible difference between fabrics; strong contrast makes the pointed shapes easier to distinguish.
Draft the larger blade. Draw a vertical centerline 15 cm long on paper. Center a 2.2 cm horizontal line across its lower end and a 10.2 cm horizontal line across its upper end. Connect the corresponding endpoints to create a symmetrical trapezoid. These are approximate seam-line dimensions for a twelve-blade ring. Add a 0.6 cm seam allowance around all four edges, then cut out the paper template. Label the narrow end “inner edge” and the wide end “point end.”
Draft the smaller blade. Repeat the process with a centerline 9 cm long, a narrow edge 1.6 cm wide, and a wide edge 6.4 cm wide. Add the same 0.6 cm seam allowance around the shape. This smaller template creates a second twelve-blade ring that sits over the larger one. Because rounded measurements and individual stitching can affect the fit, make a trial ring from inexpensive scraps before cutting special fabric. Check that it lies flat without stretching.
Prepare the center template. Draw a circle 9 cm in diameter to represent the finished central appliqué. Cut the motif fabric into a circle approximately 10.2 cm across, providing a 0.6 cm turning allowance. Fussy cutting means positioning a template to feature a particular printed image, such as Santa or a snowman. Center the character within the finished circle and check that important details remain clear of the turned edge.
Cut and organize the pieces. Cut twelve larger blades and twelve smaller blades, maintaining the same orientation on each template. Keep the long centerline parallel to the fabric grain whenever possible to reduce stretching. Arrange the pieces in two separate circles before sewing, and photograph your layout for reference. This simple preparation helps your Patchwork Wall Hanging for Home Decor Pattern retain a balanced color sequence throughout assembly.
2. Sew the Pointed Blades and Assemble Both Rings
Form the first fabric point. Take one larger blade and fold it lengthwise with right sides together, matching the two corners along its widest edge. Sew across that folded wide edge using a 0.6 cm seam allowance. This short seam creates the closed top of the blade. Secure the beginning and end with a few backstitches, keeping the stitching accurate so that all twelve points will have a consistent shape.
Turn and press the point. Trim a little bulk from the folded corner without cutting the stitches. Turn the sewn end right side out, then align its seam with the blade’s lengthwise centerline on the wrong side. Gently push out the tip with a blunt turning tool. Press the resulting point flat. The diagonal folds below the tip create the familiar pointed Dresden blade shape used in this interpretation of the photograph.
Repeat for every blade. Prepare the remaining eleven larger blades, then use the same method for all twelve smaller blades. Compare the pieces within each size group before joining them. Their narrow ends, side edges, and pointed tops should match closely. If one looks noticeably shorter or crooked, correct it now. Consistent pressing is especially helpful when working with alternating solids, because differences in point shape are easy to see.
Join the larger blades in order. Place two neighboring blades right sides together and sew along one long side with a 0.6 cm seam allowance. Match the narrow ends and the upper ends of the joining edges without pulling the fabric. Continue joining blades into groups of three, then combine the groups. Close the final seam to complete the ring, checking that your light and dark fabrics still alternate correctly.
Press and check the larger ring. Press the joining seams open to reduce bulk, using gentle lifting motions with the iron. Lay the ring on a flat surface. It should form a complete circle with an open center and evenly distributed points. If it cups or ripples substantially, check seam widths and template accuracy before proceeding. Avoid stretching or forcing the ring flat, because that can distort the fabric and make finishing more difficult.
Assemble the smaller ring. Join its twelve prepared blades using the same sequence and seam allowance. Press the seams open and check that the ring lies flat. Place it over the larger ring temporarily, rotating it until the points and colors form an attractive arrangement. The smaller layer should overlap the larger ring’s central opening generously. Its own opening will later be covered by the circular motif.
3. Build the Quilted Base and Add the Decorative Center
Prepare the shaped backing. Place the larger ring right side up on paper and trace its complete outer outline. This outline includes the valleys between the points. Add 0.6 cm outside the traced line to create a backing cutting template. Cut one backing piece from this template. Cut batting to match, then trim approximately 0.6 cm from its perimeter so that less batting will enter the outer seam.
Baste the batting in place. Center the batting on the wrong side of the backing, leaving the backing’s seam allowance exposed. Baste the batting to the backing well inside the perimeter, using removable hand stitches. Place the larger fabric ring and backing right sides together, with the batting on the outside of the stack. Pin carefully around the points and valleys, matching the backing’s seam line to the finished outline of the ring.
Sew and turn the base. Stitch around the entire outer outline with a 0.6 cm seam allowance, pivoting carefully at each change of direction. Keep the large ring’s central opening unsewn; this provides the turning opening. Trim excess seam allowance at the outward tips and clip into the inward valleys without cutting the stitches. Turn the piece right side out through the center opening, gently shape the points, and press the perimeter.
Secure the first layer. Smooth the larger ring over the batting and backing. Baste around its inner opening to keep the layers stable. Add light quilting, which means stitching through the fabric, batting, and backing to hold them together. Stitching close to selected blade seams provides useful support while allowing the fabric prints to remain prominent. Start near the center and work outward, smoothing the layers as you go.
Attach the smaller ring. Center the smaller ring on the quilted base and confirm that it covers the larger opening completely. Turn its narrow inner raw edges underneath where practical, then baste them down; the center circle will cover this area. Sew around the smaller ring’s pointed outer perimeter with a narrow machine topstitch or small hand appliqué stitches. Secure every point and valley so the decorative layer stays flat when displayed vertically.
Finish the circular motif. Sew a running stitch around the center fabric’s turning allowance, place the 9 cm paper circle inside, and gently gather the allowance around it. Press the edge, allow it to cool, and remove the paper. Position the prepared circle over the smaller ring’s opening. Attach it with tiny hand stitches or close machine stitching. This center appliqué conceals the remaining raw edges and completes the layered design.
4. Finish, Hang, and Care for Your Fabric Decoration
Inspect the finished surface. Remove visible basting and check the back for loose thread ends. Look closely at each point, the inner ring, and the center circle. Secure any sections that lift away from the base. A light final pressing from the back helps settle the layers without flattening the texture excessively. Use a pressing cloth if your chosen fabrics include metallic printing or other delicate surface details.
Make two hanging loops. Cut two fabric strips measuring 4 × 12 cm. Fold each strip lengthwise with right sides together and sew along the long edge using a 0.6 cm seam allowance. Turn the tubes right side out and press them flat. Fold each tube into a loop, then turn the raw ends inward. Position the loops on the upper back, spaced apart and hidden behind two upper points.
Attach the loops securely. Stitch each loop through the backing and batting, taking small, strong stitches that do not show on the front. Reinforce the attachment with a second line of stitching. Two support points help distribute the hanging’s weight and maintain its shape. Test the decoration briefly against a wall before deciding on the final loop positions, since rotating the design changes which points appear at the top.
Adapt the design for other seasons. The same Patchwork Wall Hanging for Home Decor Pattern works with floral cottons, autumn prints, or soft neutral fabrics. Keep a clear contrast between the outer ring and inner layer so the construction remains visible. For an everyday version, choose a botanical center or a simple fabric medallion. A coordinated group of hangings can also share one color while featuring different central pictures.
Clean and store it gently. Dust the surface with a soft brush or spot-clean small marks with a lightly damp cloth. If all fabrics were prewashed and are colorfast, occasional gentle hand washing may be suitable, although the finished points will need careful reshaping. Dry flat and avoid wringing. Store the decoration flat when possible, or place soft tissue between folds to reduce sharp creases.
Review your results for future projects. Note your final measurements, fabric choices, and any adjustments made during the trial ring. These details make the next version easier to reproduce. The most useful habits are accurate cutting, consistent seams, and frequent flatness checks. With those skills, this fabric wall decor project becomes a flexible starting point for a wider collection of handmade seasonal decorations.
Frequently Asked Questions
Is this Patchwork Wall Hanging for Home Decor Pattern suitable for beginners?
Yes, especially for beginners who can sew a consistent straight seam. The most demanding parts are drafting matching templates, joining the rings accurately, and sewing around the shaped outer edge. Practice with scrap fabric first, and complete one stage at a time. The center motif can be cut from printed fabric, so no embroidery is required.
What is the difference between patchwork, quilting, and appliqué?
Patchwork joins separate fabric pieces to create a larger design. Quilting secures fabric and batting layers with stitching. Appliqué attaches one fabric shape to another surface. This project combines all three: pieced blade rings, a lightly quilted base, and a central circle applied over the opening.
Why does my blade ring refuse to lie flat?
Common causes include inconsistent seam allowances, inaccurate template angles, and stretched fabric edges. A ring that forms a shallow bowl may have too much fabric taken into its joining seams. Rippling can indicate insufficient seam take-up or distorted pieces. Check the paper template and compare seam widths before adjusting individual joins.
Can I make this wall hanging without batting?
Yes. A version made with fabric and lightweight interfacing can hang successfully, although it will have less softness and dimension. If you omit batting, choose interfacing appropriate for your cotton and follow its application instructions. Test a scrap first to check the finished feel.
How can I change the size of the pattern?
Scale all finished template dimensions by the same percentage, including the center circle, then add the 0.6 cm seam allowances afterward. Keep twelve blades in each ring so the angles remain consistent. Enlarging only the length or width of a blade changes its geometry and can prevent the ring from lying flat.
Do I need the exact Santa or snowman fabric shown in the photograph?
No. Any suitably sized printed image can become the center. Check that the complete motif fits within the 9 cm finished circle. You can also use a plain fabric circle with your own embroidery, a small appliqué design, or a contrasting print.
How much fabric will the project actually use?
The suggested cuts provide a comfortable allowance for arranging templates and making small corrections. Actual use depends on print direction, motif placement, and cutting efficiency. Large directional prints and carefully centered images usually require more fabric than small, nondirectional designs.
Conclusion
This Patchwork Wall Hanging for Home Decor Pattern teaches you how to prepare pointed blade templates, assemble two contrasting rings, finish a shaped quilted base, and frame a decorative center with appliqué.
Careful cutting and steady seam allowances help the layers sit flat, while thoughtful fabric choices bring the design to life. Finish with secure hanging loops, and your handmade decoration is ready to display. Please leave your honest opinion about the project and share any suggestions, color combinations, or improvements you would like to try.