
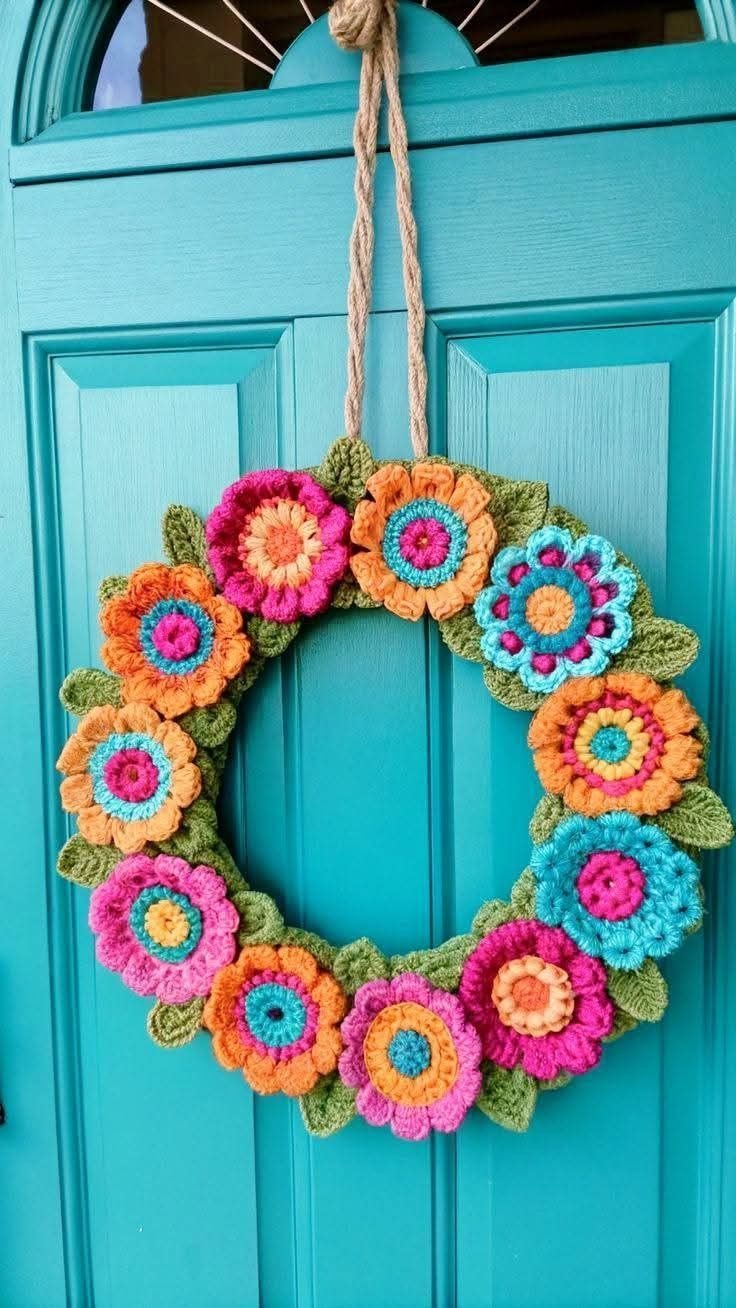
The Crochet Flower Garland Pattern is a beautiful way to bring color, texture, and handmade charm into your home. Inspired by the vibrant floral wreath shown in the photo, this crochet project combines colorful flowers, textured green leaves, and a circular base to create an eye-catching decoration. The combination of turquoise, orange, pink, yellow, and green produces a cheerful design that works wonderfully on front doors, interior walls, and seasonal displays. Unlike traditional floral wreaths made with artificial flowers, this crochet flower garland offers the warmth and character of handmade yarn creations. Each flower has its own personality, with layered petals, contrasting centers, and dimensional stitches that make the finished decoration especially attractive. Whether you enjoy decorating your home with handmade accessories or creating thoughtful gifts, this project provides a creative opportunity to explore several crochet techniques while producing something practical and decorative.
One of the most appealing features of this Crochet Flower Garland Pattern is its versatility. Although the example features a circular arrangement of approximately ten colorful flowers, you can easily adjust the number, size, and color of the flowers to create a personalized design. The wreath is constructed from individual crochet elements, including flower centers, decorative petals, green leaves, and a covered circular foundation. These components are made separately before being assembled into a balanced floral arrangement. This construction method makes the project manageable for crocheters who are still developing their skills, because each element can be completed independently. Beginners can practice basic stitches such as single crochet (sc), double crochet (dc), and slip stitch (sl st), while more experienced crocheters can experiment with puff stitches, layered petals, and textured edging. The finished result is a colorful handmade wreath that can remain on display throughout spring, summer, or any season that calls for a cheerful decorative accent.
Creating a Crochet Flower Garland Pattern is also a wonderful way to use leftover yarn from previous projects. Small quantities of brightly colored yarn are ideal for making individual flowers, while green yarn provides the foliage that connects the entire arrangement. The design shown in the reference image features overlapping flowers with rounded petals, raised centers, and textured leaves arranged around a circular opening. A natural-looking hanging cord completes the rustic appearance, making the wreath suitable for farmhouse, cottage, and contemporary home decor. In this detailed tutorial, you will learn how to select suitable materials, understand American crochet abbreviations, create dimensional flowers, crochet decorative leaves, prepare a circular foundation, and assemble all the pieces into a cohesive design. The instructions use US crochet terminology and provide specific stitch counts to help you follow the process confidently. By the end, you will have the knowledge needed to create your own colorful crochet floral wreath from beginning to end.
Materials and Essential Crochet Stitches for the Crochet Flower Garland Pattern
Before starting your Crochet Flower Garland Pattern, gather the materials needed to create a durable and attractive decoration. For a wreath approximately 30–35 cm (12–14 inches) in diameter, use medium-weight cotton or acrylic yarn in several coordinating colors. The example features turquoise, bright pink, orange, peach, yellow, and olive green. You will also need a 4.0 mm crochet hook, scissors, a yarn needle, stitch markers, and a lightweight circular wreath frame. A foam, wooden, or sturdy plastic ring works well as the foundation. Choose a frame approximately 25 cm (10 inches) in outer diameter, allowing the flowers and leaves to extend beyond its edges.
DISCOVER MORE FREE PATTERNS HERE!
Selecting the right crochet yarn makes an important difference in the finished appearance. Cotton yarn provides excellent stitch definition and helps the flower petals maintain their shape, while acrylic yarn offers softness, flexibility, and a wide variety of colors. Medium-weight yarn, commonly labeled as worsted weight yarn in the United States, is a practical choice for this project. Use yarns of similar thickness so that the flowers remain proportional. If you prefer a more delicate wreath, lightweight yarn and a smaller hook can produce miniature flowers. However, remember that changing yarn thickness will affect the finished measurements.
Understanding the basic US crochet stitch abbreviations is essential before beginning the flowers and leaves. This tutorial uses the following crochet terminology:
-
ch: Chain — yarn over and pull through the loop on the hook.
-
sl st: Slip stitch — insert the hook, yarn over, and pull through the stitch and the loop on the hook.
-
sc: Single crochet — insert the hook, yarn over, pull up a loop, yarn over, and pull through both loops.
-
hdc: Half double crochet — yarn over, insert the hook, pull up a loop, yarn over, and pull through all three loops.
-
dc: Double crochet — yarn over, insert the hook, pull up a loop, yarn over and pull through two loops twice.
-
tr: Treble crochet — yarn over twice, insert the hook, pull up a loop, then yarn over and pull through two loops three times.
-
MR: Magic ring — an adjustable starting loop used for working in the round.
-
st/sts: Stitch/stitches.
-
BLO: Back loop only.
-
FO: Fasten off.
-
Puff st: Puff stitch — work several elongated loops into the same stitch and close them together.
The magic ring technique is especially useful for creating neat flower centers. To make a magic ring, wrap the yarn around your fingers to form an adjustable loop, insert the crochet hook into the loop, and pull up the working yarn. Chain one to secure the loop, then work the required stitches into the center. Once the first round is complete, gently pull the yarn tail to close the opening. This technique produces a compact center without leaving a noticeable hole. If you find the magic ring difficult, you can substitute a chain-four ring joined with a slip stitch, although the center opening may be slightly larger.
The puff stitch adds dimension to the flower petals and creates the raised texture visible in the reference design. To make the puff stitch used in this pattern, yarn over, insert the hook into the designated stitch, yarn over, and pull up a long loop. Repeat this process three more times in the same stitch, keeping the loops approximately the height of a double crochet. You should have nine loops on your hook. Yarn over and pull through all nine loops, then chain one to secure the puff. Maintain consistent loop height to produce evenly shaped petals. If the loops are too tight, the puff may become difficult to close; if they are too loose, the petals may lose their rounded appearance.
Proper preparation will make the entire crochet flower wreath tutorial more enjoyable. Arrange your yarn colors on a table and decide how you want them distributed around the circular foundation. The wreath in the image uses alternating warm and cool colors, creating contrast without making the design feel unbalanced. Prepare a simple color plan for ten flowers, such as three orange flowers, three pink flowers, two turquoise flowers, and two multicolored flowers. You can change the exact arrangement according to your preferences. Keep your scissors, stitch markers, and yarn needle nearby, and consider making one sample flower before completing the entire collection.
Step-by-Step Crochet Flower Pattern with Colorful Layered Petals
The main attraction of this Crochet Flower Garland Pattern is the collection of colorful dimensional flowers. Begin with a simple round flower that has a raised center and eight rounded petals. Use one color for the center, another for the middle ring, and a contrasting shade for the outer petals. Start with an MR and work 8 sc into the ring. Pull the yarn tail to close the center, then join with a sl st to the first sc. For Round 2, ch 1 and work 2 sc into each stitch around, creating 16 sc. Join with a sl st. Fasten off the center color and weave in the yarn tail securely.
To create the decorative middle ring, attach a second color to any stitch from Round 2. For Round 3, ch 2, counting as the first hdc, then work 1 hdc into the same stitch. Work 2 hdc into each remaining stitch around, producing 32 hdc in total. Join with a sl st to the top of the beginning ch-2. This round forms a raised circular band around the flower center. For a stronger textured effect, you can replace the half double crochet stitches with carefully worked puff stitches, but the stitch count must remain consistent. Fasten off the second color and prepare your yarn for the outer petals.
Round 4 creates the foundation for eight individual petals. Attach your petal color to any stitch from Round 3 and ch 1. Work 1 sc into the same stitch, ch 3, skip the next 3 stitches, and work 1 sc into the following stitch. Repeat the sequence of ch 3, skip 3 stitches, and sc in the next stitch until you have eight chain-three spaces distributed evenly around the flower. The final sc joins the first anchor point; do not add another sc into the starting stitch. Join with a sl st to the first sc. These chain spaces will support the rounded petals and help maintain their shape.
For Round 5, work the crochet flower petals into each chain-three space. Begin with ch 1, then work the following sequence into the first space: 1 sc, 2 hdc, 3 dc, 2 hdc, and 1 sc. Repeat the same sequence in each of the remaining seven chain spaces. Each petal contains nine stitches, creating a softly rounded appearance similar to the flowers in the photograph. Join with a sl st to the first sc and fasten off. Gently spread the petals with your fingers to shape the flower. If you want more pronounced dimension, work the three central double crochet stitches slightly taller than the surrounding stitches.
To make the layered crochet flowers more decorative, add an optional second petal layer behind the first. Turn the flower over and attach a contrasting yarn color around the post of one of the eight sc anchor stitches from Round 4. Ch 4 and work a sl st around the next anchor post, repeating until you have eight chain-four spaces behind the flower. Into each space, work 1 sc, 2 hdc, 5 dc, 2 hdc, and 1 sc. These larger petals extend behind the original petals and create a fuller appearance. You can use this technique for two or three flowers in your wreath to introduce variation without making every flower identical.
Continue making flowers until you have approximately ten finished pieces. The Crochet Flower Garland Pattern becomes more visually interesting when you vary the center colors, petal combinations, and textures. For example, one flower can have a turquoise center with orange petals, while another can feature a yellow center surrounded by pink petals. You can also make a smaller flower by using only the first three rounds and adding six decorative petals with adjusted spacing. Aim for flowers measuring approximately 7–10 cm (3–4 inches) across, depending on your yarn and hook size. Place the completed flowers around your wreath frame before attaching them to determine whether additional flowers are needed.
How to Crochet Green Leaves and Prepare the Garland Foundation
The green foliage plays an important role in this Crochet Flower Garland Pattern because it connects the colorful flowers and gives the arrangement a natural appearance. To make a basic oval leaf, begin with olive-green yarn and ch 11. Starting in the second chain from the hook, work 1 sc, 1 hdc, 2 dc in the next two chains, 3 tr in the next three chains, 2 dc in the following two chains, and 1 hdc in the last chain. Work 3 sc into the final chain to turn around the end. Continue along the opposite side of the foundation chain, mirroring the stitches in reverse order. Work 1 hdc, 2 dc, 3 tr, 2 dc, 1 hdc, and 1 sc. Join with a sl st and fasten off.
For a more defined crochet leaf pattern, add a decorative border around the finished leaf. Attach the same green yarn at the base and work sc stitches evenly around the outer edge. At the pointed end, work 1 sc, ch 2, and 1 sc into the same stitch to create a small leaf tip. Continue along the opposite edge and join with a sl st. If you want visible leaf veins, use a yarn needle and a slightly lighter green yarn to embroider a straight line from the base toward the tip. Add two or three diagonal stitches on each side to imitate natural leaf veins. This detail is optional but gives the foliage a more finished appearance.
Make approximately 14–18 leaves for your crochet floral garland, depending on the size of the flowers and how much greenery you want to display. The example wreath includes leaves positioned behind and between the flowers, with several pointed tips extending outward. You can create different leaf sizes by adjusting the foundation chain. For smaller leaves, begin with ch 8 and use shorter stitches, while larger leaves can begin with ch 14 and include additional double or treble crochet stitches. Using two shades of green adds depth and helps prevent the foliage from looking too uniform. Arrange the leaves in pairs or small clusters to create a natural composition.
The circular foundation provides the structure needed to transform individual flowers into a crochet flower wreath. Choose a lightweight wreath ring approximately 25 cm (10 inches) in diameter. A foam ring is particularly convenient because it allows you to secure crochet pieces with stitches or suitable pins during the planning stage. If you use a wooden or plastic ring, wrap it with green yarn before attaching the decorations. Begin by securing the yarn to the ring with a firm knot. Wrap the yarn around the ring repeatedly, keeping each wrap close to the previous one. Continue until the entire foundation is covered, then secure the yarn tail with a yarn needle.
If you prefer a fully crocheted covering, create a long single crochet strip instead of wrapping the ring directly. Begin with ch 9 and work 8 sc across, starting in the second chain from the hook. Ch 1, turn, and work 8 sc across each subsequent row. Repeat until the strip is long enough to wrap around the entire ring. The exact number of rows depends on the ring’s circumference and the yarn tension. Place the strip around the foundation with its long edges meeting on the back. Sew the edges together using a yarn needle and matching green yarn. This method creates a textured crochet surface that blends naturally with the leaves.
Before assembling the wreath, prepare the hanging cord. The photograph shows a rustic natural-fiber rope, which complements the colorful crochet flowers. Cut a piece of sturdy cotton or jute cord approximately 70–90 cm (28–35 inches) long, depending on your preferred hanging height. Fold it in half, position the folded section above the wreath, and secure both ends firmly around the upper portion of the foundation. Tie a strong knot and check that the wreath hangs evenly. For an entirely crocheted alternative, create a cord using a long chain reinforced with a row of slip stitches. Whichever method you choose, ensure the hanging loop can safely support the finished decoration.
Assembling, Finishing, and Decorating Your Crochet Flower Garland Pattern
Assembling the Crochet Flower Garland Pattern is the stage where all the individual elements come together. Place the covered wreath foundation on a flat surface and arrange the flowers around its circumference without attaching them immediately. Begin by positioning one flower at the top center, then place additional flowers along the left and right sides. Continue working toward the bottom until the circular arrangement looks balanced. The reference image uses approximately ten flowers placed close together, with some petals overlapping. Alternate bright colors to distribute visual interest evenly around the wreath. Leave the center opening clear so the finished design retains its recognizable circular shape.
Once you are satisfied with the flower placement, begin attaching the crochet flowers to the foundation. Use a yarn needle threaded with strong matching yarn and sew through the back of each flower and around the covered ring. Make several secure stitches at different points to prevent the flowers from rotating or drooping. Avoid sewing through the decorative front petals unless necessary, because visible attachment stitches can interfere with the finished appearance. Start with the largest flowers and work toward the smaller ones. After attaching each flower, gently lift the wreath to check that the pieces remain stable and properly positioned.
Next, add the crochet green leaves behind and between the flowers. Position the leaves so that their pointed ends extend outward from the floral arrangement, creating the impression of natural foliage. Sew each leaf to the foundation using matching green yarn. Some leaves can overlap slightly, while others can remain more visible between the flowers. This variation helps create depth and prevents the wreath from appearing flat. If you want a fuller arrangement, add small clusters of two or three leaves behind selected flowers. Keep the leaves distributed around the entire circle to maintain a harmonious appearance.
To create a professional-looking handmade crochet garland, pay attention to the final shaping and finishing details. Check the back of the wreath for loose yarn ends and weave them securely into nearby stitches. Trim excess yarn carefully without cutting into the crochet fabric. Gently shape the flower petals with your fingers and adjust any leaves that have folded during assembly. If your yarn allows it, light steam blocking can help the pieces maintain their shape. Keep the steam source above the fabric rather than pressing directly onto the stitches, especially when working with acrylic yarn. Allow the wreath to dry completely before hanging it.
The finished Crochet Flower Garland Pattern can be customized for different decorating styles and occasions. For a spring-inspired wreath, choose pastel pink, lavender, pale yellow, and mint green. For summer decorations, combine bright orange, turquoise, coral, and fuchsia. An autumn version can feature mustard yellow, burnt orange, burgundy, and olive green. You can even create a Christmas-inspired floral wreath using red, white, forest green, and gold-colored yarn. Changing the colors is one of the easiest ways to adapt this pattern while keeping the same basic flower and leaf construction.
Finally, display your crochet flower wreath in a suitable location where its colors and textures can be appreciated. A painted interior door, covered entryway, craft room wall, or decorative hook provides an attractive setting. If you intend to hang the wreath outdoors, protect it from prolonged rain, direct sunlight, and excessive moisture, because these conditions can affect the yarn and foundation over time. Check the hanging cord regularly to make sure it remains secure. With proper care, your handmade floral wreath can become a lasting decorative piece that reflects your creativity and personal style.
Frequently Asked Questions About the Crochet Flower Garland Pattern
1. Is the Crochet Flower Garland Pattern suitable for beginners?
Yes. This pattern is suitable for confident beginners who already understand basic crochet stitches and simple increases. The flowers are worked in rounds, while the leaves are crocheted along both sides of a foundation chain. Beginners may need additional practice with puff stitches, color changes, and attaching the individual pieces. However, the project is divided into manageable sections, allowing you to learn one technique at a time.
2. What is the best yarn for making a crochet flower garland?
Medium-weight cotton yarn is an excellent option because it provides clear stitch definition and helps decorative flowers maintain their shape. Acrylic yarn is also suitable, especially if you prefer a softer texture or want access to a wider range of colors. For consistent results, use yarns with similar thickness and fiber characteristics throughout the project.
3. How many crochet flowers do I need for a wreath?
For a wreath measuring approximately 30–35 cm (12–14 inches) across, ten medium-sized flowers are a useful starting point. The exact number depends on the diameter of your foundation, the size of each flower, and how closely you arrange them. Larger flowers require fewer pieces, while smaller flowers may require additional motifs to cover the ring.
4. Can I make the crochet flower garland without a wreath frame?
Yes. You can create a flexible circular foundation using a long crocheted band or a reinforced cord. However, a rigid wreath frame provides better support and helps maintain the circular shape. If you prefer a lightweight hanging garland rather than a wreath, you can attach the flowers and leaves along a crocheted chain instead of arranging them around a ring.
5. How do I make the crochet flowers look more dimensional?
Use layered petals, puff stitches, and contrasting colors to create depth. Working an additional round of petals behind the original layer makes the flowers appear fuller. You can also vary the height of the stitches within each petal, placing taller double or treble crochet stitches near the center and shorter stitches near the edges.
6. What crochet hook size should I use?
A 4.0 mm crochet hook works well with many medium-weight yarns, but the ideal size depends on your yarn and tension. If your stitches appear loose and the petals do not hold their shape, try a slightly smaller hook. If the stitches are difficult to work or the fabric feels excessively stiff, consider using a larger hook.
7. How long does it take to complete a crochet flower wreath?
The time required varies according to your experience and the complexity of the flowers. A simple flower may take approximately 20–40 minutes, while a layered flower can take longer. Completing ten flowers, several leaves, the wreath covering, and the final assembly may require several crafting sessions. Working in stages can make the project more enjoyable and easier to organize.
8. Can I wash a crochet flower garland?
Individual crochet flowers and leaves may be washable depending on the yarn manufacturer’s care instructions. However, a completed wreath containing a foam, wooden, or cardboard foundation should not be submerged in water. Instead, remove dust gently with a soft brush or clean cloth. For small stains, spot-clean the affected area and allow it to dry completely.
9. How can I prevent the crochet flowers from losing their shape?
Use consistent stitch tension, secure all yarn ends, and attach the flowers firmly to the foundation. Cotton yarn generally provides good structure, while carefully applied blocking can help improve the shape of petals and leaves. Avoid storing the wreath under heavy objects, because pressure may flatten the decorative stitches.
10. Can I use this Crochet Flower Garland Pattern to make gifts or decorations for special occasions?
Absolutely. Handmade crochet wreaths are thoughtful gifts for birthdays, housewarmings, Mother’s Day, and seasonal celebrations. You can personalize the design by choosing the recipient’s favorite colors or incorporating flowers that match a particular decorating theme. A handmade wreath also makes an attractive decoration for craft rooms, bedrooms, and welcoming entryways.
11. How can I make a smaller version of this crochet flower garland?
To make a miniature wreath, use thinner yarn, a smaller crochet hook, and a smaller circular foundation. Reduce the number of flowers to approximately five or six, depending on their size. You can also simplify the flower pattern by omitting the optional second petal layer. A miniature version can be used as a decorative wall accent, package embellishment, or seasonal ornament.
12. Why are my crochet flower petals curling?
Curling can occur when the petals contain too many stitches for the available space or when your crochet tension is unusually tight. Check the stitch counts carefully and make sure the chain spaces are large enough to accommodate the petal stitches. If the petals curl excessively, try using a slightly larger hook or reducing the number of tall stitches in each petal. Some natural curling is desirable because it adds dimension to the flowers.
13. What is the difference between a crochet flower garland and a crochet flower wreath?
A crochet flower garland typically consists of connected flowers and leaves arranged along a flexible strand, while a crochet flower wreath features floral decorations arranged around a circular foundation. The project shown in the photograph is technically a floral wreath, although the same flower and leaf motifs can also be used to create a traditional hanging garland. Both styles use similar crochet techniques and can be customized with different colors and arrangements.
14. Can I use leftover yarn for this pattern?
Yes. This project is particularly suitable for using small amounts of leftover yarn because each flower requires relatively little material. Choose scraps with similar thickness to maintain consistent proportions. Combining different colors is encouraged, but avoid mixing yarns with dramatically different textures unless you intentionally want a varied appearance.
15. How should I store my crochet flower wreath when it is not in use?
Store the wreath in a clean, dry container large enough to prevent the flowers from being compressed. A shallow storage box works well, especially if you place a layer of acid-free tissue paper around the decorative pieces. Keep the wreath away from excessive moisture, dust, and prolonged direct sunlight to help preserve the colors and shape of the yarn.
Conclusion: Create Your Own Beautiful Crochet Flower Garland Pattern
The Crochet Flower Garland Pattern is a colorful and rewarding project that combines creativity, practical crochet skills, and handmade home decoration. Throughout this tutorial, you have learned how to select suitable yarn and tools, understand essential US crochet stitches, create rounded flower centers, work dimensional petals, crochet decorative green leaves, prepare a circular foundation, and assemble the finished pieces into a beautiful floral wreath.
One of the greatest advantages of this crochet flower wreath pattern is the freedom it offers for personalization. By changing the colors, adjusting the number of flowers, or experimenting with different petal styles, you can create countless variations using the same basic techniques. The finished decoration can brighten a doorway, add character to an interior wall, or become a thoughtful handmade gift for someone special.
Whether you are developing your crochet skills or searching for a cheerful new project, this Crochet Flower Garland Pattern provides an enjoyable way to transform simple yarn into an expressive floral decoration. Take your time with each flower, enjoy the creative process, and remember that small handmade details are what make every finished wreath unique.
EASILY FIND THE FREE PDF FOR THIS PATTERN HERE!
We would love to hear your sincere opinion! What do you think of this colorful crochet flower garland? Which color combinations would you choose for your own wreath? Share your honest feedback, creative suggestions, and experiences in the comments. Your ideas may inspire other crochet enthusiasts to create their own beautiful handmade floral decorations!