
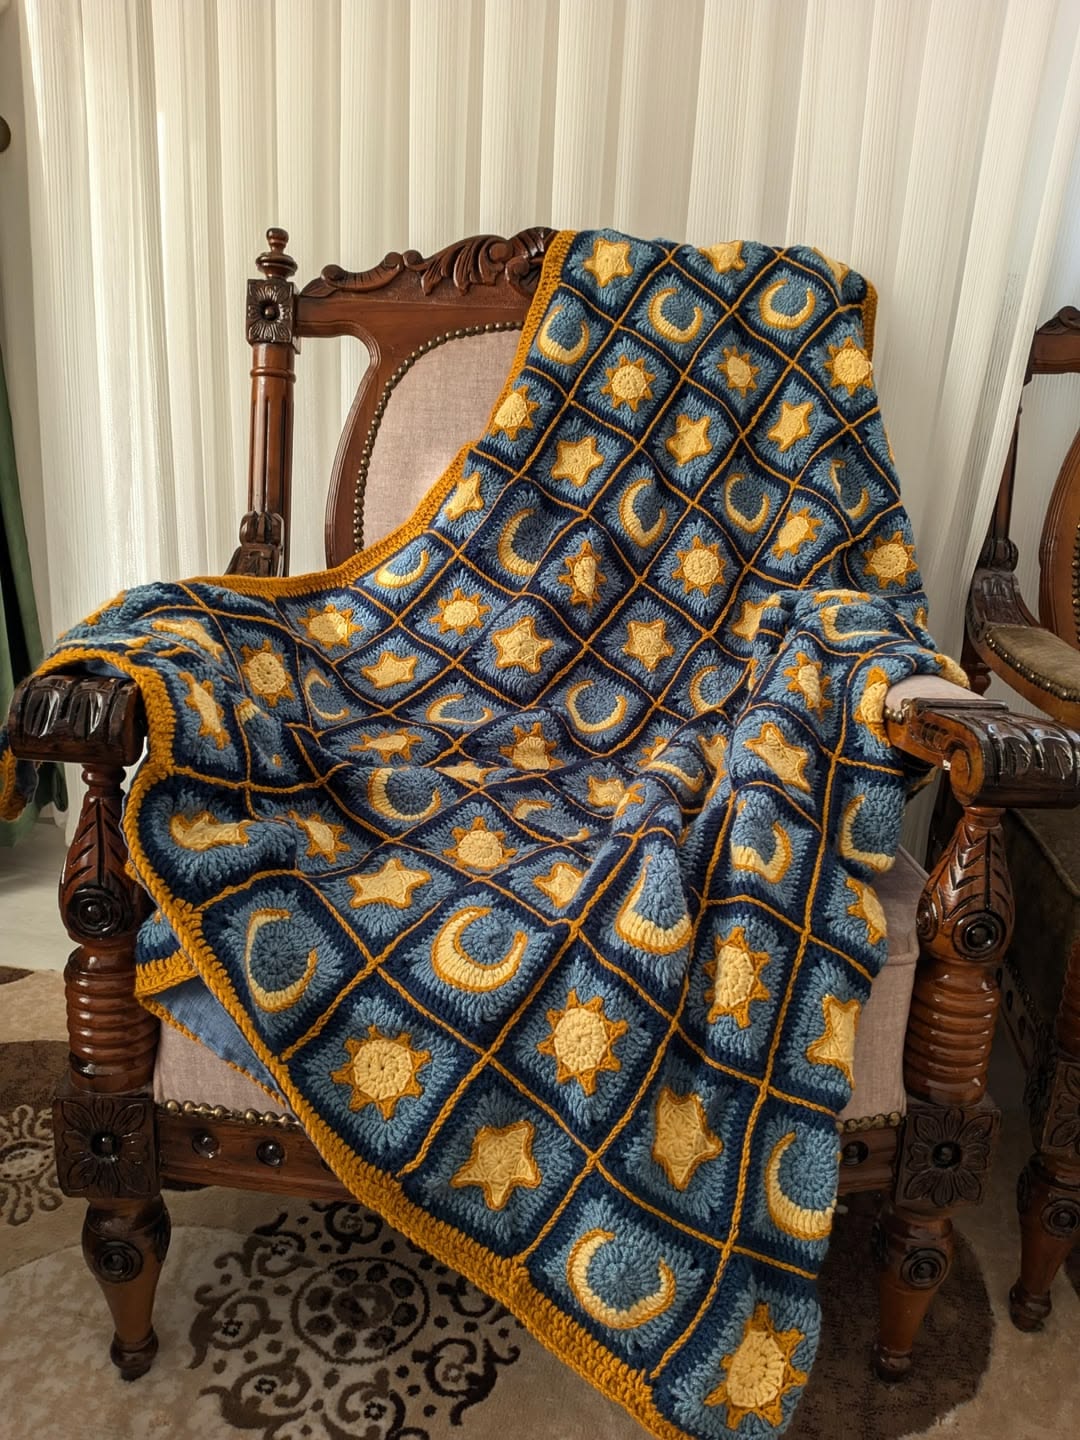
The Crochet blanket with stars and moon Pattern is a beautiful handmade project that brings together the magic of a starry night and the comforting warmth of a cozy crochet blanket. Featuring golden stars, crescent moons, deep blue squares, and elegant golden borders, this design creates a charming celestial theme that works beautifully in bedrooms, nurseries, reading corners, and living rooms. The combination of textured crochet stitches and contrasting colors gives the blanket a distinctive handcrafted appearance. Whether you are looking for a meaningful gift or a decorative addition to your home, this crochet celestial blanket offers a wonderful opportunity to explore creative techniques while making something practical and memorable.
One of the most appealing features of this Crochet blanket with stars and moon Pattern is its modular construction. Instead of working the entire blanket in one large piece, you create individual crochet granny squares decorated with stars, moons, and sun-inspired motifs. These squares are later arranged into a coordinated design and joined together to form a complete blanket. This approach makes the project easier to manage because you can work on a few squares at a time, experiment with different motif arrangements, and gradually build the blanket to your desired size. The pattern also introduces useful techniques such as working in rounds, shaping decorative motifs, creating textured backgrounds, joining squares, and finishing edges with a decorative border.
Although the finished blanket looks intricate, the project becomes much more approachable when divided into simple, organized steps. Crocheters with basic experience using single crochet, half double crochet, double crochet, and slip stitches can develop the skills needed to complete the design. Beginners may want to practice the individual motifs before assembling the full blanket, while experienced crocheters can customize the colors, dimensions, and decorative details. In this tutorial, you will learn how to choose suitable yarn, crochet the celestial motifs, construct matching squares, assemble the blanket, and add a polished border. The instructions use US crochet terminology and provide a practical interpretation of the blanket shown in the reference photograph, rather than claiming to reproduce an unavailable original stitch chart exactly.
Materials, Crochet Stitches, and Preparation for the Stars and Moon Blanket
Before beginning your Crochet blanket with stars and moon Pattern, gather the materials needed to create a soft, durable, and visually balanced blanket. The design in the photograph features a rich blue background, golden yellow celestial motifs, and darker outlines that define each square. Worsted-weight yarn is a practical choice because it offers warmth, stitch definition, and manageable working time. Acrylic yarn is particularly suitable for an everyday blanket because it is generally easy to care for, while cotton blends can provide a slightly different texture and drape. Choose yarns of similar thickness to keep the squares consistent.
DISCOVER MORE FREE PATTERNS HERE!
For a medium-sized throw measuring approximately 120 × 150 cm (47 × 59 inches), plan to make 80 squares arranged in 8 columns and 10 rows. Each blocked square should measure approximately 15 × 15 cm (6 × 6 inches). As a starting estimate, prepare 1,200–1,600 meters of blue yarn, 500–700 meters of golden yellow yarn, and 150–250 meters of dark navy yarn. Actual quantities depend on yarn thickness, stitch density, and decorative details, so purchasing a little extra yarn from the same dye lot is helpful. You will also need a 5 mm crochet hook, scissors, a yarn needle, stitch markers, and a measuring tape.
The following US crochet stitch abbreviations will be used throughout the tutorial:
| Abbreviation | US crochet term |
|---|---|
| ch | Chain |
| sl st | Slip stitch |
| sc | Single crochet |
| hdc | Half double crochet |
| dc | Double crochet |
| tr | Treble crochet |
| st / sts | Stitch / stitches |
| sp | Space |
| rep | Repeat |
| inc | Increase |
| dec | Decrease |
| MR | Magic ring |
| BLO | Back loop only |
| RS / WS | Right side / Wrong side |
Understanding these stitches is essential for creating the crochet moon and star motifs. A single crochet (sc) creates compact, firm fabric that works well for edging and shaping. A half double crochet (hdc) adds moderate height and helps form gentle curves. A double crochet (dc) produces a taller, more flexible stitch commonly used in granny squares. A treble crochet (tr) is useful for making pointed star tips. A slip stitch (sl st) joins rounds and connects decorative elements. The magic ring (MR) creates a tightly closed center for circular motifs.
To maintain a uniform appearance, make a sample square before beginning the full blanket. Crochet one background square, measure it, and adjust your hook size or tension until the finished piece is close to 15 × 15 cm. The square measurement is more important than achieving a specific number of stitches per centimeter because this project relies on consistent modular pieces. If your sample measures 14 cm instead of 15 cm, you can add another background round or adjust the hook size. Blocking your sample will also help you understand how the yarn behaves after washing and drying.
Planning the motif arrangement in advance makes the assembly process easier. For an 80-square blanket, one attractive arrangement uses 30 star squares, 30 crescent moon squares, and 20 sun-inspired squares. These motifs can be distributed throughout the blanket so that no single design dominates the overall appearance. The photograph features alternating celestial shapes within a golden grid, creating a night-sky effect. You can follow a repeating sequence or arrange the motifs randomly while maintaining an even distribution of colors. Keep a simple written record of your completed squares to avoid accidentally making too many of one design.
Step-by-Step Instructions for Crocheting Stars, Crescent Moons, and Celestial Squares
Begin the Crochet blanket with stars and moon Pattern by making the central star motifs with golden yellow yarn. Create a magic ring and work 10 sc into the ring, then join with a sl st to the first sc. For the next round, repeat the following sequence five times: sl st in the next stitch, ch 3, sc in the second chain from the hook, hdc in the next chain, and sl st in the following stitch of the original round. This produces five small pointed sections. Fasten off and weave in the ends. The resulting star is a compact appliqué that can be sewn onto the center of a square.
For a more prominent five-point crochet star, you can make a larger version using taller stitches. Start with a magic ring and work 10 hdc into the center. Join the round, then create each point by working ch 4, sc in the second chain from the hook, hdc in the next chain, dc in the last chain, skip one stitch of the central round, and sl st into the following stitch. Repeat until five points are formed. Adjust the size of the points by changing the chain length or using a slightly larger hook. Keep the points evenly spaced, and flatten the star gently before attaching it to the background.
Next, create the crochet crescent moon motif, which gives the blanket its recognizable celestial appearance. Using golden yarn, make a magic ring and work 12 dc into the center, then join with a sl st. Instead of completing a full circle, the crescent will be shaped with an additional curved section. Working across approximately half of the circular motif, place 2 sc in the first stitch, 2 hdc in the next stitch, 2 dc in each of the next three stitches, 2 hdc in the following stitch, and 2 sc in the last stitch of this section. Fasten off and gently shape the motif into a curved crescent. For a more open crescent, fold or overlap the inner portion slightly and secure it with a few discreet stitches when attaching it to the square.
To make the sun-inspired motifs, begin with a magic ring using pale yellow yarn and work 12 dc into the center. Join with a sl st, then work 2 dc in each stitch around to create a circular center containing 24 dc. Change to golden yellow yarn for the rays. Repeat the following sequence eight times: sl st in the next stitch, ch 3, sc in the second chain from the hook, hdc in the next chain, and sl st in the next two stitches of the circular base. This produces a decorative sun with eight short rays. The contrasting yellow tones help distinguish the sun motifs from the stars and moons while keeping the entire blanket visually coordinated.
Now prepare the blue crochet granny square backgrounds. With blue yarn, create a magic ring, ch 3 (counts as the first dc), work 2 dc into the ring, ch 2, then repeat (3 dc, ch 2) three more times. Join with a sl st to the top of the beginning ch 3. You should have four groups of three dc separated by four corner spaces. For Round 2, sl st into the nearest corner space, ch 3, work (2 dc, ch 2, 3 dc) into that corner, ch 1, and work (3 dc, ch 2, 3 dc) into each remaining corner, with ch 1 between corners. Join and continue building the square using traditional granny-square rounds, working (3 dc, ch 2, 3 dc) in each corner and 3 dc in each side space, separated by ch 1.
Continue crocheting the blue backgrounds until each square reaches the planned dimensions. Depending on your yarn and hook size, approximately five to seven rounds may be needed. Once the squares are complete, center a star, moon, or sun appliqué on the right side of each piece. Use a yarn needle and matching yarn to sew the motif securely onto the background, stitching around its edges without pulling the fabric too tightly. For a more textured appearance, add one round of sc around each square using dark navy yarn. This darker outline creates a strong contrast against the blue background and prepares the squares for the golden joining method used in the next stage.
Joining the Crochet Squares and Creating the Golden Decorative Border
Once all the celestial squares are complete, arrange them on a clean, flat surface to visualize the final Crochet blanket with stars and moon Pattern. Place the squares into eight columns and ten rows, alternating stars, moons, and sun motifs. Try to avoid placing identical motifs directly beside one another too frequently. The photograph demonstrates how a varied arrangement creates movement across the blanket, while the golden lines between the squares provide a consistent geometric structure. Before joining, measure several squares to ensure that they are approximately the same size. Small differences can often be corrected through gentle blocking.
For a decorative joining method, use golden yellow yarn to create a visible seam between the squares. Place two squares side by side with their right sides facing upward. Insert the hook through the corresponding edge stitches of both squares and work a slip-stitch join, keeping the working yarn on the front of the blanket. Continue along the entire edge, matching stitches carefully and avoiding excessive tension. This method creates a raised golden line that resembles the grid visible in the reference photograph. If you prefer a flatter finish, use single crochet joins or sew the squares together with a yarn needle.
Join the squares into horizontal rows first. Begin with the first row of eight squares, connecting each square to the next using the same golden yarn. Repeat until all ten rows are assembled. Next, join the completed rows together, carefully aligning the corners and intersections. Use stitch markers to keep the seams straight, particularly where four squares meet. When the joining is complete, the blanket should display a continuous network of golden lines separating the blue celestial motifs. This crochet join-as-you-go-inspired appearance can also be achieved with other joining methods, but the visible slip-stitch seam is especially suitable for this design.
After assembling the blanket, begin the outer border with golden yellow yarn. Attach the yarn at any corner and work one round of sc around the entire blanket. Place one sc into each edge stitch and add three sc into each corner to prevent the fabric from curling. When working along the sides of the blanket, distribute the stitches evenly rather than forcing a fixed number into each row end. Join with a sl st to the first sc. This foundation round creates a neat edge and helps conceal minor irregularities from the joining process. It also provides a stable base for the following decorative rounds.
For the second border round, ch 2 and work hdc into each stitch around the blanket. At every corner, work three hdc into the center corner stitch to maintain the rectangular shape. Join with a sl st and inspect the edges. If the border begins to ripple, reduce the number of added stitches along the sides. If the corners pull inward, add a little more room at each corner. For the third round, work dc stitches around the blanket, again increasing at the corners as needed. This creates a wider golden frame similar to the decorative edging shown in the photograph. The combination of sc, hdc, and dc produces a substantial border without overwhelming the celestial motifs.
For the final decorative round, consider using a simple textured edging. One option is a reverse single crochet, also known as the crab stitch, which creates a cord-like finish around the blanket. Work this stitch from left to right, inserting the hook into the previous stitch, drawing up a loop, and completing a single crochet. Continue around the entire blanket and fasten off securely. Alternatively, finish with a round of ordinary sc for a softer, understated appearance. Weave in all remaining yarn ends using a tapestry needle, then gently block the finished blanket to help the squares and border settle into a consistent shape.
Finishing, Customizing, and Caring for Your Crochet Celestial Blanket
The finishing stage is an important part of making your Crochet blanket with stars and moon Pattern look polished and professional. Begin by examining the entire blanket for loose yarn ends, uneven seams, and decorative motifs that may need additional securing. Check the points of the stars and the tips of the crescent moons to ensure they are firmly attached. Because this blanket features raised appliqués, secure every decorative element with small, consistent stitches. Avoid leaving long strands on the back of the blanket, as these may catch during everyday use. A careful final inspection improves both appearance and durability.
Blocking can make a noticeable difference in the finished appearance of the crochet star and moon blanket. If your yarn is suitable for wet blocking, gently wash the blanket according to the yarn manufacturer’s care instructions, remove excess water without twisting, and lay it flat on a clean towel or blocking surface. Smooth the squares into shape and straighten the border. Allow the blanket to dry completely before moving it. Acrylic yarn may respond better to gentle shaping and washing than aggressive heat blocking, so always follow the fiber’s recommended care. Never place a hot iron directly onto acrylic crochet fabric.
One of the advantages of this pattern is its flexibility in color selection. The original design uses blue and golden yellow to create a nighttime atmosphere, but other combinations can produce equally attractive results. A navy background with silver stars and white moons creates a cool, winter-inspired blanket. Lavender and cream produce a softer, dreamy appearance, while black and metallic gold create a dramatic celestial theme. For a nursery, pastel blue, pale yellow, and ivory can provide a gentle color palette. Whatever colors you choose, maintaining enough contrast between the motifs and the background will help the decorative shapes remain visible.
The size of the blanket can also be customized. A smaller crochet baby blanket might use 6 columns and 7 rows of 15 cm squares, producing an approximate size of 90 × 105 cm before accounting for the border. A larger bedspread could use 10 columns and 12 rows, creating an approximate size of 150 × 180 cm before the border. You can also increase the dimensions of individual squares rather than adding more pieces. For blankets intended for infants, keep all motifs firmly attached, avoid loose embellishments and long cords, and follow current safe-sleep guidance, which advises keeping loose blankets out of infant sleep spaces.
Proper care will help preserve the texture and color of your handmade blanket. Wash it according to the yarn label, preferably using a gentle cycle and mild detergent when machine washing is permitted. Placing the blanket inside a large laundry bag can help protect the raised appliqués and joining seams. Avoid harsh bleach and excessive agitation, which may weaken fibers or distort the decorative motifs. Lay the blanket flat to dry whenever possible, particularly if the yarn tends to stretch when wet. Store the blanket in a clean, dry location away from prolonged direct sunlight to help preserve the blue and golden tones.
Beyond its practical use, the Crochet blanket with stars and moon Pattern can become a meaningful handmade gift. The celestial design is suitable for birthdays, housewarmings, holiday celebrations, and special occasions. You can personalize the blanket by adding a small crocheted initial, choosing colors that match the recipient’s room, or creating a unique arrangement of stars and moons. For an especially thoughtful touch, include a small handwritten note describing the inspiration behind the design. Handmade blankets often become cherished keepsakes because they combine creativity, patience, and personal attention in an item that can be enjoyed for years.
Frequently Asked Questions About the Crochet Blanket with Stars and Moon Pattern
1. Is the Crochet blanket with stars and moon Pattern suitable for beginners?
This pattern is best suited to confident beginners or intermediate crocheters who understand basic stitches and working in rounds. The individual squares use familiar techniques, but shaping the stars and crescent moons requires some additional attention. Beginners can practice the motifs separately before starting the full blanket. Completing a few sample squares will help develop consistent tension and make the larger project more enjoyable.
2. What type of yarn is best for a crochet stars and moon blanket?
Worsted-weight acrylic yarn is a practical choice because it is generally affordable, durable, and easy to maintain. Cotton blends are another option, especially if you prefer a more breathable blanket. Choose yarn with a smooth texture so that the decorative stitches remain visible. Using yarns of similar weight for the background and appliqués will help prevent uneven thickness.
3. How many crochet squares do I need for a full blanket?
The number depends on the desired dimensions and the size of each square. For the suggested 120 × 150 cm throw, you will need approximately 80 squares measuring 15 × 15 cm each. A smaller blanket can use fewer squares, while a bedspread may require more than 100. Always calculate your dimensions after blocking a sample square, and remember that the outer border adds extra width and length.
4. Can I crochet the stars and moons directly into the granny squares?
Yes, experienced crocheters can use tapestry crochet, intarsia crochet, or specially designed motif squares to integrate the shapes directly into the fabric. However, the appliqué method described in this tutorial is easier to adjust and allows more control over the shape of the celestial motifs. It also produces a raised texture similar to the blanket shown in the photograph.
5. How do I prevent my crochet squares from becoming uneven?
Consistent tension is the most important factor. Use the same yarn weight and hook size throughout the project, count stitches regularly, and check that the corners contain the correct increases. Blocking the squares before assembly can help correct small variations. If one square is significantly larger than the others, consider remaking it rather than stretching the surrounding pieces to fit.
6. What is the best method for joining crochet blanket squares?
Several methods work well, including slip-stitch joins, single crochet joins, mattress stitch, and join-as-you-go techniques. For this particular celestial crochet blanket, a visible golden slip-stitch join is an attractive option because it emphasizes the geometric layout. A mattress stitch is better if you prefer a nearly invisible seam, while a single crochet join creates a stronger raised ridge.
7. How long does it take to make a crochet blanket with stars and moons?
The time required varies according to experience, yarn choice, motif complexity, and blanket size. A detailed 80-square blanket may require approximately 45–80 hours or more, especially when every square includes a separate appliqué. Working on several squares each day can make the project feel more manageable. Preparing the motifs in batches may also improve consistency and reduce the time spent switching between techniques.
8. Can I make this crochet blanket in different colors?
Absolutely. Although blue and golden yellow create a classic night-sky effect, the design can be adapted to many color combinations. Pastel colors work beautifully for a gentle decorative style, while navy and silver create a more dramatic appearance. The most important consideration is choosing colors with enough contrast to highlight the stars, moons, and decorative joining lines.
9. Why is my crochet blanket border curling or rippling?
Curling usually indicates that the border does not have enough stitches, while rippling often means that too many stitches have been added. Check your corner increases and distribute the stitches evenly along the edges. If the problem persists, remove the affected round and adjust the stitch count. Gentle blocking may correct minor irregularities, but significant tension problems should be addressed during crocheting.
10. Can I sell blankets made using this crochet pattern?
Handmade blankets created using these instructions can generally be sold, subject to applicable laws and any rights associated with independently sourced designs or decorative elements. When selling finished blankets, describe the materials accurately and provide appropriate care instructions. Avoid making unsupported claims about safety, fiber composition, or durability. High-quality photographs and clear product descriptions can help customers appreciate the work involved in creating each blanket.
11. How can I make the celestial motifs more three-dimensional?
You can increase the texture by using slightly thicker yarn for the motifs, adding surface crochet around the edges, or working an additional round of stitches. A raised outline made with slip stitches can emphasize the shape of the stars and moons. Keep the added texture moderate so the blanket remains comfortable and practical for everyday use.
12. What should I do if I run out of yarn before finishing the blanket?
First, check the yarn label for the brand, color name, and dye lot. Purchasing more yarn from the same dye lot provides the best chance of matching the original shade. If an exact match is unavailable, consider using a slightly different shade in a planned arrangement rather than introducing the new color randomly. This can make the variation look intentional and preserve the overall harmony of the design.
Conclusion: Create Your Own Beautiful Crochet Blanket with Stars and Moon Pattern
The Crochet blanket with stars and moon Pattern combines decorative celestial motifs, traditional granny-square construction, and thoughtful color coordination into a warm and memorable handmade project. Throughout this tutorial, you learned how to select suitable yarn, understand essential US crochet stitches, create star, crescent moon, and sun-inspired appliqués, crochet matching blue squares, and assemble the pieces with contrasting golden seams. You also explored techniques for adding a decorative border, blocking the finished blanket, adjusting its dimensions, and maintaining its appearance over time.
One of the most rewarding aspects of this handmade crochet blanket is the opportunity to personalize every detail. From choosing your favorite nighttime colors to arranging the celestial motifs in a unique pattern, each decision contributes to a blanket that reflects your creativity. The modular construction also makes the project approachable because you can complete it gradually, enjoying the progress as each new square becomes part of the larger design.
Whether you make this blanket for your own home or as a thoughtful gift, the finished project can provide comfort, beauty, and a lasting reminder of the care invested in handmade crochet. The combination of golden stars, crescent moons, textured blue backgrounds, and coordinated borders creates a timeless celestial design that can be enjoyed in many different settings.
EASILY FIND THE FREE PDF FOR THIS PATTERN HERE!
Now I would love to hear your sincere opinion! What do you think of this Crochet blanket with stars and moon Pattern? Would you keep the beautiful blue and golden color combination, or would you choose different colors? Share your honest feedback, creative suggestions, and ideas for future crochet tutorials in the comments. Your experiences and recommendations can inspire other crochet enthusiasts and help make future projects even more enjoyable!