
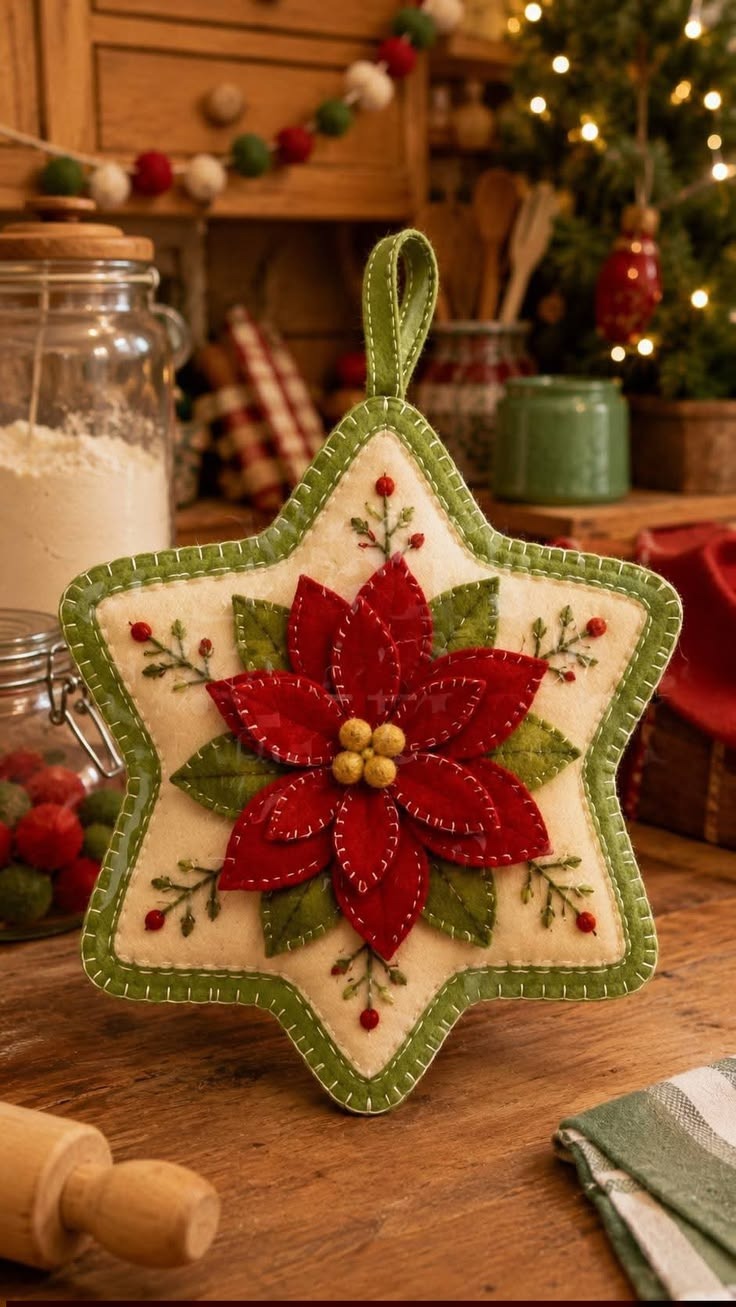
The Star-shaped Christmas ornament Pattern is a beautiful handmade decoration that combines traditional felt sewing, delicate embroidery, and the timeless charm of Christmas flowers. Inspired by the warm colors of the holiday season, this decorative star features a vibrant red poinsettia, carefully arranged green leaves, embroidered branches, and small berry accents. The combination of cream-colored felt, olive-green borders, and decorative blanket stitches creates a cozy, handcrafted appearance that fits perfectly into rustic, farmhouse, and traditional Christmas decorating styles. Whether you enjoy making ornaments for your own Christmas tree or preparing thoughtful handmade gifts, this DIY felt Christmas ornament offers a creative opportunity to turn simple materials into a meaningful holiday keepsake.
One of the most appealing characteristics of this Star-shaped Christmas ornament Pattern is its layered construction. Instead of relying on complicated sewing techniques, the project uses carefully cut felt shapes, simple hand stitches, and a few decorative details to create an elegant three-dimensional effect. The central poinsettia is made from overlapping red petals, while green felt leaves provide contrast and depth. Small golden-yellow felt balls form the flower’s center, giving the ornament an attractive finishing touch. Around the flower, delicate embroidered greenery and red berries fill the cream-colored star without making the design appear crowded. Even beginners who have never worked with decorative felt appliqué can learn the techniques with patience and a little practice.
Creating a handmade Christmas star ornament is also a wonderful way to slow down and enjoy the creative side of holiday preparations. Felt is an especially practical material for this type of project because it does not fray easily, holds its shape, and is available in many festive colors. The ornament can be sewn entirely by hand, making it suitable for crafters who do not own a sewing machine. Throughout this tutorial, you will learn how to prepare a reusable star template, cut the felt pieces accurately, assemble the poinsettia, embroider the surrounding details, and finish the ornament with a decorative hanging loop. The instructions are designed to help you recreate the style shown in the reference image while allowing room for your own color combinations and personal touches.
Materials and Preparation for the Star-shaped Christmas ornament Pattern
Before beginning your Star-shaped Christmas ornament Pattern, gather all the materials and organize a comfortable workspace. For a finished ornament measuring approximately 18 cm across and 20 cm from top to bottom, excluding the hanging loop, you will need cream felt, olive-green felt, dark red felt, embroidery floss, sewing needles, fabric scissors, polyester stuffing, and a small amount of fabric glue if desired. You will also need four small mustard-yellow felt balls or handmade wool balls for the poinsettia center. Choose medium-weight felt that is firm enough to support the appliqué while remaining flexible for hand sewing. Wool-blend felt is particularly pleasant to work with, although good-quality craft felt can also produce attractive results.
DISCOVER MORE FREE PATTERNS HERE!
The color palette is an important feature of this felt Christmas ornament pattern. Cream felt creates the main background, allowing the darker decorative elements to stand out. Olive-green felt forms the outer border, hanging loop, and poinsettia leaves. Deep red felt is used for the flower petals, while coordinating embroidery threads highlight the edges and details. For the embroidered branches, select dark green, light green, and red embroidery floss. Cream or ivory thread works beautifully for the visible blanket stitches around the border. These colors closely reproduce the traditional Christmas appearance of the ornament in the image, but you can substitute burgundy, forest green, or soft gold for a different seasonal interpretation.
To create the main star template, draw a symmetrical six-pointed star on sturdy paper or lightweight cardboard. For a balanced design, begin with a vertical centerline and divide a circle into six equal sections, placing the points approximately 60 degrees apart. Connect the points using gently curved inward sections rather than sharp, narrow corners. The result should resemble a softly rounded six-pointed Christmas star. Aim for an overall width of approximately 18 cm and a height of about 20 cm. These measurements are suggested dimensions for a handmade reproduction, not measurements taken directly from the photograph. Once the outline looks symmetrical, cut out the paper template and check that all six points have a similar shape.
Next, prepare two star templates to create the layered border. The larger template will be used for the olive-green felt backing, while the smaller cream-colored template should sit approximately 0.8 cm inside the outer edge. The easiest method is to trace the large star onto another sheet of paper and draw a second outline 0.8 cm inward, following the curved shape. Cut one large star from olive-green felt for the front and another for the back. Cut one smaller star from cream felt for the front decorative panel. Because felt does not fray, the edges can remain exposed, making a traditional turned seam allowance unnecessary. The extra green area serves as a visible decorative border rather than a hidden seam allowance.
Prepare the smaller decorative templates before sewing. Draw approximately ten to twelve elongated red poinsettia petals in two sizes, with the larger petals measuring around 4.5 to 5.5 cm long and the smaller petals measuring approximately 3 to 4 cm long. The petals should have pointed tips and slightly rounded sides. Cut six green leaves measuring approximately 4 to 5 cm long, giving each leaf a pointed shape that extends beyond the red flower. You can also prepare a few smaller green pieces to fill gaps between the petals. Arrange all the shapes on the cream star before attaching anything permanently. This planning stage helps you determine whether the flower is centered and whether enough space remains for the embroidered branches.
Finally, prepare your basic sewing tools and become familiar with the stitches used throughout this Christmas felt sewing project. The blanket stitch creates a decorative edge while helping secure two pieces of felt together. The running stitch is useful for adding simple lines and securing smaller appliqué pieces. The backstitch produces continuous embroidered stems, and the lazy daisy stitch can create tiny leaves along decorative branches. Small French knots or seed stitches can represent berries, although tiny red felt circles are another option. Practice these techniques on leftover felt before beginning the ornament. Keeping your stitches relatively even will make the finished decoration look neat without requiring professional embroidery experience.
Step-by-Step Instructions for Cutting and Assembling the Felt Christmas Star
Begin the construction of your Star-shaped Christmas ornament Pattern by transferring the prepared templates onto the felt. Place each paper shape against the material and trace around it using a removable fabric marker or tailor’s chalk. Cut slowly with sharp fabric scissors, especially around the inward curves of the star. Smooth, accurate cutting is important because the edges will remain visible in the completed ornament. After cutting the two green stars and the smaller cream panel, stack the pieces temporarily to confirm that the cream star sits evenly inside the green border. Make any necessary adjustments before sewing. A consistent border around the entire star will give the ornament the balanced appearance seen in the reference design.
Attach the cream felt panel to the front green star using small blanket stitches or evenly spaced running stitches. Position the cream piece carefully, leaving approximately 0.8 cm of green felt visible around the perimeter. Secure it with sewing clips or a few small temporary stitches so it cannot shift while you work. Thread a needle with cream embroidery floss and stitch around the edge of the cream panel, keeping the stitches approximately 0.4 cm apart. Work slowly around the inward curves, reducing the stitch spacing slightly where necessary to maintain a smooth line. The visible stitching is part of the ornament’s decorative character, so choose a thread that complements the cream felt while remaining noticeable against the olive-green background.
Once the background panel is attached, arrange the green poinsettia leaves in the center of the star. Position the leaves in a circular formation, allowing their pointed ends to extend outward toward the star’s corners. The green leaves should remain partially visible after the red petals are added, creating a natural layered effect. Attach each leaf using small stitches near its center or base, leaving the outer tips slightly raised for dimension. Add a short line of contrasting embroidery down the center of each leaf if you want to emphasize its shape. Avoid placing the leaves too close to the star’s outer edge, because the surrounding cream areas will later contain embroidered branches and berry details.
Now construct the red poinsettia, which is the focal point of this handmade poinsettia Christmas ornament. Arrange the larger red petals over the green leaves, overlapping their bases in the center. Position the petals so they radiate outward naturally, with some pointing upward, others extending sideways, and the remaining petals facing downward. Secure each petal with a few small stitches at its base. After the first layer is attached, place the smaller red petals on top, rotating their positions slightly so they fill the spaces between the larger petals. This arrangement creates the full, dimensional appearance of a traditional poinsettia flower. Use matching red embroidery floss to keep the attachment stitches discreet.
To enhance the flower’s handmade appearance, add decorative stitches along the edges and centers of the petals. Thread your needle with ivory or cream embroidery floss and work small blanket stitches around selected petal edges. The contrast between the pale thread and dark red felt creates the distinctive handcrafted texture visible in the reference image. You can also add short running stitches through the middle of several petals to suggest natural folds and veins. Keep the stitches consistent but avoid pulling the thread too tightly, as excessive tension may cause the felt to curl. For a fuller flower, gently lift the upper petals before securing their bases, allowing them to rest slightly above the lower layer.
Finish the central flower by attaching four small golden-yellow felt balls in a compact cluster. Each ball should measure approximately 0.8 to 1 cm in diameter, depending on the size of your ornament. If you do not have ready-made felt balls, create small spheres from wool roving using wet felting or carefully shape small pieces of felt around tiny amounts of stuffing. Sew the balls securely through their bases with matching yellow thread. Position them close together so they cover the attachment points of the red petals. This final detail gives the poinsettia a warm, festive center and adds another layer of texture. At this stage, the main flower should be complete, and the ornament should already resemble the central design shown in the photograph.
Embroidery Details, Decorative Borders, and Finishing Techniques
The embroidered branches surrounding the poinsettia are essential to the charm of this Star-shaped Christmas ornament Pattern. These delicate details help balance the central flower and fill the empty spaces between the petals and the star’s points. Using a removable fabric marker, lightly sketch six small botanical branches around the flower, placing one near each star point. Keep the branches approximately 2 to 3 cm long, adjusting their size according to the available space. The branches should extend outward from the central design without touching the green border. Their slightly irregular shapes will make the ornament feel natural and handmade rather than overly geometric.
Begin embroidering each branch with two strands of dark green embroidery floss. Use a backstitch or stem stitch to create a thin central stem, then add smaller branches extending diagonally from both sides. Alternate the direction and length of these smaller lines to create the appearance of natural greenery. For tiny leaves, use short straight stitches, lazy daisy stitches, or miniature leaf-shaped stitches in olive and light green. The reference ornament features delicate foliage with small red accents, so avoid making the embroidered leaves too large or heavy. The goal is to create subtle botanical details that complement the poinsettia without competing with its bold red petals.
Add the small red berries after completing the greenery. You can create them with French knots using several strands of red embroidery floss, or attach tiny red felt circles approximately 0.3 to 0.5 cm wide. For a slightly raised effect similar to the reference image, use small round beads made from felt or embroidery knots worked several times in the same location. Place one or two berries near the ends of each branch and add a few smaller red stitches along the stems. Secure all thread ends on the reverse side of the front panel. If you are using beads or small felt balls, stitch them firmly and keep the finished ornament away from children who may put small parts in their mouths.
Once the embroidery is complete, prepare the hanging loop. Cut a strip of olive-green felt approximately 2 cm wide and 12 cm long. Fold the strip lengthwise, bringing the long edges together, and secure them with small running stitches or blanket stitches. Then fold the strip in half to form a loop approximately 5 to 6 cm tall, allowing a short section at the bottom for attachment. Position the open ends at the top center of the star, between the front and back layers. Sew the ends securely to the inside of the backing area using several reinforcing stitches. A strong hanging loop is important because it must support the ornament’s weight throughout the Christmas season.
Now place the decorated front star over the plain olive-green backing star, aligning the outer edges carefully. If you want a slightly padded ornament, add a thin layer of polyester stuffing between the pieces. Begin sewing around the outer edge with cream embroidery floss, using a blanket stitch approximately 0.4 to 0.5 cm deep. Work around the curved points and inward sections, keeping the layers aligned. Leave a small opening of approximately 4 cm along one side if you plan to add stuffing. Insert small amounts gradually, concentrating on the center and gently distributing the filling toward the star points. Avoid overstuffing because the ornament should remain relatively flat, allowing the layered poinsettia and embroidery to remain the main visual features.
After adding the stuffing, close the remaining opening with the same blanket stitch used around the rest of the border. Check that the stitching is secure, especially around the hanging loop and the narrow inward curves of the star. Trim any loose thread ends and gently smooth the felt with your fingers. If necessary, use a cool iron with a pressing cloth on a small hidden test area first, avoiding direct heat on synthetic felt and raised decorations. The finished DIY star-shaped Christmas ornament should have a softly padded body, a consistent olive-green border, a dimensional red poinsettia, and delicate embroidered branches. Allow any fabric glue used during assembly to dry completely before hanging or storing the decoration.
Creative Decorating Ideas, Personalization, and Care for Your Handmade Ornament
One of the greatest advantages of the Star-shaped Christmas ornament Pattern is its versatility. Although the traditional red, cream, and olive-green combination closely resembles the ornament in the reference image, you can create beautiful variations by changing the colors. A burgundy poinsettia with sage-green leaves produces a softer vintage appearance, while a white flower with gold embroidery creates an elegant winter-inspired decoration. For a brighter farmhouse look, consider using natural beige felt, deep forest-green borders, and classic Christmas red petals. Maintaining contrast between the background and flower is important because it allows the layered appliqué to remain clearly visible.
The finished ornament can be displayed in several ways throughout the holiday season. Hang it from a sturdy Christmas tree branch, attach it to a decorative wreath, or use it as an accent on a wrapped gift. Several ornaments made in coordinating colors can also form a charming handmade garland for a mantel or doorway. Because this felt Christmas decoration is lightweight and relatively flat, it works especially well on smaller trees and tabletop Christmas displays. For gift wrapping, attach the star to a ribbon or reusable fabric bow so the recipient can remove it and enjoy it as a keepsake after opening the present.
Personalization makes this project especially meaningful when creating gifts for friends and family. Consider embroidering a name, a year, or a short holiday greeting on the back of the ornament before assembling the two star layers. You can also adjust the size of the template to create miniature stars for gift tags or larger decorations for wall displays. If you enlarge the pattern, increase the size of the poinsettia petals and embroidered branches proportionally so the overall composition remains balanced. For a coordinated handmade collection, use the same star shape while varying the flower colors, embroidery styles, and decorative centers. These small changes can make every ornament unique without requiring an entirely new pattern.
Beginners can simplify the Star-shaped Christmas ornament Pattern by reducing the number of flower petals and replacing detailed embroidery with small felt appliqué shapes. For example, use six large red petals, six green leaves, and a few simple straight stitches for the branches. More experienced crafters may prefer adding extra petal layers, decorative veins, or additional embroidered greenery. If you enjoy traditional hand embroidery, experiment with satin stitches, feather stitches, and French knots to create more intricate botanical details. Regardless of your experience level, work at a comfortable pace and focus on secure stitching and balanced placement rather than trying to make every detail perfectly identical.
Proper care will help preserve your handmade felt Christmas ornament for many holiday seasons. Store the decoration in a clean, dry location away from direct sunlight and excessive moisture. Wrap it loosely in acid-free tissue paper or place it inside a breathable fabric bag to protect the embroidery and raised flower details. Avoid compressing the ornament beneath heavy decorations, because this can flatten the poinsettia petals and felt balls. If the surface becomes dusty, gently clean it with a soft brush or lint roller used with very light pressure. Spot-clean only when necessary, testing a hidden area first to make sure the felt and embroidery threads do not bleed or become distorted.
Completing this project provides more than a decorative object; it also offers an opportunity to develop practical sewing and embroidery skills. Through the construction process, you practice template preparation, accurate felt cutting, layered appliqué, blanket stitching, decorative embroidery, and simple padded assembly. These techniques can be applied to many other seasonal crafts, including felt hearts, fabric ornaments, decorative flowers, and handmade holiday gifts. The Star-shaped Christmas ornament Pattern is particularly satisfying because each stage adds a visible element to the final design. From the first cream felt star to the last embroidered berry, every detail contributes to a festive decoration that reflects your creativity and personal style.
Frequently Asked Questions About the Star-shaped Christmas ornament Pattern
1. Is the Star-shaped Christmas ornament Pattern suitable for beginners?
Yes. This project is suitable for beginners who are comfortable using scissors, a needle, and embroidery thread. The construction relies on straightforward techniques such as cutting felt, layering appliqué pieces, and sewing blanket stitches. The embroidered branches may require a little practice, but they can be simplified with straight stitches. Beginners should start by preparing all templates carefully and arranging the decorative pieces before sewing.
2. What type of felt is best for making Christmas ornaments?
Medium-weight wool-blend felt is an excellent choice because it is durable, holds its shape, and has a pleasant texture. Polyester craft felt can also be used, especially for budget-friendly projects. Choose felt that is thick enough to support the appliqué without becoming excessively stiff. Avoid very thin felt for the main star unless you reinforce it with an additional layer.
3. How large should the finished star-shaped Christmas ornament be?
For this tutorial, the suggested finished size is approximately 18 cm wide and 20 cm tall, excluding the hanging loop. However, you can resize the pattern according to your decorating needs. Smaller stars work well as gift toppers, while larger versions can be used as wall decorations or accents on holiday wreaths.
4. Can I make this felt Christmas ornament without a sewing machine?
Absolutely. The entire ornament can be completed by hand. In fact, hand sewing is particularly suitable for this design because the visible blanket stitches and decorative embroidery contribute to its traditional appearance. A sewing machine is optional and is not required for any stage of the tutorial.
5. How do I make the poinsettia flower look three-dimensional?
The secret is to layer the red felt petals in different sizes and attach them primarily at their bases. Begin with larger petals and place smaller petals over them, slightly rotating each layer. Avoid stitching every petal completely flat. Adding felt balls to the center also enhances the flower’s dimensional appearance.
6. What is the best stitch for finishing the edges of a felt ornament?
The blanket stitch is one of the best choices for this type of project. It secures the felt layers while creating a decorative edge. Use evenly spaced stitches and maintain gentle thread tension to prevent puckering. A contrasting thread color can make the border more visually interesting.
7. Can I use fabric glue instead of sewing the felt pieces?
Fabric glue can help temporarily position the poinsettia petals and leaves, but stitching is recommended for a stronger, longer-lasting ornament. Glue may also stiffen the felt or become visible if applied excessively. For the hanging loop and outer border, secure hand stitches are especially important.
8. How long does it take to complete one handmade Christmas star ornament?
The project generally takes approximately three to five hours, depending on your sewing experience and the amount of embroidery you include. Beginners may need additional time to prepare the templates and practice the stitches. Experienced crafters can often complete the ornament more quickly, especially when making several decorations in batches.
9. Can I wash a handmade felt Christmas ornament?
Machine washing is not recommended because it may distort the felt, loosen the embroidery, and damage the layered flower. Gentle surface cleaning is usually sufficient. If the ornament becomes stained, carefully spot-clean the affected area with a slightly damp cloth after testing for colorfastness, then allow it to air-dry completely.
10. How can I make several matching Christmas ornaments efficiently?
Prepare reusable cardboard templates for the stars, petals, and leaves. Cut all the felt pieces for several ornaments at the same time, then complete each stage in batches. For example, attach all the cream panels first, assemble the poinsettias next, and finish with embroidery and borders. This approach saves time and helps maintain consistent sizes across a coordinated ornament collection.
11. Can I sell ornaments made using this tutorial?
You can use the construction techniques described here to create your own handmade ornaments. If you plan to sell finished decorations, develop your own distinctive designs and product photographs. When working from someone else’s commercial pattern or original artwork, check the applicable usage permissions. For items intended for children, also consider relevant product safety requirements, particularly when using small decorative components.
12. What other decorations can I create using this Christmas star design?
The basic star template can be adapted into many festive projects. You could create a set of embroidered stars, a decorative wall hanging, a Christmas wreath centerpiece, or fabric gift ornaments. The poinsettia appliqué can also be used separately on stockings, table runners, decorative pillows, and other seasonal sewing projects.
Conclusion: Create a Beautiful Handmade Christmas Keepsake
The Star-shaped Christmas ornament Pattern is a rewarding holiday craft that brings together the warmth of traditional Christmas colors and the beauty of handmade embroidery. By following this tutorial, you have learned how to prepare a symmetrical felt star template, create a decorative green border, assemble layered poinsettia petals, embroider delicate botanical branches, attach festive berry accents, and finish the ornament with a secure hanging loop.
This project demonstrates how simple materials can become a charming and meaningful decoration through careful cutting, thoughtful color choices, and basic hand-sewing techniques. Whether you make a single ornament for your Christmas tree or prepare an entire collection as handmade gifts, each finished star can reflect your own creativity and attention to detail.
The most enjoyable part of working with a DIY felt Christmas ornament pattern is the freedom to experiment. You can personalize the colors, change the embroidery details, add meaningful dates, or adjust the dimensions to suit your holiday decorations. With practice, the same techniques can inspire many other beautiful felt sewing projects.
EASILY FIND THE FREE PDF FOR THIS PATTERN HERE!
We would love to hear your sincere opinion! What do you think of this Star-shaped Christmas ornament Pattern? Would you choose the traditional red and green combination, or would you prefer another color palette? Share your thoughts, experiences, and suggestions in the comments. Your feedback and creative ideas can inspire other craft enthusiasts to make their own special Christmas decorations.