
The Felt Nativity Scene for Wall Hanging Pattern is a beautiful Christmas sewing project that combines traditional holiday symbolism with the warmth of handmade felt decorations. Featuring Mary, Joseph, and Baby Jesus surrounded by festive holly leaves, berries, a decorative bow, and a shining Christmas star, this charming wall hanging brings a peaceful and meaningful atmosphere to any home. Its carefully layered felt pieces, delicate embroidered details, and soft color palette create a timeless decoration that can be displayed year after year. Whether you enjoy making handmade Christmas ornaments or are discovering the wonderful world of felt appliqué, this project offers an opportunity to create something personal and memorable. The combination of burgundy, cream, sage green, and warm brown felt gives the finished decoration a rustic appearance that works beautifully with traditional Christmas interiors. Best of all, the design can be adapted to different sizes, making it suitable for doors, walls, entryways, and seasonal decorative displays.
Creating a Felt Nativity Scene for Wall Hanging Pattern is also a wonderful way to explore several essential hand-sewing techniques. The project uses simple felt shapes, layered appliqué, embroidery, and decorative stitching to transform ordinary craft materials into an expressive Christmas scene. One of the greatest advantages of working with felt is that its edges do not fray easily, allowing beginners to focus on assembling shapes and adding decorative details without complicated fabric finishing. The soft texture of felt is particularly suitable for creating the gentle facial expressions of the Holy Family, while contrasting thread colors help emphasize the handcrafted appearance. Although the finished wall hanging may look intricate, it becomes much easier when the construction is divided into manageable stages. By preparing the background, assembling the characters, and attaching the festive decorations separately, even someone with limited sewing experience can work toward an attractive result.
This detailed Felt Nativity Scene for Wall Hanging Pattern tutorial explains how to recreate a decoration inspired by the reference image, from selecting materials and preparing templates to stitching the characters and completing the hanging arrangement. The instructions use measurements in centimeters and familiar American hand-sewing terminology, making the process accessible to crafters who want clear, practical guidance. You will learn how to create a padded background, form Joseph’s robe and shepherd’s staff, shape Mary’s veil and dress, and sew a small swaddled Baby Jesus. The tutorial also explains how to make the decorative star, holly leaves, berries, and Christmas bow that frame the central figures. Because the reference image does not include exact printable templates or dimensions, the measurements provided here form an original, adaptable pattern plan inspired by its visible design. With patience, careful cutting, and a few basic stitches, you can create a handmade Christmas wall hanging that celebrates both creativity and the meaning of the Nativity.
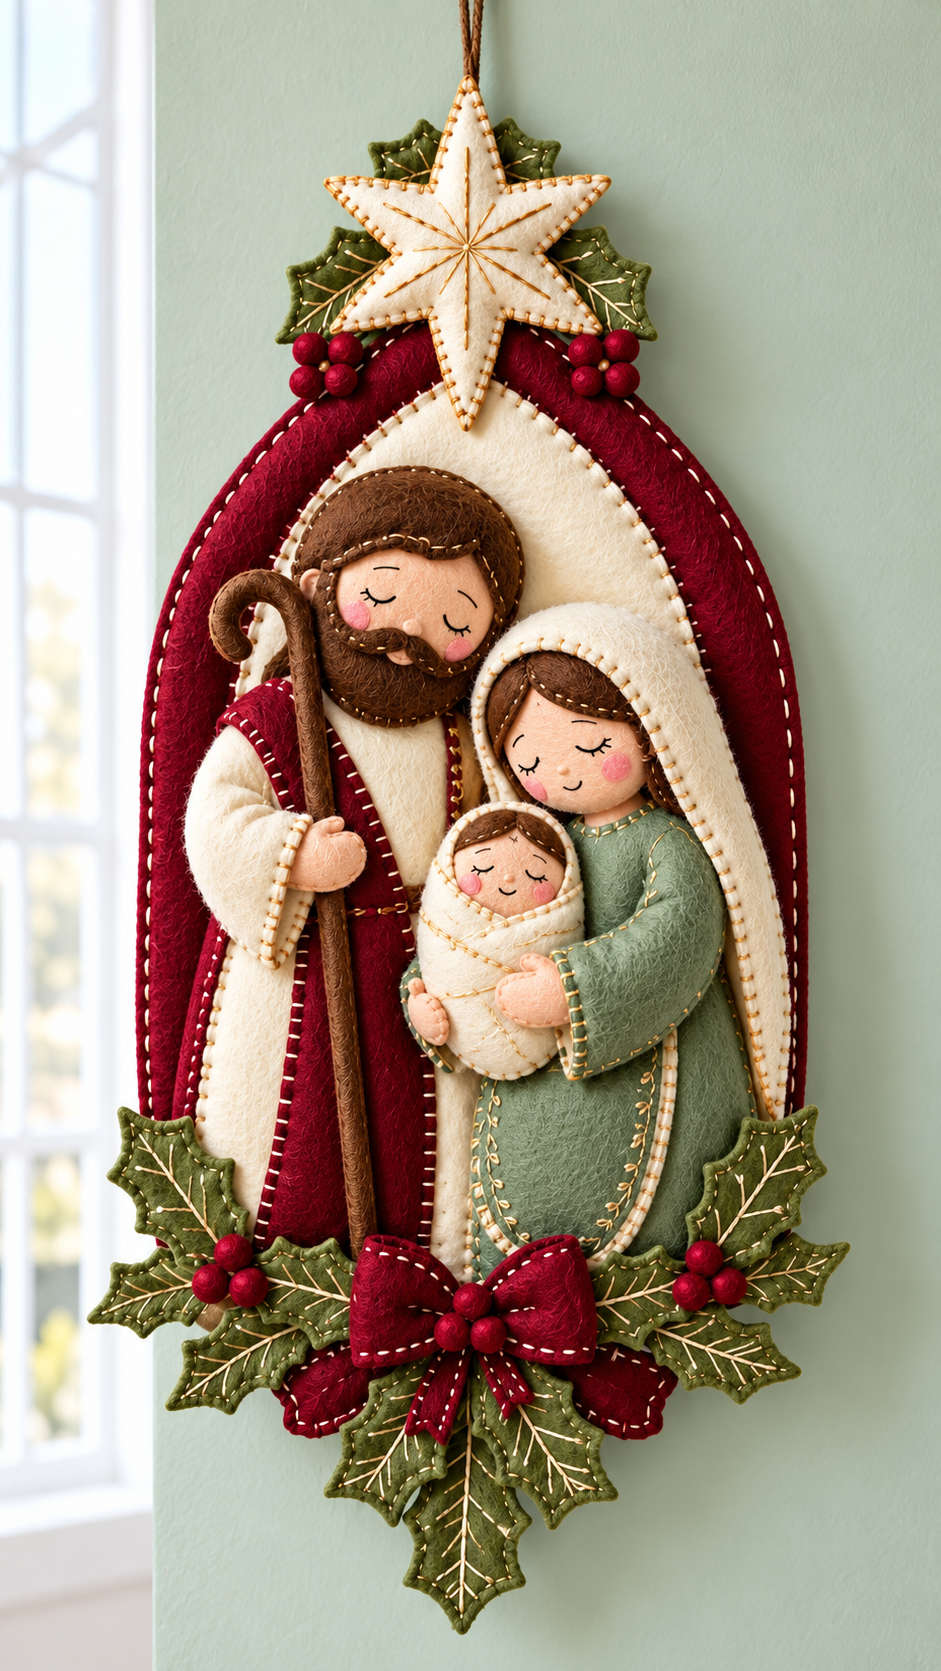
Materials and Preparation for the Felt Nativity Scene for Wall Hanging Pattern
1. Choose the appropriate felt colors and textures. Begin your handmade felt Nativity scene by selecting good-quality craft felt or wool-blend felt approximately 1–2 mm thick. For a design similar to the reference, choose deep burgundy for the outer background and Joseph’s robe, ivory or cream for the inner background, Mary’s veil, and Baby Jesus’ blanket, sage green for Mary’s dress, warm brown for hair and beard details, and peach or light beige for the faces and hands. Olive green felt works beautifully for the holly leaves, while dark red felt can be used for the berries and decorative bow. A combination of soft, muted colors gives the decoration a traditional, vintage-inspired Christmas appearance. Wool-blend felt is particularly pleasant for detailed hand stitching, although standard polyester craft felt is a practical alternative.
DISCOVER MORE FREE PATTERNS HERE!
2. Gather the essential sewing supplies. In addition to felt, prepare embroidery floss in cream, brown, burgundy, green, and black. You will need embroidery needles, sharp fabric scissors, small detail scissors, sewing pins or clips, a fabric marking pencil, paper for drafting templates, and polyester fiberfill for gentle padding. A ruler and flexible measuring tape will help you maintain consistent proportions. For the hanging loop, prepare approximately 25–30 cm of sturdy cotton cord or decorative twine. Optional supplies include fabric-safe adhesive for temporarily positioning appliqué pieces and small felt scraps for adding dimensional details. Keep your workspace organized so that tiny facial features, hands, and berry pieces are not misplaced during assembly.
3. Establish the dimensions of your Christmas wall hanging. For this tutorial, plan a finished decoration measuring approximately 43 cm tall and 25 cm wide, including the star and lower holly arrangement but excluding the hanging cord. Draw an elongated arch-shaped background approximately 24 cm wide and 35 cm tall, with a rounded top and gently tapered lower corners. Create a second, smaller arch measuring approximately 19 cm wide and 30 cm tall for the cream-colored inner panel. Leave enough space around the characters for decorative stitching and the surrounding Christmas foliage. These dimensions are suggested rather than exact measurements from the photograph. You can enlarge the design for a front-door decoration or reduce it to create a smaller handmade Christmas ornament.
4. Prepare the paper templates before cutting felt. The felt Nativity pattern requires individual templates for the background, Joseph, Mary, Baby Jesus, star, holly leaves, berries, and bow. Draw Joseph approximately 25 cm tall, with his head around 6 cm wide and his robe extending toward the lower background. Mary should measure approximately 24 cm tall, including her veil, while Baby Jesus can measure around 10 cm from head to the bottom of the swaddling blanket. Create separate pieces for faces, hair, clothing, sleeves, hands, and decorative accents. Mark the overlap areas on each template so the pieces can be assembled without visible gaps. Before cutting the final materials, arrange the paper shapes on the background to confirm that the figures fit comfortably within the arch.
5. Learn the basic stitches used in felt appliqué. Several traditional hand-sewing stitches will help you complete this Christmas felt sewing project. The blanket stitch creates decorative edging around felt shapes and helps secure layered pieces. The running stitch produces a simple dashed line that works well for clothing seams and decorative borders. The backstitch is useful for outlining facial features, hair, and small details. The satin stitch can fill tiny areas such as eyebrows or decorative embroidery accents, while the whipstitch provides a discreet way to join felt pieces. Beginners should practice these stitches on scrap felt before working on the main design. Try to maintain consistent stitch lengths of approximately 3–4 mm for a neat handmade finish.
6. Organize the project into manageable sewing stages. A successful Felt Nativity Scene for Wall Hanging Pattern becomes much easier when the components are prepared separately. First, cut and assemble the background. Next, prepare Joseph’s clothing, face, beard, and staff. Continue with Mary’s dress, hair, and veil, followed by the smaller Baby Jesus figure. After completing the characters, make the decorative star, holly leaves, berries, and bow. Finally, arrange everything on the background and attach the hanging loop. Keep small pieces in labeled containers or envelopes to prevent confusion. Preparing the elements in advance also allows you to adjust their placement before making permanent stitches, ensuring the finished scene looks balanced and harmonious.
Step-by-Step Guide to Sewing Mary, Joseph, and Baby Jesus
1. Construct Joseph’s body and burgundy robe. Start by cutting Joseph’s main body from cream felt, using an elongated shape with rounded shoulders and a slightly wider lower section. Cut two burgundy robe panels that will sit along the sides of his body, leaving a visible cream section through the center. Add cream felt sleeves beneath the burgundy outer garment to imitate the layered clothing shown in the reference image. Secure the clothing with small running stitches or blanket stitches using contrasting cream embroidery floss. For additional dimension, place a thin layer of fiberfill beneath the upper body before attaching it to a backing piece. Avoid overstuffing because the finished figure should remain relatively flat against the wall hanging. The contrasting colors and visible hand stitching give Joseph’s robe a charming, traditional appearance.
2. Create Joseph’s face, hair, and beard. Cut a rounded face approximately 5 cm wide from peach-colored felt and a slightly larger hair shape from dark brown felt. Position the hair behind the face, allowing the upper section to form a soft, rounded hairstyle. Create a separate beard and mustache using brown felt, trimming the edges into gentle curves rather than sharp points. Stitch the facial components together with matching thread, leaving a small opening if you want to add a tiny amount of padding. Embroider closed eyes using black or dark brown backstitches, creating short curved lines that communicate a peaceful expression. Add a small nose with a single stitch and use pale pink embroidery floss for subtle cheeks. This simple embroidery approach is especially effective for creating expressive felt Nativity characters without complicated sewing techniques.
3. Make the shepherd’s staff and complete Joseph’s arms. Joseph’s shepherd’s staff is one of the most recognizable elements of the design. For a soft felt version, cut a narrow brown strip approximately 23 cm long and shape the upper end into a curved hook. Reinforce the strip with a second layer of felt or a line of close stitching so it holds its shape. Alternatively, a smooth wooden craft dowel with a curved decorative top can be used if it is securely attached and has no sharp edges. Position the staff beside Joseph’s body and create a small peach-colored hand to wrap around it. Attach the hand using tiny stitches, making sure the staff remains firmly in place. Finish the robe by adding cream-colored blanket stitches along the visible burgundy edges, creating the decorative contrast seen throughout the project.
4. Sew Mary’s sage green dress and ivory veil. Mary’s clothing provides a soft visual contrast to Joseph’s burgundy robe. Cut her main dress from sage green felt, creating a gently tapered shape with rounded shoulders and a wider lower section. Add separate sleeves that curve toward the center, where her hands will hold Baby Jesus. Cut the face from peach felt and create a brown hair section that frames the forehead. The veil should be made from cream felt and designed as a broad curved shape that follows the top and sides of Mary’s head before extending down toward her shoulders and lower dress. Attach the veil with small cream stitches, allowing the outer edges to remain slightly raised for dimension. Add decorative embroidery along the dress and veil to emphasize the softness and handmade character of the felt Holy Family wall hanging.
5. Create Baby Jesus with a soft swaddling blanket. Baby Jesus is the smallest and most delicate figure in the Felt Nativity Scene for Wall Hanging Pattern. Begin with a peach-colored oval face approximately 3.5 cm wide and add a small brown hairpiece along the forehead. Embroider gently closed eyes, a tiny nose, and a peaceful smile using short, controlled stitches. Cut the main swaddling blanket from ivory felt, forming an elongated oval or rounded cocoon approximately 10 cm tall. Add two curved cream felt strips that cross over the front of the body to suggest folded fabric. Use a light running stitch or blanket stitch along the blanket edges. A small amount of fiberfill can create a softly padded appearance, but keep the thickness modest so the baby can rest naturally against Mary’s arms.
6. Assemble the Holy Family into a unified scene. Before attaching the figures to the background, arrange Joseph on the left, Mary on the right, and Baby Jesus in the center, slightly forward. This composition closely follows the visual arrangement in the reference image. Position Mary’s hands around the swaddled baby, making them appear to support the blanket. Joseph’s staff should remain visible along his left side without covering his face or clothing details. Use temporary fabric clips or small amounts of fabric-safe adhesive to test the arrangement. Once satisfied, stitch the overlapping pieces together with discreet whipstitches. Pay special attention to the shoulders, hands, and lower clothing edges, as these areas help create the illusion of connected figures. The finished group should form a compact, balanced arrangement that can be securely attached to the prepared background.
Creating the Christmas Star, Holly Leaves, and Decorative Background
1. Sew the burgundy and cream arched background. The background is an essential part of the Felt Nativity Scene for Wall Hanging Pattern because it frames the characters and provides the structure needed for wall display. Cut the large arch from burgundy felt and a matching backing piece from a coordinating color. Place a thin layer of polyester batting between the two pieces if you prefer a slightly padded decoration. Secure the layers around the edges with blanket stitches, leaving the top attachment area accessible until the hanging cord is installed. Position the smaller cream arch over the burgundy panel, ensuring that an even burgundy border remains visible. Attach the cream panel using evenly spaced blanket stitches in a complementary thread color. This layered construction creates depth and emphasizes the traditional Christmas color scheme.
2. Design and embroider the five-pointed Christmas star. The decorative star sits above the Holy Family and serves as the focal point of the upper arrangement. Draw a five-pointed star approximately 11 cm wide and 12 cm tall, using slightly elongated points to create an elegant shape. Cut two identical stars from cream felt and stitch them together using a warm beige or golden embroidery floss. Before closing the final edge, insert a small amount of fiberfill to give the star a softly padded appearance. Embroider lines extending from the center toward each point using straight stitches, creating the radiating pattern visible in the reference. Add small decorative stitches around the outer edges for additional texture. The finished felt Christmas star should be lightweight and firmly secured above the arched background.
3. Cut and prepare the olive green holly leaves. Holly leaves create the decorative frame around the star and lower portion of the wall hanging. Draw a pointed leaf approximately 8–10 cm long, with gently scalloped edges and several small points along each side. Use this template to cut around eight to ten leaves from olive green felt, varying their sizes slightly for a natural arrangement. Embroider a central vein down each leaf using cream or light beige thread, then add smaller diagonal veins extending toward the outer points. These simple stitches help the leaves resemble traditional Christmas foliage without requiring complicated embroidery. For a more dimensional appearance, stitch a second leaf layer beneath selected pieces or add a small fold near the base. The resulting felt holly leaf appliqués provide texture and decorative movement.
4. Make the red felt berries and decorative bow. Cut small circles approximately 1.5–2 cm in diameter from dark red felt to create the holly berries. For dimensional berries, gather the edges of each circle with small running stitches, add a tiny amount of fiberfill, and pull the thread gently to form a rounded shape. Secure the opening with several stitches. Create approximately twelve to sixteen berries, depending on how full you want the foliage arrangement to appear. For the central bow, cut two burgundy felt strips approximately 13 cm long and 3 cm wide, plus a narrow center band. Fold the strips into loops, secure them with small stitches, and wrap the center band around the middle. Add two short ribbon tails with angled ends and decorate them with cream running stitches. This handmade felt Christmas bow gives the lower arrangement a festive finishing touch.
5. Arrange the festive decorations around the Nativity scene. Position several holly leaves behind the upper star, allowing their pointed tips to extend beyond the arched background. Add small groups of red berries on both sides of the star to create symmetry. At the bottom, arrange the remaining holly leaves in a fan-shaped cluster, extending outward and downward beneath the Holy Family. Place the burgundy bow at the center of this foliage arrangement, allowing its loops and tails to overlap the leaves naturally. Secure each element with strong hand stitches through the backing layers, using thread colors that blend with the felt. Avoid attaching all the leaves in perfectly straight lines; slight variations in angle create a more organic appearance. Check the overall composition before tightening the final stitches.
6. Add texture, decorative embroidery, and finishing accents. Once the major components are assembled, examine the Christmas felt wall hanging for areas that would benefit from additional stitching. Small cream running stitches along the burgundy background can create a charming handmade border. Add a few embroidered lines to Mary’s dress to suggest fabric folds, and reinforce the decorative stitching along Joseph’s robe. The holly leaves can receive extra vein details if their surfaces appear too plain. If desired, use a slightly darker thread to outline selected facial features, but keep the embroidery subtle so the characters retain their gentle expressions. Avoid adding heavy beads or oversized embellishments, as these may distract from the central Nativity scene. The goal is to enhance the felt textures while preserving the peaceful simplicity of the design.
Final Assembly, Hanging Instructions, and Creative Customization
1. Position the completed Holy Family on the background. Place the assembled figures over the cream arch, checking that Joseph and Mary remain centered beneath the star. The lower edges of their clothing should sit just above the holly arrangement, while Baby Jesus remains clearly visible between them. Once the placement is correct, secure the figures with small whipstitches around the outer edges and at several concealed internal points. Stitch through the structural backing rather than relying entirely on surface adhesive, especially if the decoration will be displayed for many years. Work carefully around the faces and hands to avoid distorting their shapes. A secure attachment is essential for maintaining the appearance and durability of the Felt Nativity Scene for Wall Hanging Pattern.
2. Attach a strong and attractive hanging loop. Cut approximately 25–30 cm of cotton cord, braided twine, or decorative ribbon. Fold the cord to create a loop and position the two ends behind the top of the arched background, directly beneath the star. Secure the ends using multiple strong stitches through a small reinforcing felt patch on the back. If the star extends above the background, position it so that the cord emerges neatly behind its upper point without pulling the star out of shape. Test the hanging loop by gently lifting the decoration and checking that the weight is distributed evenly. If the piece tilts to one side, adjust the cord placement before completing the final stitches. A well-positioned loop allows the wall hanging to remain straight when displayed.
3. Finish the backing for a neat and durable appearance. Turn the decoration over and inspect the back for exposed thread ends, uneven stitches, or loose attachments. Trim excess threads carefully, leaving enough length to secure knots properly. If the backing looks untidy, cut an additional felt panel slightly smaller than the outer arch and stitch it over the exposed construction details. This optional finishing layer creates a professional appearance and protects the stitches from accidental snagging. Avoid adding too much batting or heavy reinforcement, as the finished decoration should remain lightweight. Gently smooth the felt with your hands to restore the shape of the characters and decorative elements. The result should be a soft yet sturdy hand-sewn Nativity wall decoration that can be handled and stored without losing its form.
4. Customize the pattern with different Christmas color palettes. Although the reference design uses burgundy, cream, sage green, and olive green, the Felt Nativity Scene for Wall Hanging Pattern can be adapted to complement different holiday decorating styles. Traditional red and forest green create a classic Christmas appearance, while dusty blue, ivory, and silver offer a softer winter-inspired combination. Neutral beige, warm white, and muted brown can produce a rustic farmhouse look. You may also personalize the embroidery by adding a family name or the year of creation on the reverse side. If you prefer a simpler design, reduce the number of holly leaves and berries while keeping the Holy Family and star as the main focal points. Thoughtful customization makes each finished wall hanging unique without changing the basic construction method.
5. Display and care for your handmade Nativity decoration. Choose an indoor location where the decoration can hang freely without rubbing against rough surfaces. Entryways, living room walls, seasonal display areas, and interior doors are excellent choices for a felt Christmas Nativity decoration. Keep the piece away from open flames, direct heat sources, and prolonged moisture exposure. Because felt can collect dust, gently clean the surface with a soft brush or a lint roller used with minimal pressure. Avoid soaking the decoration, especially if it contains fiberfill, embroidery, or adhesive. After Christmas, store it flat in a clean, dry container with tissue paper supporting the raised details. Proper storage helps prevent crushing, fading, and distortion, allowing the handmade decoration to remain beautiful for future holiday celebrations.
6. Turn the project into a meaningful handmade Christmas tradition. Beyond its decorative value, this DIY felt Nativity scene offers an opportunity to create a lasting family keepsake. Some crafters enjoy making one Nativity decoration each year, experimenting with new embroidery techniques or color combinations. Others prefer to prepare several pieces as thoughtful handmade gifts for relatives, friends, or members of their community. Beginners can simplify the design by using flatter appliqué pieces, while experienced sewists may add layered embroidery, more detailed clothing, or dimensional floral accents. The process also provides a peaceful creative activity during the busy holiday season. Whether displayed in your own home or given as a gift, the finished decoration represents the time, patience, and care invested in making something by hand.
Frequently Asked Questions About the Felt Nativity Scene for Wall Hanging Pattern
1. Is the Felt Nativity Scene for Wall Hanging Pattern suitable for beginners?
Yes. This felt sewing pattern for beginners can be completed by someone who understands basic cutting and hand-sewing techniques. Although the finished design contains several decorative elements, most pieces are created from simple shapes. Beginners can use running stitches, blanket stitches, and backstitches throughout the project. Working on one component at a time makes the construction process easier to manage. If you are new to felt crafts, consider practicing the facial embroidery and decorative edging on scrap material before assembling the final characters.
2. What type of felt works best for making a Nativity wall hanging?
Wool-blend felt is an excellent choice because it is flexible, durable, and generally comfortable to sew by hand. Polyester craft felt is also suitable, particularly for beginners or budget-friendly projects. A thickness of approximately 1–2 mm works well for the clothing, faces, and decorative appliqué pieces. For the background, slightly firmer felt or an additional backing layer helps maintain the arched shape. Choose felt that cuts cleanly and does not stretch excessively when handled.
3. How long does it take to complete a handmade felt Nativity scene?
The total time depends on your sewing experience and the level of decorative detail you choose. A beginner may need approximately 10–16 hours spread across several sessions, while an experienced felt crafter may finish a simplified version in 6–10 hours. The facial embroidery, layered clothing, and holly decorations usually require the most patience. Preparing all templates and materials before beginning can make the process more efficient.
4. Can I make the Nativity wall hanging without a sewing machine?
Absolutely. The Felt Nativity Scene for Wall Hanging Pattern is designed primarily for hand sewing. The blanket stitch, running stitch, whipstitch, and backstitch are sufficient for assembling nearly every component. Hand sewing also gives you greater control when working with small facial features and curved felt shapes. A sewing machine is optional and is not necessary to achieve the traditional handmade appearance.
5. How can I make the felt characters look three-dimensional?
Use a small amount of polyester fiberfill beneath the faces, bodies, and Baby Jesus’ blanket. Adding separate layers for the hair, beard, clothing, and hands also creates depth. Avoid excessive stuffing because the figures should remain relatively flat for wall display. Slightly raised clothing edges and carefully positioned overlapping pieces can create dimension without making the decoration bulky.
6. What stitches are most important for a felt Nativity pattern?
The blanket stitch is especially useful for joining felt edges and creating decorative outlines. The running stitch works well for clothing details and borders, while the backstitch is ideal for facial embroidery. The whipstitch helps attach appliqué pieces discreetly, and straight stitches can be used to create the star’s rays and holly leaf veins. These techniques are simple to learn and can be used in many other handmade Christmas projects.
7. Can I resize the Felt Nativity Scene for Wall Hanging Pattern?
Yes. You can enlarge or reduce the paper templates while maintaining the same proportions. For a smaller decoration, simplify the facial features and reduce the number of decorative leaves. For a larger wall hanging, use additional backing reinforcement and ensure that the hanging cord can support the finished weight. Always test the character arrangement on the resized background before cutting the final felt pieces.
8. How do I keep the embroidered faces symmetrical?
Lightly draw the facial guidelines with a removable fabric marker before stitching. Mark the positions of the eyes, nose, and mouth while the felt is lying flat. Use short stitches and avoid pulling the embroidery floss too tightly. Comparing both sides of the face after each few stitches helps maintain a balanced expression. Small variations are natural in handmade work and often contribute to the charm of felt characters.
9. Can fabric glue replace hand stitching?
Fabric-safe adhesive can help temporarily position small felt pieces, but stitching is recommended for the main structural connections. Hand stitches provide better long-term security, especially around the figures, hanging loop, and dimensional decorations. If you use adhesive, apply only a small amount and allow it to dry according to the manufacturer’s instructions. Avoid excessive glue near embroidery areas because it may stiffen the felt and make sewing difficult.
10. Is this felt Nativity wall hanging suitable as a Christmas gift?
Yes. A handmade Nativity Christmas gift can be a thoughtful choice for people who appreciate traditional holiday decorations and handcrafted items. You can personalize the piece with embroidered initials, a year, or a special message on the backing. If the decoration is intended for a household with young children, securely attach all small components and keep the item out of reach, as it is a decorative craft rather than a toy.
11. How should I store the wall hanging after Christmas?
Store the decoration flat in a dry, clean container, preferably between layers of acid-free tissue paper. Avoid folding the felt because permanent creases may develop. Keep heavy objects away from the padded characters and star. If the decoration must be stored vertically, support it so that the hanging loop does not carry the entire weight for an extended period. Proper care will help preserve the embroidery, shape, and colors.
12. Can I use this pattern to create other Christmas decorations?
Certainly. The same felt appliqué techniques can be adapted to smaller ornaments, decorative banners, Christmas stockings, and framed seasonal artwork. You can also use the star, holly leaves, and bow as individual embellishments for other handmade projects. Once you understand the construction of layered felt characters, it becomes easier to design additional Christmas scenes using similar methods.
Conclusion: Create a Meaningful Handmade Christmas Decoration
The Felt Nativity Scene for Wall Hanging Pattern is a rewarding sewing project that brings together creativity, traditional Christmas imagery, and the beauty of handcrafted details. Throughout this tutorial, you have learned how to select suitable felt materials, prepare paper templates, assemble Mary, Joseph, and Baby Jesus, and create the padded background that supports the scene. You have also explored how to make the embroidered Christmas star, decorative holly leaves, red berries, and burgundy bow that give the finished wall hanging its festive character.
By combining felt appliqué, blanket stitching, hand embroidery, and simple layering techniques, you can transform basic craft supplies into a charming decoration that can be enjoyed for many Christmas seasons. Remember that the suggested measurements can be adjusted to suit your preferred display space, and that the design can be personalized with different colors, embroidery details, and decorative accents. The most important part of the process is taking your time and enjoying the experience of creating something meaningful by hand.
EASILY FIND THE FREE PDF FOR THIS PATTERN HERE!
Now I would love to hear from you! What is your sincere opinion of this Felt Nativity Scene for Wall Hanging Pattern? Would you keep the traditional burgundy and sage green colors, or would you choose a different Christmas palette? Share your honest thoughts, creative suggestions, and ideas for improving the design in the comments. Your experiences and recommendations can inspire other sewing enthusiasts to create their own beautiful handmade Nativity decorations.