
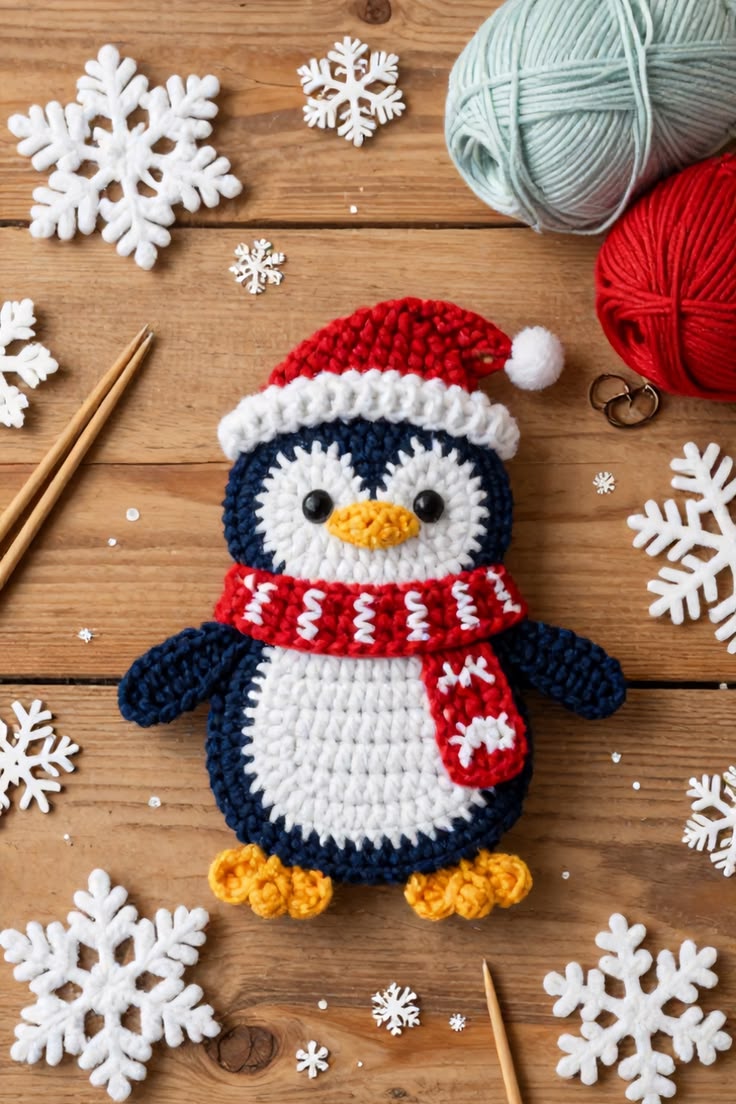
The Crochet Christmas Penguin Pattern is a delightful holiday project that combines the warmth of handmade decorations with the irresistible charm of a little winter penguin. Featuring a deep navy-blue body, a soft white belly, bright yellow feet, and a cheerful red Santa hat, this adorable penguin is perfect for bringing festive personality into your home. The matching red scarf adds another cozy detail, making the finished design especially attractive for Christmas decorating. Whether you enjoy creating handmade ornaments, seasonal gifts, or unique crochet collectibles, this Crochet Christmas Penguin Pattern offers an enjoyable opportunity to practice different crochet techniques. The project uses familiar stitches, simple shaping methods, and colorful accessories to create a recognizable holiday character. With patience and careful attention to each step, crocheters can transform a few balls of yarn into a beautiful Christmas decoration.
One of the most appealing aspects of this Christmas penguin crochet pattern is its combination of texture, color, and personality. The rounded body gives the penguin a soft, friendly appearance, while the white facial sections highlight its expressive black eyes and small yellow beak. The red Santa hat features a fluffy white brim and a pom-pom, creating the classic Christmas look that makes this project so charming. A decorative scarf wraps around the penguin’s neck, providing an additional opportunity to experiment with stitches and contrasting yarn colors. Although the finished design looks detailed, the construction can be divided into manageable sections that are suitable for adventurous beginners and intermediate crocheters. Each component is worked separately before being assembled into the completed figure. This approach makes the project easier to organize and allows you to concentrate on one technique at a time.
Creating your own Crochet Christmas Penguin Pattern also gives you the freedom to personalize the final result. You can use traditional Christmas colors, experiment with pastel shades, or create several penguins with different hats and scarves. The pattern described in this tutorial is inspired by the pictured penguin and uses US crochet terminology, making the instructions familiar to crocheters in the United States. It is designed as a softly stuffed, three-dimensional decoration with a relatively flat front, capturing the rounded silhouette and textured appearance of the reference design. The instructions include materials, stitch abbreviations, body construction, facial details, accessories, and finishing techniques. You will also discover practical tips for maintaining consistent tension, arranging the pieces, and achieving a neat handmade finish. By following the complete process, you can create a festive penguin that looks lovely on a Christmas shelf, inside a decorative basket, or as part of a handmade holiday display.
Materials, Crochet Abbreviations, and Preparation for the Christmas Penguin Pattern
Before beginning your Crochet Christmas Penguin Pattern, gather the materials needed to complete the body and accessories. Choose medium-weight yarn, commonly labeled worsted weight yarn (Category 4), in navy blue, white, red, and golden yellow. Navy blue creates the penguin’s outer body and wings, white forms the belly and facial markings, red is used for the Santa hat and scarf, and yellow adds the beak and feet. You will also need a 3.5 mm crochet hook, polyester fiberfill stuffing, a yarn needle, stitch markers, scissors, and two black safety eyes approximately 8 mm in diameter. A small amount of extra white yarn is useful for decorative scarf stitches and the hat’s fluffy brim. If the decoration is intended for a young child, replace plastic safety eyes with securely embroidered eyes because detachable components can present a choking hazard.
DISCOVER MORE FREE PATTERNS HERE!
Understanding the basic US crochet abbreviations will make the instructions easier to follow. The main stitches are ch (chain), sc (single crochet), hdc (half double crochet), dc (double crochet), sl st (slip stitch), and st (stitch). You will also use inc (increase), meaning two single crochet stitches worked into the same stitch, and dec (decrease), meaning two stitches combined into one using an invisible single crochet decrease. The abbreviation MR (magic ring) refers to an adjustable loop used to begin crocheting in the round. The instruction BLO (back loop only) means inserting the hook into the back loop of the stitch rather than underneath both loops. These techniques are commonly used in amigurumi crochet patterns because they help produce rounded shapes and tidy details.
For the finished penguin, the suggested size is approximately 22–25 cm tall, including the Santa hat, and around 14–16 cm wide across the main body, depending on yarn tension and stuffing. These dimensions are estimates rather than a guaranteed gauge measurement. A tight, even stitch tension is important because loose stitches may allow stuffing to become visible. Begin with a small test circle of single crochet stitches to check whether the fabric feels firm and flexible. If the stitches appear too open, try a smaller hook. If the fabric feels excessively stiff or difficult to work, increase the hook size slightly. Consistency matters more than matching an exact measurement for this decorative project.
The construction follows a simple sequence that helps organize the handmade Christmas penguin. First, crochet the navy-blue body and add a contrasting white belly. Next, create the face, eyes, and beak. Afterward, make the wings and yellow feet before crocheting the Santa hat and scarf. Finally, assemble the pieces, add stuffing, and complete the finishing details. Keeping the components separated until the appropriate assembly stage makes it easier to adjust their positions. You can also place the pieces temporarily with stitch markers before sewing them permanently. This preparation is especially helpful when creating symmetrical facial features.
A magic ring is the recommended starting method for the body because it produces a neat center without leaving a large opening. To make one, wrap the yarn around your fingers, insert the hook through the loop, pull up a strand, and secure it with a chain stitch. Work the required number of single crochet stitches into the ring, then gently pull the yarn tail to close the center. When working in continuous rounds, place a stitch marker in the first stitch of each round and move it upward as you progress. Do not join rounds unless the instructions specifically say to do so. This method creates a smooth fabric without noticeable seams, making it particularly useful for the penguin’s rounded body.
Color selection can make a significant difference in the appearance of your crochet Christmas decoration. Deep navy blue provides a softer alternative to traditional black, while bright white creates contrast across the face and belly. Golden yellow works beautifully for the beak and feet because it remains visible against the darker yarn. A rich Christmas red gives the hat and scarf a classic festive appearance. For a more delicate interpretation, consider pale blue, cream, and burgundy yarns. Regardless of the palette, choose yarns with similar thicknesses to maintain consistent proportions. Before starting, arrange your yarn colors together to confirm that they complement one another.
Step-by-Step Instructions for Crocheting the Penguin Body, Face, and Feet
Begin the crochet penguin body using navy-blue yarn and your 3.5 mm hook. Work in continuous rounds, marking the first stitch of each round. Follow this sequence: R1: 6 sc in MR (6). R2: inc in every stitch (12). R3: (1 sc, inc) repeat 6 times (18). R4: (2 sc, inc) repeat 6 times (24). R5: (3 sc, inc) repeat 6 times (30). R6: (4 sc, inc) repeat 6 times (36). R7: (5 sc, inc) repeat 6 times (42). R8: (6 sc, inc) repeat 6 times (48). R9: (7 sc, inc) repeat 6 times (54). R10: (8 sc, inc) repeat 6 times (60). This creates a rounded front panel that serves as the foundation of the penguin. Work R11–R13: 1 sc in each stitch (60), then fasten off. Make a second matching panel for the back, but leave a long working strand attached for joining the pieces later.
Create the white crochet belly as a separate circular appliqué. Using white yarn, work R1: 6 sc in MR (6). R2: inc around (12). R3: (1 sc, inc) repeat 6 times (18). R4: (2 sc, inc) repeat 6 times (24). R5: (3 sc, inc) repeat 6 times (30). R6: (4 sc, inc) repeat 6 times (36). R7: (5 sc, inc) repeat 6 times (42). Fasten off, leaving a long tail for sewing. Position the white circle over the lower half of the navy-blue front panel, allowing the dark border to remain visible. Slightly stretch and shape the white piece into an oval as you attach it. Sew carefully around the edges using small stitches, keeping the fabric flat and avoiding excessive tension.
For the penguin’s white face, make two rounded facial patches that sit side by side above the belly. Using white yarn, work R1: 6 sc in MR (6). R2: inc around (12). R3: (1 sc, inc) repeat 6 times (18). R4: (2 sc, inc) repeat 6 times (24). R5: (3 sc, inc) repeat 6 times (30). Fasten off and make a second identical circle. Arrange the circles so that their inner edges touch or overlap slightly, creating the familiar two-lobed penguin face. Sew the patches to the front panel, positioning them above the belly. Add the black safety eyes near the center of each white circle, following the manufacturer’s attachment instructions and installing the washers before the front and back panels are joined. For a child-safe embroidered alternative, use black yarn to create tightly secured satin-stitch eyes.
The small crochet penguin beak is worked with golden-yellow yarn. Begin with ch 6. Starting in the second chain from the hook, work R1: 1 sc, 1 hdc, 1 dc, 1 hdc, 1 sc (5 stitches). Turn and work R2: ch 1, 1 sc in each stitch (5). Fasten off, leaving a long yarn tail. Fold the piece gently lengthwise to create a slightly raised oval shape, then sew the outer edges together while leaving the base flat. Position the beak between the white facial patches, just below the eyes. Sew it securely using the yarn tail, adding a few small stitches through the center to keep the shape stable. The finished beak should be prominent enough to stand out without covering the lower portions of the eyes.
Next, crochet the penguin wings using navy-blue yarn. Make two matching pieces. R1: 6 sc in MR (6). R2: (1 sc, inc) repeat 3 times (9). R3: (2 sc, inc) repeat 3 times (12). R4–R7: 1 sc in each stitch (12). R8: (2 sc, dec) repeat 3 times (9). R9: 1 sc in each stitch (9). Fasten off, leaving a long sewing tail. Flatten each wing gently without adding much stuffing, allowing it to maintain a soft, slightly oval shape. Attach the wings to the sides of the penguin, approximately level with the upper portion of the belly. Angle them slightly downward to create a relaxed, friendly appearance. Sew through both layers at the attachment points so the wings remain securely positioned.
Complete the lower body with two bright yellow crochet feet. For each foot, begin with ch 7. Starting in the second chain, work R1: 5 sc, 3 sc in the last chain, then continue along the opposite side of the foundation chain with 4 sc and 2 sc in the final chain (14). R2: 1 sc in each stitch around (14). R3: (5 sc, dec) repeat twice (12). Fasten off and flatten the piece slightly. To create the appearance of three toes, use a yarn needle and matching yellow yarn to make two small indentations across the front edge. Repeat for the second foot. Position both feet underneath the body, leaving a small gap between them, and sew them securely to the lower edge of the front panel. Their golden-yellow color provides a cheerful finishing contrast to the navy-blue body.
How to Crochet the Santa Hat, Christmas Scarf, and Festive Accessories
The red Santa hat is one of the defining features of this Crochet Christmas Penguin Pattern. Start at the narrow tip with red yarn and work toward the wider brim. R1: 4 sc in MR (4). R2: 1 sc in each stitch (4). R3: (1 sc, inc) repeat twice (6). R4: sc around (6). R5: (2 sc, inc) repeat twice (8). R6: sc around (8). R7: (3 sc, inc) repeat twice (10). Continue increasing by 2 stitches every second round until the hat reaches 36 stitches. Work one additional round of 36 sc, then increase evenly to 42 stitches by repeating (5 sc, inc) six times. Work another round of 42 sc and increase to 48 stitches with (6 sc, inc) repeated six times. This produces a tapered hat with a slightly wider opening that can be adjusted to fit the top of the penguin’s head.
To create the fluffy white Santa hat brim, join white yarn to the last round of the red hat. Work R1: 1 sc in each stitch around (48). R2: ch 2, then work 1 hdc in each stitch around (48), joining with a slip stitch. For a fuller textured edge, work R3: ch 1, then alternate 1 sc and 1 hdc in successive stitches around. Fasten off and weave in the ends. If you prefer a more pronounced fluffy appearance, use a soft textured white yarn for the brim while maintaining the same stitch count. Gently shape the hat so the red portion curves toward one side. The brim should sit above the penguin’s eyes without covering the facial details.
A small white pom-pom completes the classic crochet Santa hat. To make a crocheted version, work R1: 6 sc in MR (6). R2: inc around (12). R3–R4: sc around (12). R5: dec around (6). Add a small amount of fiberfill before closing the opening with a yarn needle. Secure the pom-pom to the pointed end of the hat using several stitches. Alternatively, create a traditional yarn pom-pom by wrapping white yarn around a small piece of cardboard, tying the center tightly, cutting the loops, and trimming the strands into a round shape. Whichever method you choose, make sure the attachment is secure. The pom-pom should hang slightly to one side, reinforcing the playful appearance of the Christmas penguin.
The red crochet Christmas scarf is made separately and wrapped around the penguin’s neck. Using red yarn, begin with ch 49. Starting in the second chain from the hook, work Row 1: 48 sc, turn. Row 2: ch 1, 48 sc, turn. Row 3: ch 2, 48 hdc, turn. Row 4: ch 1, 48 sc, turn. Row 5: ch 1, 48 sc, then fasten off. This creates a long, narrow scarf with a slightly raised central texture. If the scarf appears too short or too long for your penguin, adjust the foundation chain before beginning. The finished scarf should wrap comfortably around the neck and leave enough length for one decorative hanging end.
To reproduce the festive scarf details visible in the inspiration image, add white embroidered crochet-style accents across the red fabric. Thread a yarn needle with white yarn and make short vertical zigzag stitches at regular intervals. You can also use surface slip stitches to create small decorative lines. Keep the decorations evenly spaced, but avoid pulling the white yarn too tightly because this may cause the scarf to curl. At one end, create a small hanging section decorated with white stitches resembling miniature snowflakes or winter patterns. Wrap the scarf around the penguin’s neck and allow one end to hang down the front-right side. Secure it with a few discreet stitches so the accessory remains in place.
For an extra seasonal touch, consider making small crochet snowflake decorations to accompany the finished penguin. Using white yarn, begin with R1: ch 4 and join into a ring with a slip stitch. R2: ch 1, then work (1 sc into the ring, ch 5) six times; join to the first sc. R3: in each chain-5 loop, work (1 sc, ch 3, 1 sc, ch 5, 1 sc, ch 3, 1 sc), then move directly to the next loop. Repeat around and fasten off. Gently stretch the six points into shape and allow the snowflake to dry flat after lightly dampening it, if appropriate for the yarn. These decorative snowflakes are optional and are not attached to the penguin itself. They can be arranged around the completed figure for a charming winter display.
Assembling, Finishing, and Personalizing Your Crochet Christmas Penguin
Once all the pieces are ready, begin assembling the Crochet Christmas Penguin Pattern by checking the placement of the facial details, belly, wings, and feet. Lay the front body panel on a flat surface and arrange the components according to the reference image. The white face should occupy the upper portion of the body, while the belly should cover much of the lower center. The wings extend outward from the sides, and the yellow feet appear beneath the rounded body. Use stitch markers or temporary yarn ties to hold the pieces in place while you inspect their alignment. Small adjustments at this stage can significantly improve the final appearance. Make sure all appliqués and facial details are securely attached before joining the body panels.
To join the front and back panels, place them together with the right sides facing outward. Using the navy-blue yarn still attached to the back panel, work single crochet stitches through the corresponding outer edge stitches of both panels. Continue around the body, leaving an opening approximately 5–6 cm wide near the bottom. Add polyester fiberfill gradually, spreading it evenly through the center and edges. Avoid overstuffing because the intended design has a rounded but relatively flat profile. Once the body feels comfortably filled, continue crocheting through the remaining edge stitches to close the opening. Fasten off securely and weave the yarn tail through several stitches before trimming the excess.
Attach the Santa hat to the upper portion of the penguin’s head. Position the white brim slightly above the eyes, allowing the red pointed section to lean toward one side. Use a yarn needle and matching yarn to sew the inner edge of the brim to the body. If the hat opening is larger than the head, gather it gently with a few hidden stitches. Add a very small amount of stuffing inside the lower portion of the hat only if necessary to maintain its shape. The upper tip should remain flexible enough to curve naturally. Check that the white pom-pom is securely attached and that the hat does not cover the penguin’s expression.
Next, arrange the Christmas scarf around the narrow area between the face and belly. Wrap it loosely enough to maintain the rounded appearance of the penguin but firmly enough that it will not slide out of position. Cross the scarf ends slightly toward one side and allow the decorated section to hang down the front. Secure the scarf with several small stitches using matching red yarn. Hide the stitches underneath the scarf wherever possible. The combination of red yarn, white embroidery, and the bright yellow beak creates an appealing contrast against the navy-blue body. This colorful balance is one of the most recognizable characteristics of the finished holiday penguin.
Personalizing your handmade crochet Christmas penguin can make the project even more meaningful. For a traditional design, maintain the red, white, navy, and yellow color combination. For a softer winter theme, substitute pastel blue for navy and use pale pink or mint green for the accessories. You can also embroider a tiny heart onto the scarf, add a small crocheted bow, or create matching penguins with different hat colors. If making several decorations, keep the same stitch counts but vary the yarn shades to produce a coordinated collection. For a larger version, use thicker yarn and an appropriately sized hook rather than simply increasing every stitch count. Remember that different yarn weights will change the final measurements and may require adjustments to the accessories.
Proper care helps preserve the appearance of your crochet Christmas decoration for many holiday seasons. Gently remove surface dust with a soft brush or a clean, dry cloth. If washing becomes necessary, first check the care instructions for the yarn and stuffing. Hand washing in cool water with mild detergent is generally a cautious approach for many washable acrylic yarns, but it is not appropriate for every material or embellishment. Avoid twisting or wringing the stuffed penguin, as this may distort its shape. Instead, press out excess moisture with a towel and allow it to dry completely in a well-ventilated area. Store the finished decoration in a clean, dry container between Christmas seasons to protect the stitches, colors, and accessories.
Frequently Asked Questions About the Crochet Christmas Penguin Pattern
Is the Crochet Christmas Penguin Pattern suitable for beginners?
Yes, this pattern can be completed by adventurous beginners who already understand basic single crochet stitches, increases, decreases, and working in the round. The main body is relatively straightforward, while the facial details and accessories require a little more patience. Beginners may find it helpful to complete each component separately before attempting the final assembly. The project is also a useful introduction to amigurumi-style crochet, especially for those interested in making seasonal characters.
What type of yarn is best for a crochet Christmas penguin?
Medium-weight acrylic or cotton-blend yarn is a practical choice for this Christmas crochet pattern. Acrylic yarn is often lightweight, affordable, and available in a wide variety of colors. Cotton yarn can provide excellent stitch definition and a slightly firmer structure. Choose yarns of similar thickness for the body, belly, wings, and accessories. Using consistent yarn weights helps the individual pieces fit together properly.
How long does it take to crochet a Christmas penguin?
The time required depends on your experience, crochet speed, and the amount of decorative detail you include. Many intermediate crocheters may complete a project of this size in approximately 5–9 hours, although beginners may need longer. Working the body panels and attaching the facial pieces usually takes a significant portion of the time. The hat, scarf, and finishing details can be completed in separate sessions. There is no need to rush, especially when making a decoration intended to be enjoyed for years.
Can I make this crochet penguin without safety eyes?
Absolutely. Embroidered eyes are an excellent alternative, particularly when creating a penguin for a household with babies or young children. Use black yarn and a yarn needle to form small rounded eyes with tightly secured stitches. You can also create miniature black crochet circles and sew them firmly onto the white facial patches. Embroidered details eliminate the detachable plastic eye components, although all seams and other embellishments must still be checked for safety.
How can I make the crochet penguin larger or smaller?
The simplest way to adjust the finished size is to change the yarn weight and hook size. Thicker yarn and a larger hook generally produce a larger penguin, while thinner yarn and a smaller hook create a more compact decoration. Keep in mind that the hat, scarf, and other accessories will also change in size. If you decide to modify the stitch counts instead, adjust all related components proportionally. Making a small sample first can help you estimate the final dimensions.
Why does my crochet penguin body look uneven?
Uneven shaping is often caused by inconsistent stitch tension, misplaced increases, or accidentally skipped stitches. Use a stitch marker to identify the beginning of each round and count your stitches regularly. When making increases, distribute them according to the pattern rather than placing several close together. If the body appears overly pointed or wavy, check the stitch counts before continuing. Gentle shaping during stuffing can also improve the finished silhouette.
Can I use this pattern to make a Christmas ornament?
Yes, although the suggested size is better suited to a shelf decoration, wall hanging, or festive display. To create a smaller crochet penguin Christmas ornament, use lighter yarn and a smaller hook. Add a secure hanging loop at the top of the hat or behind the head. Make sure the loop is firmly stitched into the body rather than attached only to the pom-pom. Lightweight stuffing can help prevent the ornament from pulling downward when hung.
How do I prevent stuffing from showing through the crochet stitches?
Use a hook that creates firm, closely spaced stitches and avoid overstuffing the body. For amigurumi projects, a hook slightly smaller than the yarn label recommendation often produces a denser fabric. Work with consistent tension throughout the rounds and inspect the fabric as you add stuffing. If small gaps become visible, redistribute the filling or remove a little stuffing. A well-shaped penguin should feel soft but maintain its structure without stretching the stitches excessively.
Can I sell finished penguins made using this tutorial?
You can generally sell handmade items you personally create using these instructions, subject to applicable laws and any relevant rights associated with other designs or branding. Focus on your own craftsmanship, original photographs, and accurate product descriptions. If selling finished decorations, clearly state the materials, approximate dimensions, and intended use. Decorations containing small components should include appropriate safety information. Handmade Christmas penguins can be attractive seasonal items at craft fairs and holiday markets.
How can I keep the Santa hat from falling off?
The most reliable method is to sew the hat directly to the penguin’s head using matching yarn. Position the brim carefully, then make small stitches around its inner edge. For additional stability, secure the back of the hat and the point where the red section bends. Avoid using temporary adhesives if you want a durable, washable decoration. A properly attached hat should remain in place during normal handling and storage.
What other decorations can I make to match the Christmas penguin?
You can create coordinating crochet snowflakes, miniature Christmas trees, small stars, or colorful winter scarves. Using the same yarn palette helps the pieces look like part of a matching holiday collection. A group of penguins with different accessories can also create a charming winter scene. These decorations work especially well in handmade Christmas displays where texture and color are important design elements.
Conclusion: Create Your Own Crochet Christmas Penguin Pattern
The Crochet Christmas Penguin Pattern is a wonderful way to combine creativity, traditional crochet techniques, and the joyful atmosphere of the holiday season. Throughout this tutorial, you learned how to prepare the necessary materials, understand essential US crochet abbreviations, construct a rounded penguin body, create white facial markings, and add the characteristic yellow beak and feet. You also discovered how to crochet a festive Santa hat, make a matching red scarf, assemble the individual components, and finish the decoration with neat, secure stitches.
One of the greatest advantages of this handmade Christmas crochet project is its versatility. You can follow the classic navy-blue, white, red, and yellow design or experiment with different colors and accessories to create a personalized penguin. The finished decoration can become part of your seasonal home décor, a thoughtful handmade gift, or a special addition to a collection of crocheted Christmas characters. Each stitch contributes to a project that reflects your time, patience, and creativity.
EASILY FIND THE FREE PDF FOR THIS PATTERN HERE!
Now that you have explored the complete Crochet Christmas Penguin Pattern, consider making your own version and experimenting with the details that make handmade projects unique. We would love to hear your sincere opinion! What did you think of this Christmas penguin tutorial? Which part of the project did you enjoy most, and what would you change or improve? Share your honest feedback, creative suggestions, and ideas for future crochet patterns in the comments. Your experiences and recommendations can inspire other crochet enthusiasts to create beautiful handmade decorations and enjoy the magic of Christmas crafting.