
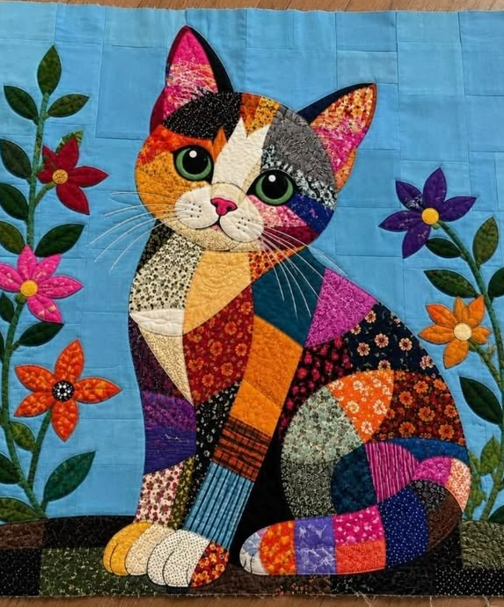
The Cat themed patchwork wall hanging Pattern is a delightful quilting project that combines colorful fabric scraps, creative appliqué techniques, and decorative stitching to produce a charming piece of handmade wall art. Featuring an adorable sitting cat surrounded by bright flowers, this design celebrates the beauty of traditional patchwork while introducing a playful, modern personality. The cat’s body is assembled from colorful fabric sections, including floral prints, geometric patterns, and contrasting textures that create a beautiful mosaic effect. Its expressive green eyes, delicate whiskers, pointed ears, and curled tail make the finished design especially appealing. Whether you are an experienced quilter or a beginner looking to develop your sewing skills, this project offers an enjoyable opportunity to explore fabric appliqué, patchwork quilting, and decorative wall hanging techniques.
One of the most attractive characteristics of this cat patchwork wall hanging is its ability to transform leftover fabric into something meaningful and decorative. Instead of relying on a single fabric collection, the design encourages the use of small cotton pieces in orange, pink, purple, yellow, blue, green, cream, and black. These fabrics are arranged across the cat’s face, body, legs, and tail to create a lively combination of shapes and colors. The background features a soft blue fabric that provides contrast without distracting from the central character. Along both sides, colorful appliqué flowers and green stems create the appearance of a cheerful garden. A dark patchwork strip along the bottom grounds the composition and gives the impression that the cat is sitting peacefully among the flowers. This combination makes the Cat themed patchwork wall hanging Pattern particularly suitable for sewing rooms, bedrooms, creative studios, and cozy living spaces.
Creating this handmade decoration is also an excellent way to practice several essential quilting skills in one manageable project. You will learn how to prepare a fabric background, organize irregular patchwork pieces, assemble a cat appliqué, create expressive facial details, attach floral decorations, and finish the entire panel with quilting stitches. The instructions below use U.S. sewing and quilting terminology, with measurements provided in centimeters for accurate cutting and assembly. The suggested finished size is approximately 50 cm wide by 60 cm tall, although you can enlarge or reduce the design to suit your available wall space. Because the reference image does not provide exact templates or measurements, the dimensions in this tutorial are practical recommendations for recreating its appearance rather than measurements taken from an original pattern. With careful preparation, patience, and a little imagination, you can make a beautiful handmade quilt that captures the cheerful personality of the pictured cat.
1. Materials, Fabric Selection, and Preparing the Cat Patchwork Wall Hanging Pattern
Before beginning your Cat themed patchwork wall hanging Pattern, gather the materials needed to create a durable and attractive quilted panel. Choose high-quality quilting cotton for the background, cat, flowers, and border sections. Cotton is especially suitable because it is easy to cut, press, sew, and layer. You will need approximately 60 × 70 cm of light blue background fabric, 60 × 70 cm of backing fabric, and a similar amount of low-loft cotton or polyester batting. Prepare assorted fabric scraps for the cat’s colorful body, including orange, yellow, pink, purple, cream, gray, black, and patterned cotton pieces. You will also need green fabrics for the flower stems and leaves, bright fabrics for the petals, and dark scraps for the ground strip. Additional supplies include fusible appliqué web, matching sewing thread, embroidery floss, quilting needles, scissors, a rotary cutter, a cutting mat, an iron, and sewing pins or clips.
DISCOVER MORE FREE PATTERNS HERE!
The first preparation step involves deciding how large your finished wall hanging should be and arranging the main design elements. For a finished panel measuring approximately 50 × 60 cm, cut the blue background fabric to 52 × 62 cm, allowing a 1 cm seam allowance on each side. Position the cat slightly toward the center, leaving enough room for the flowers on both sides. The cat can measure approximately 36–39 cm tall, from the highest ear to the bottom of its front paws. Its widest body section, including the curled tail, can extend approximately 34–36 cm. Reserve the lower 7–9 cm of the composition for the dark patchwork ground. These proportions help create a balanced design while maintaining the playful appearance of the original image.
Next, prepare the cat appliqué templates using tracing paper, lightweight cardboard, or printable pattern paper. Divide the cat into recognizable sections: two pointed ears, a rounded head, facial patches, a muzzle, a small triangular nose, a curved body, front legs, paws, and a curled tail. Rather than drawing every tiny fabric shape separately at first, begin with the complete silhouette of the sitting cat. Then sketch the internal patchwork divisions, using triangles, rectangles, curved wedges, and irregular shapes. This approach makes it easier to maintain the correct proportions. Label each section with its intended fabric color and mark the direction of any directional prints before cutting.
For the colorful patchwork sections, select fabrics that create contrast without overwhelming the overall design. The reference project features warm orange and yellow areas across the face and front legs, balanced by darker purple, navy, gray, and black patches. Bright pink and floral fabrics add visual interest to the ears, shoulders, and tail. Cream-colored pieces highlight the muzzle, chest, and paws, making the cat’s features more visible against the busy patterns. Try arranging the fabric scraps on a table before applying fusible web. A helpful patchwork color arrangement technique is to alternate large patterned pieces with smaller, quieter prints so the eye can move comfortably across the composition.
Prepare the flower appliqué pieces separately. The design includes several colorful flowers growing from slender green stems, with pointed leaves extending outward. For a similar appearance, create five or six flowers in different sizes, ranging from approximately 5 to 10 cm across. Use pink, red, orange, and purple fabrics for the petals, and yellow, cream, or dark patterned fabric for the flower centers. The stems can be cut from green cotton strips approximately 0.8–1.2 cm wide, while the leaves can be shaped into elongated ovals with pointed ends. Because the flowers are decorative appliqués, their exact measurements can vary, allowing you to use your favorite scraps.
Finally, prepare your sewing workspace and organize all pieces before assembling the quilt. Press the fabrics to remove wrinkles, check the grain direction where it matters, and keep the templates grouped by section. If you are using fusible appliqué web, follow the manufacturer’s instructions for attaching it to the wrong side of the fabric. Remember that some fusible products require tracing the design in reverse, especially when working with asymmetrical shapes. Test your iron temperature on a fabric scrap before fusing the final pieces. A little preparation at this stage makes the remaining steps easier and helps ensure that your handmade cat quilt wall hanging has clean edges, accurate placement, and a professional appearance.
2. Creating the Colorful Patchwork Cat Appliqué Step by Step
Begin constructing the cat by preparing the head, which is the main focal point of the Cat themed patchwork wall hanging Pattern. Trace a rounded cat head approximately 19 cm wide and 17 cm tall, excluding the ears. Cut the outer shape from a temporary paper template and divide its interior into several irregular sections. The reference design combines orange, yellow, cream, gray, black, and magenta patches, creating a lively expression. Cut each fabric section with enough allowance for your chosen assembly method. For a fused raw-edge appliqué, neighboring patches can overlap by approximately 2–3 mm, while traditional piecing generally requires a 0.6 cm seam allowance. Arrange the sections until the colors feel balanced, then fuse or sew them together using your preferred technique.
The pointed ears are an important feature because they establish the cat’s recognizable silhouette. Make two triangular ears approximately 8–10 cm tall, adjusting their shape to fit the head. Use darker fabric for the outer edges and bright pink, orange, or patterned cotton for the inner ear sections. In the reference image, one ear rises almost vertically while the other angles slightly outward, creating a charming asymmetrical expression. Assemble the ear fabrics first, then position them behind the upper edge of the head. Secure them with fusible web or temporary basting before attaching the entire head assembly to the blue background. Stitch around the ear edges using a narrow zigzag or blanket stitch to prevent fraying.
Continue by creating the body, chest, and front legs. The cat’s torso has an elegant, slightly curved silhouette, with one side extending outward to form the rounded back and the other narrowing toward the front paws. Divide the body into irregular patchwork fabric shapes, using orange rectangles, purple wedges, floral pieces, and dark patterned sections. The chest can feature lighter cream and yellow fabrics that contrast with the surrounding darker pieces. Construct the front legs using long, narrow patchwork sections, approximately 5–7 cm wide, extending toward the bottom of the panel. Position one leg slightly in front of the other to create depth. Keep the internal seam lines aligned where possible, but remember that the beauty of this design comes from its creative, irregular arrangement.
The curled tail is another distinctive feature of this colorful cat quilt pattern. In the reference design, the tail curves around the lower right side of the body and finishes in a rounded shape near the front paws. Draw a wide, curved tail template approximately 25–28 cm long along its outer curve, then divide it into colorful patchwork segments. Use alternating orange, purple, red, pink, blue, and patterned fabrics to emphasize its shape. Assemble the pieces with fused raw-edge appliqué or another suitable technique, keeping the seams flat. Place the tail over the lower body section so that it appears naturally curled in front of the cat. Stitch around the outer edge and add decorative quilting lines to define each fabric segment.
Once the main silhouette is complete, create the facial details that bring the cat to life. The large green eyes are especially important, so cut two oval eye shapes approximately 4–4.5 cm tall, using green fabric with black centers and small white highlights. Add a narrow dark outline around each eye to increase definition. The muzzle can be formed from two rounded cream pieces placed beneath the eyes, with a small pink triangular nose positioned between them. Use black embroidery thread to create the mouth, small whisker dots, and delicate facial outlines. The whiskers can be embroidered using long straight stitches or added with carefully secured decorative thread. These details transform a simple fabric silhouette into an expressive cat appliqué quilt design.
After completing the cat’s face and body, secure all appliqué sections with appropriate stitching. A narrow zigzag stitch is useful for curved edges, while a blanket stitch gives the project a traditional handmade appearance. For small facial details, use a shorter stitch length to maintain control. Stitch around the outer silhouette first or after the internal sections, depending on how the layers overlap. If the fabric is lightweight or the stitching becomes dense, place a removable or tear-away stabilizer behind the background while working. Press the completed appliqué gently from the wrong side, using a pressing cloth to protect delicate embroidery. At this stage, the colorful cat should be clearly recognizable and ready to become the centerpiece of the finished wall hanging.
3. Sewing the Floral Background and Assembling the Quilt Panel
With the cat appliqué prepared, begin building the garden-inspired background that makes the Cat themed patchwork wall hanging Pattern so visually appealing. Lay the blue background fabric on a flat surface and mark its center with removable fabric chalk. Position the cat slightly above the bottom edge, leaving enough space for the dark ground strip. The flowers should frame the cat without covering important facial or body details. The reference image shows taller flower stems on the left and a slightly smaller arrangement on the right. This asymmetrical layout adds movement and keeps the composition from appearing too rigid. Before attaching anything permanently, photograph the arrangement so you can check the spacing and overall balance.
Create the flower stems using narrow green fabric strips or bias-cut fabric for curved sections. For a neat finish, fold the edges under and stitch close to both sides, or use fusible web for raw-edge appliqué. Arrange the stems so they rise naturally from the lower portion of the panel, bending slightly toward the flowers. Add pointed leaves along the stems, alternating their direction to create a realistic garden effect. The leaves can measure approximately 3–6 cm long, depending on their position. Use different shades of green to add dimension, including olive, forest green, and medium green. Secure the leaves with a blanket stitch or narrow zigzag stitch, following their curved edges carefully.
Next, assemble the colorful flowers. For each flower, cut five or six rounded or pointed petals, depending on the style you want to reproduce. The image includes bright pink flowers, orange blossoms, a red flower, and a purple flower, each with a contrasting circular center. Arrange the petals around a central point and overlap their inner ends slightly so no background fabric shows through the middle. Fuse the petals in place, then stitch around their outer edges. Add the circular center last, using yellow, cream, or dark fabric. You can enhance the flowers with simple embroidery, such as small seed stitches or short radiating lines. These details help the floral patchwork appliqué coordinate beautifully with the textured cat.
Now create the dark patchwork ground along the bottom of the wall hanging. Cut several fabric rectangles from black, dark brown, olive green, and muted patterned cotton. For a strip approximately 8 cm tall before finishing, cut the pieces to the desired widths while allowing for seams if piecing them traditionally. Join the rectangles with a 0.6 cm seam allowance, press the seams to one side, and trim the strip to fit the background width. If the cat’s paws and tail extend into this area, attach the ground strip first and then layer the lower cat sections over it. This order helps recreate the natural appearance of the cat sitting on a textured garden surface.
After positioning all the decorative elements, carefully check the design before final stitching. Look for gaps between appliqué pieces, uneven edges, and areas where busy fabric prints may blend together. Adjust the flower positions if they appear too close to the cat’s whiskers or ears. Make sure the front paws remain visible against the dark ground, using cream or light-colored fabric where necessary. Once you are satisfied, fuse the remaining pieces and stitch around every appliqué edge. For a more traditional appearance, consider using matching thread for most shapes and contrasting thread for selected decorative outlines. Consistent stitching helps unify the many fabric patterns and gives the cat quilt wall art a polished finish.
The next step is assembling the quilt sandwich. Place the backing fabric wrong side up on a clean, flat surface, followed by the batting and the completed appliqué top right side up. Smooth each layer carefully to remove wrinkles and prevent puckering. Secure the layers with curved safety pins, basting spray, or long temporary stitches. Begin quilting near the center and work outward, using gentle curves or closely spaced lines to secure the layers. The blue background can be quilted with subtle vertical or horizontal lines, while the cat’s body can feature decorative stitching that follows the individual patchwork sections. Avoid quilting directly across delicate whiskers or facial features unless the stitching is part of the intended design. This quilting stage adds texture, stability, and the characteristic softness of a handmade patchwork wall hanging.
4. Quilting, Binding, Hanging, and Caring for Your Finished Cat Wall Hanging
Once the quilt sandwich is securely basted, choose quilting patterns that complement the playful design. The reference image features visible quilting texture across the cat’s body and surrounding fabrics, giving the project a warm, handcrafted appearance. For beginners, straight-line quilting is a practical choice because it is easy to control and produces a neat finish. You can stitch parallel lines approximately 2–3 cm apart across the blue background, stopping and restarting around appliqué shapes as needed. More experienced quilters may enjoy free-motion quilting with gentle swirls, curves, or small decorative motifs. On the cat itself, follow the patchwork divisions with stitching that emphasizes the colorful fabric arrangement. The goal is to add texture without overwhelming the facial details.
After quilting, trim the edges of the panel to the intended finished dimensions. Use a quilting ruler and rotary cutter to square the corners and ensure that the opposite sides are equal in length. Prepare binding strips from coordinating cotton fabric, such as dark navy, black, green, or a multicolored print. For a binding that finishes approximately 0.8–1 cm wide, cut strips about 6 cm wide and join them with diagonal seams. Fold the continuous strip in half lengthwise, wrong sides together, and press. Sew the binding to the front of the quilt using a consistent seam allowance, mitering the corners neatly. Fold it over the raw edges and secure it to the back by hand or machine. This final border protects the quilt layers and gives the Cat themed patchwork wall hanging Pattern a clean, professional frame.
To display your finished quilt, add a hanging sleeve to the back. Cut a fabric rectangle approximately 9 cm tall and slightly shorter than the finished width of the panel. Hem the short ends, fold the fabric lengthwise, and sew the long edges together to form a tube. Press the sleeve with a little extra ease so the hanging rod will not pull the quilt’s upper edge out of shape. Attach the sleeve to the upper back of the quilt using small hand stitches that do not show through the front. Insert a lightweight wooden dowel or suitable hanging rod and attach a secure cord or appropriate wall hardware. For a small panel, this method provides even support and helps prevent the fabric from stretching over time.
Personalizing the design is one of the most enjoyable parts of making a cat themed fabric wall decoration. You can change the cat’s eye color, create different facial markings, or use fabric prints that remind you of a beloved pet. A black-and-white color scheme produces a striking modern appearance, while pastel fabrics create a softer, more delicate result. Seasonal versions are also possible: autumn fabrics with orange flowers, spring prints with colorful blossoms, or Christmas-themed cotton in red, green, and gold. If you prefer a more traditional quilting style, use coordinated reproduction fabrics and hand embroidery. These variations allow the same basic pattern to become a completely different piece of handmade art.
Caring for your completed wall hanging will help preserve its colors, stitching, and decorative details. Because the project includes numerous small appliqué pieces and embroidered facial features, gentle handling is recommended. Remove dust periodically with a soft brush or a vacuum on very low suction using a protective mesh screen. If washing becomes necessary, first check that all fabrics and threads are colorfast and that the appliqué materials are washable. A gentle hand wash in cool water with mild detergent may be suitable for securely stitched, washable materials, but delicate embroidery or loosely attached details may require spot cleaning instead. Avoid twisting or wringing the quilt, and dry it flat on a clean towel away from direct sunlight.
Completing this Cat themed patchwork wall hanging Pattern provides more than a decorative item for your home. It is an opportunity to practice creative fabric selection, improve appliqué accuracy, experiment with quilting textures, and develop confidence in combining multiple sewing techniques. Each fabric scrap contributes to the personality of the finished cat, making the project unique even when following the same general layout. Whether you keep the quilt for your sewing room, display it in a cozy corner, or give it as a thoughtful handmade gift, the finished piece reflects the time and care invested in every stitch. Most importantly, the project demonstrates how traditional patchwork quilting techniques can be transformed into cheerful, expressive fabric artwork.
Frequently Asked Questions About the Cat Themed Patchwork Wall Hanging Pattern
Is this cat patchwork wall hanging suitable for beginners?
Yes. Beginners can complete this project by using fusible raw-edge appliqué and a basic straight or narrow zigzag stitch. The most challenging parts are arranging the small facial pieces and maintaining the cat’s proportions. Starting with larger appliqué shapes and practicing on fabric scraps will make these steps easier.
What is the best fabric for a cat appliqué quilt?
High-quality 100% quilting cotton is generally the best choice because it is stable, easy to press, and available in a wide variety of prints. Cotton scraps are particularly useful for the colorful patchwork sections. Avoid mixing very stretchy fabrics with quilting cotton unless you stabilize them properly.
Can I make this wall hanging without a sewing machine?
Yes. You can complete the project by hand using blanket stitches, running stitches, and embroidery techniques. Hand sewing will take longer, especially around the small appliqué sections, but it can produce a beautiful traditional finish.
Do I need an exact printable template to make this design?
An exact template is not essential if you are comfortable drawing and cutting appliqué shapes. You can sketch the cat silhouette and divide it into patchwork sections using the reference image as inspiration. However, a full-size template is helpful for maintaining consistent proportions, especially around the eyes, paws, and curled tail.
What size should the finished cat patchwork wall hanging be?
The suggested finished size for this tutorial is approximately 50 × 60 cm, but the design can be resized. A smaller version may be suitable for a narrow wall, while a larger version can become a decorative quilt panel. When resizing, adjust the appliqué shapes and quilting density proportionally.
How can I prevent the appliqué fabric from fraying?
Use fusible web to stabilize the shapes and finish their edges with a narrow zigzag or blanket stitch. For additional durability, choose fabrics with a tight weave and avoid cutting extremely narrow pieces. Turned-edge appliqué is another option if you prefer to conceal the raw edges completely.
What quilting technique works best for this project?
A combination of raw-edge appliqué and machine quilting is an accessible approach. Straight-line quilting works well on the background, while outline quilting can emphasize the cat’s patchwork sections. Decorative free-motion quilting is optional and can add extra texture.
Can I use leftover fabric scraps instead of buying new materials?
Absolutely. This project is especially suitable for using leftover quilting cotton because the cat’s body contains numerous small, irregular sections. Select scraps with contrasting colors and prints, then arrange them carefully so the design remains visually balanced.
How long does it take to finish the cat wall hanging?
The time required depends on your experience and the complexity of your stitching. A confident beginner might spend approximately 12–20 hours completing the project, while an experienced quilter using fusible appliqué may finish it more quickly. Hand embroidery and detailed quilting will increase the total time.
Can I turn this cat design into a pillow or a larger quilt?
Yes. The cat appliqué can be adapted for a cushion cover, tote bag, table runner, or larger quilt. For a pillow, simplify the smaller facial details and make sure the embroidery and appliqué edges are securely stitched. For a larger quilt, consider repeating the cat motif or combining it with coordinating patchwork blocks.
Conclusion: Create a Beautiful Handmade Cat Patchwork Wall Hanging
The Cat themed patchwork wall hanging Pattern is a rewarding project that brings together the creativity of patchwork, the charm of animal appliqué, and the warmth of handmade quilting. Throughout this tutorial, you learned how to select coordinating fabric scraps, prepare the cat’s silhouette, assemble colorful patchwork sections, embroider expressive facial features, create decorative flowers, and build a quilted background. You also explored essential finishing techniques, including layering, quilting, binding, and adding a hanging sleeve.
EASILY FIND THE FREE PDF FOR THIS PATTERN HERE!
The beauty of this project lies in its flexibility. No two handmade cats need to look exactly alike, and every choice of fabric, color, and stitch can give your wall hanging a distinctive personality. With patience and attention to detail, even small leftover pieces of cotton can become a cheerful work of textile art that adds warmth and character to your home. Now it’s your turn! 🐱🧵🌸 Have you ever made a cat-themed patchwork quilt or fabric wall hanging? Which part of this design would you enjoy creating most: the colorful cat, the embroidered face, or the beautiful flowers?