
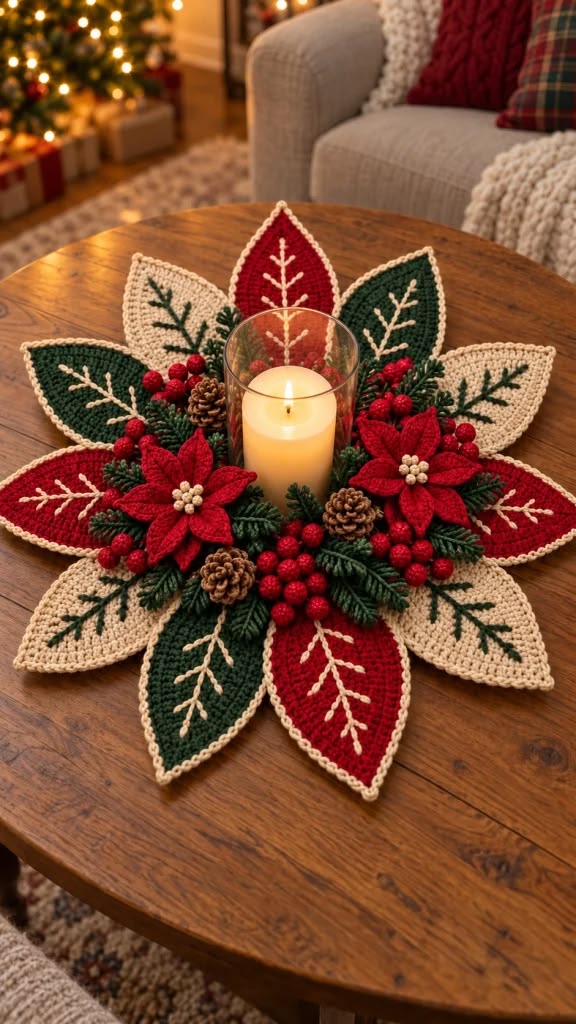
The Crochet candle centerpiece with a Christmas poinsettia motif Pattern is a beautiful way to bring handmade warmth, traditional holiday colors, and festive elegance into your home. Inspired by the timeless beauty of Christmas poinsettias, this decorative crochet project combines deep red flowers, forest-green foliage, cream-colored leaves, pinecones, and small berry clusters around a central candle holder. The finished arrangement creates an inviting Christmas decoration that looks wonderful on a coffee table, dining table, or holiday display. One of the most appealing features of this Christmas crochet centerpiece is the combination of different textures and carefully arranged botanical elements. Although the finished piece appears intricate, it can be created gradually by crocheting individual components and assembling them into one coordinated design.
Creating a crochet Christmas poinsettia centerpiece is also an enjoyable opportunity to explore several essential crochet techniques. The project includes pointed leaves, decorative embroidery, layered flower petals, textured greenery, and small three-dimensional embellishments. Each component contributes to the overall appearance, allowing crocheters to practice basic stitches while learning how to create realistic floral shapes. The color palette is especially important because traditional Christmas red, evergreen, and warm ivory create a balanced arrangement that complements many holiday decorating styles. Whether you enjoy making seasonal decorations for your own home or preparing thoughtful handmade gifts, this crochet candle centerpiece pattern offers plenty of opportunities for creativity. The following tutorial uses U.S. crochet terminology and provides practical measurements in centimeters to help you reproduce the arrangement.
The Crochet candle centerpiece with a Christmas poinsettia motif Pattern is best approached as a modular project, meaning that every leaf, flower, berry, and decorative accent is made separately before final assembly. This method makes the instructions easier to follow and allows adjustments to the finished centerpiece without changing the entire pattern. The design shown features ten large pointed leaves arranged like a festive wreath, with alternating red, green, and cream backgrounds. Two prominent red poinsettias sit near the front, surrounded by small evergreen branches, pinecones, and berries. A glass candle holder occupies the center, creating a welcoming focal point. For safety, this tutorial recommends a battery-operated LED candle, since yarn and other decorative materials must never come into contact with an open flame. With careful preparation, consistent stitching, and thoughtful assembly, you can create a beautiful handmade decoration that celebrates the charm of Christmas crochet.
1. Materials, Measurements, and Essential Crochet Stitches
Before beginning your Christmas poinsettia crochet pattern, gather medium-weight cotton yarn in Christmas red, dark green, warm cream, and pinecone brown. You will also need small amounts of lighter green and ivory yarn for embroidered leaf veins and flower centers. Cotton yarn is a practical choice because it provides clear stitch definition and helps the pointed leaves maintain their shape. For a centerpiece measuring approximately 42–48 cm across, use worsted-weight yarn, classified as Category 4 in the United States. Choose a 3.5 mm or 4.0 mm crochet hook, depending on your tension. You may need to adjust your hook size to achieve firm, even stitches.
DISCOVER MORE FREE PATTERNS HERE!
Additional supplies include scissors, a tapestry needle, stitch markers, measuring tape, removable pins, and a blocking mat. You may also use a small amount of polyester stuffing for the decorative berries and pinecones. A circular piece of sturdy felt, approximately 18 cm in diameter, can serve as a hidden support for assembling the arrangement. Select felt that matches the green yarn so it blends naturally with the foliage. For the center, choose a stable glass holder and an LED candle. A holder measuring approximately 8–10 cm in diameter works well with the suggested proportions. Keep the glass holder removable for cleaning and safe storage.
Understanding the basic crochet abbreviations will make the project much easier. All stitch instructions use U.S. crochet terms, which differ from some British terminology. The essential abbreviations are: ch (chain), sl st (slip stitch), sc (single crochet), hdc (half double crochet), dc (double crochet), tr (treble crochet), st (stitch), sts (stitches), inc (increase), and dec (decrease). The abbreviation BLO means working in the back loop only. A magic ring is used to begin small circular pieces, while turning chains help establish height when crocheting in rows. Unless stated otherwise, turning chains do not count as stitches.
For the large leaves, the main technique involves creating an oval foundation and shaping it into a pointed form with gradual increases and decreases. Single crochet produces a dense fabric, while half double crochet and double crochet create the gentle curves needed for a natural-looking leaf. Treble crochet can provide additional height near the widest sections. The contrasting borders are worked using single crochet stitches around the outer edges. After completing each leaf, decorative veins are embroidered with a tapestry needle using surface embroidery or surface slip stitches. These details give the leaves their distinctive botanical appearance and visually connect the entire centerpiece.
The poinsettia flowers require a slightly different approach because their petals overlap in layers. Each petal begins with a short foundation chain and expands toward the center before narrowing again at the tip. The petals are then joined around a small circular flower base. The raised appearance comes from arranging the petals at different angles rather than sewing them completely flat. For the pinecones, small rounded stitches and textured clusters create the impression of overlapping scales. The berries are crocheted as miniature spheres using single crochet rounds and simple decreases. These techniques are suitable for adventurous beginners who already understand basic crochet stitches.
The suggested finished measurements are approximately 16–19 cm long for each large leaf, 11–13 cm across for each poinsettia, and 1.5–2 cm across for each berry. Pinecones can measure about 3–4 cm tall, while evergreen sprigs may range from 5–9 cm long. These dimensions are estimates rather than a fixed gauge requirement, because the final size depends on yarn thickness, hook size, and individual tension. For the most consistent result, crochet one sample leaf first and measure it before making the remaining pieces. This simple preparation step helps ensure that the finished handmade Christmas table centerpiece looks balanced and symmetrical.
2. Step-by-Step Crochet Pattern for the Large Christmas Leaves
Begin the Crochet candle centerpiece with a Christmas poinsettia motif Pattern by making ten large pointed leaves. To recreate the alternating arrangement, crochet four red leaves, three dark-green leaves, and three cream-colored leaves. Each leaf will have a contrasting decorative vein, while the red and green leaves can receive cream-colored borders. The cream leaves may be outlined with the same ivory yarn or a slightly darker beige. Work the leaves individually so they can be blocked and positioned before assembly. For a sturdy construction, use relatively tight stitches and maintain consistent tension throughout each piece.
Step 1 – Create the foundation and first leaf row. With your selected leaf color, ch 21. Beginning in the second chain from the hook, work 1 sc, 1 hdc, 2 dc, 12 tr, 2 dc, 1 hdc, and 1 sc across the 20 available chains. This creates a graduated profile with taller stitches near the middle. Chain 1 and turn. For the next row, work one single crochet into each stitch, keeping the edges neat. The tall foundation row forms the central body of the leaf, while the following rows gradually establish the pointed shape. Because this is a decorative pattern rather than a fitted garment, slight variations in stitch tension can be corrected during blocking.
Step 2 – Shape the pointed leaf. Continue working in rows, decreasing one stitch at each end of every second row. To decrease neatly, use sc2tog, meaning single crochet two stitches together. Work the remaining stitches evenly across the row. Continue until approximately eight stitches remain, then work additional decreases on consecutive rows until only two stitches remain. Fasten off and weave in the yarn end. The finished shape should resemble an elongated pointed leaf. If the tip appears too rounded, add a small chain of two or three stitches at the end and slip stitch back toward the leaf. This creates a sharper botanical point.
Step 3 – Add a decorative border. Join cream-colored yarn near the base of a red or green leaf. Work single crochet stitches evenly around the entire outside edge, placing additional stitches where needed to prevent curling. At the pointed tip, work (1 sc, ch 1, 1 sc) in the same location to maintain a defined point. Continue around the opposite side and join with a slip stitch. For the cream leaves, use ivory or beige yarn for a subtle border. The contrasting edging gives the leaves a finished appearance and makes their individual shapes stand out when arranged together. Avoid adding too many stitches along the edges, since excessive increases may cause unwanted rippling.
Step 4 – Embroider the Christmas leaf veins. Thread a tapestry needle with cream yarn for the red and green leaves, or dark-green yarn for the cream leaves. Begin near the base and embroider one central vein extending toward the tip. Add approximately three or four pairs of diagonal branches along the central line, alternating their positions to create a natural pattern. Use a backstitch or chain stitch for clear definition. Keep the embroidered stitches relaxed enough that they do not pull the crochet fabric inward. This decorative technique is an important feature of the Christmas leaf crochet motif, transforming simple pointed shapes into elegant seasonal foliage.
Step 5 – Block and arrange the leaves. Lightly dampen the completed leaves and pin them onto a blocking mat, gently shaping their pointed ends and smooth sides. Allow them to dry completely before removing the pins. Arrange the ten leaves in a circular formation, overlapping their bases beneath the future candle position. Alternate red, green, and cream colors to distribute the shades evenly. A useful sequence is red, green, cream, red, cream, green, red, cream, green, and red. Rotate the leaves until the outer tips create a balanced starburst effect. The finished leaf arrangement should resemble a large decorative Christmas flower.
Step 6 – Secure the leaf foundation. Cut an approximately 18 cm circular felt base and position it beneath the overlapping leaf bases. Using matching yarn and a tapestry needle, sew the inner ends of the leaves securely to the felt. Work several small stitches through each leaf, keeping the outer sections free so they maintain their natural shape. Leave an open central area for the removable glass candle holder. Check the arrangement from above before tightening the final stitches. The foundation should lie flat on the table without excessive bunching. Once the leaf layer is complete, you will have the primary structure of your crochet Christmas candle centerpiece, ready for the floral decorations.
3. How to Crochet the Poinsettia Flowers, Pinecones, Berries, and Greenery
The most recognizable feature of this Crochet candle centerpiece with a Christmas poinsettia motif Pattern is the pair of rich red poinsettia flowers. To create each flower, begin with a small circular base. Make a magic ring and work 6 sc into the ring. Pull the ring closed and join with a slip stitch. In the second round, work 2 sc in each stitch, creating 12 stitches. In the third round, repeat (1 sc, inc) six times for a total of 18 stitches. Fasten off, leaving a long tail for assembly. This circular base provides enough room to attach the pointed petals while keeping the flower center compact and stable.
For each poinsettia, crochet five large petals and three smaller petals. To make a large petal, ch 12. Beginning in the second chain from the hook, work 1 sc, 1 hdc, 2 dc, 3 tr, 2 dc, 1 hdc, and 1 sc. Chain 1, turn, and work single crochet across the row. On the following row, decrease one stitch at each end while maintaining the central section. Continue shaping with gentle decreases until the petal narrows. Fasten off, leaving a sewing tail. For smaller petals, begin with ch 9 and use a similar sequence of graduated stitches. The petals should be elongated and pointed, resembling the distinctive bracts of a Christmas poinsettia.
To assemble the flower, position the five larger petals around the circular base, overlapping their lower edges slightly. Sew them in place using the remaining yarn tails. Add the three smaller petals above the first layer, rotating them so their tips fall between the larger petals. This arrangement creates the dimensional appearance visible in the inspiration image. For the center, crochet or embroider a cluster of small cream-colored knots. You can make five or six French knots using ivory yarn, or attach tiny crocheted bobbles. Repeat the process for the second flower. Both poinsettias should be similar in size, although slight variations make the finished decoration feel naturally handmade.
The pinecones provide a contrasting texture that complements the soft poinsettia petals. With brown yarn, begin with a magic ring and work 6 sc into the center. Increase to 12 stitches in the next round, then work several rounds evenly to create a short cylindrical shape. To suggest overlapping pinecone scales, work small 3-dc bobbles around the outer surface, spacing them evenly. A bobble is made by working three partially completed double crochet stitches into the same stitch and closing them together. Add another textured round, then gradually decrease to close the top. Stuff lightly before finishing if additional volume is needed. Make three or four pinecones and shape them gently with your fingers.
For the red berries, use the magic-ring technique to crochet small spheres. Work 6 sc in a magic ring, followed by 2 sc in each stitch for 12 stitches. Crochet two rounds of 12 sc, then decrease around using sc2tog until six stitches remain. Add a small amount of polyester stuffing and close the opening securely. Repeat until you have approximately 18–24 berries. For a realistic appearance, create a few slightly smaller berries by omitting one straight round. Group the berries into clusters of three or five and sew them together with matching red yarn. These bright accents fill small spaces between the flowers and greenery, giving the centerpiece its abundant festive appearance.
To make the evergreen sprigs, crochet a central chain of approximately 15–20 stitches using dark-green yarn. Work slip stitches along the foundation while adding short side branches made from chains of three to five stitches. Return along each branch with slip stitches before continuing along the main stem. Alternate branches on opposite sides to imitate a small pine or fir sprig. Make approximately 12–16 sprigs, varying their lengths for a natural appearance. Arrange the completed poinsettias, pinecones, berries, and evergreen branches over the inner section of the leaf foundation. Sew the decorations securely to the felt-supported crochet base, placing the larger flowers first and using the smaller elements to fill visible gaps.
4. Assembling, Decorating, and Caring for Your Christmas Crochet Centerpiece
Begin the final assembly by placing the finished leaf foundation on a clean, flat table. Position the two poinsettia flowers near the front, one slightly to the left and the other slightly to the right. Their petals should overlap the large leaves without completely hiding the embroidered details. Sew the flowers securely through their circular bases, using small stitches that remain invisible from above. Place the pinecones between and around the poinsettias to introduce texture and visual contrast. Arrange the berries in small groups near the flowers and along the inner edge of the centerpiece. This layering method creates a full, decorative composition while preserving the distinct appearance of every handmade element.
Next, position the crocheted evergreen sprigs between the flowers, berries, and pinecones. Allow some branches to extend outward over the large leaves, while others point toward the center. This variation creates depth and helps the arrangement resemble a natural Christmas wreath. Use dark-green yarn to attach the sprigs at their bases, leaving their outer branches slightly raised. If the design appears too crowded, remove a few pieces and rearrange them before sewing. The goal is to create a harmonious balance between the bright poinsettia petals, textured greenery, and decorative berries. A well-arranged crochet poinsettia centerpiece should look attractive from multiple viewing angles.
The candle holder is the central focal point, so its placement deserves particular attention. Choose a glass container with a stable, flat bottom and position it in the open space at the center of the wreath. Use a battery-operated LED candle, preferably one with a warm-white flickering effect, to create a cozy holiday glow without exposing the yarn to flame or excessive heat. Do not attach the glass permanently to the crochet base, because a removable holder is easier to clean and reposition. Keep the holder stable and ensure that the crocheted flowers and greenery do not interfere with its placement. Avoid using a real flame anywhere within this yarn-based arrangement.
Once the centerpiece is assembled, inspect the overall shape and make any necessary adjustments. Spread the large leaves evenly so their pointed ends form a balanced circular outline. Gently lift the poinsettia petals to create dimension and separate any evergreen branches that have become tangled. Check that all berries and pinecones are securely attached, particularly if the centerpiece will be moved frequently. Weave in any visible yarn ends using a tapestry needle, then trim excess threads carefully. If some leaves curl upward, lightly reshape them with your hands or repeat the blocking process on the affected sections. These finishing details help the handmade crochet Christmas decoration look polished and professionally completed.
The Crochet candle centerpiece with a Christmas poinsettia motif Pattern can be adapted to match different decorating preferences. For a traditional Christmas look, use bright red, evergreen, and ivory. For a softer farmhouse-inspired arrangement, choose muted burgundy, sage green, and oatmeal-colored yarn. A more elegant variation could include deep wine-red flowers, cream leaves, and subtle gold-colored embroidery. You can also reduce the number of large leaves to eight for a smaller centerpiece or add two additional leaves for a fuller display. If changing the size, adjust the felt foundation and central opening accordingly. These variations make the pattern suitable for many holiday interiors while preserving its recognizable poinsettia design.
Proper care will help preserve your Christmas crochet centerpiece for many holiday seasons. Remove the glass candle holder before cleaning or storing the arrangement. For light dust, use a soft brush or gently shake the decoration outdoors. If deeper cleaning is necessary, follow the care recommendations for your chosen yarn and test a small area first. Because the piece contains several layered components and optional stuffing, careful spot cleaning is generally preferable to machine washing. Allow any damp sections to dry completely before storage. Keep the centerpiece in a clean, dry container, protected from heavy objects that could flatten the flowers. With thoughtful care, this festive crochet creation can become a treasured part of your Christmas decorating tradition.
Frequently Asked Questions About the Crochet Candle Centerpiece with a Christmas Poinsettia Motif Pattern
1. Is this Christmas crochet centerpiece suitable for beginners?
This project is best suited to confident beginners or intermediate crocheters. The basic stitches are straightforward, but the complete arrangement includes several techniques, such as increasing, decreasing, shaping petals, embroidering veins, and assembling dimensional decorations. Beginners can make the project easier by completing one component at a time and practicing the large leaves before starting the poinsettias.
2. What is the best yarn for a crochet poinsettia centerpiece?
Medium-weight cotton yarn is an excellent choice because it provides good stitch definition and maintains decorative shapes. Cotton blends can also work well. Acrylic yarn is another option, especially when affordability and color variety are important. Regardless of the material, remember that all yarn and textile decorations must be kept away from flames and other heat sources.
3. How much yarn is needed for this Christmas centerpiece?
For the approximate dimensions described in this tutorial, plan for around 100–150 g of dark-green yarn, 100–150 g of red yarn, 75–100 g of cream yarn, and 25–50 g of brown yarn. Small quantities of additional yarn are needed for embroidery and decorative details. These estimates depend on yarn thickness, stitch tension, and the number of embellishments included.
4. Can I use a real candle in the center of the crochet decoration?
A real candle is not recommended. Yarn, felt, stuffing, and decorative fibers are combustible materials, and nearby flames can create a fire hazard. A battery-operated LED candle provides a similar warm appearance without an open flame. Select a stable, cool-running LED model and follow the manufacturer’s instructions.
5. How can I make the crochet leaves look more realistic?
The most effective methods are careful shaping, decorative embroidery, and blocking. Use graduated stitch heights to create a natural outline, add a contrasting central vein, and embroider diagonal branches. Blocking helps flatten uneven edges and sharpen the leaf tips. Consistent tension also improves the overall appearance.
6. Can I make the poinsettia flowers larger or smaller?
Yes. To make larger flowers, increase the foundation-chain length and add more shaping rows to each petal. For smaller flowers, reduce the number of chains and use fewer rows. You can also change hook size or yarn thickness. Keep the petals proportional to the circular base so the finished flowers remain balanced.
7. How long does it take to complete this crochet Christmas centerpiece?
The total time varies with experience and the number of decorative components. An intermediate crocheter may need approximately 12–20 hours to complete the project, including assembly and finishing. Beginners may need additional time to practice shaping techniques. Working in several short sessions makes the process more manageable.
8. Can I wash the finished Christmas crochet centerpiece?
Gentle spot cleaning is usually the safest option because the arrangement contains layered flowers, stuffed embellishments, embroidery, and a felt foundation. If the yarn becomes stained, use a mild cleaning solution appropriate for the fiber and avoid soaking the entire decoration. Always remove the LED candle and glass holder before cleaning.
9. What can I use instead of crocheted pinecones?
You can replace the pinecones with additional crocheted berries, small flowers, decorative leaves, or miniature crochet stars. Using only soft crochet embellishments creates a consistent handmade appearance. Keep any substitutions securely attached and avoid decorations that could damage the yarn or create sharp edges.
10. How do I keep the centerpiece flat on the table?
Use consistent stitch tension, block the large leaves before assembly, and attach the overlapping leaf bases to a firm felt foundation. Avoid pulling the sewing stitches too tightly, as this can cause bunching. Check the arrangement on a flat surface during assembly and adjust the leaf positions before securing the final decorations.
11. Can this pattern be used to make Christmas gifts?
Absolutely. A handmade crochet Christmas centerpiece makes a thoughtful gift for someone who enjoys seasonal decorations, traditional crafts, or cozy home accessories. Consider choosing colors that complement the recipient’s home. You can also include a removable LED candle and simple care instructions.
12. What makes this poinsettia crochet centerpiece different from a traditional crochet doily?
A traditional crochet doily usually features a relatively flat, continuous lace design. This centerpiece combines individually crocheted leaves with dimensional poinsettias, berries, pinecones, and evergreen branches. Its layered construction creates a decorative botanical arrangement rather than a flat lace mat, making it particularly suitable as a Christmas table focal point.
Conclusion: Create a Beautiful Handmade Christmas Tradition
The Crochet candle centerpiece with a Christmas poinsettia motif Pattern combines the beauty of traditional Christmas decorations with the creativity and personal satisfaction of handmade crochet. Throughout this tutorial, you learned how to select suitable materials, understand essential U.S. crochet stitches, create pointed Christmas leaves, embroider decorative veins, crochet layered poinsettia flowers, and make realistic-looking berries, pinecones, and evergreen sprigs.
You also discovered how to assemble these individual components into a balanced circular arrangement, position a removable LED candle holder safely, customize the colors, and care for the finished decoration. Each step contributes to a festive centerpiece that brings texture, warmth, and handmade character to your Christmas table.
One of the greatest pleasures of crochet is the ability to transform simple yarn into something meaningful. This Christmas poinsettia crochet pattern offers an opportunity to practice familiar stitches, explore new decorative techniques, and create a seasonal piece that can be enjoyed year after year.
EASILY FIND THE FREE PDF FOR THIS PATTERN HERE!
Now I would love to hear your sincere opinion! What do you think of this Christmas crochet centerpiece? Would you prefer the traditional red, green, and cream combination, or would you choose different colors? Please share your honest feedback, creative suggestions, and ideas for future crochet patterns. Your comments and experiences can inspire other crochet enthusiasts to create their own beautiful handmade Christmas decorations! 🎄🧶❤️