
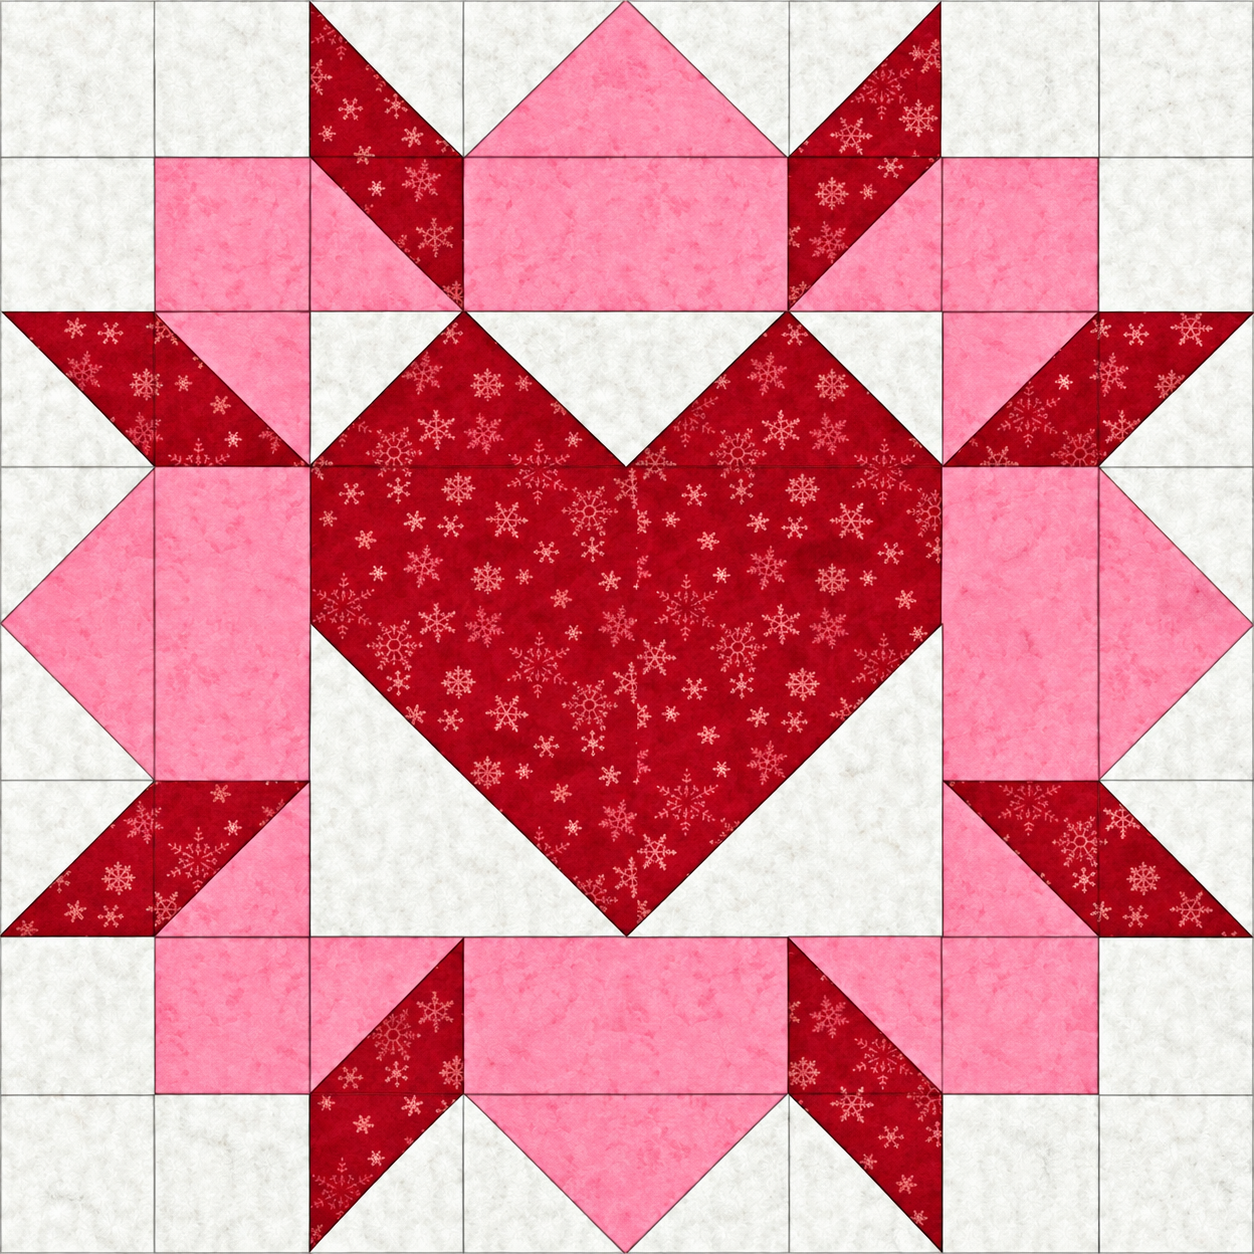
The “Heart Star” Quilt Block Pattern is a beautiful combination of traditional patchwork techniques, romantic heart shapes, and eye-catching geometric design. This charming quilt block features a large red heart at its center, surrounded by soft pink shapes and contrasting white background pieces that create a lovely star-inspired arrangement. Whether you enjoy making quilts for special occasions or simply want to add a meaningful design to your handmade collection, this project offers a wonderful opportunity to practice precision sewing while creating something truly personal. The combination of red, pink, and white fabrics makes the block especially suitable for Valentine’s Day decorations, anniversary gifts, friendship quilts, and cozy bedroom accessories. One of the most appealing features of this design is how simple geometric fabric pieces come together to form an intricate-looking composition. With careful cutting, consistent seam allowances, and patient assembly, even an adventurous beginner can create an attractive finished block.
Learning to make a Heart Star quilt block is also an excellent way to develop essential quilting skills that can be used in countless future projects. The design incorporates half-square triangles, square fabric pieces, diagonal seams, and traditional patchwork construction, all of which are fundamental techniques in American quilting. Although the completed block appears detailed, the construction becomes much easier when divided into smaller sections. The heart takes shape through strategically positioned red triangles and larger central fabric sections, while the surrounding pink pieces establish the star-like border. White background fabric provides contrast, helping the heart stand out without overwhelming the overall design. This tutorial explains the construction process in a practical, beginner-friendly manner, including fabric selection, cutting measurements, sewing techniques, assembly order, and finishing recommendations. By following the instructions carefully, you can reproduce the main visual features of the quilt block shown in the reference image.
Another wonderful aspect of the “Heart Star” Quilt Block Pattern is its versatility. A single finished block can become a decorative pillow front, a miniature wall hanging, or the centerpiece of a quilted table decoration. Multiple blocks can be arranged into a larger patchwork quilt, creating a repeating pattern filled with hearts and star-inspired shapes. The project also offers plenty of opportunities for creative fabric combinations, from traditional red and pink cotton prints to modern solids, floral fabrics, and subtle seasonal patterns. For the version presented here, the focus is on preserving the original arrangement of the design, using deep red fabric with delicate snowflake motifs for the central heart, textured pink fabric for the surrounding shapes, and soft white fabric for the background. The instructions use measurements in centimeters, along with familiar American quilting terminology, making the process accessible to quilters throughout the United States.
1. Materials, Fabric Selection, and Preparing the Heart Star Quilt Block
Before beginning your Heart Star quilt block tutorial, gather the necessary sewing materials and choose fabrics that provide enough contrast to highlight the design. The reference block features three main colors: deep red, medium pink, and warm white. The red fabric forms the central heart and several decorative points, while the pink fabric creates the surrounding geometric shapes. White fabric fills the negative spaces and defines the overall silhouette. For best results, use 100% quilting cotton, which is easy to cut, press, and sew accurately. Fabrics with similar weights are particularly important because they help prevent distortion when joining small patchwork pieces. Prewashing is optional, but if you choose to prewash, treat all fabrics consistently.
DISCOVER MORE FREE PATTERNS HERE!
For a beginner-friendly version, plan a finished block measuring approximately 40 × 40 cm (15¾ × 15¾ inches). The visible design can be interpreted as an eight-by-eight grid, with each grid unit finishing at 5 × 5 cm. This provides a useful framework for reproducing the arrangement of the original image. The cutting instructions below use a standard 0.64 cm (¼-inch) seam allowance, commonly used in American quilting. Because the original image is a visual design rather than a dimensioned cutting pattern, these measurements are a practical adaptation. The assembled block should measure approximately 41.3 × 41.3 cm before being sewn into a larger project, allowing for the outer seam allowances.
Prepare approximately 35 × 55 cm of red quilting cotton, 35 × 55 cm of pink quilting cotton, and 45 × 60 cm of white quilting cotton. These amounts provide a reasonable working allowance for the individual patchwork units, although directional prints, cutting errors, or a different construction method may require additional fabric. You will also need matching cotton or polyester sewing thread, a rotary cutter, a self-healing cutting mat, a transparent quilting ruler, fabric clips or pins, and a sewing machine with a reliable straight stitch. A quarter-inch presser foot is particularly helpful for maintaining accurate seam allowances throughout the project. Keep a seam ripper nearby for correcting any misplaced pieces.
To prepare the fabrics, press each piece carefully with a warm iron before cutting. Smooth fabric produces more accurate measurements and helps the edges remain straight when using a rotary cutter. Square the fabric edges by aligning them with the ruler and cutting mat markings. For the main grid, a finished square measures 5 × 5 cm, so a basic square unit should be cut at approximately 6.3 × 6.3 cm, allowing for two seam allowances. For half-square triangles, begin with larger fabric squares, typically around 7.5 × 7.5 cm, then trim the completed units to 6.3 × 6.3 cm after sewing. This slightly oversized method gives beginners extra room to correct small inaccuracies.
Study the heart-shaped quilt block layout before making the first cut. The central heart is not constructed as a single fabric appliqué; instead, its silhouette emerges from red geometric pieces joined with white background sections. The upper portion contains two prominent red lobes separated by a white V-shaped notch. The lower portion tapers into a central point. Around the heart, pink geometric shapes and red diagonal accents form the decorative star-inspired frame. Notice that many sections mirror one another across the vertical center of the block. This symmetry is useful because you can prepare matching left and right units together, reducing cutting mistakes and helping the completed block look balanced.
Finally, organize your workspace into separate areas for cutting, sewing, pressing, and layout assembly. Place the red, pink, and white pieces into labeled groups according to their intended position. A design board or large piece of neutral-colored felt can help keep the units arranged correctly before sewing. If you are new to quilting, photograph the layout before moving pieces to the sewing machine. This simple habit makes it easier to reconstruct the arrangement after pressing. Good preparation is one of the most important parts of successful patchwork quilt block construction, especially when working with a symmetrical design containing several diagonal seams.
2. Cutting and Sewing the Geometric Pieces for the Heart Star Pattern
The first construction stage involves preparing the individual geometric units that will eventually create the “Heart Star” Quilt Block Pattern. Rather than cutting the entire design into tiny triangles, use a combination of squares, half-square triangle units, and larger pieced sections. This approach simplifies the sewing process and reduces unnecessary seams. Start by preparing the white background pieces and the pink squares that appear along the outer portions of the design. The reference image uses an eight-unit grid, so arranging the design on an eight-by-eight planning sheet can help identify which areas require full squares and which need diagonal color divisions. Remember that some visually continuous regions can be assembled as larger pieces when their boundaries and seam allowances are planned correctly.
To make a half-square triangle (HST), place two contrasting fabric squares right sides together. Draw a diagonal line from one corner to the opposite corner on the wrong side of the lighter fabric. Sew a straight line approximately 0.64 cm away from each side of the marked diagonal. Cut directly along the drawn line to separate the square into two triangle units. Press the seams carefully and trim each finished HST to 6.3 × 6.3 cm. When sewn into the block, each unit finishes at 5 × 5 cm. This two-at-a-time method is particularly useful for the pink-and-white, red-and-white, and red-and-pink diagonal sections found throughout the pattern.
For the central heart, begin with the upper red triangle sections. These create the two rounded-looking lobes of the heart through angular patchwork rather than curved seams. Position red-and-white diagonal units so that their red portions face toward the center of the design. The white sections should form a distinct V-shaped notch between the two upper red areas. This notch is an important visual characteristic of the reference image, so check the direction of every diagonal before sewing. A triangle placed in the opposite orientation can change the appearance of the heart. Arrange the upper units on the design board and compare their angles with the reference before joining them.
Next, prepare the lower portion of the red patchwork heart. The central body should appear broad across the upper-middle section and gradually narrow toward the bottom point. Larger red sections can be used wherever the design shows uninterrupted red fabric, while red-and-white diagonal units create the sloping lower edges. Maintain consistent seam allowances to keep both sides symmetrical. When assembling larger sections, it is often helpful to sew smaller units into rows and then join the rows. Press the seams in directions that reduce bulk, especially where several diagonal seams meet. The heart should remain centered, with the bottom point aligned along the vertical midpoint of the quilt block.
The surrounding pink star-inspired patchwork requires a different arrangement of geometric pieces. At the top and bottom, pink triangular points extend outward from horizontal pink sections. On the left and right sides, matching pink points project toward the outer edges of the block. These features create the visual impression of a decorative star or flower surrounding the central heart. Use pink-and-white half-square triangle units to create the outer points, and pink squares or rectangular sections for the adjoining areas. The small red diagonal accents between the pink sections add contrast and visually connect the outer design to the central heart. Arrange each matching pair symmetrically before sewing.
Once the individual units are ready, perform a dry layout, meaning that all pieces are positioned without stitching them together. Place the white background units around the outer edges and corners, followed by the pink sections and red accents. Check that the top and bottom sections mirror each other and that the left and right sides remain balanced. Look carefully at the orientation of every half-square triangle. The red accents should point toward the heart or follow the diagonal direction shown in the reference design, while the pink triangles should point outward. Taking time to confirm the layout now will prevent frustrating corrections later and help preserve the distinctive appearance of the original quilt block.
3. Step-by-Step Assembly of the Heart Star Quilt Block
Begin assembling the Heart Star patchwork block by dividing the layout into manageable sections. A practical approach is to work from the center outward, constructing the heart first and then attaching the surrounding pink-and-white sections. Start with the upper portion of the heart, where the red lobes meet the white central notch. Sew neighboring pieces together using a 0.64 cm seam allowance, keeping the fabric edges aligned as they pass under the presser foot. Avoid pulling the fabric because stretching can distort diagonal edges. After sewing each small section, press it gently and return it to the layout board. This process helps maintain the intended geometry and prevents small inaccuracies from accumulating.
Continue by constructing the lower heart section, making sure that the diagonal red-and-white boundaries create a symmetrical downward point. When joining the lower units, match the intersections carefully so the diagonal lines remain continuous across seams. Place pins through the exact seam intersections if necessary, particularly where the red fabric meets the white background. Sew slowly over these points and avoid shifting the fabric layers. Once the upper and lower sections are complete, join them together to form the main heart motif. Press the joined section and examine the silhouette. The finished heart should have two distinct upper lobes, a centered V-shaped notch, broad red sides, and a pointed lower tip.
Now assemble the upper and lower pink star sections. Each section contains pink fabric extending horizontally across the design, with a triangular point reaching toward the outside edge. The surrounding white background creates contrast and defines the point. Small red diagonal pieces appear near the inner corners, adding a secondary decorative shape. Construct the upper section by joining the necessary pink squares, pink-and-white triangles, and red accent units. Repeat the process for the lower section, reversing the orientation of the triangular points. Lay both sections beside the central heart to verify their alignment. Their overall widths should correspond to the center section so the block can be joined without stretching.
Next, prepare the left and right side sections. These contain prominent pink shapes extending toward the outer edges, along with red diagonal accents near the upper and lower corners. The side sections are important because they complete the star-inspired frame and visually balance the large central heart. Assemble the left side first, paying attention to the direction of the pink points and red diagonal strips. Then create a mirrored version for the right side. If you are using directional fabric, such as the snowflake print shown in the reference image, consider how the motifs will appear when the pieces are rotated. Consistent print direction is optional, but it can give the finished block a more coordinated appearance.
After completing the major sections, join them into the full “Heart Star” Quilt Block Pattern. Depending on your cutting plan, you may combine the pieces into horizontal rows or larger rectangular groups before joining the final seams. Match important intersections, especially where the heart’s diagonal edges meet the surrounding white background and where the pink shapes connect with the red accents. Pin the fabric at these intersections and sew with an even stitch length of approximately 2.0 to 2.5 mm. Press each newly sewn seam before adding another section. Alternating seam directions where appropriate can help reduce bulk and improve alignment. Do not force a section to fit if the measurements differ significantly; check the seam allowances and correct the source of the discrepancy.
When the complete quilt block is assembled, place it on a flat surface and inspect the overall shape. The red heart should sit prominently in the center, surrounded by balanced pink points and white negative spaces. Use a quilting ruler to check the outer measurements and confirm that the corners form right angles. If the block is slightly larger than expected, trim it carefully while preserving the intended seam allowance around the design. If it is smaller, avoid excessive trimming because this may cut off the outer points when the block is joined to another piece. A correctly assembled version of this tutorial should finish at approximately 40 × 40 cm, although small variations may occur depending on cutting and sewing accuracy.
4. Pressing, Quilting, Finishing, and Creative Uses for the Heart Star Block
Proper pressing is essential for achieving a professional appearance in any quilt block pattern, especially one with numerous diagonal seams. After completing the piecing, place the block wrong side up on the ironing board and gently press the seams without dragging the iron across the fabric. Pressing differs from ironing because the iron is lifted and lowered rather than pushed back and forth. This prevents the diagonal edges from stretching out of shape. For seams where red fabric meets white fabric, consider pressing toward the darker red material to reduce the chance of seam allowances showing through the light background. At bulky intersections, pressing seams open may provide a flatter result. Always test the pressing method on a small section first.
If you plan to turn the Heart Star quilt block into a miniature quilt or wall hanging, prepare a quilt sandwich using the completed patchwork top, batting, and backing fabric. For a 40 × 40 cm finished block, cut the batting and backing slightly larger than the pieced top, allowing approximately 5 cm of extra material on each side for quilting and trimming. Place the backing fabric wrong side up, position the batting on top, and center the patchwork block right side up. Smooth the layers carefully to remove wrinkles. Secure them with curved safety pins, temporary basting stitches, or another suitable quilting method. Keeping the layers stable will make the quilting process easier and help prevent puckering.
Choose a quilting stitch design that complements the heart and surrounding geometric shapes. Straight-line quilting is an excellent option for beginners because it emphasizes the diagonal construction of the block. You can stitch along the edges of the heart, follow the outlines of the pink star points, or create a simple grid across the entire surface. For a softer appearance, consider gentle curved quilting lines within the red heart and subtle background quilting in the white areas. Use a walking foot for straight-line quilting to help feed the layers evenly through the sewing machine. Match the thread color to the fabric for a subtle finish, or use contrasting thread when you want the stitching to become part of the design.
Once the quilting is complete, trim the batting and backing so they are even with the quilted top. Prepare a double-fold quilt binding using coordinating cotton fabric, such as deep red, pink, or white. For a small wall hanging, binding strips approximately 6.4 cm wide work well with a standard quarter-inch seam allowance. Join the strips diagonally, press them in half lengthwise with wrong sides together, and sew the raw edges to the front of the quilt. Fold the binding over the edges and secure it to the back by hand or machine. Take extra care when forming the mitered corners so they remain neat and square. A well-finished binding frames the design and protects the raw fabric edges from wear.
The completed “Heart Star” Quilt Block Pattern can be used in many creative sewing projects. A single block makes an attractive decorative pillow, especially when paired with a simple envelope-style backing. Several blocks can be arranged into a larger quilt, alternating their orientation or separating them with narrow fabric sashing. The design also works beautifully as a Valentine’s Day wall hanging, a handmade anniversary gift, or a decorative centerpiece for a seasonal table display. For a larger quilt, repeat the same construction process and use consistent block measurements to ensure that the pieces fit together smoothly. Consider using different red and pink prints in each block while maintaining a consistent white background for visual unity.
To personalize the design, experiment with fabric textures, color palettes, and quilting details while preserving the original geometric arrangement. A Christmas-inspired version could feature deep red snowflake fabric, evergreen accents, and cream-colored background cotton. A spring version might combine rose pink, lavender, and soft ivory fabrics. For a modern interpretation, use solid fabrics with bold contrast and minimalist quilting. You can also add a small embroidered date or message to the backing if the project is intended as a gift. Whatever finishing style you choose, the most important goal is to create a handmade heart quilt block that reflects your personality while maintaining accurate seams, balanced proportions, and the recognizable heart-and-star composition.
Frequently Asked Questions About the “Heart Star” Quilt Block Pattern
Is the “Heart Star” Quilt Block Pattern suitable for beginners?
Yes. This project is suitable for confident beginners who have basic experience with straight seams and rotary cutting. The design includes several diagonal pieces, so patience and accurate measurements are important. Beginners may find it helpful to practice making half-square triangles before assembling the full block. Working in smaller sections also makes the project easier to manage.
What is the finished size of this Heart Star quilt block?
The version described in this tutorial finishes at approximately 40 × 40 cm (15¾ × 15¾ inches). This size is based on an eight-by-eight design grid with 5 cm finished units. The measurements can be scaled up or down, provided the seam allowances and geometric proportions are adjusted correctly.
What fabrics work best for a Heart Star quilt block?
Medium-weight 100% cotton quilting fabrics are generally the best choice. They are easy to cut accurately, press well, and maintain their shape during sewing. The original design features red snowflake fabric, pink textured fabric, and white background fabric, but other color combinations can work equally well.
How do I keep the points of the heart and star sharp?
Use accurate cutting measurements, maintain a consistent quarter-inch seam allowance, and match seam intersections before sewing. Avoid stretching diagonal edges, and press the fabric gently after each seam. Making half-square triangle units slightly oversized and trimming them to the required dimensions can also improve precision.
Can I sew this quilt block entirely by hand?
Absolutely. Although a sewing machine makes the process faster, the Heart Star quilt pattern can be completed using traditional hand-piecing techniques. Mark the stitching lines carefully, use small running stitches, and secure the ends of each seam. Hand sewing takes longer but can be especially enjoyable for quilters who appreciate slow, detailed craftsmanship.
How many Heart Star blocks do I need to make a quilt?
The number depends on your desired quilt size and whether you plan to include sashing or borders. For example, arranging 12 blocks in three columns and four rows creates a central patchwork area approximately 120 × 160 cm before adding borders. A larger quilt may require 20 or more blocks. Always calculate the finished measurements before cutting fabric for a full quilt.
Can I make the central heart using appliqué instead of patchwork?
Yes, although the result will have a different construction style. Traditional piecing creates the heart from geometric sections, while appliqué involves attaching a heart-shaped fabric piece to a background. Appliqué may simplify the central motif, but it will not reproduce all the internal seam details visible in the reference design.
What is the difference between a half-square triangle and a quarter-square triangle?
A half-square triangle unit is made from two triangular fabric pieces that together form a square. A quarter-square triangle unit generally contains four triangles or uses triangles cut from a square divided diagonally in both directions. The Heart Star design can be constructed primarily with squares and half-square triangles, although alternative piecing methods may use other triangle configurations.
Should I wash my fabrics before sewing?
Prewashing is a personal choice. Some quilters prefer washing fabrics to reduce the possibility of later shrinkage or color bleeding, while others enjoy the crisp texture of unwashed quilting cotton. If you decide to prewash, wash all fabrics consistently. For deep red fabric, testing for color bleeding is especially useful when it will be sewn next to white fabric.
How can I prevent the red fabric from bleeding into the white background?
Choose good-quality quilting cotton and test the red fabric for colorfastness before cutting. Wash a small sample according to the manufacturer’s care instructions and check whether it releases dye. Avoid assuming that a color-catching laundry sheet will completely prevent bleeding. Proper fabric preparation is particularly important when using strong reds beside light-colored cotton.
What is the best way to quilt around the heart shape?
For beginners, stitch-in-the-ditch quilting or simple straight lines are practical options. More experienced quilters may prefer echo quilting around the heart or free-motion designs within the red sections. The best choice depends on your skill level, sewing machine, and intended use of the finished project.
Can I sell handmade projects made with this quilt block design?
In general, handmade quilts and accessories may be sold when the maker has the necessary rights to use the design. However, copyright and pattern licensing requirements can vary. If you are working from a purchased or independently published pattern, review its usage terms before producing items for sale.
How long does it take to complete the Heart Star quilt block?
The time required depends on experience and preparation. An experienced quilter may complete the pieced block in several hours, while a beginner may prefer to divide the work across two or three sewing sessions. Additional time will be needed if the block is turned into a quilted pillow, wall hanging, or larger quilt.
What are the most common mistakes when sewing this pattern?
Common mistakes include reversing diagonal triangle units, using inconsistent seam allowances, stretching bias edges, and joining sections before checking their orientation. These problems can be minimized by laying out the entire design first, photographing the arrangement, and checking each section before sewing.
Can I change the colors without changing the design?
Yes. The “Heart Star” Quilt Block Pattern is highly adaptable. You can replace the red heart with burgundy, purple, blue, or another favorite color. The surrounding pink areas can also be changed to coordinate with your décor. For the clearest result, maintain enough contrast between the heart, the surrounding points, and the background fabric.
Conclusion: Create a Beautiful Heart Star Quilt Block with Confidence
The “Heart Star” Quilt Block Pattern brings together meaningful symbolism, traditional patchwork skills, and a charming geometric design. Throughout this tutorial, you learned how to select coordinating quilting fabrics, prepare accurate measurements, construct half-square triangle units, assemble the central heart, position the surrounding star-inspired shapes, and finish the project with careful pressing and quilting. Each step contributes to a balanced design that highlights the beauty of handmade fabric art.
One of the most rewarding aspects of this project is seeing the individual red, pink, and white fabric pieces gradually transform into a complete heart surrounded by decorative points. Although the design may appear complicated at first, dividing the construction into smaller sections makes the process much more approachable. With patience, accurate cutting, and consistent stitching, the Heart Star quilt block can become a beautiful addition to your collection of handmade quilting projects.
Whether you use the finished block for a decorative pillow, a romantic wall hanging, a seasonal gift, or a larger patchwork quilt, this pattern offers plenty of room for creativity. You can preserve the original red-and-pink palette or experiment with new fabric combinations that reflect your personal style. The essential techniques practiced here will also help you approach other geometric quilt blocks with greater confidence.
EASILY FIND THE FREE PDF FOR THIS PATTERN HERE!
Now I would love to hear from you! What do you sincerely think about this “Heart Star” Quilt Block Pattern? Would you keep the classic red, pink, and white combination, or would you choose different colors? Please share your honest opinion, sewing experiences, and suggestions in the comments. Your ideas may inspire other quilting enthusiasts to create their own beautiful versions of this heartfelt patchwork design.