
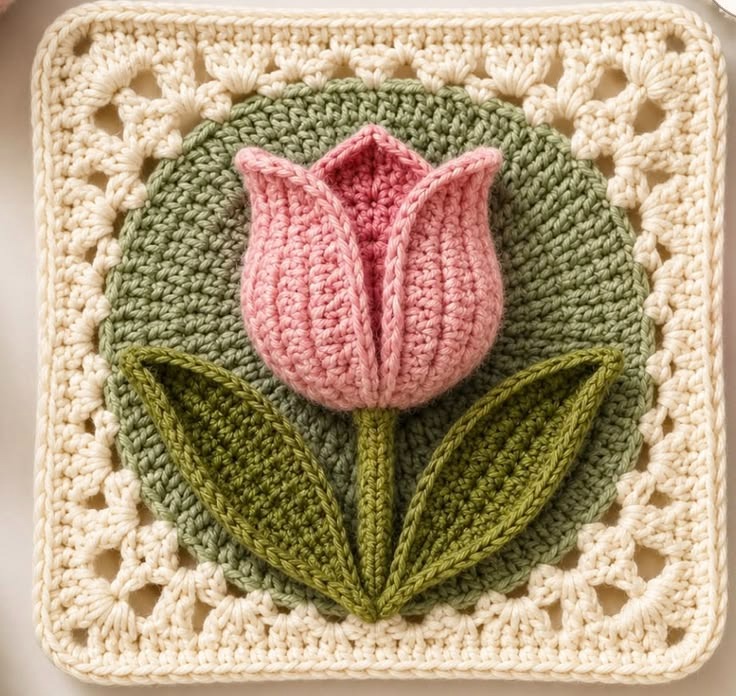
The Tulip Crochet Square Tutorial Pattern is a beautiful way to combine dimensional crochet, floral design, and traditional square construction in one decorative project. Inspired by the raised pink tulip, green leaves, circular background, and cream openwork border shown in the reference design, this pattern creates a piece that feels both classic and modern. The three-dimensional flower becomes the focal point, while the textured leaves and neutral outer square provide balance. It is an appealing project for crocheters who enjoy creating home décor, individual crochet blocks, wall art, cushions, or larger handmade arrangements from joined squares. Because several crochet techniques are brought together in one piece, the project is also an enjoyable opportunity to practice shaping, layering, edging, and careful assembly.
A successful Tulip Crochet Square Tutorial Pattern begins with understanding its construction. Rather than trying to crochet the entire design as one complicated piece, it is easier to divide it into manageable sections: the circular green background, the tulip petals, the stem, two leaves, and the cream square border. Each section can be worked separately and then joined with a yarn needle or crochet hook. This modular approach makes the project more beginner-friendly and allows you to adjust the size or colors without changing the overall appearance. Standard U.S. crochet terminology is used throughout this tutorial, including chain (ch), slip stitch (sl st), single crochet (sc), half double crochet (hdc), and double crochet (dc).
Yarn selection is especially important when creating a dimensional crochet flower. A smooth cotton or cotton-blend yarn gives the petals enough structure to stand away from the background while still producing soft, attractive stitches. For a design similar to the example, choose soft pink yarn for the tulip, olive or moss green yarn for the leaves, a lighter muted green for the circular background, and cream yarn for the decorative square frame. A medium or DK-weight yarn works particularly well, although the project can be adapted to other yarn weights. Select a crochet hook that produces firm, even stitches without making the fabric excessively stiff, and keep a yarn needle, scissors, stitch markers, and blocking supplies nearby.
Materials, Crochet Abbreviations, and Preparing the Square
For this Tulip Crochet Square Tutorial Pattern, gather four coordinated yarn colors before beginning. You will need cream for the outer frame, sage or muted green for the central circle, darker green for the stem and leaves, and pink for the flower. Small amounts are generally sufficient for a single square, making this an excellent project for using coordinated leftover yarn from previous crochet projects.
DISCOVER MORE FREE PATTERNS HERE!
The main U.S. crochet abbreviations are ch = chain, sl st = slip stitch, sc = single crochet, hdc = half double crochet, dc = double crochet, tr = treble crochet, st = stitch, sts = stitches, inc = increase, and dec = decrease. An increase means working two stitches into the same stitch to widen the piece. A decrease combines stitches and is useful when shaping the tapered tips of petals and leaves.
Begin the green background with a magic ring or a short chain joined into a circle. Work approximately 10 to 12 double crochet stitches into the center and close the round with a slip stitch. On the following round, work two double crochet stitches into each stitch. This regular increase creates a flat circular base rather than a cupped shape.
Continue enlarging the circle with evenly spaced increases. A common progression is to work 1 dc, increase around one round, then 2 dc, increase around the next, followed by 3 dc, increase. The exact stitch count can be adjusted according to your yarn and desired square size. The important goal is a smooth circle that lies flat without rippling.
Once the circular background reaches the desired diameter, finish the final round neatly and fasten off. If the circle begins to wave, reduce the number of increases. If the edges curl upward, add slightly more increases. This simple adjustment is useful because individual crochet tension can influence the final shape even when two crocheters follow identical instructions.
The cream border transforms the circular motif into a recognizable crochet square. Attach the cream yarn to the outer edge of the green circle and distribute stitches evenly around it. Establish four corner positions at equal intervals. At each corner, work a combination such as 2 dc, ch 2, 2 dc into the same space. These corner increases provide enough room for the fabric to turn from a circle into a square.
For the decorative openwork appearance, alternate groups of double crochet stitches with chain spaces as you build outward. A useful repeat is 3 dc, ch 1, followed by another group of three double crochets. At the four corners, maintain larger chain spaces. Continue until the square has a balanced width, then add a final round of single crochet or half double crochet for a clean, stable outer edge.
Crocheting the Dimensional Tulip, Stem, and Petals
The raised flower is the defining feature of the Tulip Crochet Square Tutorial Pattern. Instead of making a completely flat appliqué, construct several shaped petals and overlap them. This creates the sculpted tulip appearance visible in the inspiration piece. The petals should be firm enough to maintain their curves but flexible enough to arrange naturally.
Begin the central petal with pink yarn. Ch 12 as a starting foundation, adjusting the number if you want a larger or smaller flower. Starting in the second chain from the hook, work sc, hdc, dc, continue with double crochet stitches through the middle section, and then reverse the sequence near the opposite end with dc, hdc, sc. This gradual progression produces an elongated petal with softer curves.
Work around the opposite side of the foundation chain rather than immediately fastening off. Use corresponding stitches to create a complete oval or pointed petal. Near the upper tip, place several stitches strategically into one space to create a gentle point. Finish with a slip stitch and leave a long yarn tail for sewing.
Make two side petals using a similar method. The side petals can be slightly wider than the center petal by adding an extra increase along their outer edges. After completing each one, gently fold it lengthwise with your fingers. This simple shaping technique gives the tulip its characteristic cupped form without requiring wire or other internal supports.
Arrange the three primary petals before sewing anything permanently. Position the central petal slightly behind or between the side petals, allowing the upper tips to remain visible. The two side petals should curve inward toward the flower’s center. Sew mainly along the lower and side edges while leaving portions of the upper petals free. This preserves the dimensional quality of the crochet tulip.
To create an even richer blossom, add one or two smaller inner petals. These can begin with a shorter foundation chain and follow the same sc-hdc-dc-hdc-sc shaping principle. Position the smaller petals behind the front layers so that their pointed tops appear between the larger petals. Avoid sewing every edge flat against the background because some movement is what gives the flower its realistic appearance.
For the stem, use dark green yarn and crochet a narrow strip. Ch 18 to 24, depending on the size of your background, and work one row of single crochet back across the chain. For a thicker stem, add a second row of single crochet. Fasten off with a long tail. Position the stem vertically from the bottom center of the flower toward the lower edge of the green circle and sew it securely in place.
Making the Crochet Leaves and Assembling the Floral Motif
The leaves provide visual balance and help connect the dimensional tulip with its green background. In the pictured style, two elongated leaves rise diagonally from the lower center. Their pointed shape can be created using graduated stitch heights, making this section a useful exercise in crochet leaf shaping.
Begin one leaf with approximately ch 18. Starting in the second chain from the hook, work sc, hdc, dc, then several double crochet stitches through the center. Near the far end, transition back through hdc and sc. Work additional stitches around the end of the chain so that you can crochet down the opposite side.
As you return along the second side of the foundation chain, mirror the stitch sequence. Work taller stitches through the widest portion and shorter stitches near the pointed ends. If necessary, place an increase in the broadest section. The finished leaf should resemble a narrow almond shape rather than a simple oval.
For more definition, work one additional round around the leaf using single crochet or slip stitches. A contrasting or slightly lighter green can emphasize the edge. Another attractive technique is surface slip stitch, worked along the center of the leaf to imitate a vein. This small detail gives the finished motif additional texture without making construction significantly harder.
Make a second leaf using the same instructions. The leaves do not need to be perfectly identical. In fact, making one slightly shorter can create a more natural floral arrangement. Position one leaf toward the lower left and the other toward the lower right, allowing both bases to meet near the bottom of the stem.
Before attaching the pieces, place the flower, stem, and leaves on the green circle and check the proportions. The tulip should occupy the upper central area without covering the cream border. The leaves should remain mostly within the circular background. Use stitch markers or small removable clips to hold everything temporarily while evaluating the arrangement.
Sew the stem first, followed by the leaves and finally the flower. This order allows the tulip to overlap the top of the stem naturally. Use small stitches and matching yarn so that the attachment stitches remain discreet. Secure all yarn tails on the back, but avoid pulling them excessively tight because this can distort the circular background.
Finishing, Blocking, Customizing, and Using the Crochet Square
Once the flower has been assembled, examine the entire Tulip Crochet Square Tutorial Pattern from the front and back. Look for loose yarn tails, uneven corners, or sections where the appliqué needs additional support. Add a few discreet securing stitches underneath the petals if the flower feels unstable, but keep the upper portions free to maintain their raised appearance.
Blocking can significantly improve the finished square. Pin the four corners to the desired dimensions and gently shape the cream border so that each side is straight. If the yarn is suitable for wet blocking, lightly dampen the piece and allow it to dry completely while pinned. Always follow the care recommendations for the yarn you are using.
Avoid aggressively flattening the flower during blocking. The background and border benefit from becoming flat and square, but the tulip should remain dimensional. Shape the petals by hand after the base has dried. You can gently curve the two outer petals toward the center and lift the smaller inner petals to emphasize the layered construction.
Color customization offers many possibilities. A pink crochet tulip creates a romantic spring look, while red gives the square a bold traditional appearance. Yellow, white, peach, lavender, or burgundy flowers can create completely different moods. The green circle can also be changed to pale sage, forest green, or even a neutral shade if you want stronger contrast.
Individual squares can be used as decorative wall pieces, cushion fronts, bag panels, or framed fiber art. Multiple crochet flower squares can also be joined to make a larger project. When joining several blocks, make sure they are blocked to approximately the same measurements first. Consistent dimensions make joining easier and produce cleaner seams.
The most important finishing detail is maintaining balance between texture and structure. The cream square should lie relatively flat, the green center should provide a stable foundation, and the flower should project forward. When these three elements work together, the Tulip Crochet Square Tutorial Pattern develops the handcrafted dimensional appearance that makes floral crochet so visually appealing.
FAQ About the Tulip Crochet Square Tutorial Pattern
Is the Tulip Crochet Square Tutorial Pattern suitable for beginners?
An adventurous beginner can complete this project, especially if they already understand chains, single crochet, half double crochet, double crochet, slip stitches, increases, and basic sewing. The dimensional petals require a little patience, but each component can be practiced separately.
What yarn works best for a crochet tulip square?
Cotton and cotton-blend yarns are excellent because they provide clear stitch definition and enough structure for the petals and leaves. Acrylic yarn can also work, particularly for blankets or cushions where softness is important.
How can I make the tulip more three-dimensional?
Do not sew every part of each petal to the background. Secure the base and selected side sections while leaving the upper edges free. Overlapping several petals also creates natural depth.
Why is my green crochet circle becoming wavy?
A wavy circle usually indicates too many increases. Reduce the number of increases on the next round and check the piece frequently on a flat surface.
Why does my crochet circle curl upward?
Curling can indicate that there are not enough increases or that your tension is especially tight. Adding a few evenly distributed increases may help the circle lie flat.
How do I turn a crochet circle into a square?
Mark four equally spaced corner locations and use larger stitch groups or chain spaces at those points. Continue adding stitches around each side while maintaining consistent increases at the corners.
Can I make the square larger?
Yes. Add more rounds to the green circle before beginning the cream section, or work additional rounds around the finished cream border. Keep the four corners clearly defined as the square grows.
Can the flower and leaves be made separately?
Yes, and this is actually one of the easiest approaches. Making the appliqué pieces separately gives you greater control over their placement and makes it easier to adjust the final composition.
How do I keep the square corners from curling?
Make sure the corner spaces contain enough stitches to turn comfortably. Blocking afterward will also help straighten the sides and corners.
What does “dc” mean in U.S. crochet terminology?
Dc means double crochet. Yarn over, insert the hook into the designated stitch, yarn over and pull up a loop, yarn over and pull through two loops, then yarn over and pull through the final two loops.
What is the difference between sc, hdc, and dc?
Single crochet (sc) is a short, dense stitch. Half double crochet (hdc) is slightly taller, while double crochet (dc) produces additional height. Combining these stitch heights is what helps create smooth pointed leaves and petals.
Can several tulip squares be joined into a blanket?
Absolutely. Crochet multiple squares in matching dimensions and join them using your preferred crochet or sewing technique. You can repeat one flower color or create a garden-inspired arrangement using several tulip colors.
How should I wash a finished dimensional crochet square?
Follow the care instructions for your chosen yarn. Gentle hand washing is often appropriate for decorative pieces. Reshape the petals and leaves while the project dries so that the dimensional details remain defined.
Conclusion
The Tulip Crochet Square Tutorial Pattern combines several enjoyable techniques in one creative floral project. Throughout this tutorial, we explored how to crochet a flat circular background, transform that foundation into a square with an openwork cream border, shape dimensional tulip petals, create a narrow stem, crochet pointed leaves, and assemble the individual components into a balanced design.
The key to achieving a beautiful result is working patiently through each component rather than treating the project as one complicated pattern. The crochet flower, crochet leaves, dimensional petals, granny-style square border, and carefully shaped background each contribute something different to the finished piece. Once these elements are assembled, they create a textured floral square that can become decorative art or part of a larger handmade project.
EASILY FIND THE FREE PDF FOR THIS PATTERN HERE!
You can also make this design distinctly your own by experimenting with yarn colors, border widths, flower sizes, and leaf shapes. Once you understand the basic construction, the same technique can inspire an entire collection of floral crochet squares. I hope this Tulip Crochet Square Tutorial Pattern helps you create a beautiful dimensional tulip from beginning to end. After trying the pattern, please leave your sincere opinion about the project and share any suggestions you have. Your ideas about colors, stitch combinations, finishing techniques, or future floral patterns can inspire even more creative crochet projects.