
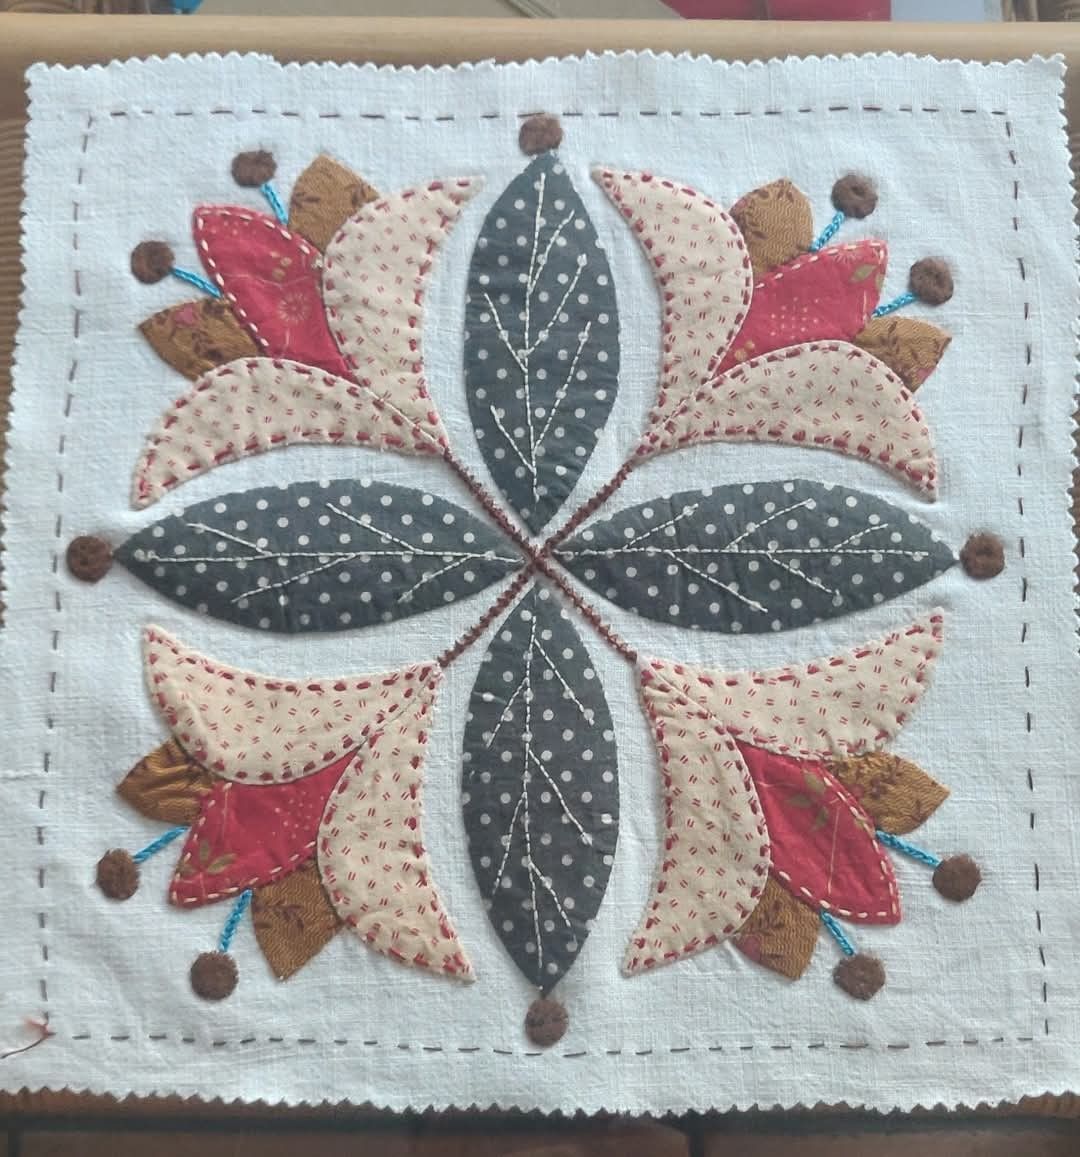
The Quilt Block Tutorial with Appliqué Pattern is a beautiful way to combine traditional quilting techniques with decorative hand stitching and layered fabric shapes. Inspired by the project shown in the photo, this design features a symmetrical arrangement of elongated leaves, curved petals, small accent leaves, colorful floral shapes, embroidered branches, and tiny dimensional details. The result has the warm personality associated with handmade folk-art quilting while still being organized enough for a confident beginner to recreate. One of the most attractive characteristics of this project is the contrast between the neutral background and the patterned appliqué fabrics. Cream, burgundy, brown, charcoal, and small touches of blue work together naturally without making the block feel overly complicated. Because the individual pieces are relatively simple, the project is also an excellent opportunity to practice accurate placement, fabric appliqué, hand stitching, and decorative embroidery.
Creating a successful Quilt Block Tutorial with Appliqué Pattern begins with understanding how the design is constructed. Rather than treating the block as one complicated motif, it is easier to imagine it as several groups of simple shapes arranged around a central point. Four dark elongated leaves establish the main cross-shaped structure. Around them are cream curved pieces resembling petals or stylized leaves, followed by deeper red pieces and smaller brown accents. Embroidered stems extend toward small circular details around the outside of the arrangement. This layered construction is useful because each section can be positioned independently before anything is permanently stitched. Careful preparation at this stage makes the finished quilt block appear balanced and intentional. It also gives you freedom to experiment with your own fabric combinations while maintaining the recognizable structure of the original inspiration.
Another appealing feature of this appliqué quilt block is that it does not require a huge collection of specialized supplies. Cotton fabric, basic sewing tools, embroidery thread, batting or stabilizer if desired, and a selection of coordinating scraps are enough to begin. Fabric scraps are particularly useful because most appliqué pieces are relatively small. Before cutting valuable fabric, make paper templates and test the entire arrangement on the background square. This allows you to adjust proportions without wasting material. The dimensions suggested throughout this tutorial are practical approximations for recreating the visual proportions of the photographed handmade piece rather than measurements taken from the original object. A finished block around 30 × 30 cm (approximately 12 × 12 inches) provides enough room for the details while remaining convenient for pillows, wall hangings, table décor, or a larger quilt made from multiple blocks.
Materials, Templates, and Fabric Preparation
For this Quilt Block Tutorial with Appliqué Pattern, begin with a background square approximately 32 × 32 cm, allowing room for trimming and finishing. Choose a light cotton or cotton-linen fabric so the colorful appliqué pieces remain clearly visible. You will also need small pieces of charcoal or dark gray printed fabric, cream printed cotton, burgundy or muted red fabric, warm brown fabric, and a small amount of blue embroidery thread. Add neutral, brown, burgundy, and light-colored embroidery floss according to the decorative stitching you want to reproduce.
DISCOVER MORE FREE PATTERNS HERE!
The most important templates are the four long central leaves. Make one elongated leaf template approximately 12 cm long and 5 cm wide at its widest point. The exact dimensions can be adjusted according to your block size. A gently pointed oval works well. You will use this basic shape four times: once facing upward, once downward, once left, and once right. These dark leaves create the visual foundation of the entire appliqué pattern.
Next, prepare the cream curved pieces. Instead of making them perfectly symmetrical, give each piece a soft crescent or curved-petal shape. Prepare approximately eight larger cream elements, adapting their orientation to fit around the central leaves. A practical starting size is about 7–9 cm long. These pieces should visually overlap or nest beside the red floral elements without covering too much of the central design.
Create smaller pointed templates for the burgundy and brown pieces. The burgundy pieces function as secondary petals and bring warmth to the otherwise neutral palette. The brown pieces can be slightly smaller and positioned behind the red and cream shapes. This layering technique creates visual depth without requiring complicated piecing. Scrap fabric quilting is ideal here because every petal can come from a small leftover piece.
For traditional turned-edge appliqué, add approximately 6 mm seam allowance around each paper template when cutting the fabric. If you prefer raw-edge appliqué, cut directly to the finished template shape and secure the pieces with a suitable fusible web before stitching. The photographed project has a charming handcrafted character, so small variations in shape are perfectly appropriate. Consistency in overall placement matters more than making every individual piece mathematically identical.
Finally, press all fabric before assembly and mark the horizontal and vertical centerlines of the background square using a removable fabric marker or gentle finger pressing. Avoid permanent pens because markings may remain visible. Place a small removable mark at the exact center. This simple preparation step becomes extremely valuable when arranging a symmetrical quilt block, as nearly every major element radiates from this central reference point.
Arranging and Sewing the Main Appliqué Design
Begin the assembly by positioning the four charcoal leaves around the center. Their pointed inner ends should nearly meet, forming a cross or four-petal structure. Leave only a small amount of space between them so the center remains neat. Before sewing, measure from the outer tips to the edges of the background. Similar distances on opposite sides will help maintain symmetry. Pin, baste, or temporarily secure the pieces only after you are satisfied with their arrangement.
If you are using needle-turn appliqué, work around each leaf with small, nearly invisible stitches. Turn the seam allowance underneath gradually with the tip of the needle and follow the curves carefully. For raw-edge appliqué, a small blanket stitch, running stitch, or decorative hand stitch can be used around the perimeter. The visible stitching is part of this project’s handmade appearance, so it does not need to disappear completely.
Once the four central leaves are attached, arrange the cream pieces around them. Notice how the cream elements visually frame the darker central shapes. Place them in mirrored groups whenever possible. Start with the upper half, then recreate a similar arrangement on the lower half. Do not worry about making both sections absolutely identical; folk-art appliqué often benefits from subtle handmade differences.
Add the burgundy petals next. Position these between or slightly underneath the cream elements so that the stronger color appears as a secondary layer. Use temporary fabric glue designed for sewing, appliqué pins, or basting stitches to keep everything stable. Step away from the block occasionally and look at the whole composition rather than focusing only on one corner. This is one of the easiest ways to identify an element that needs repositioning.
The smaller brown leaves can now be tucked behind the larger petals. Their purpose is to add another level of contrast and make the floral clusters look fuller. Because these pieces are small, hand appliqué is particularly practical. Work slowly around pointed ends, folding excess seam allowance carefully underneath. If a point is slightly rounded after stitching, that is acceptable and can reinforce the handmade character of the finished quilt appliqué block.
After all major pieces have been secured, press the block gently from the reverse side using an appropriate temperature for your fabrics. Avoid flattening any intentionally dimensional sections. Check that the block remains square and that none of the appliqué has distorted the background. If necessary, lightly steam and reshape the fabric before moving to the embroidery stage. Do not perform the final trimming yet because decorative stitching may slightly change the block’s dimensions.
Adding Embroidery, Decorative Stitching, and Dimensional Details
The embroidery inside the dark leaves is one of the most distinctive features of this Quilt Block Tutorial with Appliqué Pattern. Using light embroidery floss, stitch a gently curved central vein from the base toward the tip of each dark leaf. Add smaller branches extending toward both sides. Simple backstitch, stem stitch, or tiny running stitches can create this effect. Keep the branches organic rather than perfectly straight.
Small knots or short stitches along the branches add texture and help reproduce the delicate botanical appearance of the inspiration. A French knot is particularly useful for creating tiny raised accents. If French knots are unfamiliar, wrap the embroidery thread around the needle once or twice, hold the wraps close to the fabric, and carefully pull the needle through. Practice on a scrap before working directly on your quilt block.
Decorative running stitches can also be added around selected cream and burgundy appliqué pieces. Choose a contrasting thread so the stitches become visible design elements. Aim for reasonably even stitch lengths, but remember that handmade stitching naturally contains variation. This visible handwork is an important part of the block’s personality and distinguishes the project from a completely machine-finished appliqué.
For the small outer stems, use bright blue or turquoise embroidery thread to create short lines extending from the floral clusters. A simple stem stitch or backstitch works well. At the end of each line, attach or embroider a small brown circular accent. These can be tiny felt circles, padded fabric circles, fabric-covered knots, or dense groups of embroidery stitches depending on the materials available.
To make fabric circles, cut circles slightly larger than the desired finished size, gather around the perimeter with small running stitches, place a tiny amount of batting inside if you want dimension, and pull the thread closed. Secure the gathered side against the background so it remains hidden. These raised dots introduce another texture and help visually extend the appliqué motif toward the edges of the block.
Finish the decorative work by adding a large running-stitch border around the main design. Keep the border approximately 1.5–2 cm from the finished edge so there is enough room for trimming and construction. Brown or burgundy thread complements the earthy fabrics particularly well. Use removable guidelines if necessary. This border frames the floral arrangement and visually connects the individual appliqué sections into one complete composition.
Finishing the Quilt Block and Creative Ways to Use It
Once all appliqué and embroidery are complete, place the block on a flat surface and check its final dimensions. Square it carefully to approximately 30 × 30 cm, or another size that suits your intended project. Use a quilting ruler and rotary cutter for accurate trimming. Make sure the central motif remains centered before removing fabric from any edge, because correcting an off-center block after trimming is difficult.
If you want a quilted version, layer the completed top with thin batting and backing fabric. Baste the three layers together using your preferred method. Hand quilting is especially attractive for this rustic design because it complements the visible appliqué stitches. You might quilt around each major appliqué shape, following the outline approximately 3–5 mm outside the edge.
Machine quilting is another practical option. Use a walking foot for straight areas or free-motion quilting around the appliqué motifs. Keep the quilting relatively simple so it does not compete with the decorative embroidery. Echo quilting around the central leaves can emphasize their shape while providing enough quilting density to keep the layers stable.
For a wall hanging, add binding around all four sides after quilting. A dark brown, burgundy, cream, or small-scale printed binding would coordinate naturally with the colors used in the appliqué. If you want a softer decorative panel similar to a folk-art textile, a narrow binding or turned backing can preserve the simple appearance of the original design.
The completed Quilt Block Tutorial with Appliqué Pattern can also become the front of a cushion. Add an envelope-style or zippered backing and insert a pillow form. Alternatively, create several coordinating blocks using different fabric combinations and join them with sashing. Repeating the same basic design in changing colors is an effective way to create a larger appliqué quilt without designing every block from scratch.
Most importantly, allow room for personalization. Replace burgundy with blue, green, mustard, or rose; use floral prints instead of dots; embroider different leaf veins; or modify the small outer accents. The construction method remains essentially the same. Once you understand the relationship between the central leaves, surrounding petals, smaller accents, and embroidery, this appliqué pattern becomes an adaptable foundation for many creative quilting projects.
FAQ About the Quilt Block Tutorial with Appliqué Pattern
What is the best fabric for this appliqué quilt block?
Quilting cotton is one of the easiest choices because it is stable, widely available, easy to press, and simple to hand or machine stitch. Cotton-linen blends can also work beautifully for the background and provide additional texture.
Is this project suitable for beginners?
Yes. A beginner can complete the design by working one group of shapes at a time. The most useful skills to practice beforehand are basic cutting, running stitch, backstitch, and your chosen appliqué technique.
Should I use raw-edge or turned-edge appliqué?
Either method works. Raw-edge appliqué is generally faster and can create a casual handcrafted finish. Turned-edge appliqué requires more preparation but produces smooth fabric edges. Choose the method that matches your experience and desired appearance.
Can I sew the entire project by machine?
Yes. The appliqué pieces can be secured using machine blanket stitch, zigzag stitch, or another decorative stitch. Some embroidery details can also be recreated with machine stitching, although hand embroidery gives the design a particularly warm and traditional texture.
How large should the finished quilt block be?
A block around 30 × 30 cm (12 × 12 inches) is a convenient starting point for this interpretation. However, the pattern can be enlarged or reduced as long as all templates are scaled proportionally.
Do I need fusible web for the appliqué?
No. Fusible web is optional. It is helpful for raw-edge appliqué because it keeps the pieces from shifting during stitching. Traditional needle-turn appliqué normally relies on turned seam allowances, pins, basting, or temporary positioning methods instead.
How can I keep the design symmetrical?
Mark the vertical and horizontal centerlines before placing the appliqué. Attach the four main dark leaves first and then work outward. Frequently compare opposite sides and measure from major points to the edges of the background.
What embroidery stitches work best for this design?
Running stitch, backstitch, stem stitch, and French knots are excellent choices. These stitches are relatively straightforward and provide enough variety to create outlines, branches, stems, borders, and small dimensional details.
Can fabric scraps be used for this project?
Absolutely. This is an excellent fabric scrap quilting project because the petals and leaves require relatively small pieces. Coordinating scraps with similar color intensity can create a harmonious result without requiring matching fabrics.
How should the finished block be cared for?
Care depends on the fabrics, threads, batting, and appliqué method used. Prewashing washable cotton fabrics before construction can reduce later shrinkage. For heavily embroidered or dimensional blocks, gentle washing and air drying are generally kinder to the decorative stitching.
Conclusion
This Quilt Block Tutorial with Appliqué Pattern demonstrates how a collection of simple fabric shapes can become an intricate-looking decorative block through thoughtful layering, symmetry, hand stitching, and embroidery. The process begins with a prepared background and paper templates, continues with four central leaf shapes and surrounding cream, burgundy, and brown appliqué pieces, and finishes with embroidered veins, colorful stems, dimensional dots, and a running-stitch border. By dividing the design into manageable stages, even someone developing their appliqué skills can approach the project with confidence.
EASILY FIND THE FREE PDF FOR THIS PATTERN HERE!
The most valuable lesson is that an attractive appliqué quilt block does not depend on absolute perfection. Thoughtful fabric selection, careful placement, secure stitching, and consistent finishing techniques matter far more than making every handmade stitch identical. Use this tutorial as a foundation, experiment with your favorite colors and prints, and adapt the finished block into a cushion, wall hanging, table decoration, or larger quilt. If you create your own version, leave your sincere opinion about the project and share any suggestions or creative changes you would make. Your ideas can inspire new variations and make this traditional quilting technique even more enjoyable.