
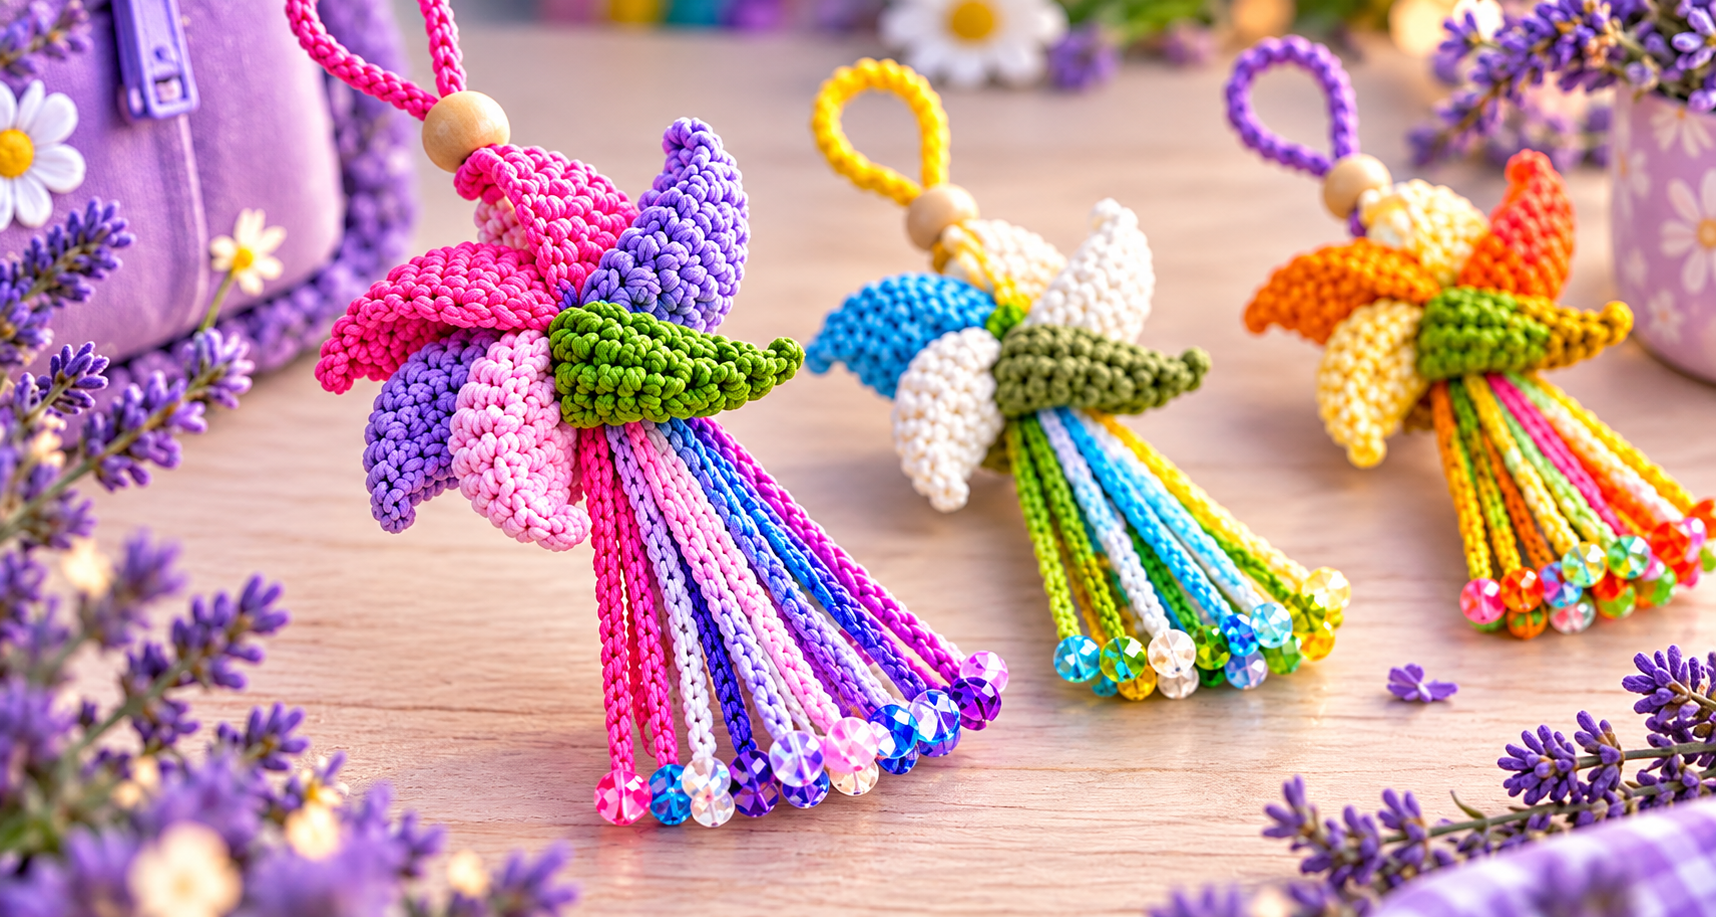
The Miniature Crochet Pinwheel Bag Charm and Keychain Pattern is a cheerful small crochet project that combines dimensional petals, colorful cords, decorative beads, and a practical hanging loop. Inspired by the playful pinwheel-style ornaments shown in the reference image, this design can be used as a crochet bag charm, keychain, backpack decoration, zipper accessory, or handmade gift. The layered petals create a flower-like spinning shape, while the dangling cords add movement and provide an excellent opportunity to experiment with contrasting colors. Although the finished piece looks elaborate, the construction can be divided into manageable crochet sections, making the project approachable for adventurous beginners as well as experienced crocheters looking for a quick scrap-yarn project.
One of the most enjoyable features of this Miniature Crochet Pinwheel Bag Charm and Keychain Pattern is its flexibility. There is no need to reproduce every color exactly as shown in the inspiration photo. You can work with pink and purple for a bright floral look, combine blue, white, and green for a cooler palette, or use orange, yellow, and green for a warm autumn-inspired accessory. The pattern mainly uses familiar U.S. crochet terminology such as ch (chain), sl st (slip stitch), sc (single crochet), hdc (half double crochet), and dc (double crochet). Small amounts of yarn are sufficient, so this is also a practical way to turn leftover yarn into something decorative rather than leaving short lengths unused in your craft basket.
The construction begins with a compact center and develops outward into several tapered, slightly curved crochet pinwheel petals. These pieces are arranged around the center so that each petal overlaps its neighbor and creates the characteristic rotating appearance. A small crocheted cone or wrapped center can conceal the joining area, while a loop at the top turns the ornament into a functional keychain or charm. Long crocheted cords are attached beneath the flower and may be finished with lightweight craft beads for extra sparkle. Because accessories attached to bags receive regular handling, neat finishing is especially important. Secure knots, carefully woven yarn ends, and firmly attached embellishments will make the finished charm more attractive and durable.
Materials, Crochet Abbreviations, and Preparing the Pinwheel
For one Miniature Crochet Pinwheel Bag Charm and Keychain Pattern, gather several colors of lightweight or medium-light yarn, an appropriately sized crochet hook, a yarn needle, scissors, stitch markers, and optional lightweight beads. Cotton or cotton-blend yarn is especially useful because it provides clear stitch definition and helps the small petals maintain their shape. You may also add a wooden bead near the hanging loop, as suggested by the visual style of the reference project. Choose embellishments with openings large enough for the crochet cords, and remember that very heavy beads may stretch a miniature ornament.
DISCOVER MORE FREE PATTERNS HERE!
The main U.S. crochet abbreviations used throughout the pattern are ch = chain, sl st = slip stitch, sc = single crochet, hdc = half double crochet, dc = double crochet, st = stitch, sts = stitches, inc = increase, and dec = decrease. An increase means working two stitches into the same stitch to expand the fabric. A decrease combines stitches so that the piece gradually becomes narrower. Understanding these basic terms before beginning makes the following instructions much easier to follow.
Begin the center with a magic ring (MR). Work 6 sc into the MR, then gently pull the yarn tail until the center closes. Join with a sl st to the first sc. For the next round, ch 1, 2 sc in each st around, producing 12 stitches. Join again with a sl st. This compact circle becomes the foundation beneath the overlapping petals. If you do not enjoy using a magic ring, chain 3 or 4, join into a ring, and work the first six single crochet stitches into that opening instead.
The individual petals can be made separately because this gives you greater control over color placement. Ch 8 and begin in the second chain from the hook. Work 1 sc, 1 hdc, 3 dc, 1 hdc, 1 sc across the foundation chain. This progression creates a naturally fuller middle and narrower ends. Turn, ch 1, and work back across using single crochet stitches. Fasten off while leaving a sewing tail approximately 15 cm long. This produces a simple tapered petal that can be gently curved during assembly.
Repeat the petal instructions until you have approximately six petals. For a fuller ornament, make seven or eight. Changing the color of every petal creates the vibrant handmade appearance seen in the inspiration image. Another attractive approach is to alternate two or three colors. Keep the yarn weight and hook size consistent among the petals so that the pieces remain approximately equal in length and thickness, even when different colors are used.
Before assembling the petals, lay them around the crocheted center. Turn every petal slightly in the same direction so that one edge overlaps the next. This placement is what transforms an ordinary flower arrangement into the recognizable crochet pinwheel pattern. Experiment with the positioning before sewing. Once you like the spiral effect, use the long yarn tails to tack each petal securely to the center, making several small stitches through the hidden lower portion of every piece.
Crocheting and Assembling the Dimensional Pinwheel Petals
To create more dimension in the Miniature Crochet Pinwheel Bag Charm and Keychain Pattern, gently fold the base of each petal before attaching it. Pinch approximately 0.5 to 1 cm of the lower section together and sew through both layers. This small fold makes the petal stand outward instead of lying completely flat. Arrange each folded petal so that its tip points diagonally away from the center. The result should resemble a spinning flower or miniature textile pinwheel rather than a perfectly symmetrical flat blossom.
If you prefer thicker petals like those suggested by the reference image, make two identical petal pieces and join them together. Place the pieces with their edges aligned and work sl st or sc around the outer edge, leaving the bottom open for attachment. A tiny amount of soft filling may be inserted before closing, although this is optional. Avoid overfilling because the petals should remain flexible enough to overlap naturally. A lightly padded construction gives the charm a soft three-dimensional appearance.
For a more curved petal variation, start with ch 9. Beginning in the second chain from the hook, work sc, hdc, dc, 3 dc, dc, hdc, sc across. On the return row, work single crochet across while occasionally making 2 sc in one st along one edge. Those subtle increases encourage the fabric to bend. Crochet all petals with the same basic formula, but do not worry if handmade pieces differ slightly; small variations often add character to miniature crochet accessories.
After positioning all petals, stitch repeatedly through their bases and the central crochet circle. Work from the back whenever possible so the joining stitches remain inconspicuous. The petals should be firmly secured because this area experiences movement whenever the charm hangs from a bag. After sewing, weave each tail through several nearby stitches, reverse direction, and weave through a second section before trimming. This simple finishing technique reduces the chance of yarn ends gradually working loose.
Next, create the small center cone that covers the petal joins. Begin with an MR and 5 sc. On the following round, work 2 sc in each st for 10 stitches. Crochet one round of sc around without increasing. If additional depth is needed, work another plain round. Fasten off with a long tail, position the piece over the center of the petals, and sew around its lower edge. Green works beautifully for a flower-inspired design, but any contrasting shade can become an eye-catching focal point.
Once assembled, gently shape the petals with your fingers. Rotate them all toward the same direction and slightly bend their tips. Crochet fabric often responds well to light shaping without requiring aggressive blocking. If you decide to block the pieces, follow the care requirements of your chosen yarn and avoid excessive heat. The completed center of your Miniature Crochet Pinwheel Bag Charm and Keychain Pattern should now have a distinct spiral silhouette with enough structure to support the decorative tassel cords below.
Making the Hanging Loop, Decorative Cords, and Beaded Tassels
The top hanging loop can be created entirely with crochet. Join yarn securely to the upper back of the pinwheel and ch 30 to 40, depending on the desired loop length. Join the final chain back to the starting point with a sl st, taking care not to twist the chain. For a stronger loop, work one round of slip stitches or single crochet around the entire chain. A reinforced loop is particularly helpful when the finished piece will be used regularly as a crochet bag charm rather than simply displayed as decoration.
A wooden bead can be incorporated between the loop and the pinwheel. If the opening is large enough, thread both strands of the loop through the bead before securing them to the crochet center. The bead provides a polished transition and echoes the handmade appearance of the inspiration design. Choose a smooth, lightweight bead without sharp edges that might damage the yarn. For items intended around very young children or pets, it is generally safer to omit loose decorative beads and use embroidered or crocheted details instead.
For the dangling cords, join yarn to the underside of the pinwheel and ch 25 to 35. Starting in the second chain from the hook, work sl st in each chain back toward the center. This creates a narrow, flexible crochet cord. Repeat the process in multiple colors until you have approximately eight to twelve strands. Slight differences in length can make the tassel look more natural, while equal lengths create a neat, formal finish. Either approach works well for this miniature crochet project.
Another cord option uses a simple chain without working back across it. Make ch 30, fasten off, and secure the free end. These strands are thinner and move more freely than slip-stitched cords. If your yarn is already thick or tightly twisted, plain chains may be all you need. When using fine yarn, however, the slip-stitch method generally produces stronger cords. Mix pink, purple, blue, green, white, orange, and yellow to recreate the lively multicolored feeling of the reference accessory.
Decorative beads can be added to the bottom of each cord. Thread a bead onto the yarn tail and make a secure knot beneath it, or pass the yarn back through the final crochet stitch several times before weaving the tail upward. Be sure every bead is firmly attached. Faceted acrylic beads can provide sparkle without adding excessive weight. Matching each bead to its cord produces a coordinated appearance, while contrasting beads make the crochet keychain pattern feel even more playful.
After completing the tassels, hold the charm vertically and inspect the balance. If one side appears noticeably heavier, reposition the cords or remove an especially heavy embellishment. Trim only after all knots have been checked. The decorative strands should swing independently while remaining securely attached to the pinwheel. At this stage, the main structure is complete: you have the dimensional petals, central cap, hanging loop, and colorful tassels that define the Miniature Crochet Pinwheel Bag Charm and Keychain Pattern.
Finishing, Customizing, and Caring for Your Crochet Bag Charm
Finishing is particularly important with miniature crochet because every stitch is visible. Turn the project over and inspect the back for loose yarn tails. Use a yarn needle to weave each end through several stitches, change direction, and continue through another section. Avoid simply cutting tails close to a knot because repeated movement can eventually loosen them. Carefully finished ends help the Miniature Crochet Pinwheel Bag Charm and Keychain Pattern maintain its shape during everyday use.
If you want a true keychain rather than a soft hanging loop, a standard craft key ring or swivel clip can be attached to the crocheted loop. Make the connection area strong by stitching through it several times with matching yarn. The metal component should sit above the decorative bead or center section so it does not interfere with the petals. For a purely textile version, skip metal hardware and make a longer reinforced crochet loop that can wrap around a bag handle.
Color customization is one of the easiest ways to make every charm unique. A pink and purple crochet pinwheel feels bright and floral, blue and white can produce a fresh look, and orange with yellow creates a sunny palette. You can also use leftover yarn from larger crochet projects. When combining scraps, choose yarns with similar thicknesses. Dramatically different yarn weights may cause some petals to become larger than others and can make the finished ornament unbalanced.
The approximate finished size will depend on yarn and hook choice. With lightweight yarn, the pinwheel center may measure roughly 7 to 10 cm across, excluding the cords and hanging loop. Smaller hooks and thinner yarn create miniature keychains, while medium-weight yarn can produce larger bag decorations. Crochet a single test petal before making the entire set. If it looks too large, reduce the starting chain or use a smaller hook; if it is too small, add one or two foundation chains.
For cleaning, gentle hand care is usually the safest choice, particularly when beads or wooden components are included. Use cool or lukewarm water and a small amount of mild detergent appropriate for the yarn fiber. Avoid soaking untreated wooden beads for extended periods. Press excess moisture out gently without twisting the crochet, reshape the petals with your fingers, and allow the charm to dry flat. Always prioritize the care instructions supplied for the specific yarn you used.
The completed Miniature Crochet Pinwheel Bag Charm and Keychain Pattern is an excellent project for practicing small-scale shaping, color combinations, chains, single crochet, half double crochet, double crochet, slip stitches, increases, simple assembly, and decorative finishing. Once you understand the construction, it becomes easy to create variations. You might make a monochromatic version, alternate petal colors, shorten the tassels, eliminate the beads, or crochet several coordinating charms as handmade gifts.
FAQ – Frequently Asked Questions
Is the Miniature Crochet Pinwheel Bag Charm and Keychain Pattern suitable for beginners?
Yes. A beginner who already understands chain, slip stitch, single crochet, half double crochet, and double crochet should be able to follow the construction. The assembly requires a little patience because several small pieces must be positioned and sewn together, but there are no highly advanced techniques required.
What yarn works best for this crochet bag charm?
Cotton and cotton-blend yarns are excellent choices because they usually provide good stitch definition and enough structure for the petals. Acrylic can also work well. More important than the exact fiber is choosing yarn that produces compact stitches and does not become excessively floppy.
How many petals should the crochet pinwheel have?
Six petals provide a balanced starting point, but the number can be adjusted. Seven or eight petals produce a fuller center. When adding more petals, overlap them slightly and make sure they all rotate visually in the same direction.
Can I make the pattern without beads?
Absolutely. The beads are decorative rather than structural. You can finish the cords with small knots, crocheted bobbles, tiny pom-poms, or simply leave the ends plain. A bead-free version may also be lighter and easier to wash.
How can I make the petals stiffer?
Use a slightly smaller crochet hook so the stitches become tighter, select a structured cotton yarn, or make double-layered petals. Light blocking can also help establish the desired shape, provided it is appropriate for your yarn fiber.
How do I make the pinwheel smaller?
Reduce the petal foundation chain from eight chains to six or seven and use thinner yarn with a smaller hook. Shorten the tassel cords and hanging loop proportionally so that all components remain visually balanced.
Can this pattern be turned into a backpack charm?
Yes. The same construction works very well for backpacks, handbags, craft totes, zipper pulls, and decorative keychains. For frequently used items, reinforce the hanging loop and all joining points carefully.
Why are my petals not forming a pinwheel shape?
The most common reason is positioning. Instead of arranging every petal straight outward like a traditional flower, rotate each one slightly and overlap its lower edge with the neighboring petal. Every petal should lean in the same direction to establish the spinning effect.
How can I keep the tassel cords from stretching?
Use tightly crocheted slip-stitch cords rather than loose chains, especially with yarn that naturally stretches. Lightweight embellishments also help because heavy beads can gradually lengthen the cords.
Can leftover yarn be used for this pattern?
Yes, and this is one of the pattern’s biggest advantages. Each component requires only a small quantity of yarn, making the project ideal for colorful scraps. Try to combine yarns of approximately the same thickness for consistent petal sizing.
How do I secure the beads safely?
Pass the yarn through the bead, create a secure knot or reinforced stitch below it, and weave the remaining tail back into the cord whenever possible. Test each bead with a gentle pull before using the charm. Decorative pieces with small components should be kept away from young children who may place them in their mouths.
Can I sell finished charms made from this type of pattern?
Finished handmade pieces can be wonderful additions to craft collections or small handmade product lines, subject to the rules that apply to the materials, designs, branding, and marketplace you use. Consistent sizing, securely attached components, tidy finishing, and clear care instructions can make finished accessories look more professional.
Conclusion
The Miniature Crochet Pinwheel Bag Charm and Keychain Pattern transforms basic crochet techniques into a colorful dimensional accessory. Throughout this tutorial, you learned how to crochet a compact center, create tapered pinwheel petals, arrange them into a rotating design, cover the joining area, make a reinforced hanging loop, crochet decorative tassel cords, and optionally finish those cords with colorful beads.
The project also offers plenty of room for creativity. By changing yarn colors, petal quantities, cord lengths, hook sizes, and embellishments, you can create many different versions from the same basic crochet pinwheel pattern. It is especially useful for leftover yarn because small scraps can become individual petals and tassels instead of going unused.
Most importantly, take time with the assembly and finishing stages. Securely sewn petals, well-woven yarn ends, reinforced hanging points, and carefully attached decorations can make a major difference in the durability and appearance of your finished crochet bag charm and keychain. After making your own Miniature Crochet Pinwheel Bag Charm and Keychain Pattern, leave your sincere opinion about the project and share any suggestions you have. Which color combination would you choose, and what changes would you make to personalize your next miniature crochet pinwheel?