
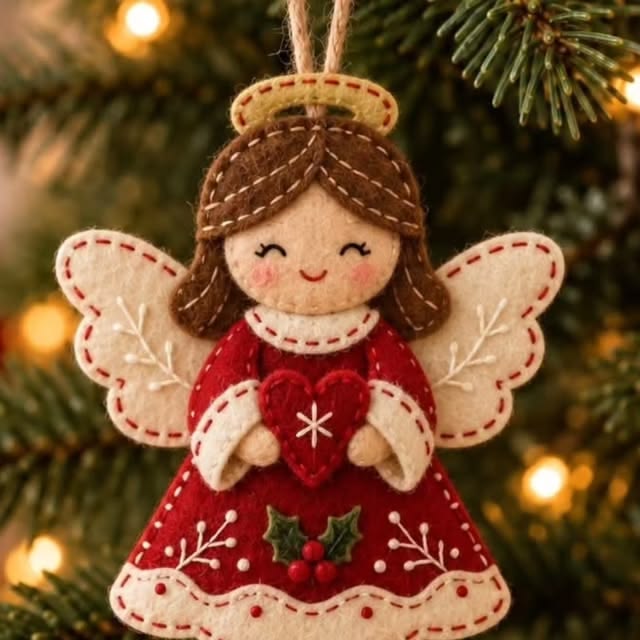
The Felt Christmas Angel Ornament Pattern is a charming handmade Christmas project that combines traditional felt crafting with simple embroidery and layered appliqué. Inspired by the ornament shown in the reference image, this design features a sweet angel dressed in a deep red gown, cream-colored wings, brown hair, a soft golden halo, and a small heart held between her hands. Decorative stitching around the edges gives the ornament a cozy handcrafted appearance that works beautifully with rustic, farmhouse, traditional, and vintage-inspired Christmas décor. Because most pieces are created from basic felt shapes, this is also an approachable project for crafters who are developing their hand-sewing skills.
One of the most attractive features of this Felt Christmas Angel Ornament Pattern is the amount of personality that can be created with relatively inexpensive materials. Small pieces of red, cream, brown, green, gold, and beige felt are enough to construct the main ornament. Embroidery floss adds the facial expression, decorative branches, wing details, and contrasting borders. The tiny holly leaves and berries near the bottom of the dress provide an unmistakable Christmas touch, while the heart at the center creates a warm focal point. Instead of requiring complicated equipment, the project mainly depends on careful cutting, neat hand stitches, and patient assembly.
The finished angel can be hung from a Christmas tree, displayed on a wreath, attached to a holiday garland, or included with a handmade gift. You can also enlarge the Felt Christmas Angel Ornament Pattern to create a decorative wall hanging or reduce it slightly for smaller tree ornaments. The instructions below explain how to reproduce the overall appearance of the reference project while still allowing room for personal choices. Since handmade felt pieces naturally vary, small differences in the face, embroidery, or shape of the wings can make every angel special rather than making the project look imperfect.
Materials, Pattern Pieces, and Preparation
Begin by gathering the materials for your felt Christmas angel ornament. You will need craft felt in deep red, cream or ivory, medium brown, beige or light peach, muted gold or mustard, dark green, and bright red. You will also need embroidery floss in coordinating colors, especially red, cream or white, brown, black, green, and gold. Add a hand-sewing needle, sharp embroidery scissors, fabric scissors, pins or clips, removable fabric marking tools, a small amount of polyester stuffing, and twine or decorative cord for the hanging loop.
DISCOVER MORE FREE PATTERNS HERE!
The pattern can be divided into several manageable pieces: a large bell-shaped dress, two wings, a circular or softly rounded face, several overlapping hair sections, a curved collar, two sleeves or arms, two small hands, a heart, two holly leaves, three berries, and an oval halo. Keeping the pieces separate makes cutting and assembly easier. For a medium tree ornament, a finished height of approximately 13 to 16 cm works well, although the dimensions can be adjusted proportionally.
For the dress, draw a gently rounded triangular or bell shape. The upper portion should be narrow enough to sit naturally beneath the angel’s head, while the bottom should flare outward. Add a softly scalloped cream trim across the lower edge. The reference design has a substantial red dress, so this piece should remain the dominant shape of the entire Christmas felt ornament.
Draw the wings as two mirrored shapes with rounded lobes. They should extend clearly beyond the shoulders without becoming so large that they overpower the body. Cut them from cream felt. If you want the ornament to look attractive from the back as well as the front, cut two layers for each wing. Double-layer construction also provides enough thickness for decorative blanket stitching around the edges.
Create the head from light beige or peach felt and cut the hair from brown felt. The hairstyle can be built from a larger back section and two curved front pieces that overlap around the forehead. A small oval halo cut from muted gold felt sits above the hair. Before cutting every piece from your best felt, make a quick paper version and arrange the components together. This allows you to correct proportions without wasting material.
Finally, prepare the smaller decorative pieces. Cut a red heart that fits comfortably between the angel’s hands, two cream sleeve shapes, two tiny beige hands, two green holly leaves, and three small red berries. These details are important because they create the layered appearance seen in the Felt Christmas Angel Ornament Pattern. Keep all the pieces together in a small tray while working so that the tiny berries and hands are not accidentally lost.
Building the Angel Body, Wings, Face, and Hair
Start construction with the wings because they belong behind most of the other components. If you are using two layers of cream felt for each wing, align the matching pieces and secure them temporarily with a pin. Sew around the outside with a small blanket stitch or evenly spaced running stitch. Red embroidery floss creates the beautiful contrasting outline associated with traditional handmade Christmas felt ornaments.
Before permanently attaching the wings to the body, embroider their internal decorations. The reference design uses delicate branch-like white lines. Stitch a central stem first, then add several short diagonal branches. These do not have to be perfectly identical on both wings. Slight variations reinforce the handmade character of the ornament. Keep the stitches reasonably loose and smooth so they do not distort the felt.
Next, construct the head. Place the brown back-hair section behind the beige face. Add the curved front hair pieces over the upper portion of the face, arranging them so they create a center-parted hairstyle. Use small brown or cream stitches to secure them. Decorative running stitches along the hair can imitate strands and give a flat felt piece more dimension without requiring additional materials.
The facial features should remain simple. Use black embroidery floss to create two small curved closed eyes and short eyelashes. Make the mouth with a small curved line of dark red or brown floss. Soft pink cheeks can be added with tiny pieces of pink felt, textile-safe coloring, or very subtle fabric pigment. When making the angel face embroidery, use minimal details; the peaceful expression comes from clean, uncomplicated lines.
Place the halo behind or slightly above the head. A muted mustard or golden felt works especially well because it provides the appearance of gold without requiring metallic material. Outline the halo with red or brown running stitches. Attach the hanging cord behind this area before closing the ornament. Fold a piece of twine into a loop and secure both ends firmly between the back layers so the finished ornament can safely hang from a tree branch.
Now arrange the head, wings, and dress before sewing everything permanently. The wings should extend from behind the shoulders, while the face should slightly overlap the top of the red gown. Check the ornament from a short distance to make sure both wings appear balanced. Once satisfied, stitch the components together securely. If desired, insert a very thin layer of polyester stuffing between front and back body pieces before completely closing them.
Creating the Dress, Heart, Arms, and Christmas Details
The red gown is the visual center of this Felt Christmas Angel Ornament Pattern, so take time with its decorative stitching. Cut matching front and back dress pieces if you want a padded ornament. Join them with small running or blanket stitches, leaving a temporary opening for stuffing. Add only enough filling to give the dress gentle dimension; excessive stuffing can distort the bell-shaped silhouette.
Create the cream neckline by cutting a narrow curved piece that follows the top edge of the dress. Attach it with contrasting red stitches. This light-colored collar creates a visual transition between the face and the dark red body. It also repeats the cream color used on the wings, sleeves, and lower trim, helping the entire felt angel decoration feel coordinated.
Position the two cream sleeves diagonally toward the center of the body. Place the small beige hands at their lower ends so they appear to hold the heart. Stitch the sleeves around their edges using red embroidery floss, then secure the hands with tiny beige or brown stitches. Keep the hand shapes simple because very small fingers would be difficult to cut cleanly from felt.
Place the red felt heart between the hands. The heart should be large enough to become an obvious focal point but small enough that the sleeves remain visible. Stitch around it with slightly darker red floss or a subtle running stitch. Add a small white embroidered star or snowflake shape in the middle. This simple detail brings contrast to the heart and strengthens the festive appearance of the Christmas angel ornament pattern.
For the bottom decoration, attach two small dark-green holly leaves near the center of the dress. You can cut tiny points along their edges to imitate real holly foliage. Add three small red felt circles for berries. Secure each berry carefully with matching thread. These miniature appliqué elements introduce another Christmas motif without making the ornament visually crowded.
Finish the dress with white embroidered branches positioned near the lower corners. Create each branch from one curved or diagonal stem and several smaller stitches extending outward. Tiny French knots or short circular stitches can represent berries or snow. Add the cream scalloped hem over the bottom edge and outline it with red running stitches. Small red dots or knots along the trim complete the handcrafted holiday look.
Finishing, Customizing, Displaying, and Caring for the Ornament
Once all decorative elements are attached, inspect every edge of your Felt Christmas Angel Ornament Pattern. Look for loose threads, uneven pieces, or areas that require additional reinforcement. If the ornament has been lightly stuffed, close the remaining opening with small stitches that match the existing border. Hide the thread ends between the felt layers whenever possible rather than leaving knots exposed on the back.
Gently reshape the wings and dress with your fingers after sewing. Felt can sometimes curve or wrinkle after extensive embroidery, particularly when stitches have been pulled too tightly. Avoid stretching the material aggressively. Instead, smooth each area and adjust the stuffing until the silhouette appears symmetrical. A well-shaped angel should have an upright head, evenly positioned wings, and a balanced bell-shaped gown.
Customization is one of the biggest advantages of a handmade felt Christmas ornament. The red gown can be replaced with burgundy, forest green, navy blue, dusty pink, or cream. Hair can be made in many shades, and different skin-tone felt can be used for the face and hands. You could also replace the central heart with a tiny star, snowflake, miniature Christmas tree, or another simple seasonal motif.
For a more rustic version, use natural wool-blend felt, cotton embroidery floss, and jute twine. For something more festive, introduce small beads, sequins, metallic embroidery thread, or tiny decorative buttons. When adding embellishments, keep their weight in mind. A tree ornament should remain light enough to hang comfortably from an ordinary branch without pulling it downward.
Storage is important if you want your Felt Christmas Angel Ornament Pattern project to remain attractive for many holiday seasons. After Christmas, place the ornament flat in a clean storage box away from moisture. Avoid crushing it beneath heavier decorations. A piece of acid-free tissue between handmade ornaments can help prevent snagging and reduce pressure on raised embroidery or beads.
This design also makes a thoughtful handmade gift. Create several angels with different dress colors or hair styles for relatives, friends, teachers, neighbors, or holiday guests. A collection can even become a family tradition, with a new felt angel ornament made each year. Adding a small embroidered year to the back is a simple way to turn the project into a keepsake while leaving the decorative front unchanged.
FAQ – Felt Christmas Angel Ornament Pattern
What type of felt works best for this ornament?
Craft felt is suitable for an inexpensive and beginner-friendly version, while wool-blend felt generally provides a firmer texture and refined finish. The most important consideration is choosing felt that cuts cleanly and is not excessively thin.
What are the main stitches needed for the project?
The design can be completed primarily with running stitch, blanket stitch, backstitch, French knots, and simple embroidery stitches. Beginners do not need advanced sewing skills to reproduce the overall style.
Does the angel need to be stuffed?
No. A completely flat ornament works well. However, inserting a small amount of polyester filling between the front and back layers gives the angel a softly padded appearance. Use only a thin amount so the felt does not become distorted.
How large should a felt Christmas angel ornament be?
A finished height of approximately 13 to 16 cm is practical for many Christmas trees. You can make the pattern larger or smaller as long as all individual pieces are resized proportionally.
Can this Felt Christmas Angel Ornament Pattern be sewn by hand?
Yes. In fact, hand sewing complements the design because the visible decorative stitches are an important part of its character. A sewing machine is not necessary.
How do I make the stitching look even?
Mark tiny guide dots before sewing, especially around long edges. Try to keep both the stitch length and the distance between stitches consistent. Do not pull the embroidery floss too tightly, since this can cause the felt to pucker.
What can I use for the hanging loop?
Jute twine, embroidery floss, narrow ribbon, cotton cord, or decorative string can all work. Secure the loop between felt layers whenever possible so that the attachment point remains hidden and strong.
Can beginners make this Christmas angel?
Yes. The project is particularly suitable for beginners because it relies on simple shapes and basic hand stitches. New crafters may find it helpful to cut paper templates first and assemble the complete design on a table before beginning to sew.
Can I change the colors from those shown in the reference design?
Absolutely. The combination of red, cream, brown, green, and gold creates a classic Christmas appearance, but the pattern can easily be adapted. White and gold can produce an elegant angel, while pastel colors can create a softer style.
How can I make several angels look consistent?
Create reusable paper or cardstock templates for every component. Trace the same templates onto the felt for each ornament, and use small stitch-spacing marks as guides. This approach is particularly useful when creating matching ornaments for gifts or a coordinated Christmas tree.
Can I personalize the finished ornament?
Yes. A name, date, short word, or initials can be embroidered on the back before final assembly. Personalization turns a simple Felt Christmas Angel Ornament Pattern into a memorable handmade keepsake.
How should handmade felt ornaments be cleaned?
Light dust can usually be removed carefully with a soft, dry brush. Avoid aggressive rubbing, soaking, or high heat, especially when the ornament includes embroidery, beads, glue, or delicate embellishments. Proper dry storage is the best way to keep the piece looking fresh.
Conclusion
The Felt Christmas Angel Ornament Pattern combines straightforward felt appliqué, decorative embroidery, layering, and simple hand sewing to create a warm Christmas decoration with plenty of handmade character. Throughout this project, we covered how to prepare the dress, wings, face, hair, halo, heart, hands, holly embellishments, embroidered branches, decorative borders, and hanging loop before bringing everything together into one coordinated ornament.
The most important lesson is to work gradually. Start with accurate templates, test the placement of every felt piece before stitching, and build the ornament from the background layers toward the foreground. The wings and hair form the foundation, the face and dress establish the main silhouette, and smaller elements such as the heart, holly berries, scalloped trim, and embroidery provide the final personality.
EASILY FIND THE FREE PDF FOR THIS PATTERN HERE!
You can follow the classic red-and-cream appearance closely or use the Felt Christmas Angel Ornament Pattern as a starting point for your own Christmas collection. Different colors, facial details, embroidery designs, and small personalized touches can transform the same basic template into many unique angels. Most importantly, enjoy the handmade process. Felt crafts do not need machine-perfect stitches to look beautiful; consistent hand sewing and thoughtful details are part of their charm. If you make this Christmas angel, leave your sincere opinion about the project and share your suggestions for future felt patterns. Your ideas can inspire new color combinations, embellishments, and creative variations for many more handmade Christmas decorations.