
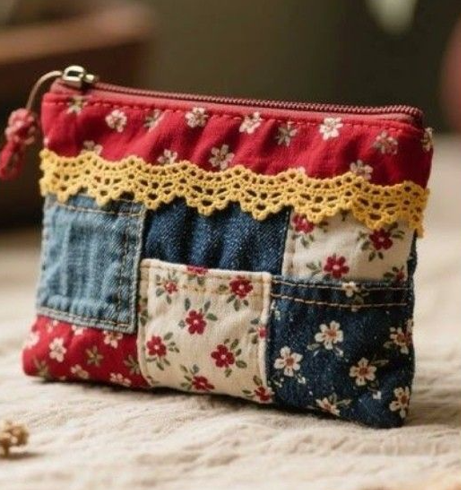
Patchwork Zippered Toiletry Bag Pattern is a charming sewing project that combines practical storage with the cozy personality of handmade patchwork. Inspired by the bag shown in the reference image, this design mixes small pieces of floral cotton, denim-style fabric, decorative lace, and a gathered upper section to create a compact pouch with a distinctly vintage look. The finished project can be used as a toiletry bag, cosmetic pouch, sewing notions holder, travel organizer, or everyday zipper pouch. Because the exterior is assembled from relatively small fabric pieces, it is also an excellent project for using beautiful scraps that are too special to throw away.
One of the most appealing features of this Patchwork Zippered Toiletry Bag Pattern is that perfect fabric matching is not necessary. In fact, the design becomes more interesting when different prints and textures are combined thoughtfully. Small floral prints can sit beside dark denim, faded blue cotton, red fabric, and cream-colored material. Decorative lace placed between the gathered top and the patchwork body adds another layer of texture. The goal is to create a coordinated handmade appearance while allowing each individual fabric piece to remain visible. This makes the project especially suitable for sewists who enjoy scrap sewing, patchwork projects, quilting techniques, and handmade accessories.
The construction is approachable when divided into manageable stages. You will first select and prepare the fabrics, then build the patchwork exterior, create the decorative gathered section, add lace, install the zipper, prepare the lining, and finally assemble the pouch. A finished size of approximately 22 cm wide × 16 cm high is practical for many everyday uses, although the dimensions can easily be adjusted. A 1 cm seam allowance works well throughout most of the project. Taking time to press the seams and check measurements after every stage will help produce a neat, balanced bag that closely reflects the handcrafted style of the reference design.
Materials, Fabric Selection, and Cutting the Patchwork Pieces
Begin by collecting several coordinating fabrics for your Patchwork Zippered Toiletry Bag Pattern. You can use quilting cotton, lightweight denim, chambray, floral cotton, or similar woven fabrics. For a look inspired by the reference project, combine red floral fabric, cream floral fabric, medium blue fabric, and dark denim-style material. Avoid fabrics that are extremely different in weight unless you stabilize the lighter pieces with interfacing.
DISCOVER MORE FREE PATTERNS HERE!
For the main patchwork body, prepare enough scraps to create two rectangular exterior panels measuring approximately 23 cm × 12 cm after assembly. Rather than cutting every patch exactly the same size, create a mixture of rectangles and squares. Pieces around 6–9 cm wide work particularly well. Remember to include your seam allowances when cutting so the completed panels reach the required dimensions.
Cut two pieces of red floral fabric approximately 23 cm × 7 cm for the gathered upper sections. These pieces will eventually be reduced slightly in width through gentle gathering, producing the soft folds visible near the zipper. If you prefer stronger gathers, cut the strips a few centimeters wider and gather them until they match the width of the patchwork panels.
You will also need two pieces of lining fabric approximately 23 cm × 17 cm. Choose a light or medium-weight cotton that complements the exterior. A lighter lining can be especially useful inside a toiletry or cosmetic bag because small objects are easier to see against it. If desired, use water-resistant lining fabric, but make sure it can safely be sewn with your machine and needle.
Prepare two pieces of lightweight fusible interfacing or thin batting approximately the same size as your completed exterior panels. Interfacing gives the pouch stability and helps prevent the patchwork seams from stretching. Thin batting produces a softer, lightly quilted result. For a small toiletry bag, avoid very thick batting because excessive bulk can make zipper installation and final assembly more difficult.
Finally, gather a zipper approximately 22–25 cm long, matching sewing thread, pins or sewing clips, fabric scissors or a rotary cutter, ruler, marking tool, iron, zipper foot, and approximately 45–50 cm of decorative cotton lace. The lace should be wide enough to be noticeable without covering too much of the patchwork. A narrow crocheted or scalloped trim recreates the warm handmade character of the inspiration.
Sewing the Patchwork Exterior and Decorative Lace
Lay the fabric scraps on your work surface before sewing anything together. Experiment with several arrangements until the colors feel balanced. Place darker denim pieces beside lighter floral fabrics and distribute the strongest red prints throughout the design rather than concentrating them in one area. This simple planning stage is an important part of creating an attractive patchwork zipper pouch.
Once you are happy with the arrangement, begin joining the smaller pieces using a 1 cm seam allowance. Sew individual pieces into short rows first. Press each seam carefully after stitching. You can press the seam allowances to one side or press them open when the fabric is bulky. Accurate pressing helps the patchwork panel stay flat and prevents distorted corners.
Join the completed rows to form a larger rectangle. Check the panel with a quilting ruler and trim the edges until you have a clean rectangle measuring approximately 23 cm × 12 cm. Repeat the process for the second side of the bag. The two panels do not need to be identical. Slightly different arrangements actually emphasize the handcrafted character of the Patchwork Zippered Toiletry Bag Pattern.
Apply lightweight fusible interfacing to the wrong side of each patchwork panel according to the manufacturer’s temperature recommendations, or place thin batting behind each panel. If you use batting, add a few lines of topstitching near selected patchwork seams. Straight stitching about 2–3 mm from a seam gives the exterior subtle definition and reinforces the individual fabric sections.
Next, prepare the red floral upper sections. Sew one or two rows of long machine stitches along the lower edge without backstitching. Gently pull the bobbin threads to create soft gathers until each upper section matches the width of its corresponding patchwork panel. Distribute the folds evenly instead of creating tight ruffles. The finished effect should look relaxed and softly textured.
Position the decorative lace across the joining line between the gathered floral section and patchwork body. Stitch the gathered fabric to the patchwork first, press the seam carefully, and then position the lace over the seam. Sew along the upper edge of the lace and, if necessary, secure the lower edge with another narrow line of stitching. This creates the recognizable lace-trimmed patchwork bag appearance.
Installing the Zipper, Lining, and Building the Bag
Before installing the zipper, place the two exterior panels beside each other and confirm that they are approximately the same dimensions. Trim small differences if necessary. The decorative lace should sit at roughly the same height on both sides. These little adjustments are easier to make now than after the zipper has been attached.
Place the zipper right side down along the top edge of the first exterior panel. The zipper teeth should face toward the exterior fabric. Place one lining piece on top, right side facing the exterior panel, creating a sandwich with the zipper between the two layers. Clip or pin the layers securely and sew them together using a zipper foot.
Fold the exterior and lining away from the zipper and press carefully. Topstitch close to the folded fabric edge, making sure the lining stays clear of the zipper teeth. This line of stitching creates a professional appearance while preventing fabric from becoming caught in the zipper during normal use. Repeat the same process with the second exterior panel and remaining lining piece.
After both sides are attached, open the project flat. The two exterior pieces should be on one side of the zipper and the two lining pieces on the opposite side. Open the zipper at least halfway before proceeding. This is extremely important because the zipper opening will provide the route for turning the finished bag right side out.
Bring the exterior panels together with their right sides facing. Bring the lining pieces together in the same way. Carefully align the side edges and bottom corners, paying particular attention to the points where the zipper meets the exterior. Pin or clip around the perimeter. Leave an opening approximately 7–9 cm wide along the bottom edge of the lining.
Sew around the perimeter using approximately a 1 cm seam allowance, leaving the lining opening unstitched. Reinforce the areas near both zipper ends with a second short line of stitching. Trim bulky corners carefully without cutting through the seams. If the lace creates excess thickness along the side seams, trim only unnecessary seam allowance while preserving enough fabric to keep the construction secure.
Turning, Finishing, and Personalizing the Toiletry Bag
Reach through the opening in the lining and gently pull the exterior through. Then carefully guide the entire bag through the partially opened zipper. Work slowly around the corners rather than pulling aggressively. Use a blunt turning tool or the rounded end of a suitable sewing tool to shape the corners without puncturing the fabric.
Once everything is right side out, inspect the zipper and exterior seams. Press the bag gently, protecting delicate lace from direct excessive heat. Fold the raw edges of the lining opening inward by approximately 1 cm and stitch the opening closed close to the folded edge. For an almost invisible finish, you can close it by hand with a ladder stitch.
Push the lining into the bag and smooth it into the bottom corners. Close and reopen the zipper several times to ensure that no lining or gathered fabric catches in the teeth. The finished Patchwork Zippered Toiletry Bag Pattern should have a stable rectangular body, softly gathered floral top, visible decorative lace, and a smooth zipper opening.
For additional structure, you can create small boxed corners before turning the bag. Pinch each bottom corner so the side seam aligns with the bottom seam, measure approximately 2–3 cm across the triangular point, stitch across it, and trim the excess. This technique creates a wider base, allowing the toiletry bag to stand more easily when filled.
You can also personalize the design with a small zipper pull made from fabric, ribbon, or coordinating cord. A narrow fabric loop can be inserted into one side seam before final assembly if you want an easy carrying point. Small decorative details should remain functional and securely attached, particularly if the pouch will be used frequently during travel.
The same Patchwork Zippered Toiletry Bag Pattern can be adapted to many styles. Replace the vintage floral fabrics with modern geometric prints, pastel cotton, monochromatic scraps, or recycled denim. You can also vary the lace or omit it for a simpler appearance. The essential construction remains the same, making this pattern a useful foundation for creating many different handmade zipper bags.
FAQ About the Patchwork Zippered Toiletry Bag Pattern
What is the best fabric for a Patchwork Zippered Toiletry Bag Pattern?
Quilting cotton is one of the easiest materials to work with because it cuts cleanly, presses well, and is available in countless prints. Lightweight denim and chambray are also excellent for adding visual texture. When combining fabrics, try to keep their weights reasonably similar or use fusible interfacing to create a more consistent structure.
What finished size should I use for this toiletry bag?
A finished measurement around 22 cm wide × 16 cm high is a practical starting point for cosmetics, small toiletries, sewing supplies, or personal accessories. You can enlarge or reduce the pattern while maintaining the same basic construction method. Remember that all pieces affected by the change should be resized consistently.
Do I need batting inside the patchwork bag?
No. Batting is optional. Lightweight fusible interfacing is usually enough when you want a crisp but flexible pouch. Thin batting is useful when you prefer a padded, slightly quilted appearance. Avoid overly thick batting around the zipper because it may create unnecessary bulk.
How can I make the patchwork seams look neater?
Accurate cutting, consistent seam allowances, and careful pressing make the greatest difference. Sew slowly when joining small patches and press after every seam. Topstitching beside selected seams can also help keep the panel flat while highlighting the patchwork construction.
Can I make this bag from fabric scraps?
Absolutely. Fabric scrap sewing is one of the main advantages of this design. Small leftover rectangles and squares can become individual patchwork sections. Using scraps also gives you freedom to experiment with color combinations without requiring large pieces of fabric.
What zipper should I use?
A standard nylon coil zipper is easy to sew and works well for this project. Choose one approximately the same width as the finished pouch or slightly longer. A longer zipper can often be easier to install because the zipper pull can be moved away from the sewing area while you work.
How do I stop the lining from catching in the zipper?
After installing each side of the zipper, press the fabric away from the zipper teeth and add a neat line of topstitching. Keep the stitching close enough to secure the fabric but far enough from the teeth that the zipper slider can move freely.
Can I wash the finished toiletry bag?
That depends on the materials used. Prewashing cotton fabrics before construction can reduce later shrinkage. If the bag contains delicate lace, special interfacing, or decorative elements, gentle hand washing may be preferable. Always consider the care requirements of every material included in the project.
Is this project suitable for beginners?
A confident beginner can complete it successfully by working one stage at a time. Basic straight stitching is used for most of the construction. The zipper installation and patchwork alignment require a little patience, but neither technique needs to be complicated when the pieces are prepared accurately.
Can I use recycled denim for the blue sections?
Yes. Recycled denim can add wonderful texture to a handmade patchwork toiletry bag. Choose thinner sections of denim whenever possible and avoid bulky seams from the original garment. If the denim is considerably heavier than the floral cotton, reduce interfacing in those areas to control thickness.
Why is pressing so important in patchwork sewing?
Pressing helps each seam settle into its correct position and keeps the overall panel flat. Small measurement errors can accumulate across several patchwork pieces, so pressing and checking dimensions after each row helps maintain accuracy. Use an up-and-down pressing motion rather than aggressively sliding the iron across the fabric.
What other projects can be made with this construction method?
Once you understand the basic technique, you can adapt it for cosmetic pouches, pencil cases, sewing organizers, travel bags, small accessory cases, and gift pouches. Changing the proportions, fabrics, zipper length, and internal structure allows one patchwork bag pattern to inspire many variations.
Conclusion
The Patchwork Zippered Toiletry Bag Pattern brings together several enjoyable sewing techniques in one practical handmade project. Throughout this tutorial, we covered fabric selection, scrap arrangement, patchwork construction, interfacing, gentle gathering, decorative lace application, zipper installation, lining assembly, turning, topstitching, and final finishing. Each technique contributes to the finished appearance while also building useful sewing skills that can be applied to many future projects.
The combination of floral cotton, denim-style fabric, patchwork pieces, gathered fabric, and decorative lace gives this bag its distinctive handmade personality. At the same time, there is plenty of room for creativity. You can change the prints, modify the dimensions, add boxed corners, use different lace, experiment with quilting, or create an entirely new color palette while keeping the same construction method.
Most importantly, work carefully rather than quickly. Accurate seams, frequent pressing, careful zipper placement, and neatly finished lining will make a noticeable difference in the final result. Even small fabric scraps can become something attractive and useful when they are thoughtfully arranged.
EASILY FIND THE FREE PDF FOR THIS PATTERN HERE!
After completing your Patchwork Zippered Toiletry Bag Pattern, take a moment to look at the combinations and techniques that worked best for you. Handmade patchwork is especially rewarding because every finished pouch can be slightly different from the last. We would love to hear your sincere opinion about this project. Which fabric combination would you choose for your toiletry bag? Leave your thoughts, creative ideas, and suggestions for future patchwork projects. Your suggestions can inspire new variations and help other sewing enthusiasts discover fresh ways to enjoy this charming pattern.