
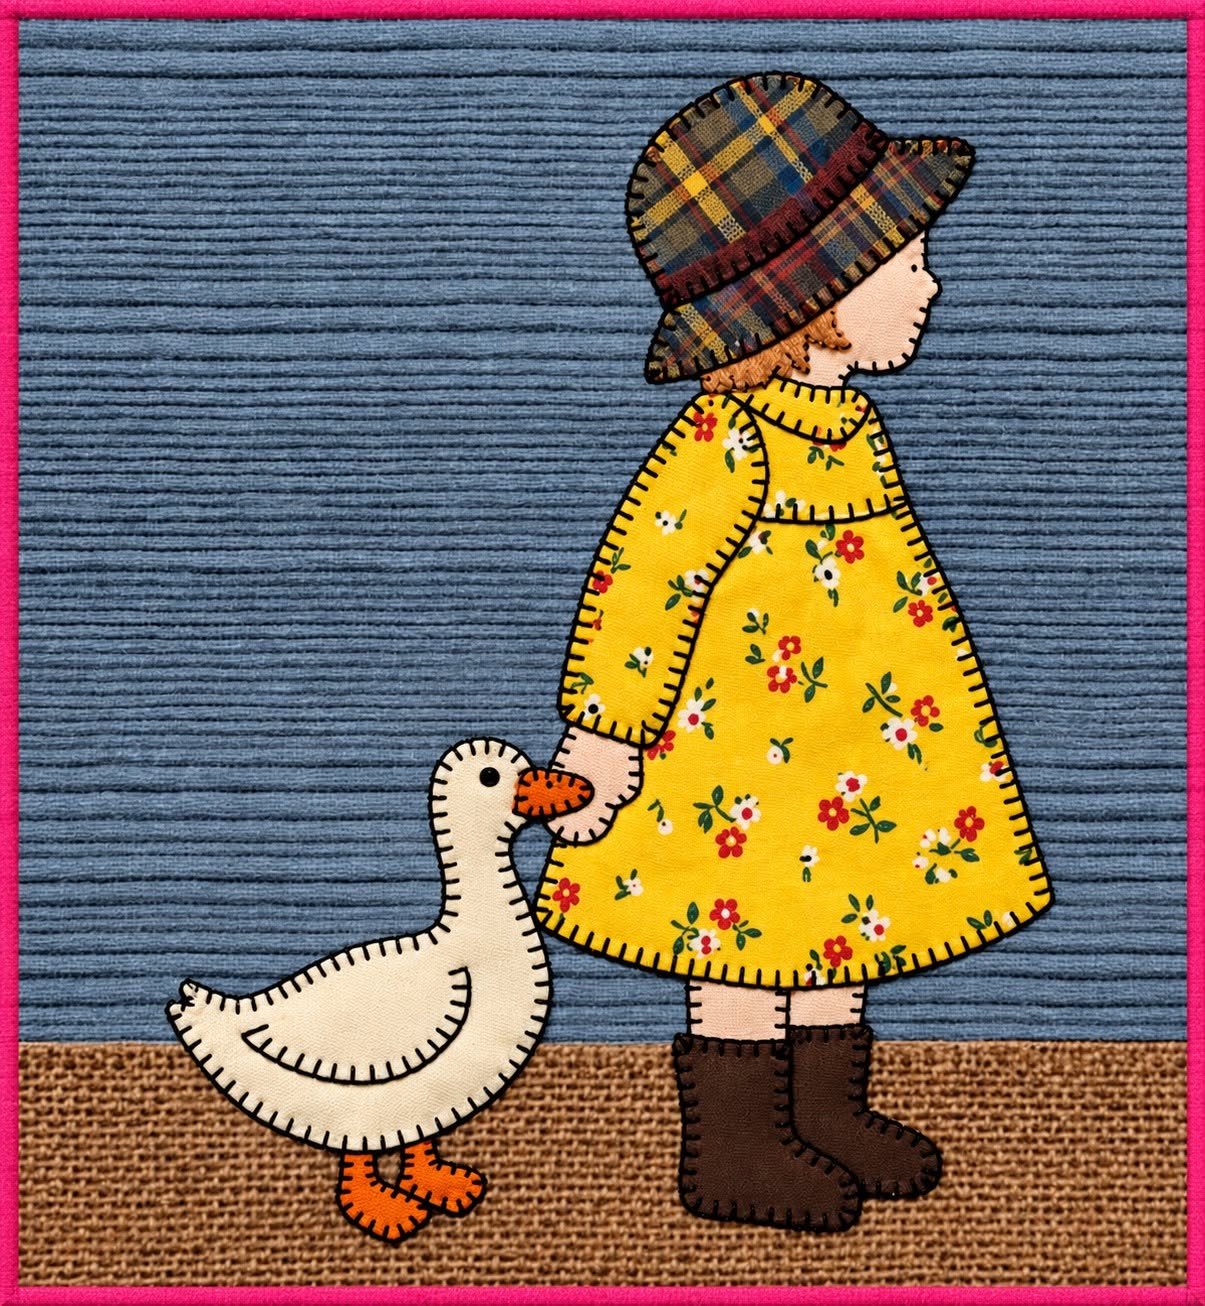
The “Girl and Goose” Fabric Appliqué Panel Pattern is a charming sewing project that combines traditional appliqué, hand-stitch-inspired details, layered fabrics, and a warm country aesthetic. The design features a little girl dressed in a cheerful floral coat, a plaid hat, dark boots, and a friendly goose walking beside her. Against the textured background, the simple silhouettes and contrasting fabrics create a cozy handmade appearance that works beautifully as a decorative wall panel, quilt block, pillow front, or centerpiece for a larger textile project. One of the strongest features of this pattern is that it does not require complicated piecing to achieve an expressive result. Instead, the personality comes from carefully selected fabrics, clean shapes, thoughtful placement, and visible decorative stitching around the appliqué pieces.
Creating your own “Girl and Goose” Fabric Appliqué Panel Pattern is also an enjoyable way to practice several essential sewing techniques. You will learn how to prepare a fabric background, trace individual appliqué templates, work with fusible web, layer overlapping pieces in the correct order, and finish raw edges with decorative stitches. The girl can be assembled from separate pieces for her face, hat, coat, legs, and boots, while the goose is formed from simple body, wing, beak, and leg shapes. Because each component is prepared separately before being assembled on the background, beginners can work slowly and make adjustments before anything is permanently stitched. More experienced makers can personalize the project through fabric choices, embroidery, quilting, and additional details.
Another appealing quality of this fabric appliqué pattern is the opportunity to use small pieces from a fabric collection or scrap basket. A bright floral cotton is ideal for the girl’s coat, while plaid fabric gives the hat wonderful visual texture. Neutral cream fabric works well for the goose, orange scraps can form the beak and feet, and brown fabric creates recognizable boots. These colors can certainly be changed to suit your own decorating style. The finished panel can have a rustic appearance, a modern palette, or even a seasonal theme. What matters most is maintaining enough contrast between neighboring pieces so that the silhouettes remain easy to see. With careful preparation and patient stitching, this approachable project can become a distinctive piece of handmade textile art.
Materials and Preparation for the Girl and Goose Appliqué
Begin your “Girl and Goose” Fabric Appliqué Panel Pattern by choosing a firm background fabric that can support multiple appliqué layers without becoming distorted. Medium-weight cotton, linen-look cotton, or quilting cotton backed with lightweight stabilizer are practical choices. For a panel approximately 35 × 35 cm, cut the background slightly larger, around 40 × 40 cm, so you have extra fabric for trimming and finishing after the appliqué work is complete.
DISCOVER MORE FREE PATTERNS HERE!
For the girl, collect several coordinating fabric scraps. You will need a skin-tone fabric for the face and visible leg area, a patterned yellow or similarly bright fabric for the coat, plaid or checked fabric for the hat, and dark brown fabric for the boots. Small-scale prints are especially useful because the pattern remains recognizable even after the fabric has been cut into relatively small appliqué pieces. Press every scrap before tracing the templates.
The goose requires cream, ivory, or soft white fabric for the main body and wing. Select a small orange fabric scrap for the beak and feet. If you want the appliqué to resemble the handcrafted appearance of the reference design, choose fabrics with subtle woven or printed texture instead of extremely bold patterns. The contrast between the neutral goose and colorful girl helps establish a clear focal point.
In addition to fabric, prepare fusible web, sharp fabric scissors, an iron, an ironing surface, coordinating thread, pins or appliqué glue, a fabric marking pencil, and optional tear-away or lightweight stabilizer. Fusible web is particularly useful for this project because it keeps small components from shifting while you sew around them. Always follow the temperature instructions supplied with your chosen fusible product to protect the fabrics.
Before cutting the actual fabric, create paper templates for every major component. Separate the girl into the hat, head, hair if desired, coat, hands, legs, and boots. Divide the goose into its body, wing, beak, and feet. Remember that pieces traced onto the paper side of fusible web may need to be reversed, particularly when you want the girl and goose to face a specific direction in the finished composition.
Finally, arrange your paper pieces on the background before cutting expensive or limited fabric. This simple planning stage lets you check proportions and spacing. In a balanced composition, the girl should stand prominently on one side while the goose occupies the lower opposite area, with enough empty background surrounding both figures. Mark the approximate positions lightly so you can reconstruct the arrangement after preparing the individual appliqué pieces.
Cutting, Layering, and Assembling the Fabric Appliqué
Trace each template onto the paper side of your fusible web, leaving a small amount of space between shapes. Rough-cut around each traced piece rather than immediately cutting on the final outline. Fuse each piece to the wrong side of its corresponding fabric according to the manufacturer’s directions. Once everything has cooled, cut precisely along the traced outlines using small, sharp scissors.
Start assembling the girl with the pieces that visually sit farthest behind. In the “Girl and Goose” Fabric Appliqué Panel Pattern, the legs should generally be positioned before the coat because the lower edge of the coat overlaps their upper portion. Similarly, the head can extend slightly underneath the hat. Thinking of the design as a series of layers will help you avoid awkward gaps between neighboring fabric pieces.
Position the coat over the legs and check the overall silhouette before fusing it permanently. The slightly flared coat is one of the most recognizable parts of this design. If you are creating your own templates from the visual concept, keep the shoulders narrower and gradually widen the shape toward the hem. A floral print adds movement and personality without requiring complicated piecing.
Next, assemble the head and hat. The face can remain intentionally simple because this style of appliqué sewing relies on silhouette rather than realistic facial features. Position the plaid hat so that it overlaps the upper portion of the head. A brim created as a separate appliqué layer can add dimension, especially when the direction of the plaid differs slightly from the crown.
Construct the goose separately before final fusing. Place the main cream body first, followed by the wing. The wing can be made from the same fabric or a slightly different neutral tone to create gentle contrast. Add the orange beak and feet last. Small pieces can be difficult to handle, so tweezers or the tip of a pin can help with precise positioning.
When you are satisfied with the complete arrangement, fuse the pieces carefully to the background. Work gradually rather than pressing the entire design aggressively at once. Check that every overlapping component remains correctly aligned. Allow the panel to cool completely on a flat surface before moving it to the sewing machine or beginning the hand-stitched edge finishing.
Stitching and Finishing the Girl and Goose Fabric Panel
The visible edge stitching is an important decorative element in this “Girl and Goose” Fabric Appliqué Panel Pattern. A blanket stitch works particularly well because it secures the raw fabric edges while creating the traditional handmade appearance seen in folk-style appliqué. You can create the stitch by hand or use a sewing machine that includes a suitable blanket-stitch setting.
Begin with the larger shapes because they are easier to control. Stitch around the girl’s coat slowly, pivoting whenever necessary to follow curves. If using a machine, reduce your sewing speed around the neckline, shoulders, sleeves, and lower corners. The goal is to produce an even border that enhances the shape rather than distracting from the fabric print.
Continue around the hat, face, legs, and boots. Dark brown thread can blend with the boots, while contrasting thread can intentionally emphasize the stitched outline. For a cohesive result, you may instead use one neutral or complementary thread throughout most of the project. Decorative appliqué stitching is an excellent place to personalize the panel.
Stitch the goose using the same method. Secure the body first and then outline the wing to make it visually distinct. Carefully sew around the orange beak and feet because these pieces are considerably smaller. If machine stitching feels difficult in these areas, hand stitching provides excellent control and can reinforce the handcrafted character of the finished design.
Once all appliqué edges are secure, consider adding subtle embroidered details. A tiny dark stitch can form the goose’s eye, while a few simple lines can enhance the wing. Avoid adding too many details to the girl’s face if you want to preserve the gentle silhouette style. Sometimes a minimalist approach gives a fabric character more charm than elaborate facial embroidery.
Press the completed panel from the reverse side using appropriate heat protection. Square the background to your desired final measurement and decide how the project will be displayed. You can add borders and batting to transform it into a quilted wall hanging, incorporate it into a pillow cover, or use the appliqué panel as one block in a larger quilt. A narrow binding around a quilted version gives the project a polished finish.
Creative Variations, FAQ, and Final Tips
One advantage of the “Girl and Goose” Fabric Appliqué Panel Pattern is its flexibility. The yellow floral coat can become red, blue, green, or patchwork, and the plaid hat can be replaced with denim, gingham, or another small print. When changing colors, focus on contrast. The coat should remain clearly visible against the background, and the goose should not disappear into fabric that is too similar in value.
You can also modify the background to create a completely different atmosphere. Gray gives the project a contemporary neutral appearance, while pale blue suggests an outdoor scene. Beige and brown can create a rustic farmhouse feeling, and pastel colors can produce a softer nursery-style panel. A narrow strip of textured brown fabric along the bottom can suggest the ground and visually anchor both figures.
For additional dimension, consider lightly quilting the background after completing the appliqué. Straight horizontal lines, gentle echo quilting, or simple free-motion textures can make the figures stand forward from the surface. If you intend to quilt the panel, place batting and backing behind it and baste the layers securely before beginning the quilting process.
Scrap fabrics make this design particularly economical. Since most pieces are relatively small, the fabric appliqué project can use leftovers from previous quilts and sewing projects. This is also an opportunity to combine prints that might seem too bold for a large project. Small floral, plaid, dotted, and textured fabrics often become more visually interesting when used as individual appliqué elements.
Beginners should resist the temptation to rush through the cutting stage. Accurate shapes make assembly and stitching considerably easier. If a curve appears uneven, refine it before removing the fusible paper. Likewise, test your chosen decorative stitch on scrap fabric before working on the actual panel. Adjust stitch width, stitch length, thread tension, and stabilizer until the sample lies flat.
Most importantly, treat the pattern as a creative starting point rather than a rigid formula. Handmade appliqué naturally contains small differences, and those details contribute to its character. Careful construction is important, but perfect mechanical uniformity is unnecessary. The combination of recognizable silhouettes, contrasting fabric, and decorative stitches is what gives the “Girl and Goose” Fabric Appliqué Panel Pattern its welcoming handmade personality.
FAQ – Frequently Asked Questions
What is the best fabric for the “Girl and Goose” Fabric Appliqué Panel Pattern?
Quilting cotton is one of the easiest materials to use because it presses well, cuts cleanly, and is available in many prints. Cotton-linen blends and other stable woven fabrics can also work. Avoid very stretchy materials when making your first version because they are more difficult to keep flat during appliqué stitching.
Do I need fusible web to make this appliqué panel?
It is not absolutely required, but fusible appliqué makes the process much easier, especially for beginners. Fusible web temporarily or permanently holds the pieces in position while their edges are stitched. Traditional needle-turn appliqué is another possibility, although it requires a different template preparation and sewing technique.
Can this project be sewn completely by hand?
Yes. In fact, hand blanket stitching can complement the folk-art character of the design beautifully. Use small, consistent stitches around the appliqué shapes and secure your thread carefully on the reverse. Hand sewing takes longer than machine appliqué, but it offers excellent control around the small beak, feet, hat, and boots.
What stitch should I use around the appliqué pieces?
A blanket stitch is an excellent choice for the visual style of this project. A narrow zigzag can also secure raw edges effectively, while a satin stitch provides much denser coverage. If you prefer a deliberately rustic appearance, hand blanket stitching with slightly heavier thread can make the outlines an important part of the design.
How can I stop the background from puckering?
Use a stable fabric, avoid excessive heat when applying fusible web, and consider placing lightweight stabilizer behind the background during decorative stitching. Do not pull or stretch the fabric while sewing. If using a machine, test the tension and stitch settings on scraps made from the same materials before stitching your finished pieces.
Should the appliqué pieces have seam allowances?
For raw-edge fusible appliqué, the pieces are normally cut to their finished outline, so traditional seam allowances are generally unnecessary. If you choose needle-turn appliqué instead, you will need extra fabric around the templates so the raw edges can be turned underneath. Decide which construction technique you will use before preparing your templates.
How large should the finished panel be?
The size is flexible. A finished area around 35 × 35 cm provides comfortable space for a decorative panel, but the templates can be enlarged or reduced according to your intended project. When resizing, adjust all pieces by the same percentage so the proportions between the girl, goose, and background remain consistent.
Can I turn the design into a quilt block?
Absolutely. Leave sufficient background fabric around the appliqué so the finished piece can be squared accurately and joined to neighboring blocks. You could repeat the girl-and-goose theme, combine it with floral blocks, or make this scene the central block of a larger quilt. Remember to account for the seam allowance required when joining blocks.
Can fabric scraps be used for this pattern?
Yes, and this project is especially suitable for fabric scraps. The hat, boots, beak, feet, face, wing, and coat can all be cut from relatively small pieces. Coordinating leftovers can create a charming scrappy appearance while helping you make practical use of materials already available in your sewing collection.
How do I make the goose wing visible when using similar fabrics?
Choose a wing fabric that is slightly lighter or darker than the body, or rely on decorative stitching to define its outline. Even when both pieces are made from the same cream cotton, a clearly stitched curved border can distinguish the wing. You can also add a few simple embroidered feather lines for extra definition.
Is the Girl and Goose appliqué suitable for beginners?
Yes. The project introduces several useful beginner appliqué techniques without requiring complicated patchwork construction. The larger coat, body, hat, and goose shapes are relatively forgiving. Beginners can practice on these pieces before working on smaller elements such as the beak and feet.
How should the finished appliqué panel be cared for?
Care depends on the fabrics, thread, fusible product, batting, and finishing method you use. Prewashing washable cotton fabrics can reduce unexpected shrinkage. For decorative wall panels, gentle cleaning is usually sufficient. If the project will become a washable pillow or quilt, select materials specifically intended for laundering and follow their care instructions.
Conclusion
The “Girl and Goose” Fabric Appliqué Panel Pattern combines simple shapes, colorful fabrics, careful layering, and decorative stitching to create a warm textile scene with plenty of handmade character. Throughout this tutorial, we covered how to select and prepare the background fabric, choose scraps for the girl’s floral coat, plaid hat and boots, construct the cream-colored goose, prepare templates, apply fusible web, arrange overlapping pieces, and secure the appliqué with decorative stitches.
The most important part of the process is good preparation. Taking time to press the fabrics, create accurate templates, test the arrangement, and carefully cut each component will make the final sewing much easier. Once the shapes are correctly positioned, blanket stitching provides both practical edge security and the decorative outline that makes this style of fabric appliqué so recognizable.
EASILY FIND THE FREE PDF FOR THIS PATTERN HERE!
You can keep your finished project close to the original country-inspired look or completely personalize it with your favorite colors and prints. Turn the panel into wall décor, a cushion front, a quilt centerpiece, or part of a collection of handmade appliqué blocks. The same techniques can also be reused for many future fabric characters and decorative scenes. If you make your own version of the “Girl and Goose” Fabric Appliqué Panel Pattern, leave your sincere opinion about the project and share any suggestions you have. Which fabrics and colors would you choose for the girl’s coat and hat? Your creative ideas can inspire new variations and make this sweet appliqué design even more personal.