
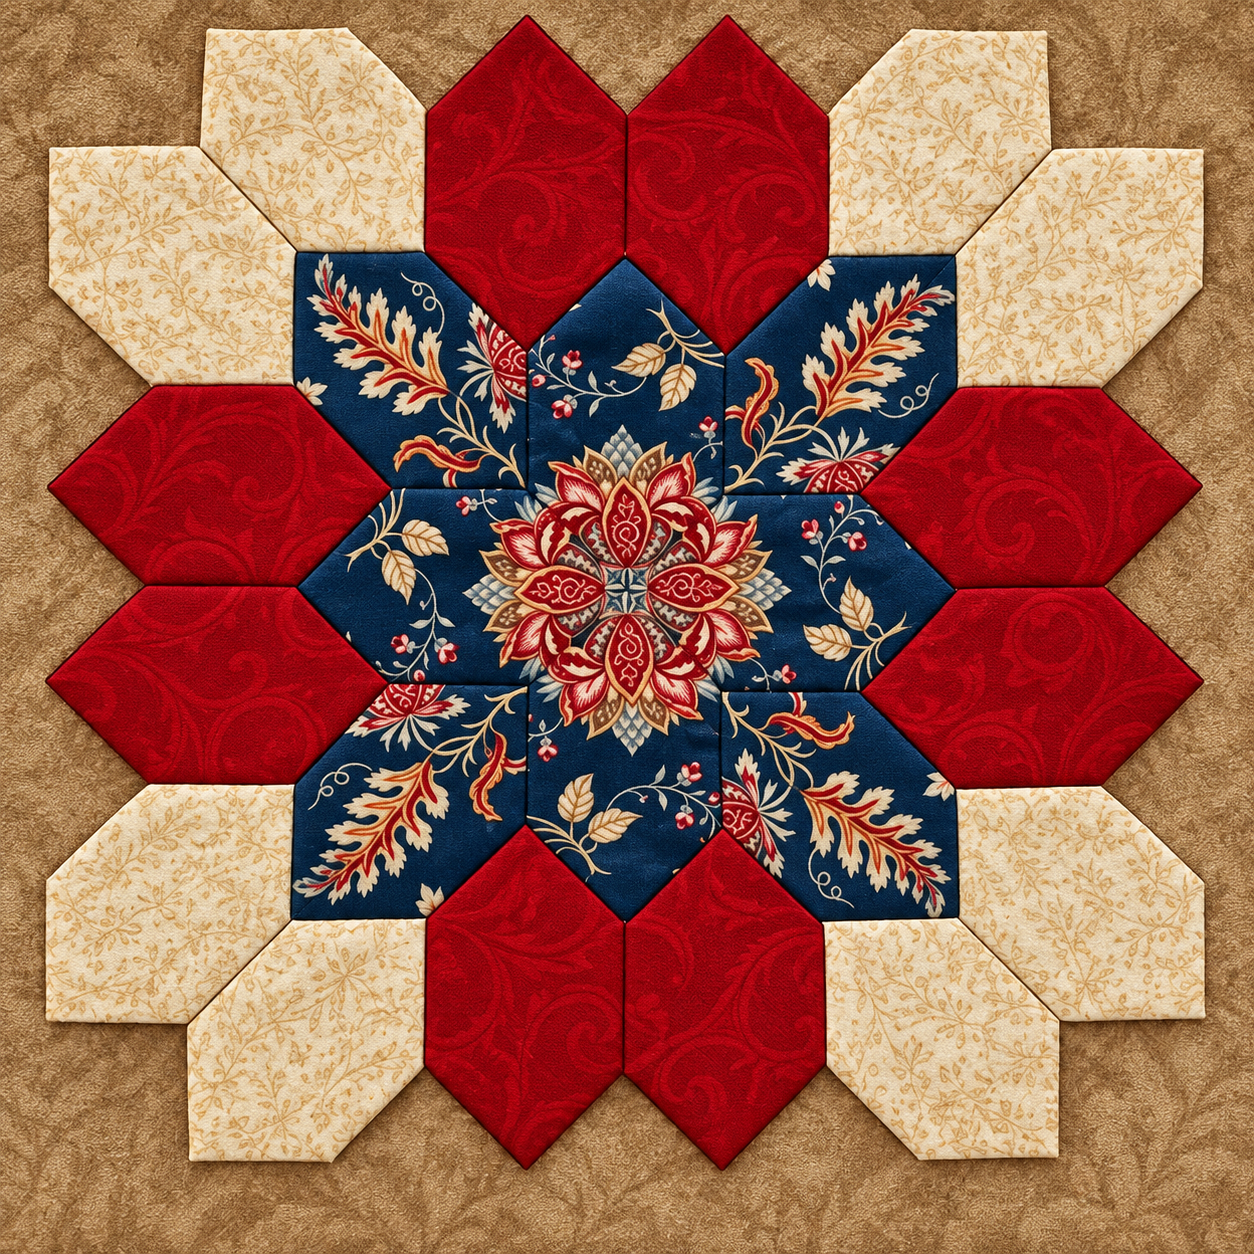
Patchwork Quilt Block Pattern is a beautiful way to combine geometric piecing, carefully selected fabrics, and a striking central motif into a quilt block that immediately draws the eye. Inspired by the project shown in the reference image, this design uses a strong combination of deep navy blue, rich red, warm cream, and neutral brown tones. The arrangement creates a flower-like or medallion effect, with the printed blue fabric forming the decorative center and the red and cream pieces building rhythmic layers around it. Although the finished block looks intricate, it becomes much easier to understand when the construction is divided into individual units. Careful cutting, consistent seams, and thoughtful fabric placement are the main ingredients for achieving a polished result.
One of the most appealing qualities of this Patchwork Quilt Block Pattern is its balance between traditional patchwork techniques and bold visual impact. The center can showcase a beautiful floral, paisley, or medallion print, while coordinating fabrics provide enough contrast to define the geometric structure. This makes the pattern especially useful for quilters who have a favorite piece of fabric they want to feature rather than cutting it into tiny, unrecognizable pieces. The surrounding red sections create a strong frame, while the light cream pieces brighten the outer portion of the design. Once completed, a single block can become a decorative wall piece, cushion front, table topper, or the starting point for a larger quilt.
The project also provides an excellent opportunity to practice several important patchwork quilting techniques, including accurate measuring, fussy cutting, matching seams, pressing, and arranging directional pieces before sewing. The measurements suggested in this tutorial can be adjusted according to the desired finished size, because the most important factor is maintaining the same proportions throughout the block. Beginners should consider making a test unit from scrap fabric before cutting their favorite material. Experienced quilters can use the same basic construction method while experimenting with different color combinations, prints, and block sizes. With patience and careful preparation, the complex appearance of this design can be achieved through a logical sequence of manageable sewing steps.
Materials and Preparation for the Patchwork Quilt Block Pattern
Before cutting anything, gather all the materials needed for the Patchwork Quilt Block Pattern. You will need quilting cotton in at least three coordinated colors or prints. For a look similar to the reference project, choose approximately 35 × 35 cm of navy floral fabric, 30 × 40 cm of red fabric, and 30 × 40 cm of cream fabric. Keep additional fabric available for test pieces and trimming. You will also need coordinating cotton thread, a sewing machine, an iron, an ironing surface, quilting pins or clips, and basic sewing supplies.
DISCOVER MORE FREE PATTERNS HERE!
A rotary cutter, acrylic quilting ruler, and self-healing cutting mat are highly recommended because geometric patchwork depends heavily on accuracy. Scissors can work, but a rotary cutting system generally makes it easier to create straight edges and repeat identical pieces. Before beginning, check the ruler markings carefully and replace a dull rotary blade when necessary. Clean cuts are particularly important around angled pieces because even a small difference can affect how the units meet around the center.
Fabric preparation is another important part of successful quilt block construction. If you normally prewash quilting cotton, wash and dry all fabrics before cutting so that they are treated consistently. Press each fabric flat with an iron without stretching it. Wrinkles or folds can cause measurement errors during cutting. Fabric should be completely flat on the cutting mat before you begin measuring any geometric pieces.
The central blue section is the visual focus of this particular design. A technique known as fussy cutting can be especially helpful here. Fussy cutting means intentionally positioning a template or ruler over a specific section of printed fabric so that a flower, leaf, medallion, or other decorative element appears exactly where you want it. In the reference design, the central floral imagery produces an almost kaleidoscopic appearance. When selecting your fabric, look for a medium or large-scale print that offers interesting motifs for this purpose.
Color contrast deserves just as much attention as cutting accuracy. The dark blue center works effectively because it is surrounded by vivid red and then softened by the cream sections. You do not have to reproduce those exact colors. A successful patchwork color palette could use forest green, burgundy, and ivory; teal, coral, and white; or even several coordinated scraps. What matters is creating enough contrast to make the different geometric layers visible.
Before sewing, decide on your seam allowance and use it consistently. A standard quilting seam allowance of approximately 0.6 cm (¼ inch) works well for this project. If you are working primarily in centimeters, test your sewing machine position on scrap fabric and maintain the same seam allowance throughout the block. Inconsistent seams can gradually change the dimensions of individual sections and make the final assembly difficult.
Cutting and Organizing the Geometric Fabric Pieces
Begin the cutting process with the central printed fabric. Because the reference Patchwork Quilt Block Pattern relies on repeated angular units surrounding a focal center, accuracy is more important than speed. A practical starting size is to create units based on approximately 7.5 cm finished sections, adding the required seam allowance around every edge. If you enlarge or reduce the design, change every related measurement proportionally rather than adjusting individual pieces independently.
Create a paper or template-plastic pattern for each unique geometric shape before cutting multiple fabric pieces. The design contains shapes resembling rectangles with clipped corners, elongated hexagonal forms, and pointed units. Templates make these repeated shapes much easier to reproduce accurately. Mark the sewing line, cutting line, and grain direction on every reusable template. Remember that the cutting line must include your chosen seam allowance.
For the blue printed sections, position the templates over the motifs before cutting. This is where fussy-cut patchwork can dramatically improve the appearance of the finished project. Instead of randomly cutting the printed fabric, look through the template area and determine which flowers or leaves will appear in each unit. Try rotating mirrored pieces around the center before cutting them. The goal is not necessarily perfect symmetry; rather, it is to create a balanced visual flow similar to the floral arrangement visible in the reference image.
Next, cut the red pieces. These sections create the bold middle ring and several pointed elements around the blue center. Stack only a few fabric layers at a time when rotary cutting because excessive layers can shift. After cutting each shape, place it immediately in its intended position on a large table or design board. This simple habit prevents similar-looking pieces from becoming confused, especially when some pieces need to be rotated or mirrored.
Cut the cream background units last. The light pieces form the outer corners and help transform the colorful center into a balanced block. If using a directional cream print, pay attention to the orientation of the design while cutting. Small botanical or tone-on-tone prints are forgiving, but obviously directional prints require additional planning. Labeling the reverse side of each piece lightly with a removable fabric marker can make assembly considerably easier.
Once every piece has been cut, perform a complete dry layout before going to the sewing machine. Arrange the entire design on a flat surface exactly as it should appear when finished. Begin with the floral center, position the surrounding blue sections, add the red ring, and finally place the cream units around the outside. Photograph the layout with your phone for reference. This provides a valuable visual guide if pieces are accidentally moved during sewing.
Sewing and Assembling the Patchwork Quilt Block
The safest approach to sewing this Patchwork Quilt Block Pattern is to work from the center outward. Start by joining the central blue units in small groups rather than attempting to construct an entire row immediately. Align the raw edges carefully, secure them with pins if necessary, and sew using the established 0.6 cm (¼ inch) seam allowance. Avoid pulling the fabric as it passes beneath the presser foot because stretching can distort angled edges.
After sewing each small unit, press the seam before attaching another piece. Pressing is different from aggressively ironing fabric back and forth. Place the iron onto the seam, lift it, and reposition it as needed. This helps preserve the original shape of the pieces. Depending on the construction, seams can be pressed toward the darker fabric or opened flat when several bulky intersections need to meet. The objective is to create a smooth surface without unnecessary thickness.
Continue building the blue center while checking the placement of the printed motifs. At major intersections, match the seam lines rather than relying only on the raw fabric edges. Insert a fine pin directly through matching seam points when extra precision is needed. Sew slowly as you approach these intersections. Good seam matching is one of the details that gives geometric patchwork its crisp, professional appearance.
Once the central area is stable, begin attaching the red pieces. Work symmetrically whenever possible: add a section to one side and then construct its corresponding section on the opposite side. This makes it easier to detect orientation mistakes early. The red units should visually radiate away from the blue center, forming the bold secondary shape visible in the reference project. Continually return the partially sewn block to your original layout photograph to confirm placement.
Add the cream outer sections after the red ring has been assembled. Because these pieces create the outer boundaries of the design, check their alignment before stitching. If a unit appears slightly too large, do not immediately trim it. First check whether the neighboring seam allowances were sewn accurately. Premature trimming can create additional problems later. Small discrepancies can often be corrected through careful pressing and accurate attachment of the next section.
When all sections have been joined, place the block on the cutting mat and examine it from a distance. Check whether the center appears balanced and whether the red and cream units are evenly distributed. Press the entire block from the back and then lightly from the front. If necessary, square the quilt block using a large acrylic ruler. Remove only the minimum amount of fabric needed to create clean, straight outer edges while preserving seam allowances around important points.
Finishing, Quilting, FAQ, and Final Tips
After completing the patchwork top, you can use it as an individual decorative block or continue toward a quilted project. For a small wall hanging or table topper, prepare batting and backing fabric slightly larger than the patchwork top. A practical allowance is approximately 3 to 5 cm extra on every side. Layer the backing with the wrong side facing upward, position the batting on top, and center the finished Patchwork Quilt Block Pattern over the batting with the right side facing upward.
Baste the three layers together using safety pins, temporary basting methods, or your preferred quilting technique. Begin near the center and work outward so that the layers remain smooth. Avoid stretching the quilt top while basting. Because this design contains several geometric seams, stitch-in-the-ditch quilting is an accessible option. This technique places quilting stitches close to the seam lines and emphasizes the construction without competing visually with the printed fabric.
Another option is simple echo quilting. Sew approximately 0.6 to 1 cm away from selected geometric seams, repeating the shapes of the blue, red, and cream sections. This creates additional texture while reinforcing the medallion-like appearance. More experienced quilters may choose free-motion quilting in the larger red or cream areas. Whatever method you select, keep the quilting density reasonably balanced throughout the project.
After quilting, trim the batting and backing so that the edges are even with the quilt top. Add binding if the project will become a wall hanging, table topper, or small quilt. A binding width of approximately 6 to 6.5 cm before folding is a practical choice for many small quilting projects. Join binding strips with diagonal seams, press them in half lengthwise, attach them around the front edge, and finish them on the back by machine or hand.
The same Patchwork Quilt Block Pattern can also be repeated to make a larger quilt. Before producing many blocks, complete one full sample and measure its actual finished dimensions. Small variations are normal, and using the real measurement of your test block can help you plan borders, sashing, and overall quilt dimensions more accurately. Repeating the block in alternating colorways can produce a particularly dramatic quilt because the medallion structure changes visually depending on fabric placement.
Most importantly, do not judge the project solely by individual pieces during construction. Complex patchwork patterns often look confusing while they are being assembled. The design becomes clear only after the blue center, red secondary sections, and cream outer units come together. Work carefully, press frequently, compare the pieces with the full layout, and focus on consistent seams rather than rushing toward completion.
FAQ – Frequently Asked Questions About the Patchwork Quilt Block Pattern
Is the Patchwork Quilt Block Pattern suitable for beginners?
Yes, although it is more detailed than a basic square block. A confident beginner who understands straight stitching and basic seam allowances can approach the project successfully by making templates and constructing one small unit at a time. Creating a practice version from inexpensive fabric is an excellent way to understand how the angles fit together before using special quilting cotton.
What is the best fabric for this quilt block?
Medium-weight 100% quilting cotton is an excellent choice because it cuts accurately, presses well, and remains stable during piecing. Fabrics with similar weight and weave are easier to combine. Very stretchy, slippery, or heavy fabrics can make geometric seam matching more difficult, especially for beginners.
What does fussy cutting mean in quilting?
Fussy cutting means deliberately cutting around a selected portion of a fabric print instead of cutting pieces randomly. For this project, the technique allows decorative flowers, leaves, or medallions to become part of the block’s central composition. It is especially effective with large floral prints and repeating motifs.
How can I make my patchwork points match accurately?
Use an accurate seam allowance, press after each important seam, and match the actual seam intersections before sewing. Pinning through corresponding points can help prevent movement. Sewing slightly more slowly near intersections also gives you greater control. Remember that consistent cutting and sewing usually matter more than sewing quickly.
Can I change the colors shown in the original design?
Absolutely. The navy, red, cream, and brown palette provides strong contrast, but the construction does not depend on those specific colors. You can create a Christmas version using red, green, cream, and gold; a spring version using pastel colors; or a modern interpretation using black, white, gray, and one bright accent. Maintaining clear contrast between the main areas will help preserve the geometric effect.
Can this pattern be used for something other than a full quilt?
Yes. One completed Patchwork Quilt Block Pattern can become a cushion cover, wall hanging, table topper, placemat, decorative bag panel, or framed textile piece. Several blocks can also be joined with sashing to create a bed runner or larger quilt. This versatility makes the pattern useful even when you do not want to commit to a full-size quilting project.
Why is my finished block smaller than expected?
The most common causes are slightly oversized seam allowances, inaccurate cutting, or excessive trimming during construction. Even a tiny difference repeated across many seams can noticeably reduce the finished dimensions. Make a test unit, verify your ¼-inch seam allowance, and measure periodically rather than waiting until the entire block is assembled.
Should seams be pressed open or to one side?
Both methods can work. Pressing toward the darker fabric is traditional and can make intersecting seams easier to nest. Pressing seams open can reduce bulk where several pieces meet. For a design with many angular intersections, use whichever method allows the block to remain flatter while keeping seam allowances secure.
How do I keep the center from becoming bulky?
Accurate seam allowances and careful pressing are essential. At intersections where many seams meet, press the seam allowances in directions that distribute the bulk rather than stacking every layer in the same location. A tailor’s clapper or firm pressing surface can also help flatten stubborn intersections without stretching the fabric.
Do I need special quilting equipment?
No specialized machine is required. A standard sewing machine capable of producing a reliable straight stitch can complete the piecing. However, a ¼-inch quilting foot, rotary cutter, cutting mat, acrylic ruler, fine pins, and a good iron can make the process faster and more accurate.
Conclusion
The Patchwork Quilt Block Pattern combines geometric construction, fabric contrast, and decorative print placement to create a project that looks far more complex than its individual steps. Starting with carefully prepared quilting cotton, the process moves through accurate template cutting, fussy cutting, organized layout, consistent seam allowances, controlled pressing, and systematic assembly from the center outward.
The most important lesson is to treat accuracy as a series of small habits. Cutting carefully, keeping a consistent 0.6 cm (¼ inch) seam allowance, checking orientation before stitching, and pressing each section before moving forward can dramatically improve the final result. These techniques are valuable not only for this project but also for many other patchwork and quilting patterns.
EASILY FIND THE FREE PDF FOR THIS PATTERN HERE!
Once the block is assembled, you can finish it with batting, backing, quilting, and binding, or incorporate several blocks into a larger quilt. Different fabrics can completely transform the personality of the design, so this is also an excellent pattern for experimenting with seasonal palettes, floral prints, scraps, or carefully coordinated fabric collections. Whether you recreate the rich red, navy, cream, and neutral appearance of the reference project or develop your own color combination, take your time and enjoy the construction process. If you make this Patchwork Quilt Block Pattern, leave your sincere opinion about the design and share your suggestions for colors, fabrics, or variations you would love to try. Your ideas can inspire new interpretations of this beautiful patchwork project.