
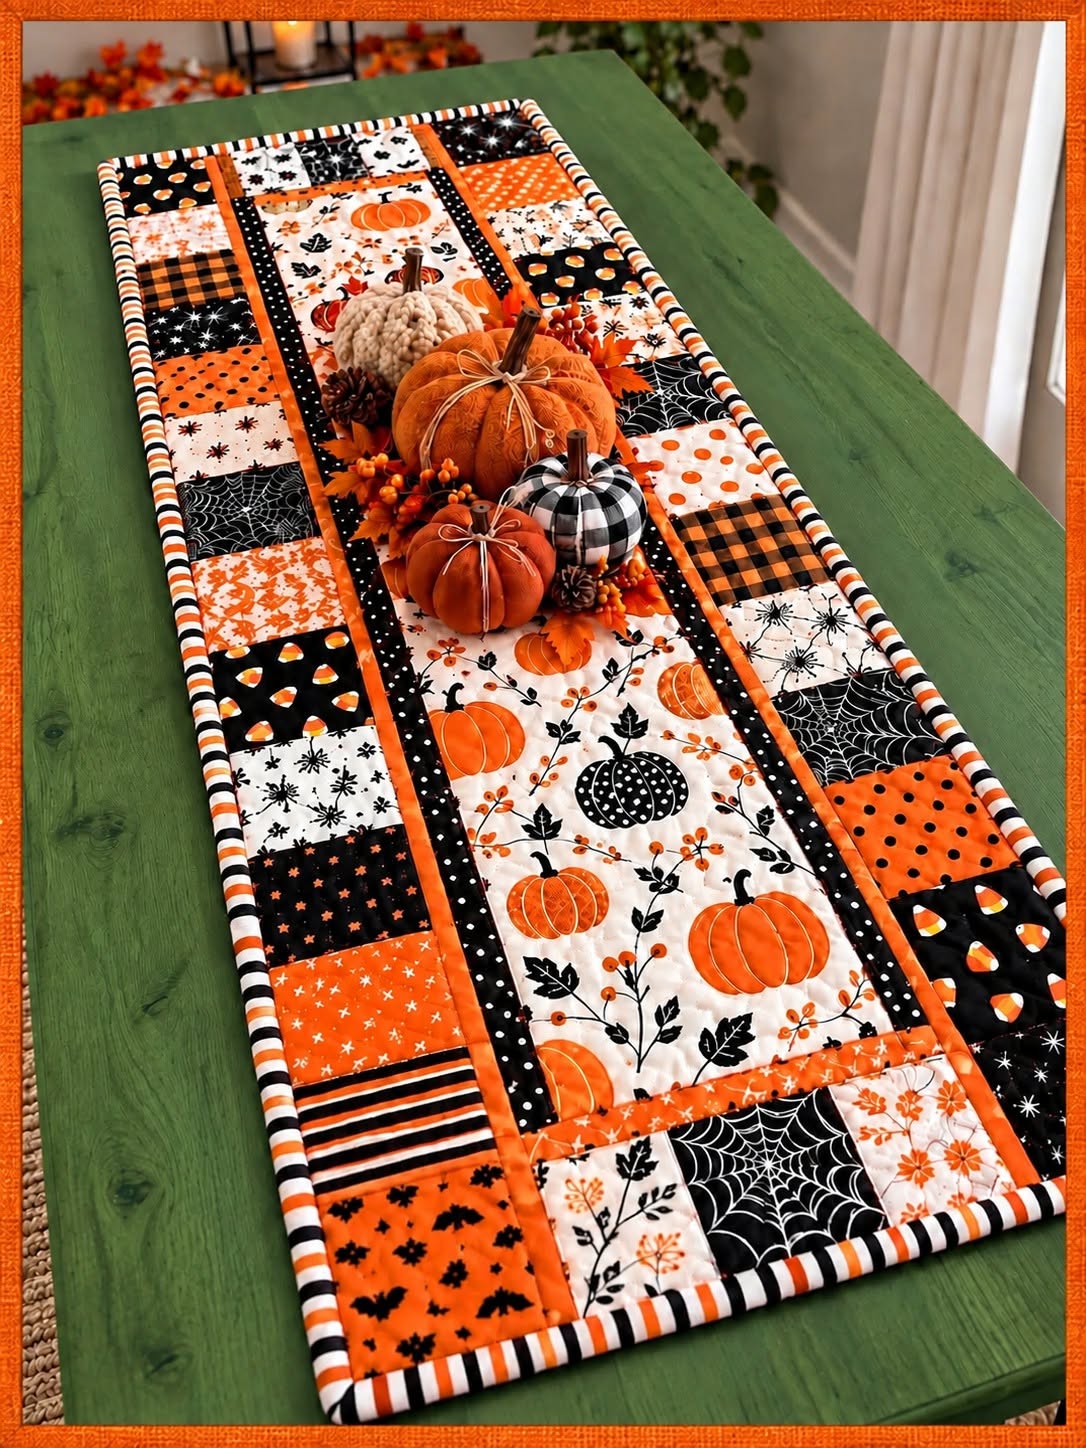
The Patchwork Table Runner Pattern is a beautiful way to combine traditional quilting techniques with seasonal decorating, turning a simple dining table into a warm and welcoming focal point. Inspired by the project shown in the photo, this design uses a long central fabric panel surrounded by colorful patchwork sections in orange, black, cream, and white. The combination creates a festive autumn and Halloween feeling without making the finished runner difficult to coordinate with everyday home décor. One of the best things about this project is its flexibility: you can use coordinated fabric collections, leftover quilting cotton, or carefully selected scraps from previous projects. Because the design is based primarily on straight cuts and straight seams, it is also approachable for beginners who want to practice patchwork sewing, quilting, borders, and binding while producing something practical and decorative.
A successful Patchwork Table Runner Pattern begins with thoughtful fabric selection and accurate preparation. The example features pumpkins as the central theme, complemented by spiderwebs, candy corn, checks, stripes, dots, stars, bats, and small botanical prints. Although the prints are different, the restricted palette keeps everything visually connected. This is an important lesson in patchwork: fabrics do not have to match perfectly, but they should share enough colors or visual characteristics to create harmony. For a similar result, choose approximately eight to fifteen coordinating prints and separate them into light, medium, and dark values. A few bold black fabrics provide contrast, while orange brings warmth and cream or white prevents the design from becoming visually heavy. Pre-pressing every fabric before cutting also makes accurate measuring and piecing much easier.
The construction itself can be customized to suit your dining table, buffet, coffee table, or kitchen island. Instead of depending on one fixed finished measurement, measure the surface where the runner will be displayed and decide how much of the tabletop you want covered. A practical starting size for a long runner is approximately 40–45 cm wide and 120–150 cm long, although you can shorten or lengthen it as needed. The central panel should remain the visual focus, while the patchwork columns and borders frame it. Throughout the project, maintaining a consistent seam allowance is more important than making every patch exactly the same size as the photographed example. With careful cutting, pressing, quilting, and binding, this Patchwork Table Runner Pattern can become a polished handmade piece suitable for fall decorating, Halloween gatherings, Thanksgiving-inspired displays, or simply celebrating colorful seasonal fabrics.
Materials, Fabric Selection, and Cutting Preparation
For this Patchwork Table Runner Pattern, start with quality 100% cotton quilting fabric whenever possible. You will need a feature fabric for the long center section, assorted orange, black, cream, and white prints for the patchwork sections, coordinating fabric for narrow borders, backing fabric, batting, and binding. Approximately 1.5 to 2 meters of assorted fabric in total should provide plenty of material for a medium-sized runner, although the exact amount depends on its finished dimensions and how many different prints you use.
DISCOVER MORE FREE PATTERNS HERE!
The center panel establishes the personality of the runner. In the pictured inspiration, a light background fabric featuring pumpkins and botanical details creates a strong contrast against the darker surrounding pieces. Cut one long rectangle for this area, allowing enough extra width and length for seam allowances. If your fabric has a directional design, check the orientation before cutting so pumpkins, leaves, words, or other recognizable motifs appear upright when the runner is positioned on the table.
Next, prepare the patchwork rectangles and squares that will form the side columns and end sections. There is no requirement for every patch to be identical. In fact, slightly varied rectangular sections help reproduce the playful scrap-quilt appearance of the inspiration. Try blocks around 10–15 cm wide, adjusting their heights to create visual variety. Remember to add seam allowances to your desired finished measurements. Cutting with a rotary cutter, acrylic ruler, and cutting mat will usually provide cleaner results than freehand cutting.
Organize the patches before sewing anything together. Place your central panel on a flat surface and arrange the assorted pieces along both sides. Avoid placing several black prints together or clustering all of your orange fabrics in one location. Instead, alternate light, medium, and dark fabrics. This creates movement from one end of the runner to the other and gives the patchwork a more intentional appearance.
Narrow strips are another important feature of this design. The inspiration uses dark dotted strips and bright orange accents to visually separate the center from the patchwork columns. You can cut strips approximately 3–5 cm wide before sewing, depending on how prominent you want these frames to appear. The narrow borders provide structure and keep the many prints from visually competing with the central design.
Before moving to the sewing machine, label or stack your patches in construction order. This simple preparation prevents accidentally reversing a directional fabric or sewing two similar prints beside each other. Use a consistent seam allowance—approximately 6 mm (¼ inch) is standard for quilting—and test your machine settings on scrap fabric. A reliable quarter-inch seam helps all the individual sections fit together accurately.
Sewing the Patchwork Table Runner Pattern Step by Step
Begin construction with the two long side patchwork columns. Join the individual fabric rectangles end to end, placing each pair right sides together. Sew using the same seam allowance throughout the project. Continue adding pieces until each column reaches approximately the length required for your central section. Do not worry if the ends are slightly uneven at this stage because they can be trimmed after the columns have been assembled and pressed.
Press each seam carefully as you work. You can press seam allowances to one side or open, depending on your preferred quilting method. When neighboring seams need to intersect, pressing them in opposite directions can help the seams nest neatly together. Avoid aggressively dragging the iron over the fabric, since this may stretch the pieces. Instead, lift and press the iron gently over each seam.
Now prepare the central panel assembly. Sew a narrow contrasting strip along each long edge of the feature fabric. In a design inspired by the photo, black fabric with small white dots works particularly well because it creates a crisp frame around the lighter pumpkin fabric. Add a second orange strip if you want to reproduce the layered border effect. Sew slowly and keep the edges aligned so the long panel remains straight rather than becoming wavy.
Attach one completed patchwork column to each side of the central assembly. Pin or clip at several points before stitching, especially when working with a long runner. Start by matching the top and bottom edges and then secure the center. Sew the entire length with an even seam allowance. After attaching both sides, press the seams carefully and place the runner flat on your work surface to check whether the top remains square.
Create the top and bottom patchwork sections next. These can be assembled from several rectangles or squares using the same fabrics found in the side columns. The photographed design includes contrasting spiderweb, botanical, and seasonal prints at the ends, helping connect the two sides visually. Assemble these rows separately, press them, trim them to the width of the runner, and then sew them across the upper and lower edges.
At this stage, examine the entire patchwork top before proceeding. Trim loose threads and use a large quilting ruler to straighten the outside edges. Check the corners with the ruler’s 90-degree markings. Minor differences can usually be corrected during trimming, but avoid removing too much fabric. Your completed Patchwork Table Runner Pattern top should now lie relatively flat and display a clearly framed central panel surrounded by balanced patchwork.
Creating the Quilt Sandwich, Quilting, and Binding
Once the patchwork top is complete, prepare the quilt sandwich. Cut the batting and backing approximately 5 cm larger on every side than the patchwork top. Place the backing wrong side facing upward on a clean flat surface. Smooth it carefully, position the batting on top, and finally place the patchwork top right side facing upward. The three layers should be flat without wrinkles or folds.
Secure the layers using quilting safety pins, temporary basting methods, or long hand-basting stitches. Begin securing the layers near the center and gradually work toward the outer edges. This approach helps push excess fabric outward instead of trapping wrinkles beneath the runner. Because a table runner is much smaller than a bed quilt, this is an excellent project for learning quilt basting without managing an overwhelming amount of fabric.
For quilting, a simple straight-line quilting design is both attractive and beginner-friendly. Stitch along some of the patchwork seams, quilt parallel lines through the central section, or outline selected pumpkins and seasonal motifs. You can also quilt approximately 0.5–1 cm away from important seams to emphasize the structure of the patchwork. There is no need to make the quilting overly complicated because the printed fabrics already provide plenty of visual detail.
Always begin quilting near the center and gradually work outward. This helps distribute the fabric evenly and reduces puckering. A walking foot is particularly useful because it helps move the quilt top, batting, and backing through the sewing machine together. Periodically check the underside to make sure the backing remains smooth and that no folds have been stitched accidentally.
After quilting is finished, trim the excess backing and batting so they are flush with the patchwork top. Use a ruler and rotary cutter to straighten all four sides. Pay special attention to the corners. A properly squared runner will be much easier to bind, and the finished edges will look considerably more professional when displayed on a rectangular table.
Finish with quilt binding. The striped black, white, and orange binding visible in the inspiration creates an especially striking frame, but a solid black, orange, or coordinating print would also work beautifully. Prepare enough binding strips to travel around the entire perimeter, joining strips diagonally when additional length is required. Sew the binding to the front, fold it around the raw edges, and secure it on the back by hand or machine. Take extra care when forming neat mitered corners.
Finishing, Styling, Care, and Creative Variations
After attaching the binding, give your Patchwork Table Runner Pattern a final inspection. Remove visible basting threads, trim loose sewing threads, and gently press the finished piece. Avoid stretching the binding while pressing. The runner should lie flat, although a newly quilted project may retain a little texture from the batting. This soft dimensional effect is part of the handmade quilted appearance.
To recreate the seasonal atmosphere of the photo, place the runner lengthwise along a wooden or neutral dining table. Decorative fabric pumpkins, artificial autumn leaves, pinecones, or a simple seasonal centerpiece can emphasize the orange-and-black palette. Keep hot candles and other heat sources appropriately separated from fabric decorations, especially when creating a centerpiece for a table that will remain unattended.
The same construction method can easily become an autumn table runner without a Halloween theme. Replace spiderwebs, bats, and candy corn with leaves, acorns, pumpkins, plaids, and small florals. Maintain the orange, cream, brown, and black palette for a warm farmhouse-inspired appearance. This makes the basic pattern useful throughout the entire fall season rather than for one particular celebration.
For a completely different look, reinterpret the Patchwork Table Runner Pattern for Christmas, spring, summer, or everyday decorating. Red and green prints can create a Christmas runner, while soft florals and pastels work beautifully for spring. Blue and white fabrics can produce a classic year-round version. The construction sequence remains almost exactly the same; only the fabric selection and decorative quilting need to change.
When laundering the finished runner, follow the care recommendations for the fabrics and batting you selected. Quilting cotton projects can often be gently machine washed, but handmade pieces generally benefit from cool water and mild detergent. Air drying flat can help preserve the runner’s shape. If ironing is necessary, use a temperature appropriate for cotton and avoid excessive heat on any synthetic batting or decorative elements.
Most importantly, treat this project as a framework rather than an inflexible formula. Patchwork quilting is especially rewarding because small changes in fabric placement can produce completely different results. Save leftover pieces from the project as well; they can become matching coasters, placemats, mug rugs, potholders, or small decorative quilt blocks. Once you understand the center-panel-and-border construction, you can resize and personalize the design for many future sewing projects.
FAQ About the Patchwork Table Runner Pattern
What is a Patchwork Table Runner Pattern?
A Patchwork Table Runner Pattern is a sewing and quilting design used to create a narrow decorative textile that runs along the center of a table. Patchwork versions are constructed by joining multiple fabric pieces before adding batting, backing, quilting, and binding. This particular style combines a feature panel with contrasting patchwork columns and borders.
Is this project suitable for a beginner?
Yes. The design is particularly approachable because most pieces are rectangles or strips and the majority of seams are straight. Beginners should focus on accurate cutting, a consistent ¼-inch seam allowance, careful pressing, and checking measurements after each major construction stage.
What fabrics work best for this pattern?
Medium-weight quilting cotton is an excellent choice because it cuts accurately, presses well, and is available in a huge variety of coordinating prints. Using fabrics of similar weight will also make the finished runner easier to assemble and quilt.
How large should a table runner be?
There is no single required measurement. Approximately 40–45 cm wide and 120–150 cm long works well as a starting point for many tables, but the ideal size depends on your furniture. Measure your table first and adjust the center panel and patchwork columns accordingly.
Do all patchwork rectangles need to be the same size?
No. Using rectangles of different lengths can create the charming scrap-patchwork effect seen in this design. However, pieces within each completed side column should ultimately produce a straight column with consistent width.
How can I keep the runner straight while sewing long borders?
Measure carefully, pin the border at both ends and the center first, and then distribute additional pins between those points. Avoid stretching either layer while sewing. Press each long seam gently before adding the next border.
What type of batting should I use?
A relatively thin cotton or cotton-blend batting is ideal for many table runners. Thick batting may make glasses, dishes, or decorations less stable. A thinner batting provides enough structure for quilting while allowing the runner to remain practical.
Can I make this pattern from fabric scraps?
Absolutely. A scrap fabric table runner is an excellent way to use leftovers. Choose scraps that share a common color palette and distribute light, medium, and dark fabrics throughout the design. Even very different prints can look coordinated when their colors connect visually.
Do I need a special sewing machine for quilting?
No. A standard domestic sewing machine can handle a table runner of this size. A walking foot can make quilting the three-layer sandwich easier, but you can still complete the project using standard equipment and careful sewing techniques.
How do I choose fabrics that look good together?
Begin with one feature print and pull colors directly from it. For the pictured style, that means orange, black, cream, and white. Add a combination of large and small prints, geometric designs, dots, checks, stripes, and several calmer fabrics. Contrast is important because it prevents individual patches from blending together.
Can I make matching placemats using the same pattern?
Yes. Simply reduce the dimensions while preserving the same visual structure. A central feature rectangle surrounded by small patchwork sections can create coordinated placemats. Matching napkin accents, mug rugs, or coasters can also be made from remaining scraps.
Can the runner be made without Halloween fabrics?
Certainly. The construction method is not limited to Halloween. Replace the seasonal prints with Christmas fabrics, florals, farmhouse neutrals, patriotic colors, modern geometric prints, or fabrics that coordinate with your kitchen and dining room.
What is the easiest quilting method for beginners?
Straight-line quilting is usually one of the simplest options. Follow existing seams, quilt parallel lines, or stitch just beside the patchwork seams. These methods secure the three layers while complementing the geometric construction of the runner.
Why does my table runner look wavy after sewing?
Waviness can result from stretched borders, inconsistent seam allowances, excessive pressing, or uneven feeding through the sewing machine. Accurate measuring and gentle pressing can reduce these problems. A walking foot can also help when quilting multiple layers.
How can I personalize the finished pattern?
Change the central feature fabric, experiment with border widths, incorporate meaningful fabric scraps, select different binding, or add decorative quilting. Personalization is one of the greatest advantages of making a handmade patchwork table runner rather than following the inspiration exactly.
Conclusion
The Patchwork Table Runner Pattern combines straightforward sewing techniques with the creativity that makes patchwork so enjoyable. Starting with a strong central feature fabric, the project grows through coordinated patchwork columns, contrasting narrow borders, top and bottom sections, batting, backing, quilting, and a neatly finished binding. Each stage introduces a useful quilting skill while remaining manageable enough for someone developing their sewing experience.
The orange, black, cream, and white combination shown in the inspiration creates a striking seasonal runner, but the same construction can be adapted to almost any decorating style. By learning how to balance prints, alternate fabric values, maintain consistent seams, create a quilt sandwich, add straight-line quilting, and finish the perimeter with quilt binding, you gain techniques that can also be used for placemats, wall hangings, small quilts, and many other fabric projects.
EASILY FIND THE FREE PDF FOR THIS PATTERN HERE!
Most importantly, your finished runner does not need to duplicate every patch in the original inspiration. Handmade patchwork becomes special through personal choices. Select fabrics you genuinely enjoy, adjust the measurements for your own table, and arrange the patches until the composition feels balanced. The result will be a practical seasonal decoration with its own character. If you make your own Patchwork Table Runner Pattern, leave your sincere opinion about the project and share your suggestions. Which colors, prints, or seasonal theme would you choose for your version? Your ideas can inspire new combinations and creative variations for future patchwork projects.