
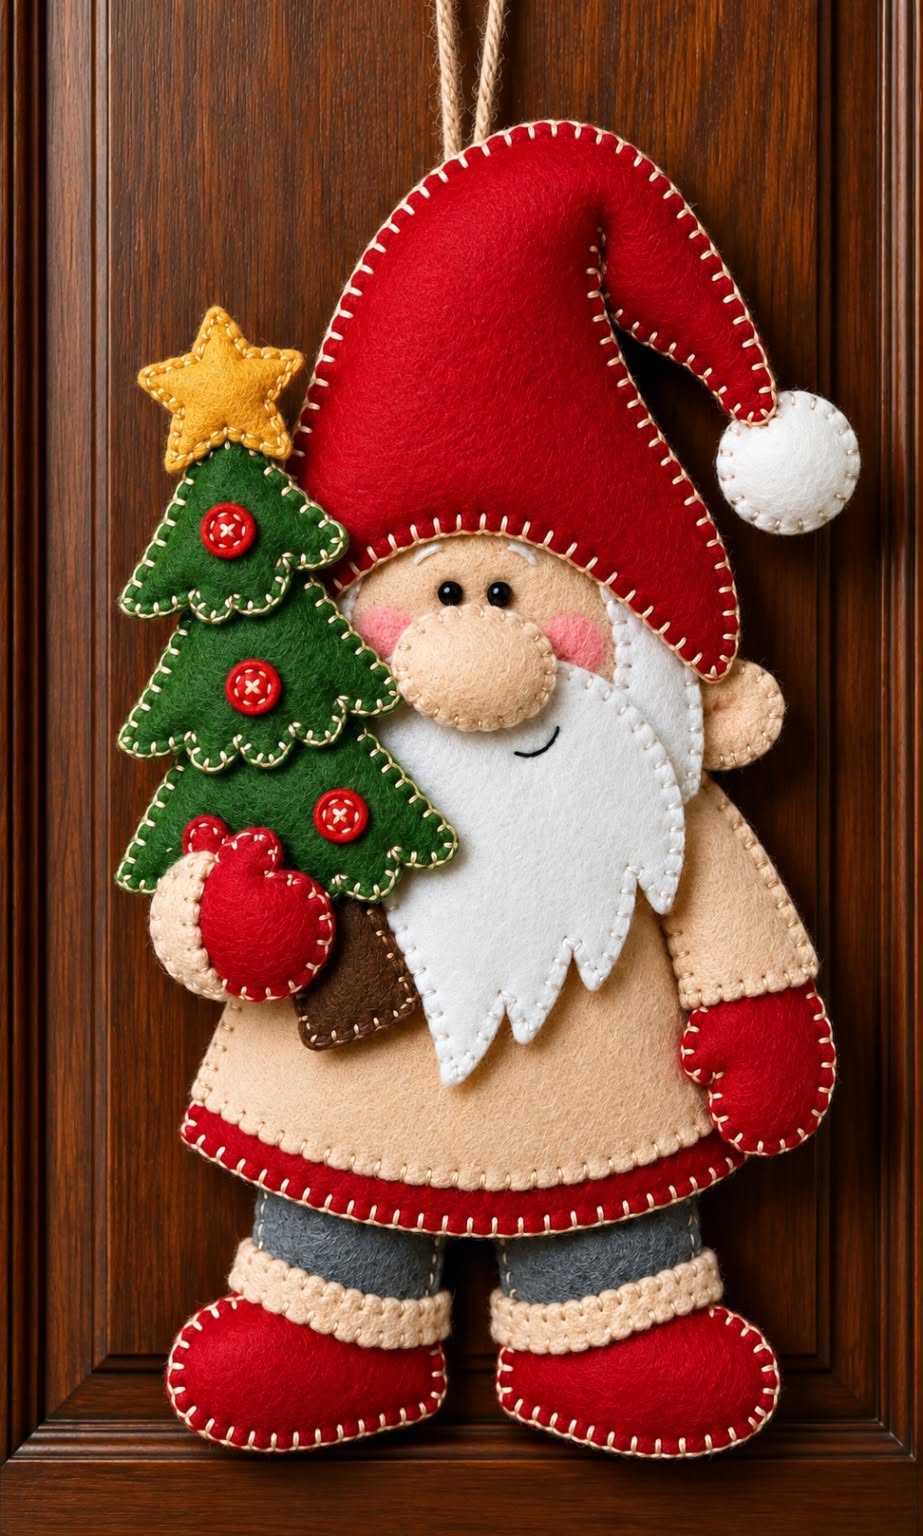
Felt Santa Claus Christmas Ornament Pattern is a charming Christmas sewing project that combines the warmth of handmade décor with the playful personality of a classic Santa figure. Inspired by the ornament shown in the reference image, this design features a large red Santa hat, a soft beige coat, a layered white beard, red mittens and boots, and a small decorated Christmas tree held beside Santa. The visible blanket stitching around the felt pieces gives the entire project a traditional handcrafted finish, making it especially attractive for rustic, farmhouse, and family-style Christmas decorating.
One of the best things about this Felt Santa Claus Christmas Ornament Pattern is that the project can be adapted to different skill levels. Most of the shapes are simple enough to cut from felt without complicated sewing techniques, while details such as the curved hat, layered beard, dimensional nose, buttons, tree, star, and mittens provide opportunities to practice appliqué and decorative hand stitching. Because felt does not fray easily, it is particularly convenient for projects that use exposed edges and blanket stitches. You can also adjust the finished size by enlarging or reducing all pattern pieces proportionally before cutting.
The finished ornament can be used as a Christmas wall hanging, door decoration, tree ornament, handmade gift, or seasonal craft display. The reference design has a wonderfully dimensional appearance because several pieces are layered and lightly padded rather than simply attached flat. In this tutorial, we will recreate that overall style while keeping the construction process practical and beginner-friendly. Take your time with the cutting and placement stages, because accurate shapes and balanced proportions will make the final Santa look polished while still preserving the cozy character of a handmade felt decoration.
Materials, Pattern Pieces, and Preparation
Begin by gathering the materials for your Felt Santa Claus Christmas Ornament Pattern. You will need craft felt in red, white, cream or beige, green, brown, gray, yellow or gold, and a small amount of pink. Prepare matching or contrasting embroidery floss, sewing thread, a hand-sewing needle, sharp fabric scissors, straight pins or sewing clips, polyester fiberfill, and a fabric-safe marking tool. Small black beads can be used for the eyes, while red buttons create attractive ornaments on the Christmas tree.
DISCOVER MORE FREE PATTERNS HERE!
The most important material is the felt fabric itself. Felt works especially well for this project because its edges can remain exposed without unraveling like many woven fabrics. Medium-weight craft felt is suitable for decorative pieces, while wool-blend felt can create a softer and more refined finish. Choose felt with enough body to hold the Santa shape after light stuffing, but avoid material that is so thick that several overlapping layers become difficult to sew by hand.
Create paper templates before cutting the actual fabric. You will need pattern pieces for Santa’s body or coat, head, large curved hat, hat pom-pom, beard, nose, cheeks, arms, mittens, pants or legs, boot cuffs, boots, Christmas tree sections, tree trunk, star, and the hanging loop. For a dimensional ornament, prepare two pieces for major padded components such as the body, hat, nose, mittens, boots, and tree whenever necessary.
A useful starting size for a substantial wall ornament is approximately 35 to 45 cm tall, although you can make the design considerably smaller for a Christmas tree. If you change the size, scale every pattern component together. Enlarging only the body without adjusting the hat, beard, arms, and tree can make the finished proportions look awkward. Arrange the paper templates together before cutting to check how the completed Santa will look.
Trace the templates onto the appropriate felt colors. The hat, mittens, boots, coat trim, and decorative heart or round ornament can be cut from red felt. Use cream or beige for Santa’s face, hands, and coat; white for the beard and pom-pom; gray for the pants; dark green for the tree; brown for the trunk; and golden yellow for the star. Small pink pieces can become the rosy cheeks visible beneath Santa’s eyes.
Cut slowly with sharp scissors, especially around the beard points and curved edges of the tree. Clean cutting makes the later blanket stitch much easier to space evenly. Once all pieces are prepared, place them on your work surface in approximately their final arrangement. This dry layout gives you an opportunity to adjust the beard, face, tree, hat, and arms before anything is permanently stitched.
Sewing the Santa Body, Face, Hat, and Beard
Start construction with Santa’s main body. Place the front and back coat pieces together with their edges aligned. Sew around the perimeter using a blanket stitch, leaving a small opening for stuffing. Add polyester fiberfill gradually, spreading it into the corners rather than creating one large lump in the center. The goal is gentle dimension rather than the firmness of a stuffed toy. Close the remaining opening with the same decorative stitch.
The blanket stitch is one of the defining visual features of this project. Bring the needle through the felt close to the edge, loop the thread under the needle, and pull gently so that a neat vertical stitch forms along the border. Continue with consistent spacing. Cream or light-colored embroidery floss creates beautiful contrast against red, green, and brown felt and reproduces the handcrafted appearance of the inspiration.
Prepare Santa’s face using beige felt. Position two small black beads or secure black stitches for the eyes. Place pink felt circles or ovals below the eyes for the cheeks. These can be attached with tiny running stitches or small appliqué stitches. Keep the facial details simple because the oversized nose and large beard provide most of Santa’s personality.
For the nose, cut two matching rounded pieces of beige or peach felt. Blanket stitch around the edges while leaving a small opening, insert a tiny amount of fiberfill, and close the opening. A lightly padded dimensional felt nose creates the rounded effect seen in the project. Position it centrally over the lower portion of the face, allowing it to overlap the upper beard slightly.
Next, make the white felt beard. Cut the beard with several pointed sections along the bottom edge to create the whimsical layered shape. You can use a single layer of thicker felt or two layers stitched together for additional structure. Attach the beard beneath the nose and face, making sure the beard remains centered. Add a short curved black embroidered line near one side if you want to create Santa’s small smiling mouth.
The red hat should be oversized and curved dramatically toward one side. Stitch matching hat layers together and add a little fiberfill if you want gentle volume. Attach the hat over the top portion of Santa’s head and allow the long tip to curve downward. Finish it with a stuffed white felt pom-pom. Use cream blanket stitches around the red hat and matching or cream stitches around the white pom-pom for a coordinated handmade finish.
Creating the Christmas Tree, Arms, Mittens, and Layered Details
The miniature tree is an important element of this Felt Santa Claus Christmas Ornament Pattern because it balances the large red hat on the opposite side. Cut the tree from dark green felt using a tiered triangular silhouette with softly curved branch tips. For additional dimension, cut front and back pieces, blanket stitch them together, and insert only a thin layer of stuffing.
Decorate the tree before attaching it to Santa. Red buttons work beautifully as Christmas tree ornaments and are easy to sew securely through the felt. Arrange two or three buttons at different heights rather than creating perfectly symmetrical rows. You can also add tiny embroidered crosses through the button holes, echoing the decorative handmade stitching found throughout the rest of the ornament.
Create the golden star using two identical pieces of yellow or gold felt. Stitch around the star points carefully with contrasting thread and lightly stuff the center before closing it. Place the finished star at the top of the green tree. Because star points can become distorted easily, use very small stitches around tight corners and avoid pulling the embroidery floss too firmly.
The brown felt tree trunk should extend slightly below the bottom branches. Cut two small trunk shapes, sew and lightly stuff them, then position the trunk behind the green tree so that only the lower portion remains visible. Layering the trunk behind the tree rather than placing it on top creates a cleaner and more natural construction.
Make Santa’s arms from beige felt and position one arm toward the Christmas tree. Add a red mitten at the end so that Santa appears to be holding or supporting the tree. The second arm can hang naturally along the opposite side of the coat. Create each mitten from two red pieces, add minimal stuffing, and finish the outside edges with the same cream decorative blanket stitching used around the hat.
Before permanently sewing the tree to the body, experiment with its position. In the reference style, the tree overlaps one side of Santa and extends upward toward the hat, producing a compact composition. Sew the tree to Santa at several hidden contact points rather than stitching through every visible edge. This method maintains the dimensional appearance while making the ornament strong enough for seasonal handling and storage.
Finishing the Boots, Decorative Edges, Hanging Loop, and Final Assembly
Create Santa’s lower legs from gray felt and place them beneath the coat. The legs only need to be long enough to support the visible boots. Add cream-colored cuffs where the gray pants meet the red footwear. A slightly textured or thicker felt can make the cuffs look especially cozy, but standard felt with closely spaced stitches will also work well.
The red felt boots should be generously rounded to complement the soft shapes used throughout the ornament. Cut two pieces for each boot, sew around the exposed perimeter, insert a small amount of fiberfill, and close the opening. Position both boots beneath the body, checking that Santa stands visually balanced. Attach them firmly from behind so the connection stitches are not distracting from the front.
Consider adding a narrow red felt band along the bottom of Santa’s beige coat. This small detail visually connects the body with the hat, mittens, and boots. Sew around the lower coat and red band with evenly spaced cream stitches. Consistency is more important than making every stitch mechanically identical; slight variations help preserve the authentic hand-sewn Christmas ornament character.
Now inspect all layered areas. The beard should cover the center of the coat without hiding too much of Santa’s body, the nose should remain prominent, and the tree should sit comfortably against one side. Secure any loose overlapping pieces with small hidden stitches. If necessary, add a few extra stitches behind the hat, tree, hands, or beard where the pieces meet.
For hanging, create a strong loop from twine, ribbon, embroidery cord, or doubled thread. Attach it securely behind the top of Santa’s hat. Reinforce the attachment point with several stitches because a large felt Christmas decoration can become heavier than expected once all the padded components are assembled. Test the loop gently before displaying the ornament.
Finish by trimming stray threads and gently reshaping the stuffed pieces with your fingers. Avoid pressing heavily with an iron unless your felt manufacturer specifically recommends heat, since synthetic felt can react poorly to high temperatures. Your completed Felt Santa Claus Christmas Ornament Pattern should now have the layered, cheerful appearance of the inspiration: a cozy Santa carrying a decorated green tree, surrounded by beautiful visible hand stitching.
Frequently Asked Questions About the Felt Santa Claus Christmas Ornament Pattern
What is the best felt for making this Santa ornament?
Medium-weight craft felt is an accessible choice for beginners. A wool-blend felt is another excellent option when you want a softer texture and a more refined finish. The most important requirement is that the material holds its shape while still being comfortable to cut and hand sew.
Can beginners make this Felt Santa Claus Christmas Ornament Pattern?
Yes. Although the completed ornament looks detailed, it is constructed from relatively simple individual pieces. Beginners can work on one component at a time: body, face, beard, hat, tree, arms, and boots. Practicing the blanket stitch on a scrap of felt before starting the final project can make the process easier.
What stitch should I use around the edges?
A blanket stitch is ideal because it joins the layers while simultaneously creating a decorative border. You can also use a whip stitch if you prefer something simpler. For facial features and tiny appliqué details, running stitches, backstitches, and small straight stitches are useful.
Does every felt piece need stuffing?
No. Stuff only the elements that benefit from dimension. The main body, hat, nose, pom-pom, boots, mittens, star, and tree can receive small amounts of fiberfill. Cheeks, beard sections, buttons, and decorative trim can usually remain flat.
How large should the finished Santa ornament be?
There is no mandatory finished measurement. Approximately 35–45 cm works nicely for a door or wall decoration, while a much smaller version can be used on a Christmas tree. Always resize every pattern component at the same percentage to maintain the original proportions.
Can I sew the ornament with a sewing machine?
Some larger sections can be machine sewn, but visible hand stitching is an important part of this design’s character. Hand sewing also gives you better control around tight curves, beard points, tree branches, and small pieces such as the star and nose.
How do I make the blanket stitches look even?
Mark tiny guide points along the edge using a removable fabric marker if necessary. Try to maintain approximately the same distance between stitches and the same depth from the edge. Work slowly around curves and reduce the spacing slightly around sharp corners.
Can I replace the buttons on the Christmas tree?
Certainly. Small felt circles, embroidered stars, beads, sequins, or tiny fabric appliqués can replace the buttons. If the ornament will be accessible to small children or pets, securely stitched flat felt decorations may be preferable to loose small components.
How can I personalize this handmade Santa decoration?
Change the hat or coat colors, embroider a family name or year on the back, add different tree decorations, or choose embroidery floss that coordinates with your existing Christmas décor. You could also make several Santas with slightly different fabrics to create a matching handmade collection.
How should the ornament be stored after Christmas?
Store the ornament flat or loosely supported in a dry container. Avoid crushing the hat, beard, tree, or padded nose beneath heavier decorations. Wrapping the piece in clean tissue paper can help protect the felt from dust and prevent other decorations from catching on the embroidery stitches.
How can I keep the Santa ornament from becoming too bulky?
Use fiberfill sparingly. A thin layer is usually enough to give felt a pleasant three-dimensional appearance. The nose, boots, pom-pom, and mittens can be slightly fuller, while the body and tree generally need only gentle padding.
Why is felt so useful for Christmas sewing projects?
Felt fabric is easy to cut into decorative shapes, available in many seasonal colors, and particularly well suited to exposed-edge construction. This makes it convenient for layered appliqué projects where the stitching is intended to become part of the decoration rather than being hidden inside seams.
Conclusion
The Felt Santa Claus Christmas Ornament Pattern combines several approachable crafting techniques into one cheerful holiday project. Throughout this tutorial, we covered choosing and preparing felt, creating templates, cutting the individual shapes, constructing Santa’s padded body, forming the oversized red hat, adding the face and dimensional nose, shaping the white beard, and finishing the edges with decorative blanket stitching.
We also explored how to build the layered green Christmas tree, decorate it with buttons and a golden star, assemble the arms and red mittens, create Santa’s gray legs and rounded red boots, and install a secure hanging loop. Working on these components individually makes the project much less intimidating and allows you to carefully control the shape and amount of padding in each section.
The key to achieving an attractive result is patience with the small details. Cleanly cut felt pieces, consistent embroidery stitches, balanced layering, and light stuffing will help create the dimensional handmade appearance seen in the inspiration. At the same time, small variations are part of the beauty of handmade felt Christmas décor, so the finished ornament does not need to look machine-perfect.
Once you understand the basic construction, this pattern also offers plenty of room for creativity. You can experiment with different Christmas colors, personalize the tree ornaments, alter Santa’s clothing, embroider a date on the back, or resize the complete design for different decorating purposes. The same fundamental techniques can also be reused for many other seasonal felt projects.
EASILY FIND THE FREE PDF FOR THIS PATTERN HERE!
Most importantly, enjoy the process of transforming simple pieces of colored felt into a complete Christmas character. A handmade Santa can become part of your annual holiday decorating tradition or a thoughtful gift that carries the personality of the person who made it. What is your sincere opinion of this Felt Santa Claus Christmas Ornament Pattern? Share which detail you like most, and leave your suggestions for colors, decorations, or changes you would make to personalize the project. Your ideas can inspire even more creative versions of this festive handmade Santa.