
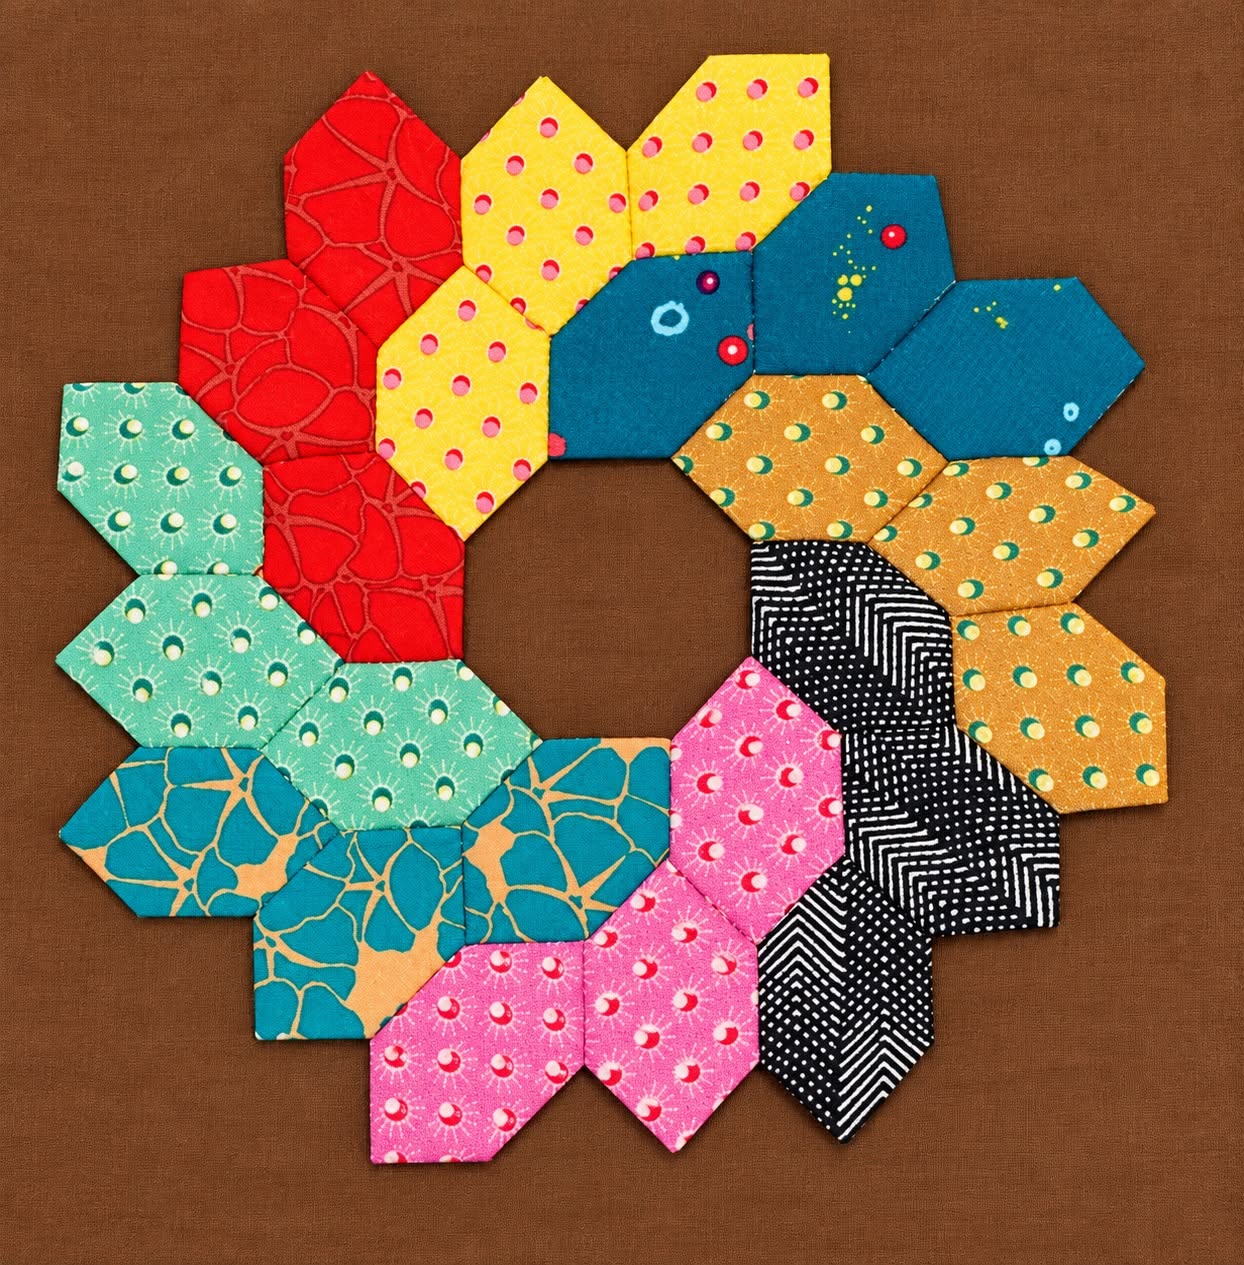
The Hexagon Wreath Quilt Block Pattern is a colorful and creative quilting project that transforms simple hexagonal fabric pieces into an eye-catching circular wreath. Inspired by the arrangement shown in the reference image, the design uses groups of coordinated hexagons placed around an open center. The result has the charm of traditional patchwork while still feeling playful and modern. Because each section can feature a different fabric, this project is also an excellent opportunity to work with favorite prints, leftover quilting cotton, and carefully selected scraps. The repeated geometric shapes create visual rhythm, while the open center gives the finished block a distinctive wreath appearance.
One of the most appealing qualities of this hexagon quilt pattern is its flexibility. Instead of requiring every piece to come from the same fabric collection, the design encourages quilters to combine several colors and prints. In the pictured project, warm red, yellow, turquoise, tan, black, pink, and green fabrics are arranged in small groups around the circle. You can follow a similarly cheerful palette or create your own version using Christmas colors, pastels, florals, farmhouse prints, solids, or even fabric saved from previous projects. The important element is not an exact color combination but the recognizable arrangement of the hexagons around the central opening.
The Hexagon Wreath Quilt Block Pattern can also be approached as a manageable introduction to geometric patchwork. Hexagons require a little more attention than ordinary squares because their angled sides must meet accurately, but careful preparation makes the process much easier. This tutorial explains how to choose fabrics, prepare consistent hexagon pieces, arrange the wreath, join neighboring units, press the seams, and secure the finished design to a background. Whether you eventually turn the block into a wall hanging, cushion front, table decoration, or part of a larger quilt, taking your time during the cutting and arrangement stages will help produce a neat and balanced result.
Materials, Fabric Selection, and Planning the Hexagon Wreath
Begin by gathering quilting cotton, coordinating thread, a sewing needle or sewing machine, fabric scissors or a rotary cutter, a cutting mat, an iron, pins or fabric clips, and a reliable hexagon template. You will also need a background fabric large enough to accommodate the completed wreath with extra room around every edge. Lightweight quilting cotton is particularly convenient because it presses well and does not add unnecessary bulk where several seams meet.
DISCOVER MORE FREE PATTERNS HERE!
For a design similar to the reference, prepare approximately 24 hexagons, arranged as eight groups of three pieces. This creates the characteristic segmented wreath effect seen in the project. Before cutting all of your fabric, make one test hexagon and arrange three copies together. This simple test helps you confirm that the chosen template produces the scale you want and prevents wasting fabric if you later decide that the pieces should be larger or smaller.
Fabric selection plays an important role in the finished appearance of the Hexagon Wreath Quilt Block Pattern. Try choosing approximately six to eight fabric combinations that can be easily distinguished from one another. A mixture of small dots, subtle geometric prints, tone-on-tone designs, and lightly textured-looking prints works especially well because the individual hexagonal shapes remain visible. Extremely large motifs can work too, although careful fussy cutting may be necessary.
The photograph provides a useful lesson in color placement. Rather than scattering every print randomly, similar hexagons are gathered into small sections. One portion is red, another yellow, followed by blue-green, tan, black, pink, turquoise, and pale green areas. This grouping gives the eye an easy path around the circle and strengthens the wreath effect. When designing your own patchwork wreath, place all pieces on a flat surface before sewing and experiment with several sequences.
Contrast deserves special attention around neighboring groups. If two fabrics have almost identical values, their boundary may disappear from a distance. Alternating lighter and darker groups can make the geometry easier to recognize. You do not need dramatic contrast everywhere, but a thoughtful balance of light, medium, and dark fabrics usually produces a more interesting hexagon quilt block.
Finally, choose the background fabric after arranging the colored pieces. White or cream can create a crisp traditional appearance, while a darker solid can make bright scraps stand out dramatically. Leave generous background space around the wreath instead of cutting the final block to size immediately. Patchwork and appliqué can cause slight distortion, so keeping extra fabric available gives you the freedom to square the project accurately after all stitching and pressing are complete.
Cutting and Preparing Accurate Hexagon Pieces
Accuracy begins with the template. All hexagons used in the Hexagon Wreath Quilt Block Pattern should be identical in size unless you are intentionally redesigning the project. A reusable acrylic template is convenient, but a carefully prepared cardboard or template-plastic shape can also work. Whatever method you choose, mark the orientation consistently and check the template before cutting an entire batch of fabric.
If you plan to machine-piece the hexagons, remember that the cutting template must account for the chosen seam allowance. A common quilting seam allowance is approximately ¼ inch, or about 0.6 cm. The exact finished dimensions are less important than consistency. Every piece needs the same seam allowance so the corners align when the groups are assembled. If you prefer an English paper piecing approach, prepare paper templates at the finished size and cut fabric around them with sufficient allowance for wrapping.
Press the fabrics before cutting. Even a small crease can alter the edge of a geometric piece and make matching seams more difficult. Position the template carefully, cut cleanly around every side, and avoid stretching the fabric along angled edges. A sharp rotary blade can improve accuracy, but ordinary fabric scissors are perfectly suitable when used slowly and carefully.
Organize the cut hexagons into color groups immediately. For a wreath modeled on the photograph, make eight sets of three coordinating hexagons. Lay each trio together and check the direction of directional prints before stitching. If a fabric contains stripes, flowers, animals, words, or other directional motifs, rotating the pieces intentionally can make the completed section look much more polished.
Before joining anything permanently, recreate the entire circle on your work surface. Arrange the eight three-hexagon sections around an empty center. Look at the wreath from several angles and, if helpful, take a quick reference photograph before moving the pieces. This arrangement stage is one of the most valuable parts of the process because changing colors now is far easier than unpicking completed seams later.
Pay particular attention to the central opening. The inside edges should create a reasonably balanced circular or polygonal opening without one group projecting too far inward. Likewise, inspect the outside silhouette. The outer edge naturally has an attractive stepped geometric appearance, and that irregular outline is part of the charm of the Hexagon Wreath Quilt Block Pattern. Once the arrangement looks balanced, label the groups discreetly or stack them in sewing order.
Sewing and Assembling the Hexagon Wreath Quilt Block Pattern
Start construction with one three-hexagon color group. Place the first two neighboring pieces with right sides together and align the exact edges that must be joined. Sew only along the intended side, maintaining a consistent seam allowance. With traditional hexagon piecing, stopping accurately at the seam intersection can be important because multiple angled seams eventually meet at the corners.
Add the third hexagon according to your layout. Do not assume that every trio is assembled in exactly the same orientation; refer to the complete arrangement as you work. After finishing one section, return it to its original location on the table. Repeat the process with the remaining groups until you have all of the colored units necessary to reconstruct the wreath.
Pressing should be controlled rather than aggressive. First set each seam briefly with the iron, then press the seam allowances in the direction that creates the least bulk. Depending on your construction method, some seams may naturally need to open instead. Avoid dragging the iron sideways across the patchwork because the angled fabric edges can stretch. A gentle up-and-down pressing motion helps maintain the original geometry.
Next, begin connecting adjacent colored sections. Work progressively around the circle rather than randomly joining opposite sides. Align seam intersections carefully and use pins or clips where needed. After adding each new group, return the partially completed wreath to a flat surface and check its shape. Small discrepancies are easier to correct early than after the complete ring has been assembled.
When the final sections meet, inspect both the outer perimeter and the central opening. The wreath should lie reasonably flat without pronounced ripples or puckering. Minor variations are normal in handmade patchwork, especially when working with many angled seams. If one area feels bulky, check the seam allowances before pressing harder. Correcting a folded or twisted allowance is generally more effective than attempting to flatten it with excessive heat.
Once the ring is assembled, give the hexagon wreath quilt block a careful final press. At this stage you can decide whether to preserve it as a freestanding patchwork unit temporarily or attach it directly to the prepared background. Handle the wreath gently because the irregular outer edges and central opening create several areas that can stretch if repeatedly pulled or repositioned.
Attaching, Quilting, Finishing, and Creative Variations
Center the completed wreath on the background fabric. Measure from several points instead of relying entirely on visual judgment. When you are satisfied with the position, secure the patchwork using pins, temporary fabric-safe adhesive if appropriate for your method, or hand basting. Keeping the wreath stable before stitching is particularly important because you want the central opening and outer perimeter to remain evenly positioned.
The attachment method depends on how the patchwork was constructed. A neatly prepared wreath can be appliquéd onto the background with small hand stitches, a narrow machine stitch, or another suitable appliqué technique. Work around both the outside perimeter and the inside opening as required by your construction method. Keep the stitches controlled and avoid pulling the thread so tightly that the background fabric puckers.
If you want to turn the project into a quilted piece, create a traditional quilt sandwich using the completed top, batting, and backing fabric. Baste the three layers securely before quilting. Simple quilting is often especially effective with a colorful geometric design. Straight lines around the wreath, gentle echo quilting, or restrained background quilting can add texture without competing with the patchwork itself.
For a cushion, trim the completed quilted block to the required pillow size and construct your preferred envelope or zippered backing. For a wall hanging, add borders if desired, quilt the layers, square the project, and finish the perimeter with binding. A smaller Hexagon Wreath Quilt Block Pattern can also become a table mat, while several wreath blocks could be combined into a larger quilt layout.
Scrap lovers can use this design as a scrap fabric quilt project by giving each trio its own personality. For example, one group could feature pink florals, another blue dots, another green leaves, and another warm orange prints. Alternatively, create a controlled palette using different values of one or two colors. A red-and-green version would naturally suit Christmas decorating, while spring fabrics could create a bright seasonal wall hanging.
Before considering the project finished, inspect every seam and edge. Remove loose threads, check that the appliqué is secure, and press the finished piece from the appropriate side using settings suitable for your fabrics. If the block will be incorporated into another project, square the background only after all major stitching is complete. This final check helps preserve the symmetry and gives your handmade Hexagon Wreath Quilt Block Pattern a clean presentation.
FAQ About the Hexagon Wreath Quilt Block Pattern
What is a Hexagon Wreath Quilt Block Pattern?
A Hexagon Wreath Quilt Block Pattern is a patchwork design in which hexagonal fabric units are arranged around an open central area to create a wreath-like shape. Different colors or prints can be grouped around the circle to emphasize the segmented appearance.
How many hexagons are needed for this version?
For a layout closely inspired by the reference image, approximately 24 hexagons can be organized into eight groups containing three pieces each. Because hexagon patterns can be constructed in different ways, always test your chosen template and arrangement before cutting every piece.
What fabric is best for a hexagon quilt block?
Good-quality quilting cotton is an excellent choice. It is relatively stable, easy to cut, presses neatly, and is widely available in coordinated colors and prints. Beginners may find very stretchy or slippery fabrics more difficult to control.
Can I make this pattern with fabric scraps?
Yes. This project is particularly suitable for a scrap quilt because the individual pieces are relatively small. Scraps can be sorted into coordinating trios so that each portion of the wreath has a recognizable color identity.
Can beginners make a hexagon wreath?
A patient beginner can certainly try it. The main challenge is maintaining accurate angled seams and matching the corners. Working slowly, using identical templates, checking the layout frequently, and pressing carefully will make the process considerably easier.
Do all the hexagons need to use the same fabric?
No. In fact, using different fabrics is one of the main attractions of the design. You can group three matching pieces together, combine three related prints, or create a completely scrappy arrangement. The repeated hexagonal shape provides continuity even when the fabrics vary.
What seam allowance should I use?
For machine-pieced quilting, a ¼-inch seam allowance, approximately 0.6 cm, is commonly used. However, consistency matters more than choosing a particular system. Follow the requirements of your template and use the same allowance throughout the project.
Can this pattern be made with English paper piecing?
Yes. Hexagons are traditionally well suited to English paper piecing (EPP). Fabric is wrapped around paper templates and neighboring shapes are hand-sewn together. After the units are securely joined, the papers can be removed according to the chosen EPP technique.
How can I keep the wreath from becoming distorted?
Avoid stretching angled fabric edges, maintain consistent seam allowances, and press instead of aggressively ironing back and forth. It is also helpful to place the project on a flat surface regularly during construction so you can notice distortion before it becomes difficult to correct.
What can I make with the finished block?
The finished Hexagon Wreath Quilt Block Pattern can become a wall hanging, pillow cover, table mat, decorative quilt panel, tote-bag feature, or part of a larger quilt. Changing the size of the hexagon template makes it possible to adapt the same basic arrangement to many projects.
Should the center of the wreath remain open?
Keeping the center open is what gives this particular arrangement its recognizable wreath appearance. The background fabric showing through the middle also provides visual contrast. However, you can personalize the center with additional appliqué after completing the basic block if that suits your project.
How should colors be arranged around the wreath?
There is no single required sequence. A useful approach is to distribute light, medium, and dark values around the circle and avoid placing too many nearly identical groups beside each other. Arrange everything before sewing and move the groups until the composition feels visually balanced.
Conclusion: Creating Your Own Hexagon Wreath
The Hexagon Wreath Quilt Block Pattern combines one of quilting’s most recognizable geometric shapes with a cheerful circular composition. By preparing consistent hexagons, grouping fabrics thoughtfully, testing the complete arrangement before sewing, maintaining accurate seam allowances, and pressing carefully, you can build the wreath progressively without losing control of its shape.
The process begins with fabric selection and accurate cutting, continues through the assembly of the individual three-hexagon groups, and finishes by joining those sections into a complete ring. From there, the wreath can be secured to a background and transformed into a quilted wall decoration, cushion, table piece, or larger patchwork project.
EASILY FIND THE FREE PDF FOR THIS PATTERN HERE!
Most importantly, this pattern leaves plenty of room for creativity. Your hexagon patchwork wreath does not have to reproduce the colors in the reference exactly. Scraps from previous quilts, favorite floral fabrics, seasonal prints, solids, or coordinated collections can all give the same geometric arrangement an entirely different personality. If you make your own Hexagon Wreath Quilt Block Pattern, leave your sincere opinion about the project and share your suggestions. Which fabric colors would you choose for your wreath, and what would you turn the finished block into? Your ideas can inspire new variations and creative ways to enjoy this beautiful patchwork design.