
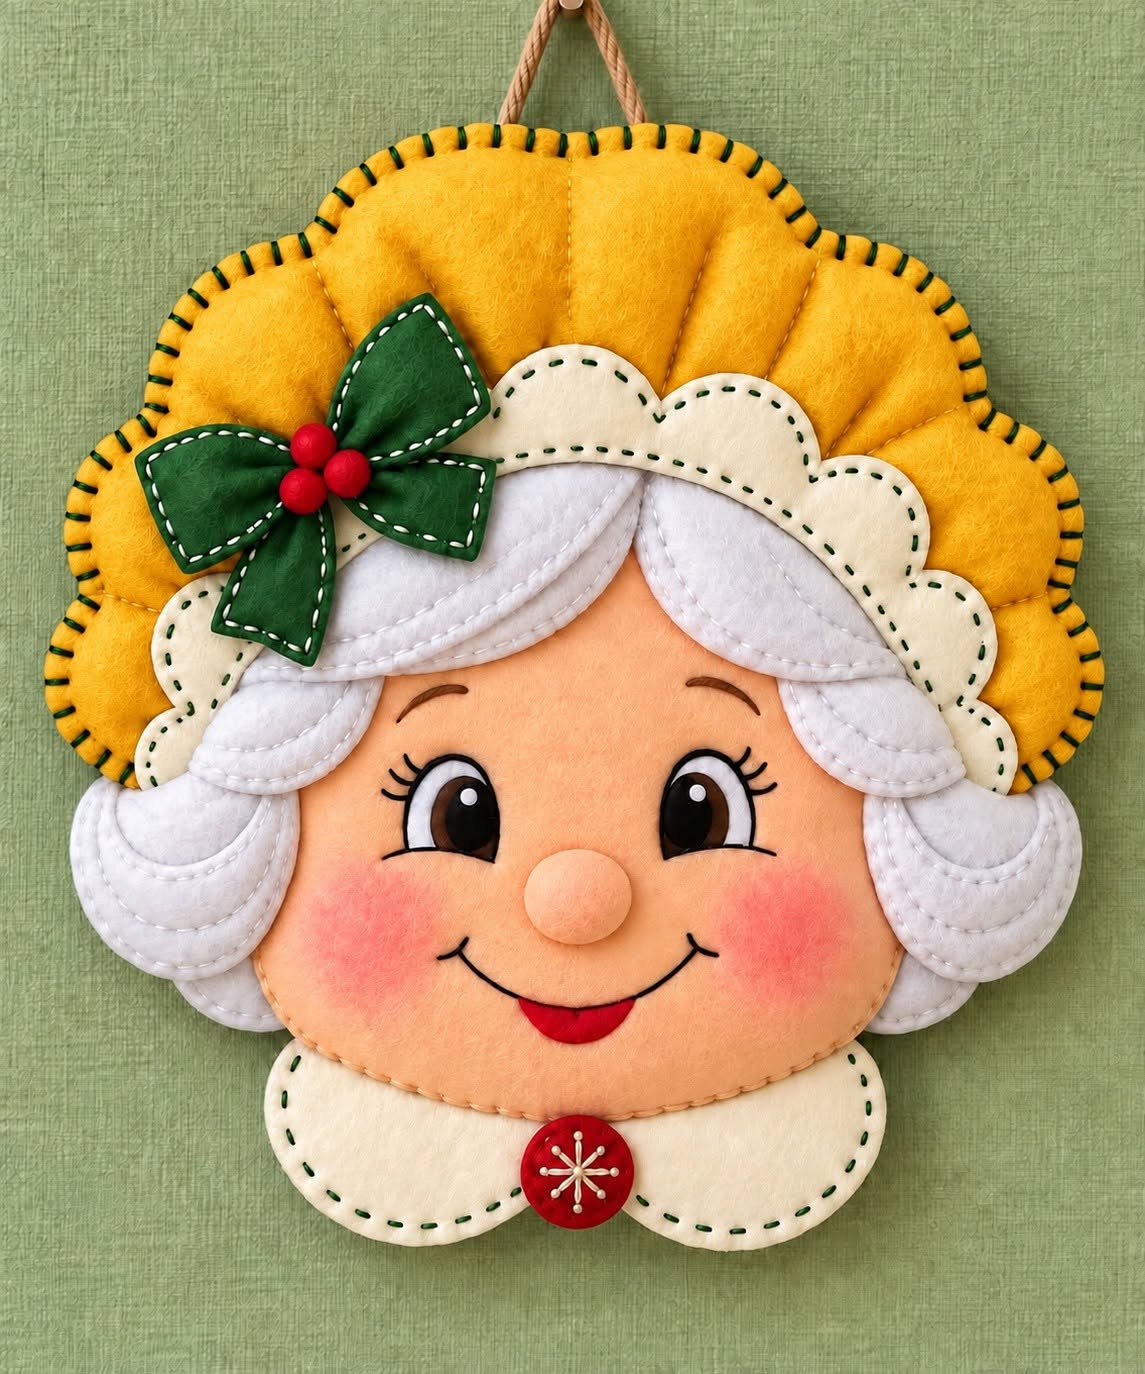
Grandma Themed Felt Christmas Wall Decoration Pattern is a warm and charming handmade Christmas project that combines traditional felt crafting with a cheerful grandmother-inspired character. The design features a friendly face, soft white hair, a scalloped cream bonnet, a golden padded background, a festive green bow with red berries, and a decorative collar. These layered details give the finished piece dimension while keeping the construction approachable for anyone who enjoys felt sewing, Christmas crafts, and handmade holiday décor. Because the project is built from relatively simple shapes, you can create an impressive decoration without complicated equipment. Careful cutting, neat hand stitching, and thoughtful layering are the most important techniques for achieving a polished result.
One of the most appealing qualities of this Grandma Themed Felt Christmas Wall Decoration Pattern is the combination of color, texture, and personality. The golden felt creates a warm background reminiscent of traditional Christmas decorations, while cream, white, peach, green, and red introduce familiar seasonal colors. The face becomes the focal point through expressive eyes, rosy cheeks, a dimensional nose, and a smiling mouth. Meanwhile, the white layered hair gives the character a soft appearance that works beautifully with the padded construction. You can use this project as a wall hanging, door decoration, handmade gift, or part of a larger collection of DIY Christmas felt decorations.
The tutorial below explains how to recreate the general appearance of the pictured decoration while still allowing room for personal creativity. Exact dimensions can be adjusted depending on where you plan to display the finished piece, but a decoration approximately 32–38 cm tall works particularly well because it provides enough space for the smaller facial and stitching details. Beginners can simplify the design by using fewer hair layers or flatter pieces, while experienced crafters can add additional embroidery and dimensional stuffing. The essential idea is to work from the back toward the front, creating each component separately before completing the final assembly. This approach makes the felt Christmas wall hanging easier to control and helps produce clean edges.
Materials, Pattern Pieces, and Preparation
Begin by gathering your materials for the Grandma Themed Felt Christmas Wall Decoration Pattern. You will need felt in golden yellow, peach or skin tone, white, cream, dark green, red, black, and brown. Small amounts of additional white felt can be used for the eyes. Choose reasonably sturdy craft felt for structural pieces and softer felt for dimensional areas such as the face and hair. You will also need embroidery floss or strong sewing thread in coordinating colors.
DISCOVER MORE FREE PATTERNS HERE!
For the padded appearance, prepare lightweight polyester fiberfill. Only a small amount is required because the goal is gentle dimension rather than heavily stuffed shapes. Other useful supplies include sharp fabric scissors, embroidery needles, sewing pins or clips, a fabric marking pen, paper for creating templates, and a ruler. A fabric-safe washable marker can make transferring details considerably easier.
The main pattern begins with the large golden background. Draw a rounded, scalloped silhouette resembling a soft bonnet or flower. For a medium-size decoration, start with a shape around 34 cm wide and 31 cm tall. The scallops do not have to be mathematically identical, but keeping them reasonably balanced creates a professional-looking result. Cut two identical golden felt pieces if you want the background lightly padded.
Next, create the face template. Draw a wide rounded shape approximately 24–26 cm across, with a gently curved lower edge. Cut two peach felt pieces if you plan to stuff the face slightly. The face should sit centrally over the golden background while leaving enough golden material visible around the upper and side edges. Test the placement before cutting additional components because this determines the proportions of the entire decoration.
Prepare templates for the white felt hair using several overlapping curved pieces. Instead of attempting to make the hair from one complicated pattern, divide it into manageable sections: two upper center sections, two middle side curls, and two larger lower side curls. This layered approach produces the dimensional appearance seen in the project while making each individual piece much easier to sew.
Finally, create templates for the cream bonnet trim and collar. The upper cream section can be drawn as a sequence of rounded scallops following the top of the face. Make two rounded collar pieces that meet beneath the chin. Also prepare templates for the green bow loops and tails, three small red berries, eyes, nose, mouth, and center collar button. Arrange every paper template together before cutting your final felt so you can check the overall proportions.
Building the Face, Hair, and Character Details
Start assembling the felt grandma face separately from the background. Place the two peach felt face pieces together and begin stitching around the outer edge with a small running stitch or blanket stitch. Leave an opening of approximately 5–7 cm, insert a thin and evenly distributed layer of fiberfill, and then close the opening. Avoid overstuffing because the face should remain relatively flat for wall display.
Position the eyes symmetrically on the upper half of the face. Each eye can be constructed with white and black felt layers, with a tiny white highlight creating a cheerful expression. Black embroidery thread works well for outlining the eyes and creating eyelashes. Brown embroidery floss can then be used to form gently curved eyebrows above them. Before permanently attaching anything, temporarily position the nose and mouth to make sure the facial proportions look balanced.
Create the dimensional nose by cutting two small peach felt circles approximately 4–5 cm in diameter. Sew around the circumference, add a tiny amount of fiberfill, and close the shape so it becomes softly rounded. Attach it securely to the center of the face. The nose should project slightly forward without becoming disproportionately large compared with the eyes.
For the mouth, use black embroidery floss to create a broad curved smile. A small red felt semicircle positioned underneath the center of the smile can represent the tongue or lower mouth detail. Rosy cheeks can be produced carefully with fabric-safe coloring, blush suitable for craft applications, or small pieces of pale pink felt. Keep the color soft and gradually build the intensity rather than applying too much at once.
The layered felt hair is one of the project’s defining features. Cut pairs of curved white pieces for each curl section, stitch them together, and add just enough fiberfill to create subtle volume. Decorative white running stitches around the inner curved lines help define individual sections of hair. Assemble the upper hair first and gradually work outward toward the lower curls.
Complete this stage by placing the cream scalloped bonnet trim behind or slightly over the upper hairline. Green running stitches provide attractive contrast against the cream felt. The scallops should frame the character without covering too much of the white hair. Once the face, bonnet, and hair have been temporarily arranged, photograph or mark their positions before removing them for final assembly.
Creating the Golden Background, Bow, Collar, and Final Assembly
The golden background gives the Grandma Themed Felt Christmas Wall Decoration Pattern its recognizable silhouette. Place the two golden pieces together and stitch around the scalloped perimeter with dark green embroidery floss. A blanket stitch works especially well because it simultaneously secures and decorates the edge. Keep your stitch spacing consistent throughout the perimeter.
Before completely closing the golden background, add a thin layer of fiberfill. Spread it evenly so the background develops gentle volume without becoming bulky. To create the radiating padded sections visible behind the grandmother’s head, sew several lines from the inner area toward the outer scallops. These lines divide the background into softly raised segments and add visual depth.
Now position the finished face assembly over the background. Center it carefully and verify that roughly equal portions of the golden border remain visible on both sides. Secure the face with pins or clips and attach it using discreet hand stitches. Add the lower hair curls afterward if necessary so they overlap the face and background naturally. Working in layers prevents visible construction stitches.
Create the Christmas felt bow from dark green felt. Cut two or four matching loop shapes depending on whether you want a flat or padded bow. Add two lower ribbon tails and outline the pieces with contrasting white running stitches. Assemble the bow near the upper left side of the bonnet. Three small red stuffed circles or felt balls can be attached to its center to resemble festive berries.
The cream collar is assembled beneath the face using two broad rounded sections. Add green running stitches around their edges to coordinate with the bonnet. At the center, attach a round red felt button approximately 4–5 cm wide. You can embroider a simple white or cream snowflake motif onto this circle using straight stitches radiating from the center.
Finish the construction by adding the hanging loop before permanently closing the back. A braided cord, ribbon, or strong fabric loop works well. Secure both ends firmly between the background layers so the weight of the decoration does not pull directly against decorative stitches. Inspect every section, trim loose threads, adjust the stuffing where necessary, and make sure all small embellishments are securely attached.
Finishing Techniques, Customization, Care, and Display Ideas
Consistent stitching makes a significant difference in the appearance of a handmade felt Christmas decoration. Try to keep the distance between stitches approximately equal, especially around highly visible areas such as the golden border, cream bonnet, bow, and collar. Perfect mechanical uniformity is unnecessary; the slight variations of hand stitching contribute to the handmade character of the piece.
Color selection also influences the final personality of the project. Golden yellow, forest green, cream, white, peach, and Christmas red create the traditional combination shown in the design. However, the same Grandma Themed Felt Christmas Wall Decoration Pattern can be customized with burgundy, sage green, dusty rose, icy blue, silver gray, or other colors that coordinate with your seasonal decorations.
Personalization can make this project especially meaningful as a handmade gift. Consider embroidering a family name, year, short holiday greeting, or initials on the back. You could also change the hair color, glasses, bonnet style, bow, or facial expression to create a character inspired by a beloved grandmother while maintaining a stylized craft appearance.
When displaying the decoration, choose an indoor location protected from moisture and excessive direct sunlight. Felt can collect dust, so occasional gentle cleaning with a soft lint roller or clean brush is usually sufficient. Avoid aggressively rubbing embroidered sections or pulling on the dimensional embellishments. Proper storage will also help maintain the padded shape between holiday seasons.
For storage, place the decoration flat inside a clean box with acid-free tissue or another soft protective material around it. Avoid placing heavy decorations directly on top because prolonged pressure can flatten the fiberfill. If the hanging cord becomes bent during storage, simply reposition it when unpacking rather than pulling forcefully against the felt.
This pattern can also become the starting point for an entire collection of handmade Christmas wall decorations. By maintaining the same golden scalloped background and changing the central character, you can develop coordinating family-inspired pieces. The repeated colors and stitching techniques create visual consistency, while different faces, bows, hats, or collars allow every decoration to have its own personality.
FAQ About the Grandma Themed Felt Christmas Wall Decoration Pattern
Is the Grandma Themed Felt Christmas Wall Decoration Pattern suitable for beginners?
Yes. Most of the construction uses basic cutting, layering, running stitches, and blanket stitches. Beginners should work slowly on the smaller facial features and arrange all components before sewing them permanently. Creating the project one layer at a time makes the process considerably easier.
What type of felt works best for this Christmas decoration?
Medium-weight craft felt is suitable for most sections. A slightly thicker felt can provide additional structure for the golden background, while softer felt works nicely for the padded face and hair. If your felt is very thin, doubling the major pieces can improve durability.
How large should the finished decoration be?
A finished height of approximately 32–38 cm is practical for a decorative wall hanging. However, the pattern can be enlarged or reduced as long as every component is resized proportionally. Larger versions are also easier when you want to include detailed embroidery.
Do I need a sewing machine?
No. This project is especially suitable for hand sewing because decorative stitches are part of its visual appeal. A sewing machine may be used for hidden structural seams, but it is not necessary for completing the decoration.
What stitches should I use?
A running stitch works beautifully for decorative outlines on the hair, bonnet, and collar. A blanket stitch is useful around the large outer background and other exposed edges. Straight embroidery stitches can create the eyebrows, mouth, eyelashes, and snowflake-style button detail.
How much stuffing should I add?
Use fiberfill sparingly. Each component should look softly raised rather than heavily stuffed. Too much filling can distort the pattern shapes and make layered pieces difficult to attach. Add small amounts gradually until you achieve the desired dimension.
Can I make the decoration without stuffing?
Absolutely. A completely flat version can be created by using single or doubled felt layers. The result will have less dimensional texture but can be easier to sew and store. Flat construction is also useful when creating several decorations at once.
How can I keep the facial features symmetrical?
Mark a faint vertical centerline on the face before positioning the eyes, eyebrows, nose, and mouth. Measure from this line when placing paired features. Temporarily pin everything in position and inspect the entire expression before sewing.
Can the colors be changed?
Yes. The color palette is completely customizable. Traditional Christmas shades work beautifully, but pastel, rustic, farmhouse, or winter-inspired colors can also be used. Maintaining good contrast between neighboring felt layers will keep the design easy to see.
How do I create neat decorative stitches?
Mark tiny guide points at equal intervals before stitching. Use embroidery floss of consistent thickness and avoid pulling the thread too tightly, which can wrinkle the felt. Practicing a few stitches on scrap felt first can help establish comfortable spacing and tension.
Can this pattern be made as a gift?
Yes. A handmade Grandma Themed Felt Christmas Wall Decoration Pattern project can become a thoughtful seasonal gift, especially when customized with colors, embroidered initials, a date, or other decorative details that have personal meaning.
How should I attach the hanging cord?
Place both ends of a strong cord or ribbon between the two background layers and reinforce them with several stitches. The attachment should be structural rather than decorative because it supports the entire finished piece. Test the loop gently before hanging the decoration.
Conclusion
The Grandma Themed Felt Christmas Wall Decoration Pattern brings together several enjoyable crafting techniques in one cheerful holiday project. Starting with a padded golden scalloped background, you can gradually build the character using a peach felt face, expressive embroidered features, dimensional white hair, a cream bonnet, a green Christmas bow, red berries, and a coordinating collar. Working from larger structural pieces toward smaller decorative details keeps the construction organized and makes it easier to achieve a clean finish.
Throughout the project, the most important techniques are careful pattern cutting, controlled stuffing, felt layering, running stitch, blanket stitch, simple embroidery, and thoughtful placement. None requires complicated equipment, making the design accessible to crafters who prefer traditional hand sewing. At the same time, there is enough detail for experienced makers to personalize the project with additional embroidery, alternative colors, or more elaborate dimensional elements.
EASILY FIND THE FREE PDF FOR THIS PATTERN HERE!
Most importantly, treat the pattern as a creative starting point rather than a rigid formula. Change the colors, expression, hair, bow, collar, or embroidered details until your handmade grandmother character feels unique. A small variation can transform the finished piece while preserving the recognizable charm of the original Grandma Themed Felt Christmas Wall Decoration Pattern. If you make your own version, leave your sincere opinion about the project and share any suggestions or creative changes you would add. Your ideas about different colors, stitches, accessories, and Christmas details can inspire even more beautiful variations of this handmade felt decoration.