
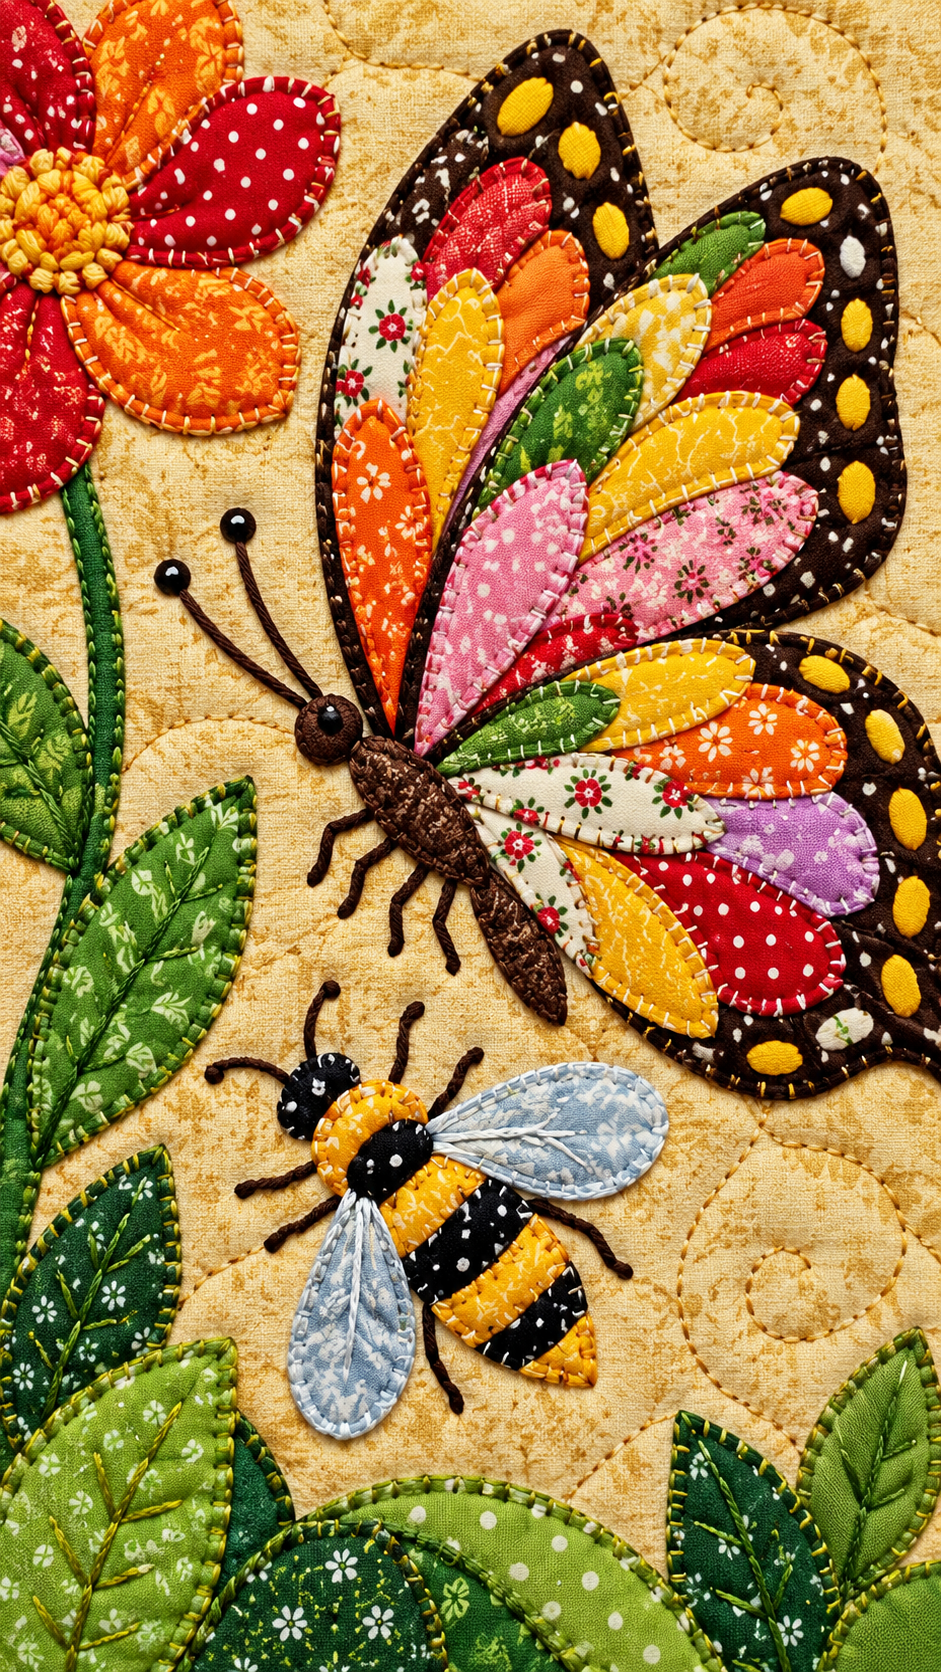
The Fabric Appliqué Panel with Butterfly and Bee Pattern is a cheerful sewing project that combines colorful fabric scraps, dimensional appliqué, decorative hand stitching, and gentle quilting in one nature-inspired design. The finished panel features a large butterfly with layered wings, a charming bee, leafy greenery, and a bright flower, all arranged over a warm neutral background. One of the most attractive qualities of this project is the opportunity to combine many small prints without needing large pieces of fabric. Florals, dots, tiny geometric prints, and tone-on-tone cottons can all work together, turning leftover material into an expressive piece of textile art. Although the design looks detailed, it can be constructed gradually, making it approachable for patient beginners while still offering plenty of creative possibilities for experienced makers.
Creating a Fabric Appliqué Panel with Butterfly and Bee Pattern is also an excellent way to practice several useful sewing techniques in a single project. The butterfly introduces layered appliqué and careful placement, the bee provides practice with small curved pieces, and the leaves are ideal for learning how decorative stitches can define shapes and add texture. Instead of trying to make every element perfectly identical to the inspiration image, focus on the overall composition: a prominent butterfly, a smaller bee below it, botanical elements surrounding them, and a background that allows the brighter fabrics to stand out. This approach makes the project personal while preserving the recognizable garden theme. The result can become a wall hanging, a decorative quilt panel, a cushion front, or even the central block of a larger quilt.
Before cutting anything, it helps to understand how the layers work together. The background can be made from quilting cotton, backed with batting and a backing fabric so that the finished project has the softly padded appearance visible in the reference. The butterfly and bee can then be built from individual appliqué pieces secured with fusible web or another preferred appliqué method. Decorative blanket stitches around the edges create the handcrafted appearance that gives this design much of its personality. Gentle free-motion or hand quilting in the open background areas adds movement without competing with the colorful insects. By planning the project in stages—background, templates, appliqué construction, decorative stitching, and quilting—you can recreate the look in an organized and enjoyable way.
Materials, Fabric Selection, and Preparing the Pattern
Begin by choosing the size of your fabric appliqué panel. A practical starting size is approximately 40 cm × 55 cm, although you can enlarge or reduce the project according to its intended use. Cut the background fabric slightly larger than the desired finished dimensions so there is room for quilting and final trimming. A cream, pale yellow, beige, or softly mottled cotton works particularly well because it provides contrast against the vivid butterfly and green foliage.
DISCOVER MORE FREE PATTERNS HERE!
For the appliqué, collect a variety of colorful cotton fabric scraps. The butterfly can incorporate red, orange, yellow, pink, green, lavender, cream, and floral fabrics. For the dark outer sections of the wings, choose brown or nearly black fabric with small dots or subtle prints. This darker outline visually frames the brighter interior wing sections and helps establish the distinctive butterfly silhouette.
The bee requires yellow or golden fabric, black or very dark brown fabric, and pale blue, gray-blue, or cream fabric for the wings. Small printed fabrics are especially useful because large motifs can disappear when cut into tiny appliqué pieces. The bee’s striped abdomen should have enough contrast that each alternating section remains clearly visible after stitching.
For the botanical elements, gather several shades and prints of green fabric rather than using one single green. Combining olive, grass green, forest green, and yellow-green creates depth. The flower can use warm reds and oranges with a textured yellow center. These contrasting colors connect visually with the warm colors found throughout the butterfly.
You will also need lightweight fusible web if you prefer fusible appliqué, batting, backing fabric, coordinating sewing thread, embroidery floss or heavier decorative thread, fabric scissors, pins, an iron, a sewing machine, and basic marking tools. A removable fabric marker is useful for drawing antennae, legs, quilting lines, and placement guides. Always test the marker on a scrap before using it on the actual background.
Create paper templates for every major shape before cutting the fabric. Separate the butterfly into its outer wings, inner feather-like wing sections, body, head, antennae, and decorative spots. Make individual templates for the bee’s head, thorax, striped abdomen, wings, legs, and antennae. The leaves and flower petals should also be prepared separately. Labeling each template prevents confusion when numerous small pieces are spread across the work surface.
Building the Butterfly, Bee, Flower, and Leaves
Start the butterfly appliqué by positioning its large dark outer wing shapes. The butterfly should be the primary focal point, so place it slightly above the center rather than exactly in the middle. Leave enough surrounding space for the flower and foliage. Before fusing anything permanently, arrange all major elements on the background and photograph the placement. That reference can be extremely useful if the pieces are accidentally disturbed.
Inside each butterfly wing, arrange elongated teardrop or feather-shaped fabric pieces. Allow their colors to alternate naturally instead of creating rigid repetition. Yellow beside green, orange beside pink, and floral cream beside red will produce the lively scrap-fabric effect seen in the inspiration. Slight overlaps can help eliminate unwanted background gaps and make the layered construction appear fuller.
Once satisfied with the arrangement, secure the pieces using your chosen appliqué sewing technique. With fusible appliqué, follow the manufacturer’s temperature instructions and avoid overheating the fabric. After fusing, work around the exposed edges using a small blanket stitch. Hand stitching produces a charming folk-art character, while a sewing machine can provide a more regular finish. Both approaches are appropriate for this design.
Next, create the butterfly body using dark brown fabrics. A rounded head, compact thorax, and elongated abdomen help establish the insect’s structure. The antennae and legs can be made with embroidery thread, narrow cord, or dense machine stitching. Keep these details relatively thin so they complement rather than overpower the colorful wings.
Construct the bee appliqué below the butterfly. Alternate yellow and black fabric sections across the abdomen to create the characteristic striped appearance. Position the wings so that they extend outward and slightly upward. Pale blue printed fabric works beautifully here because it contrasts with both the warm background and the dark sections of the bee. Decorative stitching along each wing edge gives the small pieces greater definition.
Finish this stage by arranging the leaves and flower around the insects. Layer leaves of different sizes and shades to create a lush garden setting. Add stitched veins through the centers of larger leaves and smaller diagonal veins toward the edges. For the flower, overlap several rounded petals around a textured yellow center. The goal is not botanical realism but a warm, handcrafted garden composition that supports the butterfly and bee.
Appliqué Stitching, Quilting, and Dimensional Details
The edge stitching is one of the defining characteristics of the Fabric Appliqué Panel with Butterfly and Bee Pattern. A blanket stitch is particularly effective because it both secures the appliqué and creates a visible decorative outline. Choose thread that contrasts slightly with each piece if you want the stitches to become part of the design. Yellow, cream, brown, green, and red are versatile choices for this style.
Try to keep stitch spacing reasonably consistent, but do not worry about achieving machine-like perfection when sewing by hand. Slight variations reinforce the handcrafted personality of the panel. Around tight curves, shorten the stitch length so the thread follows the contour smoothly. This is particularly important around butterfly wing tips, flower petals, small leaves, and the bee’s curved body.
After the appliqué pieces are secured, prepare the quilt sandwich. Place the backing fabric wrong side upward, add the batting, and position the completed appliqué top right side upward. Smooth all three layers carefully and baste them together. You can use safety pins, temporary basting spray where appropriate, or traditional thread basting.
Quilt the open background areas using loose swirls, loops, or organic curves. The inspiration uses curved quilting that resembles gentle movement through a garden. Avoid extremely dense quilting immediately beside the appliqué because the insects should remain visually raised. Moderate quilting density in the background can actually make the appliqué appear more dimensional.
Additional embroidery can bring the scene to life. Consider reinforcing the butterfly antennae, adding tiny highlights to the eyes, defining the bee’s legs, and stitching leaf veins. These details require very little fabric but have a noticeable effect on the finished appearance. Decorative embroidery also offers an opportunity to introduce additional texture without adding bulky layers.
When all quilting is complete, trim the panel to its final dimensions. Square the corners carefully and check that the butterfly remains visually balanced within the composition. Finish the outside edge with traditional quilt binding, a narrow fabric frame, or another clean finishing method. Press gently from the reverse side where possible so dimensional appliqué sections are not flattened unnecessarily.
Finishing, Displaying, and Customizing Your Fabric Appliqué Panel
Before calling the project complete, examine every appliqué edge. Look for corners or curved sections that may have lifted during quilting. Reinforce loose areas with a few small stitches. Check the back for long thread tails and secure them neatly. This final inspection is particularly important if the panel will be handled frequently rather than displayed permanently.
If the Fabric Appliqué Panel with Butterfly and Bee Pattern will become a wall hanging, add a hanging sleeve to the back before or after binding. A sleeve allows a lightweight rod to support the panel evenly without visible clips. Small fabric corner pockets can also work for miniature panels and provide an unobtrusive display solution.
For a cushion version, adapt the composition to a square format before beginning. Keep the butterfly away from the seam allowance and avoid placing important appliqué details directly where the cushion bends sharply. Add an envelope-style or zippered back once the quilted front is complete. The padded appliqué creates an especially attractive tactile surface for decorative cushions.
The design can also become the centerpiece of a larger appliqué quilt. Instead of finishing it as an individual panel, surround the completed block with patchwork borders. Scrappy squares using colors taken from the butterfly can connect the central scene to the surrounding quilt. Repeating smaller flowers, bees, or leaves in additional blocks can extend the garden theme.
Color customization is another enjoyable possibility. A spring interpretation could emphasize pastel pink, lavender, mint, and pale yellow. An autumn version could feature rust, burgundy, mustard, olive, and deep brown. A more contemporary interpretation might limit the palette to three or four colors. Maintaining strong contrast between the outer butterfly wings and their colorful inner pieces will help preserve the design’s visual impact regardless of palette.
Most importantly, allow the project to show evidence of the maker’s individual choices. Scrap fabric appliqué is naturally suited to variation because every collection of leftover fabric is different. Your butterfly does not need the exact same prints, colors, or number of internal wing pieces shown in the inspiration. Preserve the essential structure and techniques while allowing your available fabrics to make the finished panel unique.
Frequently Asked Questions About the Fabric Appliqué Panel with Butterfly and Bee Pattern
What is the best fabric for this appliqué project?
Quilting cotton is one of the easiest choices because it is stable, widely available, and simple to cut into small shapes. Cotton scraps with small-scale prints are particularly effective for the layered butterfly wings, bee, leaves, and flower.
Can a beginner make this fabric appliqué panel?
Yes. A beginner can complete the project by working slowly and treating each element as a separate mini-project. Starting with fusible appliqué can simplify placement because the pieces can be secured before decorative stitching begins.
What stitch should I use around the appliqué pieces?
A blanket stitch is an excellent choice for the handcrafted appearance shown in this design. A narrow zigzag or appliqué stitch can also be used with a sewing machine. Hand stitching is especially attractive when you want visible, slightly rustic decorative edges.
Do I need fusible web?
No. Fusible web makes the process easier, especially when dealing with many small butterfly wing pieces, but traditional needle-turn appliqué or other appliqué methods can also be used. Choose the technique that best matches your sewing experience and desired finish.
How can I prevent small appliqué pieces from moving?
Position and secure the pieces before stitching. Fusible web is convenient for this purpose. If you prefer not to fuse them, small amounts of fabric-safe temporary adhesive, appliqué glue, pins, or basting stitches may help stabilize individual pieces.
What size should the finished panel be?
Approximately 40 cm × 55 cm is a useful starting size for a decorative wall panel, but there is no mandatory measurement. The templates can be enlarged or reduced depending on whether you are making a wall hanging, cushion, quilt block, or larger textile artwork.
How do I make the butterfly look dimensional?
Layer the colorful interior pieces over the larger outer wing shapes and avoid excessively dense quilting directly over the butterfly. Batting underneath the background helps the appliqué retain a soft raised appearance. Visible edge stitching also emphasizes the boundaries between layers.
Can I make the project entirely by hand?
Absolutely. The appliqué, blanket stitching, embroidery, and quilting can all be completed by hand. A fully hand-sewn version will take longer, but the technique complements the folk-art character of the design beautifully.
How should I choose colors for the butterfly?
Combine warm and cool colors while repeating a few shades throughout the composition. Red, orange, yellow, pink, green, and lavender create a lively butterfly. A dark brown or black outer wing provides contrast and keeps the many interior prints visually organized.
Why use several different green fabrics for the leaves?
Multiple greens create depth and prevent the foliage from appearing flat. Mixing light, medium, and dark greens also makes individual leaves easier to distinguish, especially when they overlap.
Should the background be quilted before adding the appliqué?
For this particular look, it is generally easier to construct and stitch the appliqué first, assemble the quilt sandwich, and then quilt the background. This allows the quilting to flow naturally around the completed butterfly, bee, flower, and leaves.
Can fabric scraps really be used for such small pieces?
Yes, and this is one of the best features of the Fabric Appliqué Panel with Butterfly and Bee Pattern. Many interior wing sections require only small pieces of cotton. Scraps left from previous quilting and sewing projects can therefore become important decorative elements instead of being discarded.
Conclusion
The Fabric Appliqué Panel with Butterfly and Bee Pattern brings together several enjoyable textile techniques in one colorful garden composition. By beginning with a neutral quilted background and gradually adding a layered butterfly, striped bee, dimensional flower, and varied green leaves, you can create a decorative piece that looks detailed without requiring complicated construction all at once.
The main process involves preparing templates, selecting contrasting fabric scraps, arranging the composition, securing the appliqué, outlining the shapes with blanket stitching, adding embroidered details, assembling the quilt sandwich, and quilting the open background. Working through these stages individually makes even the numerous small butterfly pieces much easier to manage.
EASILY FIND THE FREE PDF FOR THIS PATTERN HERE!
Remember that the charm of this project comes from color, texture, and handcrafted detail rather than absolute uniformity. Different fabric prints, slightly varied stitches, and personalized color combinations can make every finished panel distinctive. Whether you turn yours into a wall hanging, cushion front, quilt block, or larger decorative project, the same techniques can be reused for many future fabric appliqué patterns. If you make your own version, leave your sincere opinion about the project and share any suggestions or creative changes you would make. Your ideas about different colors, fabrics, stitching techniques, or ways to use the finished panel can inspire new variations of this butterfly-and-bee design.