
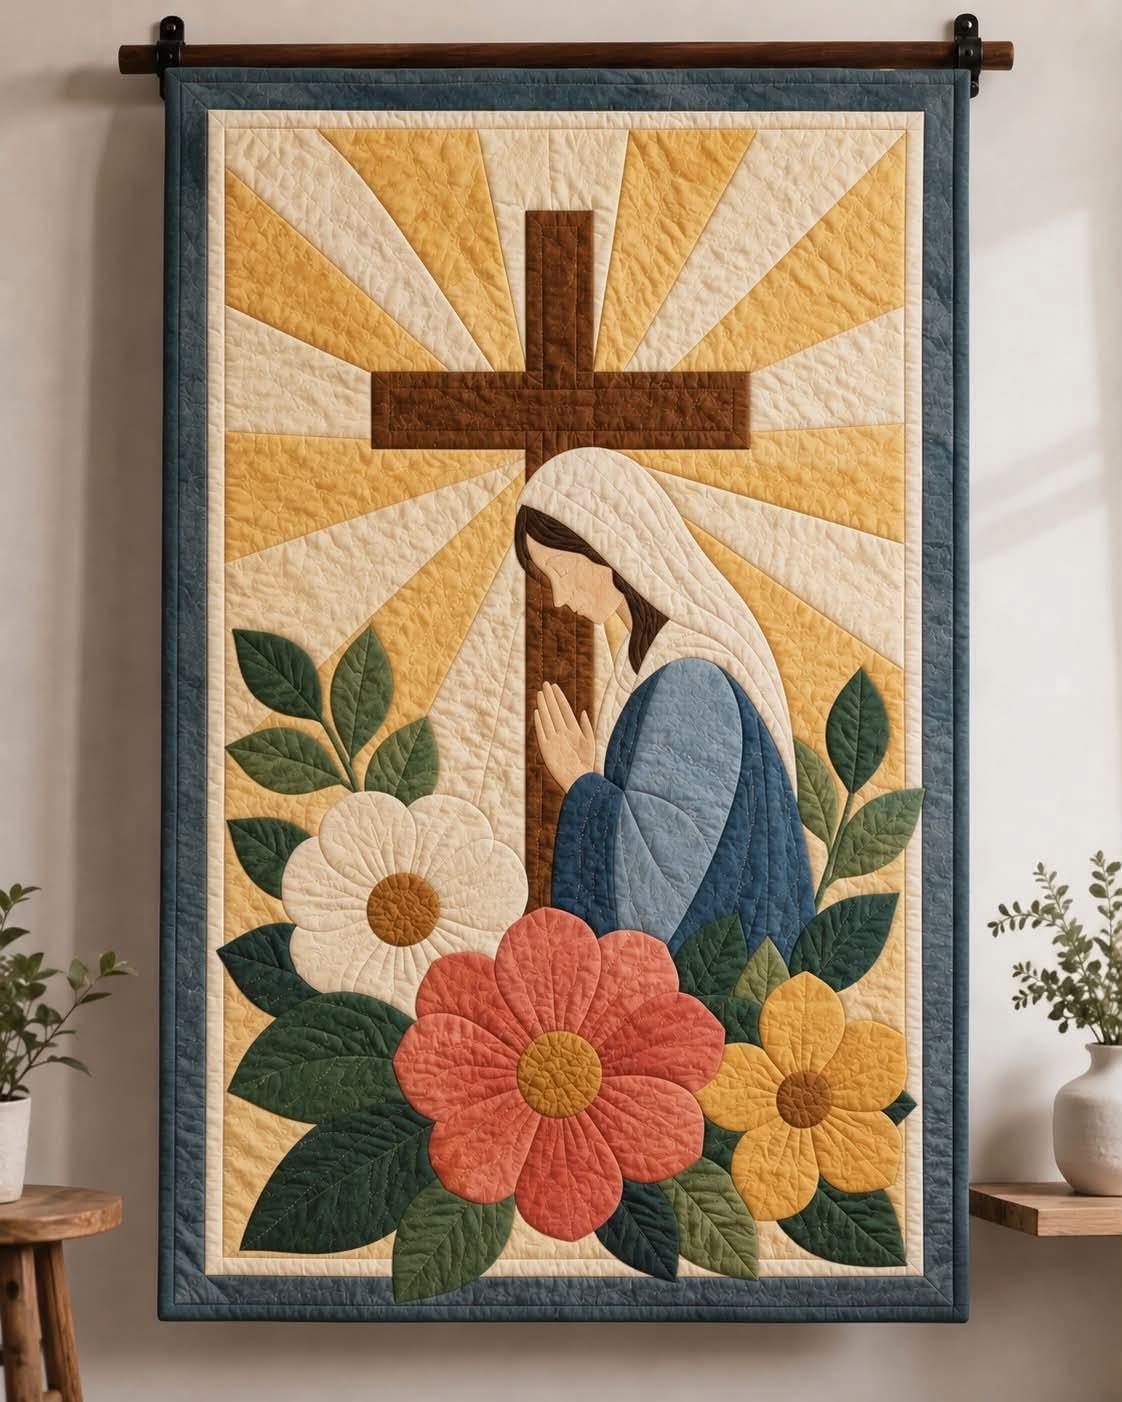
The Padded Wall Panel with Mary and Cross Pattern is a beautiful fabric-art project that combines appliqué, quilting, dimensional shapes, and thoughtful color placement in one decorative wall hanging. Inspired by the panel shown in the reference image, the design places Mary in a peaceful praying pose beneath a large brown cross, surrounded by warm rays and an abundant arrangement of flowers and leaves. The combination of cream, golden yellow, muted blue, earthy brown, coral, and green gives the finished piece a warm handcrafted character. Because the individual appliqué pieces are softly padded and quilted, the project has considerably more texture than an ordinary flat fabric panel. It can become a meaningful handmade decoration for a living room, prayer space, bedroom, entryway, or seasonal display. This tutorial explains the construction process in an approachable way so that even someone relatively new to fabric appliqué and wall quilting can understand how the different layers come together.
One of the most attractive features of this Padded Wall Panel with Mary and Cross Pattern is the way simple fabric shapes create an elaborate-looking composition. The cross is formed from straightforward rectangular pieces, while the rays in the background use long tapered sections radiating outward from a central area. Mary requires several curved appliqué templates for the veil, face, hair, hands, and blue clothing, but these pieces can be prepared individually before they are assembled. The flowers are equally approachable because each blossom is created from repeated petal shapes arranged around circular centers. Large and small leaves then fill the spaces between the flowers and visually connect the lower floral arrangement to the central figure. Careful layering is more important than complicated sewing, making this a rewarding project for sewists who want to practice raw-edge appliqué, turned-edge appliqué, free-motion quilting, layering, and binding.
Before beginning, remember that handmade fabric artwork does not have to reproduce every tiny detail of the reference piece exactly. Small variations in flower shapes, leaf placement, quilting lines, and fabric shades can give your panel its own personality while preserving the recognizable composition. A practical finished size for this style of wall hanging is approximately 60 cm × 90 cm, although the pattern can be enlarged or reduced according to the space where it will be displayed. Gather quilting cotton in cream, golden yellow, brown, dark green, medium green, coral, mustard, dark blue, and dusty blue, along with batting, backing fabric, coordinating thread, fusible web if desired, and binding fabric. You will also need basic sewing supplies such as fabric scissors, pins or clips, an iron, marking tools, a quilting ruler, and a sewing machine. Once these materials are prepared, you can begin building the padded religious wall panel from the background forward.
1. Preparing the Background, Cross, and Radiating Quilt Design
Start by deciding the finished dimensions of your Padded Wall Panel with Mary and Cross Pattern. For a panel around 60 cm wide × 90 cm high, cut the working background slightly larger, leaving approximately 2 to 3 cm of extra fabric around every side. This additional fabric provides room for trimming after quilting. Choose a warm cream fabric for the main field because a neutral background allows the darker cross, blue clothing, green foliage, and colorful flowers to remain visually distinct.
DISCOVER MORE FREE PATTERNS HERE!
The radiating background can be constructed from alternating cream and golden-yellow fabric wedges. Draw a central reference point slightly above the middle of the panel, approximately where the horizontal beam of the cross will sit. From that area, extend diagonal lines toward the outer edges. These lines create wedge-shaped sections similar to sun rays. Make paper templates before cutting expensive fabric, especially if this is your first time sewing irregular geometric pieces.
Cut alternating golden and cream wedges with approximately 0.7 cm seam allowance wherever the sections will be pieced together. Join neighboring wedges with right sides facing, press each seam carefully, and continue until the entire background rectangle is assembled. Pressing after every seam helps prevent distortion. If piecing tapered wedges feels too complicated, another option is to begin with one cream background and appliqué golden wedges over it, securing their edges with a narrow machine stitch.
Create the cross using rich brown quilting cotton. A proportional design for a 60 × 90 cm panel might use a vertical section approximately 9 to 11 cm wide and 38 to 42 cm long, together with a horizontal beam approximately 32 to 38 cm wide. These measurements can be adjusted according to your composition. Position the cross high enough to leave substantial room for Mary and the flowers beneath it.
Secure the brown cross with fusible web or temporary fabric adhesive, following the manufacturer’s directions if you use these products. Stitch around its perimeter with a straight stitch, narrow zigzag, blanket stitch, or another favorite appliqué stitch. For the dimensional appearance visible in the inspiration piece, add parallel quilting lines or a subtle grid inside the cross. The stitching gives the brown fabric structure while reinforcing its strong geometric shape.
Once the rays and cross are complete, place the background over batting and backing fabric to create a quilt sandwich. Baste the three layers using pins, thread basting, or a suitable temporary method. Quilt along some of the ray seams and add gentle free-motion quilting in the larger background areas. Avoid making the quilting excessively dense where padded appliqué elements will later be positioned, because those areas need enough flexibility to accommodate the dimensional shapes.
2. Creating Mary with Layered and Padded Fabric Appliqué
The figure of Mary is the visual center of the Padded Wall Panel with Mary and Cross Pattern, so begin by making full-size paper templates before cutting fabric. Separate the figure into manageable components: outer veil, inner veil or face opening, face, hair, hands, main blue garment, darker blue outer sections, and any visible sleeve pieces. Numbering the templates makes assembly easier and prevents confusion when several similarly curved pieces are on the worktable.
Choose soft cream or ivory fabric for the veil and warm beige or peach fabric for the face and hands. Dark brown works well for the hair, while dusty blue and deeper navy-blue fabrics create depth in the clothing. Trace each template onto the appropriate fabric. When using turned-edge appliqué, include approximately 0.5 to 0.7 cm around the template for turning. With fusible raw-edge appliqué, pieces can normally be cut directly along the finished outline.
Arrange the figure temporarily on the quilt before permanently attaching anything. Begin with pieces that should appear behind the others, usually the hair and lower clothing. Continue with the face, veil, sleeves, and hands. This is an important principle of layered appliqué: background pieces are attached first and foreground details are added afterward. Take a photograph of your arrangement before moving the pieces so you have a placement reference while sewing.
For a padded effect, place a thin layer of batting behind major pieces such as the blue garment and veil. Trim the batting slightly smaller than the fabric shape so bulky edges do not develop. Secure each appliqué carefully, then stitch around the contours. A small blanket stitch gives a traditional decorative finish, while a narrow straight stitch can create a cleaner contemporary appearance.
The praying hands require slightly more precision because their shape communicates the pose of the figure. Instead of trying to create individual fingers from tiny pieces, use one simplified hand silhouette and indicate finger divisions with several carefully positioned stitched lines. The face can also remain intentionally simple. A minimal profile created through fabric shape and subtle stitching complements the peaceful folk-art quality of this Mary appliqué quilt pattern.
After the figure has been secured, add quilting lines inside the clothing and veil. Follow the natural curves of the body rather than sewing only straight lines. Echo quilting around the veil can emphasize its shape, while longer curved lines across the blue garment create the softly padded appearance seen in dimensional quilted panels. Stop periodically and view the panel from several steps away to make sure the quilting enhances rather than overwhelms the figure.
3. Making the Padded Flowers, Leaves, and Dimensional Details
The floral arrangement brings color and balance to the lower half of the Padded Wall Panel with Mary and Cross Pattern. The reference composition uses three prominent flowers in different sizes and colors, supported by an assortment of dark and medium green leaves. You can recreate this effect with a large coral flower, a medium cream flower, and a smaller golden-yellow flower. Their contrasting sizes prevent the arrangement from looking overly symmetrical.
Create reusable paper templates for the petals. The large flower can have approximately seven or eight rounded petals, while the smaller flowers may use five or six. Individual petals can be sewn separately, but a single connected flower silhouette is easier for beginners. Add a circular center in mustard, ochre, or warm brown. A small amount of batting behind each flower provides the padded appliqué effect without making the panel excessively bulky.
Position the largest coral flower near the lower center, overlapping the foliage slightly. Place the cream flower toward one side and the yellow flower toward the opposite side. This creates a triangular arrangement that naturally directs the viewer’s attention upward toward Mary and the cross. Before sewing, experiment with the positions until the flowers feel balanced with the figure above them.
Next, prepare leaves in several sizes. Use deep forest green as the dominant color and introduce olive or medium green for variation. Most leaves can be elongated ovals with pointed ends, making them easy to trace and cut. Place larger leaves around the bottom corners and smaller leaves closer to Mary. Overlapping several shapes creates the impression of dense foliage without requiring complicated botanical details.
Secure the leaves before attaching most of the flowers because the blossoms should visually sit in front of the greenery. Stitch around each leaf and add a central vein running from base to tip. Optional diagonal veins can branch outward from the center. These simple quilting lines create surprisingly convincing quilted fabric leaves and help the padding remain evenly distributed.
Finish the flowers with quilting that follows the direction of the petals. Start near each flower center and stitch outward toward the rounded edge, creating gentle channels that emphasize individual petals. Quilt the circular centers with spirals, small grids, or free-motion texture. These details transform relatively simple appliqué shapes into dimensional elements and help reproduce the richly textured appearance that makes the Padded Wall Panel with Mary and Cross Pattern visually distinctive.
4. Quilting, Borders, Binding, and Finishing the Wall Panel
With the main appliqué completed, examine the entire project before adding the borders. Look for empty areas that may need additional quilting and check that every appliqué edge is securely stitched. Background quilting should support the design rather than compete with it. Gentle meandering stitches, echo quilting, or irregular organic lines work particularly well in the cream and yellow ray sections.
Square the quilt carefully using a quilting ruler and rotary cutter. For the suggested finished dimensions, trim the panel close to approximately 60 × 90 cm, or to whatever size best suits your completed composition. Check all four corners with a square ruler if available. Accurate trimming at this stage makes the borders and final binding noticeably easier to install.
The reference design uses a narrow light inner border followed by a wider muted blue outer border. To create a similar effect, cut cream strips approximately 2.5 to 3.5 cm wide for the inner frame. Sew the side strips first, press them outward, and then attach the top and bottom strips. This light frame visually separates the colorful central composition from the darker outer edge.
For the outer border, use a dusty navy, slate blue, or blue-gray fabric that coordinates with Mary’s clothing. A finished width of approximately 5 to 7 cm creates a substantial frame without dominating the artwork. Quilt this border with straight parallel lines, gentle curves, or a simple continuous motif. The darker border anchors the lighter center and makes the golden background appear warmer.
Prepare double-fold binding from coordinating blue fabric. Strips approximately 6 to 7 cm wide are suitable for many quilting projects, although the exact width depends on your preferred binding method. Join the strips diagonally, press the long strip in half, and attach it around the quilt perimeter. Fold the binding to the back and finish it by hand for a traditional appearance or machine stitch it for a durable, practical finish.
Finally, add a fabric hanging sleeve to the back if the panel will be displayed on a rod. A sleeve approximately 8 to 10 cm deep can accommodate many decorative hanging rods, but measure your hardware before sewing it permanently. Hand-stitch the sleeve to the backing without allowing the stitches to show on the front. Give the completed wall panel a gentle final press where appropriate, taking care not to flatten the padded appliqué, and your handcrafted display is ready.
Frequently Asked Questions About the Padded Wall Panel with Mary and Cross Pattern
What is a padded wall panel?
A padded wall panel is a textile decoration constructed with fabric, batting, and backing. Unlike a simple fabric picture, the batting provides softness and dimension. In this project, quilting and selectively padded appliqué make the flowers, leaves, clothing, veil, cross, and surrounding background appear more textured.
Is the Padded Wall Panel with Mary and Cross Pattern suitable for beginners?
An adventurous beginner can make this project by dividing it into smaller stages. The cross and floral elements are relatively straightforward, while Mary’s curved silhouette requires more careful cutting and placement. Beginners can simplify small details and use fusible appliqué instead of more advanced hand-turned techniques.
What fabric is best for this project?
Good-quality quilting cotton is an excellent choice because it is stable, easy to cut, widely available, and comfortable to sew. Small fabric scraps can be used for the face, hands, flower centers, leaves, and other details, making this a useful project for using coordinated leftovers.
How do I make the appliqué look padded?
Place thin batting behind selected appliqué pieces before stitching them to the background. Cut the batting slightly smaller than the fabric shape so it stays away from the finished edge. Quilting within the appliqué can then define individual sections while retaining some raised dimension.
Can I make the panel larger or smaller?
Yes. The entire Padded Wall Panel with Mary and Cross Pattern can be resized as long as all pattern components are enlarged or reduced proportionally. Remember to consider seam allowances separately because they should not necessarily change at the same percentage as the decorative shapes.
Do I need a free-motion quilting machine?
No. A standard sewing machine can complete the project. Free-motion quilting provides flexibility for curved textures, but straight stitching, gentle curves with a walking foot, and decorative machine stitches can also produce an attractive result. Hand quilting is another option for anyone who enjoys slower traditional techniques.
Should the flowers be attached before Mary?
It is usually easier to establish Mary’s position first because she determines the center of the composition. The leaves can then be arranged around the lower portion of the figure, followed by the flowers in the foreground. Temporarily laying out every major element before stitching is one of the best ways to avoid placement problems.
How can I keep the wall hanging flat?
Baste the quilt sandwich thoroughly, quilt outward from balanced areas, and avoid pulling the fabric while sewing. Consistent quilting density across the background also helps. After quilting, square the project before adding borders or binding so small distortions can be corrected.
What quilting designs work best for the flowers and leaves?
Petal-following lines are ideal for the flowers because they emphasize their rounded shapes. Leaves look attractive with one central stitched vein and several smaller diagonal veins. The flower centers can be quilted more densely with spirals, grids, or small free-motion patterns to contrast with the softer petals.
Can the raw edges of the appliqué fray?
Yes, particularly after repeated handling. If you want very clean edges, use turned-edge appliqué or secure raw edges with a close zigzag or satin stitch. Fusible web can also stabilize the fabric, but the perimeter should still be stitched for a durable finished wall hanging.
How should I choose colors for this pattern?
Begin with a limited palette of warm neutrals, golden yellow, brown, blue, green, and two or three flower colors. The important principle is contrast. Mary’s blue clothing should remain distinct from the background, the brown cross should be clearly visible against the rays, and the flowers should stand out against the foliage.
How long does this wall panel take to make?
The time varies according to experience, panel size, appliqué technique, and quilting density. Rather than rushing, divide the project into stages: background construction, cross, Mary appliqué, foliage, flowers, quilting, borders, and binding. This makes a detailed project much easier to manage.
Conclusion
The Padded Wall Panel with Mary and Cross Pattern combines several enjoyable sewing techniques in one expressive textile project. Beginning with alternating cream and golden rays, the design develops through the brown cross, layered Mary appliqué, richly colored flowers, dimensional green leaves, batting, decorative quilting, blue borders, and a neatly finished binding. Each component can be created independently, allowing the maker to concentrate on one technique at a time before assembling the complete composition.
The most important lessons are careful template preparation, thoughtful layering, balanced color selection, secure fabric appliqué, controlled padding, and quilting that follows the natural shapes of the design. You can stay close to the reference composition or personalize the colors, flower arrangement, dimensions, stitching, and quilting density to create a unique handmade piece. With patient construction, even relatively simple fabric shapes can develop into an impressive dimensional wall hanging.
EASILY FIND THE FREE PDF FOR THIS PATTERN HERE!
If you make your own Padded Wall Panel with Mary and Cross Pattern, leave your sincere opinion about the project and share your suggestions. Which colors would you choose for Mary’s clothing, the flowers, and the outer border? Your ideas and creative variations can be a wonderful source of inspiration for future sewing and quilting projects.