
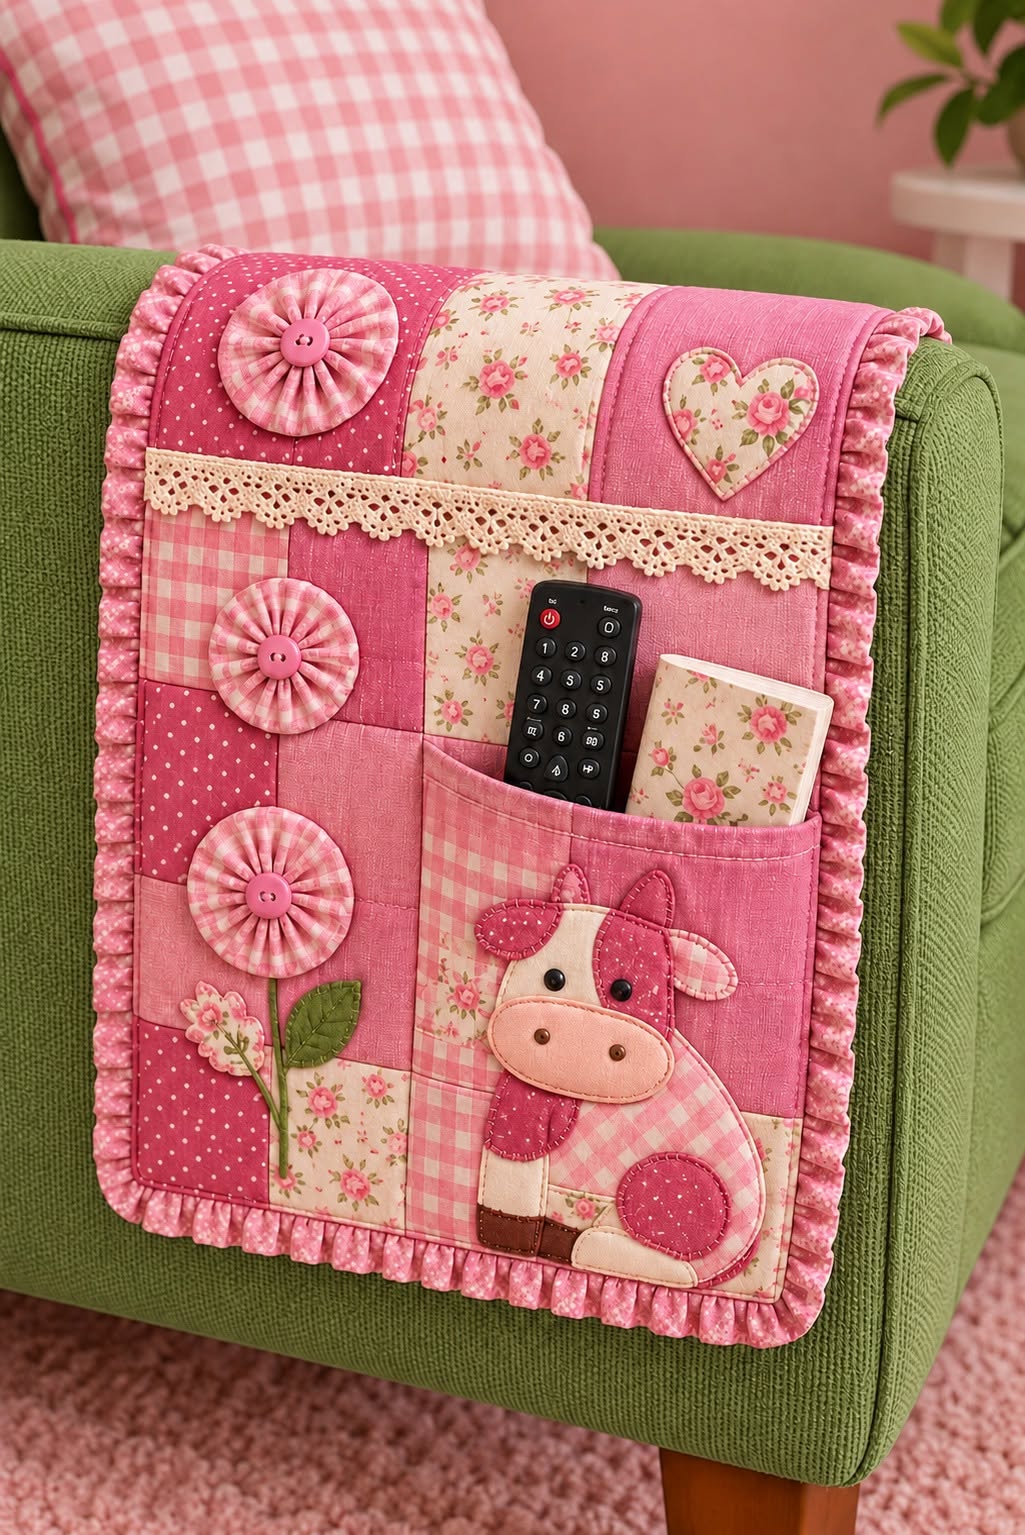
The Sofa Armrest Organizer Sewing Tutorial Pattern is a charming and practical sewing project designed to keep everyday essentials organized while adding a handmade decorative touch to a living room. Inspired by the organizer shown in the image, this project combines patchwork sewing, appliqué, fabric pockets, gathered ruffles, decorative flowers, lace, and quilting techniques in one useful accessory. The finished organizer can rest over the arm of a sofa or chair, providing convenient storage for a TV remote, reading glasses, a small notebook, craft supplies, or other lightweight items that tend to disappear between cushions. The combination of pink gingham, floral prints, polka dots, and textured fabrics gives the design a warm cottage-style appearance. Better still, the same construction method can be adapted to almost any color palette or decorating style.
One of the most enjoyable aspects of this Sofa Armrest Organizer Sewing Tutorial Pattern is that it can be made largely from small pieces of fabric. Instead of requiring a large amount of a single print, the front panel is divided into sections that create a colorful patchwork background. This makes the project especially suitable for coordinating fabric scraps left from quilts, cushions, bags, or other sewing projects. Decorative elements such as the fabric rosettes, floral appliqué, heart, and cow appliqué transform a basic organizer into something that looks carefully designed and personalized. Although the finished piece appears detailed, the individual techniques are approachable when completed one at a time. Beginners can also simplify the design by reducing the number of appliqués or decorative details.
Before beginning, remember that the dimensions in this tutorial are practical suggested measurements rather than exact measurements taken from the photograph. A finished organizer measuring approximately 40 cm wide by 55 cm long (15.7 × 21.7 inches) works well for many standard upholstered sofa arms, but measuring your own furniture first is recommended. You will need several coordinating cotton fabrics, backing fabric, lightweight batting or fusible fleece, matching thread, pins or clips, an iron, fabric scissors or a rotary cutter, a ruler, a sewing machine, and optional decorative materials such as cotton lace and buttons. For the appliqué pieces, fusible web can make positioning easier. A seam allowance of approximately 1 cm (3/8 inch) can be used consistently unless a particular step requires otherwise.
Materials, Measurements, and Preparing the Patchwork Base
Start your Sofa Armrest Organizer Sewing Tutorial Pattern by choosing a coordinated fabric collection. The example uses shades of pink, cream, soft green, gingham, tiny polka dots, and floral cotton. You do not have to duplicate these exact prints. The important design principle is balance: combine a few relatively simple fabrics with one or two busier prints. Quilting cotton is an excellent choice because it is easy to cut accurately, presses well, and is stable enough for appliqué. Prewash fabric if you expect the organizer to be washed frequently, then press everything before cutting.
DISCOVER MORE FREE PATTERNS HERE!
For a finished organizer of approximately 40 × 55 cm, prepare a front patchwork panel slightly larger than the desired finished measurement. A convenient starting size is around 42 × 57 cm, allowing room for trimming and construction. Divide this area into rectangular patchwork sections of different sizes rather than trying to create identical squares. The photograph uses a deliberately varied arrangement, with vertical and horizontal rectangles giving the background more visual movement. Cut your pink gingham, floral, solid-textured, and polka-dot fabrics according to the arrangement you prefer.
Sew the smaller fabric pieces into rows first. Place two pieces right sides together, align their raw edges, and sew using the chosen seam allowance. Press the seam carefully, usually toward the darker fabric, before attaching the next section. Once each horizontal row is assembled, join the rows together. Try to keep major seam intersections aligned, but do not worry if every rectangle is different in size. The handcrafted patchwork effect is part of the character of this organizer. Press the completed front panel flat without stretching it.
Next, cut a piece of lightweight batting or fusible fleece approximately the same size as your completed patchwork front. If you want a firmer organizer, a medium-weight fusible interfacing can be added as well. The goal is to create enough structure for the panel to remain attractive over the sofa arm without making it excessively stiff. Layer the patchwork over the batting and secure it with temporary basting, pins, or quilting clips. Simple stitching near the patchwork seams is enough to stabilize the layers.
Prepare a backing panel measuring approximately the same size as the front. The backing can be made from a single coordinating fabric because it will usually face the sofa rather than the room. A smooth cotton backing is useful because it allows the organizer to settle naturally around the shape of the armrest. If your sofa has a particularly wide or rounded arm, place a piece of fabric over it before final cutting to determine whether you need additional length or width. Custom sizing is one of the major advantages of making your own fabric sofa organizer.
Finally, square the quilted panel with a ruler and rotary cutter. Check that the sides are straight and that the top and bottom edges are perpendicular to them. Do not attach the backing permanently yet because the pockets and appliqué details should generally be completed while the front remains easy to handle. At this stage, you should have a neat patchwork organizer base ready for the decorative and functional elements that make the project distinctive.
Sewing the Storage Pockets, Lace Trim, and Fabric Decorations
The most important functional feature is the storage pocket. For a lower pocket approximately 22–24 cm wide and 20–22 cm high, cut the fabric slightly larger than the desired finished size to provide seam and hem allowances. You can create a patchwork pocket like the one in the inspiration image by joining two or three coordinating fabrics before cutting the final pocket shape. Add lightweight interfacing if the fabric feels too soft. Fold the upper edge toward the wrong side twice, press it carefully, and topstitch to produce a clean, reinforced opening.
Position the pocket on the lower-right portion of the organizer. Pin or clip the side and lower edges while leaving the top completely open. Sew around the sides and bottom with secure stitching, reinforcing the upper corners with several extra stitches because those points receive the greatest stress during everyday use. A slightly wider pocket can accommodate a TV remote control, notebook, glasses case, or small book. You can also divide one large pocket into two compartments by adding a vertical line of stitching from the bottom to the top edge.
The decorative cream lace across the upper-middle area provides both texture and a visual transition between sections. Cut the lace slightly longer than the width of the organizer. Position it horizontally across the front, keeping it level with the patchwork seams if possible. Pin carefully and stitch along the stable upper portion of the lace. Depending on the lace design, you can add a second line of stitching for extra security. Choose washable cotton lace if you expect the organizer to receive regular use.
To create the fabric rosettes, cut long fabric strips approximately 5–7 cm wide. Fold each strip lengthwise with the wrong sides together and press. Sew a long gathering stitch along the raw edge, gently pull the thread to gather the strip, and curve it into a circular rosette. Adjust the gathers until the circle looks balanced, overlap the ends, and secure them by hand or machine. Cover the center with a coordinating button. The organizer in the image uses several rosettes of different sizes, which helps create a playful dimensional effect.
For the heart appliqué, draw a symmetrical heart onto paper and use it as your template. Trace the shape onto fusible web, fuse it to the wrong side of your floral fabric according to the manufacturer’s instructions, and cut out the heart. Remove the paper backing, position the heart on a contrasting pink section, and press it into place. Stitch around the perimeter using a small zigzag, blanket stitch, or straight appliqué stitch. A narrow border in another coordinating fabric can be added behind the floral heart if you want a layered appearance.
Small floral details can be created in much the same way. Cut a simple flower and leaf shape, fuse the pieces into position, and secure their edges with decorative stitching. A narrow strip of green fabric or embroidery can become the stem. When arranging these embellishments, leave enough empty space for the organizer to remain practical. Decorative sewing should complement the storage area rather than interfere with it. This balance between functional sewing and fabric decoration is what gives the project its handmade character.
Creating the Cow Appliqué, Ruffled Border, and Final Assembly
The cow is the focal appliqué of this Sofa Armrest Organizer Sewing Tutorial Pattern. Begin by drawing or printing simple individual templates for the body, head, muzzle, ears, horns, legs, and large decorative patches. Keep the shapes uncomplicated so they are easy to cut and sew. Trace each template onto fusible web and transfer it to the appropriate fabric. Pink gingham works beautifully for the body, while cream, deep pink, peach, and brown fabrics can be used for the contrasting areas.
Build the cow directly on the pocket or on a separate fabric section before the pocket is attached. Start with the shapes that sit farthest behind, such as the body and legs. Continue by layering the head, ears, muzzle, and patches. Press each section carefully before sewing. Stitch around every appliqué piece using blanket stitch, narrow zigzag, or close straight stitching. If the organizer will be washed often, stitched edges are preferable to relying only on fusible adhesive because the additional sewing improves durability.
Facial features can be made with small securely sewn buttons, embroidery, or tiny fabric circles. If the organizer may be accessible to very young children, embroidered eyes are generally a more practical choice than removable buttons. Add the nose details with embroidery or small stitched fabric circles. A few simple stitches can define the ears, patches, and other details without making the appliqué overly complicated. The aim is a cheerful handcrafted character rather than photographic realism.
For the gathered outer border, cut fabric strips approximately 6–8 cm wide with a combined length around 1.7 to 2 times the perimeter of the organizer. Join the strips end to end if necessary. Fold the strip lengthwise, press it, and run one or two rows of long gathering stitches near the raw edge. Pull the bobbin threads gradually to create even gathers. Distribute those gathers around the entire perimeter so there are no heavily bunched or completely flat sections.
Pin or baste the ruffle to the right side of the organizer front with the ruffle pointing inward and its raw edges aligned with the organizer’s raw edge. Pay particular attention to the corners, where the gathers need enough flexibility to turn naturally. Place the backing fabric over the decorated front with right sides together, sandwiching the ruffle between them. Stitch around the perimeter while leaving a turning opening of approximately 12–15 cm along a relatively straight edge.
Trim bulky seam allowances if necessary and clip the corners carefully without cutting through the stitching. Turn the entire organizer right side out through the opening. Gently shape the corners and press the perimeter. Fold the raw edges of the opening inward and close it with invisible hand stitching or careful machine topstitching. A final line of topstitching around the main panel can strengthen the edges. Your handmade sofa armrest organizer is now ready to be placed over the chair or sofa and filled with lightweight everyday essentials.
FAQ About the Sofa Armrest Organizer Sewing Tutorial Pattern
What is the best fabric for a sofa armrest organizer? Medium-weight quilting cotton is one of the easiest choices because it combines stability with easy handling. Cotton also works especially well for patchwork, appliqué, ruffles, and decorative stitching. If you want additional body, pair the cotton with fusible fleece, batting, or interfacing. Avoid extremely stretchy fabric unless you have experience stabilizing it, because stretch can distort pockets and patchwork seams.
How large should a sofa armrest organizer be? There is no universal measurement because sofa arms vary considerably. The approximate 40 × 55 cm finished size suggested in this tutorial is a useful starting point, but measure the width and curve of your own sofa arm before cutting. The organizer should extend far enough over both sides to remain reasonably stable. If the arm is very wide, increase the organizer width while maintaining enough length to support the pockets.
Can a beginner make this sewing project? Yes, although it is easiest when approached as several small techniques rather than one complicated project. Beginners can first assemble the patchwork panel, then make a pocket, followed by simple appliqué and finally the ruffle. You can omit the cow or rosettes for a faster beginner version. The fundamental skills are straight stitching, pressing, basic quilting, gathering fabric, pocket construction, and simple appliqué, making this a useful project for developing several sewing skills.
How can I keep the organizer from sliding off the sofa arm? Proper sizing is the first step. An organizer with enough length on both sides of the arm naturally has more stability. Batting can add a small amount of grip and weight, while the contents of the outer pocket may also help hold the panel in position. For very smooth upholstery, consider adapting the pattern with a longer inner flap. Always choose a solution that will not damage or permanently mark your sofa fabric.
Can I add more pockets to the pattern? Absolutely. The basic Sofa Armrest Organizer Sewing Tutorial Pattern can be customized with multiple pockets. You might create one narrow compartment for remote controls, another for glasses, and a wider section for a notebook. When adding several pockets, consider what they will hold before determining their width and depth. Reinforce the upper corners of every frequently used pocket, and avoid overloading the organizer with heavy objects.
How should the organizer be washed? Washing depends on the materials used. If everything is washable cotton and polyester batting, gentle machine washing may be possible, but delicate lace, dimensional rosettes, and buttons often benefit from gentler care. Hand washing or a delicate cycle in cool water can help protect decorative details. Air drying is also useful for preserving the shape. Always consider the care requirements of every material before combining them in the project.
Do I need batting inside the organizer? Batting is not absolutely required, but it gives the project a softer quilted appearance and helps the patchwork maintain its shape. Fusible fleece is another convenient option. For a thin organizer, lightweight interfacing may provide sufficient stability. If you intend to store several remotes or other moderately bulky items, some form of stabilizer is recommended because an unsupported cotton panel may sag over time.
Can I make the project from fabric scraps? Yes. In fact, this is an excellent fabric scrap sewing project. Small floral, gingham, polka-dot, and solid pieces can be combined into the patchwork base, rosettes, heart, flowers, and cow appliqué. To keep a scrap-based design visually coordinated, select a limited main color palette and repeat important colors in several areas. This repetition makes many different fabrics feel intentional rather than random.
What seam allowance should I use? A consistent 1 cm (approximately 3/8 inch) seam allowance works well for the construction described here. If you prefer the traditional 1/4-inch quilting seam for the patchwork portion, that can also work, provided you account for the difference when calculating your finished dimensions. Consistency matters more than choosing one specific seam allowance.
Can the pattern be made in colors other than pink? Definitely. The construction is independent of the color scheme. Blue and cream can create a calm cottage appearance, red and green can produce a seasonal version, while neutral beige and brown fabrics can coordinate with traditional furniture. The key is to maintain enough contrast between the patchwork background, appliqué shapes, pocket, and decorative details so that each feature remains visually distinct.
Is the cow appliqué necessary? No. It is a decorative focal point inspired by the pictured organizer, but the construction works without it. The same space could feature a cat, dog, bird, flower basket, heart, farmhouse motif, or simply another patchwork section. Changing the appliqué is one of the easiest ways to personalize the pattern while preserving the functional structure of the project.
How can I make the organizer more durable? Use quality cotton, reinforce pocket openings, stitch appliqué pieces securely, and add interfacing or batting where additional structure is needed. Backstitch at stress points and check that buttons are firmly attached. Good pressing throughout construction is equally important because accurately pressed seams help the layers sit correctly and reduce distortion. A carefully constructed organizer can remain attractive through repeated everyday use.
Conclusion
The Sofa Armrest Organizer Sewing Tutorial Pattern brings together practical organization and decorative sewing in a project that can be customized almost endlessly. Starting with a coordinated patchwork fabric panel, you learned how to add stability, construct a useful storage pocket, decorate the surface with lace, create gathered fabric rosettes, apply a heart and floral motif, build a layered cow appliqué, and finish the entire organizer with a charming gathered ruffle.
The most important part of the project is adapting the dimensions to your own furniture before cutting the final pieces. Once the size is established, the construction can be completed gradually, allowing you to concentrate on one sewing technique at a time. Careful measuring, accurate seams, regular pressing, secure pocket stitching, and thoughtful appliqué placement will make the finished piece both attractive and functional.
EASILY FIND THE FREE PDF FOR THIS PATTERN HERE!
This project is also a creative way to transform leftover fabrics into something useful. Whether you reproduce the romantic pink patchwork style shown here or create an entirely different color combination, the basic Sofa Armrest Organizer Sewing Tutorial Pattern can become a personalized accessory for your living room, reading chair, sewing room, or favorite relaxation space. If you make your own version, leave your sincere opinion about the project and share any suggestions you have for improving or customizing the pattern. Your ideas—whether they involve different appliqués, extra pockets, new color combinations, or alternative decorative details—can inspire even more creative versions of this practical handmade organizer.