
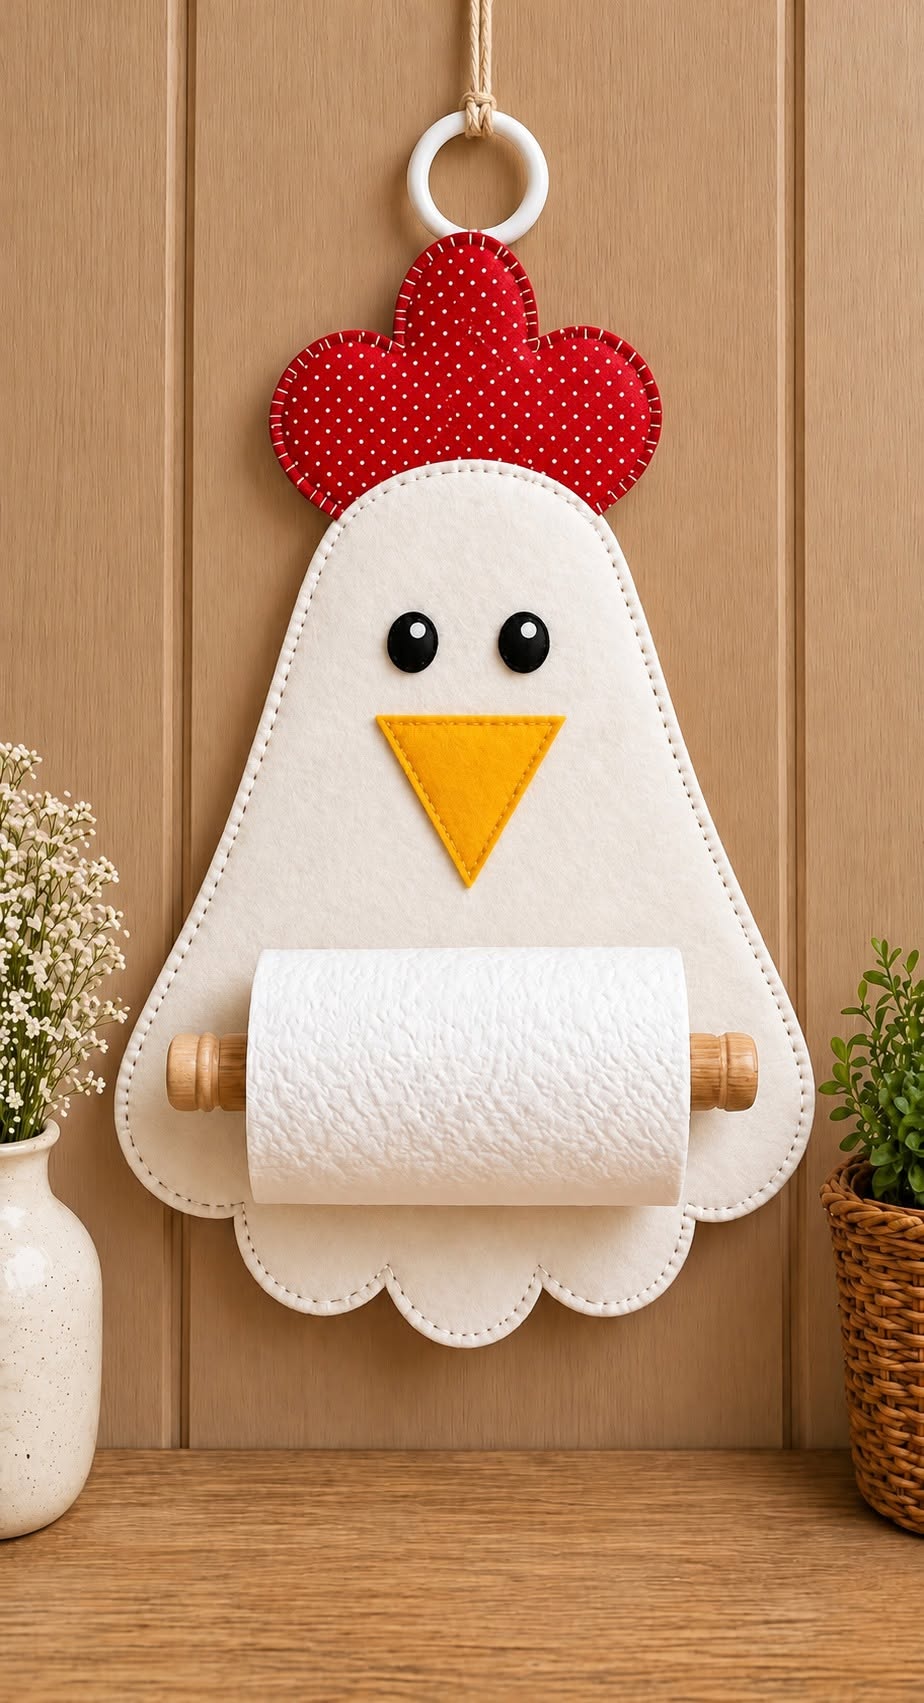
The Chicken shaped paper towel holder Pattern is a charming sewing project that combines practical organization with handmade farmhouse-style décor. Inspired by the chicken-shaped holder shown in the reference image, this project uses a soft neutral body, a contrasting red comb, a yellow beak, simple dark eyes, decorative stitching, and a wooden dowel to hold a roll of paper towels. The finished piece can be hung on a wall, cabinet, pantry door, or another suitable vertical surface, making it especially useful when you want to keep counter space clear. Although the design looks detailed, the individual shapes are simple enough for a confident beginner to assemble with patience and basic sewing skills.
One of the best features of this Chicken shaped paper towel holder Pattern is that it can be customized without changing the basic construction. Felt, cotton, canvas, interfaced quilting fabric, or a combination of these materials can be used depending on the amount of structure you want. The chicken body in the reference design has a clean cream-white appearance, while the red dotted comb creates a traditional country accent. A triangular golden-yellow beak and two black oval eyes give the chicken its recognizable expression. Decorative blanket-style stitching around the edges completes the handcrafted appearance and helps define every curve of the silhouette.
Before beginning, it is helpful to understand that a functional fabric paper towel holder needs more reinforcement than a purely decorative wall hanging. The body must be stable enough to support the wooden dowel and a full paper towel roll without folding excessively. For that reason, this tutorial uses multiple fabric layers and recommends interfacing or stabilizer inside the chicken. Careful reinforcement around the dowel supports and hanging loop is equally important. The measurements below can be adjusted to suit your preferred paper towel roll, so consider making a paper prototype before cutting your final fabrics.
Materials, Measurements, and Preparing the Chicken Pattern
For this Chicken shaped paper towel holder Pattern, gather approximately 50 cm of cream or white felt, canvas, or sturdy cotton fabric for the body. You will also need about 25 cm of red fabric for the comb, a small piece of yellow felt for the beak, black felt or fabric for the eyes, matching or contrasting embroidery thread, fusible interfacing, and a wooden dowel. A dowel approximately 30–35 cm long is suitable for many standard rolls, but measure your actual paper towel roll before cutting the wood.
DISCOVER MORE FREE PATTERNS HERE!
Start by drawing the main chicken body on pattern paper. A practical starting size is approximately 45–50 cm high and 34–38 cm wide at the broadest point. The silhouette should be narrower toward the top and wider toward the bottom, with three rounded scallops forming the lower feather area. Keep the sides gently curved rather than perfectly straight. This broad body is what gives the project its recognizable chicken shape while also providing enough space behind the paper towel roll.
Next, create the chicken comb pattern. Draw three connected rounded lobes, with the center lobe slightly taller than the two side sections. A finished comb around 25–28 cm wide and 14–17 cm high works well with the suggested body size. The exact proportions are flexible, so place the paper comb behind the body pattern before cutting fabric. This quick fitting step helps you determine whether the two pieces look balanced together.
For the facial details, cut two small oval eye templates approximately 2.5–3 cm high. The beak can be made as an inverted triangle approximately 8–9 cm wide at the top and 9–10 cm long. These dimensions are approximate because the face should be scaled to the body you create. Positioning is more important than exact measurements: the eyes should be level and evenly spaced, while the beak should sit centrally beneath them.
The wooden dowel system deserves special attention because it turns a decorative chicken into a useful paper towel holder. Plan two reinforced fabric tabs, loops, or channels on opposite sides of the lower body. Position them at exactly the same height so the dowel remains horizontal. Make the openings large enough for your chosen dowel but snug enough to prevent unnecessary movement. Before sewing these supports permanently, slide the dowel through them and test the fit with a paper towel roll.
Finally, prepare all pattern pieces before sewing. Cut two mirrored main body pieces, the necessary comb layers, eye pieces, beak pieces, interfacing, and reinforced dowel-support pieces. Add approximately 0.7–1 cm seam allowance wherever you intend to sew and turn the fabric. If you are constructing the project primarily from felt with exposed decorative edges, you may not need a traditional seam allowance. Label every paper template before removing it from the fabric so that assembly remains organized.
Sewing and Assembling the Chicken Body
Begin the construction of the Chicken shaped paper towel holder Pattern by reinforcing the main body. Fuse interfacing to the wrong side of one or both body layers according to the interfacing manufacturer’s directions. For soft cotton, a medium-weight interfacing can help the chicken remain flat when hanging. If you use thick felt, additional interfacing may not be necessary, although a thin internal stabilizer can still improve the structure around the dowel supports.
Prepare the red comb separately. Place the comb layers together with the right sides facing if you are using a turned construction, stitch around the curved perimeter, clip the curved seam allowances carefully, and turn the piece right side out. Press gently according to the fabric type. Alternatively, felt users can place two matching comb pieces together and work a visible blanket stitch around the exposed perimeter, creating an attractive handcrafted finish similar to the reference project.
Position the completed comb between or behind the upper body layers. The lower portion of the comb should extend far enough into the body to create a secure connection. Pin or clip it carefully, checking that the three rounded sections remain centered. Sew the connection with a reinforced seam because the upper area may also carry part of the hanging load. Avoid relying on decorative stitching alone for structural areas.
Now assemble the main fabric chicken body. Place the layers together and secure them so they cannot shift while sewing. If using a turned method, sew around the perimeter while leaving an opening for turning, then clip the curves and carefully turn the body right side out. Insert additional stabilizer if needed and close the opening. For an exposed-edge felt construction, align the layers precisely and sew them together around the perimeter.
Add decorative stitching around the outer edge. A blanket stitch, whipstitch, or evenly spaced running stitch works beautifully for this project. The stitching can be done by hand with embroidery floss for a traditional appearance or by machine using an appropriate decorative stitch. Try to maintain consistent spacing around the curves, especially across the three lower scallops. These stitches are highly visible and become part of the finished design rather than simply serving as construction seams.
Before continuing, hang the unfinished chicken temporarily and inspect its shape. The body should remain reasonably flat, the comb should sit upright, and the bottom scallops should hang evenly. If the fabric folds near the center, additional stabilizer may be useful. Correcting structural problems now is easier than making changes after the face and paper towel mechanism have been permanently attached.
Adding the Face, Dowel Holder, and Hanging System
The face gives the Chicken shaped paper towel holder Pattern its personality. Begin by finding the vertical center of the body and lightly marking it with removable fabric chalk. Position the two black oval eyes an equal distance from that centerline. Pin or temporarily adhere them in place before stitching. You can use a small appliqué stitch, blanket stitch, or straight stitch around each eye. Small white highlights can be added with tiny felt circles or embroidery if desired.
Place the yellow triangular beak below the eyes. Keep the top edge level and point the triangle downward, as seen in the reference style. The beak can be made from felt for an easy raw-edge appliqué, or from two pieces of cotton that are sewn, turned, and topstitched. Stitch around all three sides securely. A contrasting thread can emphasize the triangular shape, while matching thread creates a cleaner, quieter appearance.
Next comes the most important functional stage: constructing the paper towel dowel supports. Reinforce the inside of each side with extra interfacing or a small patch of sturdy fabric. Sew a tab or loop to each side at the same height, making sure the wooden dowel can pass through both supports. Because a fresh roll adds weight and creates pulling force when paper is removed, sew each support with multiple lines of stitching rather than a single decorative seam.
Test the mechanism before finishing anything permanently. Insert the dowel through one support, slide a standard paper towel roll onto it, and pass the dowel through the opposite support. The roll should rotate freely without rubbing excessively against the chicken body. There should also be enough exposed dowel on each side to keep the roll securely positioned. If the roll is compressed between the supports, move them slightly farther apart or use a longer dowel.
At the top, create a sturdy hanging loop. The reference design uses a ring above the comb, which provides both decoration and function. You can use a suitable craft ring with a strong fabric or cord attachment. Reinforce the connection inside the upper body or comb area rather than attaching it only to one thin layer of fabric. The finished hanging system must support the combined weight of the holder, wooden dowel, and a full paper towel roll.
Complete the project by trimming loose threads and checking every seam. Insert a fresh roll and hang the chicken from a secure hook appropriate for the mounting surface. Pull a few sheets gently to test the holder. If everything stays aligned, your Chicken shaped paper towel holder Pattern is complete. For regular household use, periodically inspect the dowel supports and hanging loop for wear, particularly if the holder is used frequently.
FAQ About the Chicken Shaped Paper Towel Holder Pattern
What fabric works best for a Chicken shaped paper towel holder Pattern? Sturdy felt, canvas, interfaced cotton, or quilting cotton reinforced with stabilizer are practical choices. Felt fabric is particularly beginner-friendly because its edges do not fray easily. Quilting cotton provides a much wider selection of colors and prints, but it usually benefits from interfacing. Whatever fabric you choose, the finished body should be firm enough to support the roll without collapsing around it.
Can a beginner make this chicken paper towel holder? Yes. Most of the construction involves basic cutting, appliqué, edge stitching, and straightforward assembly. The most challenging area is the functional dowel system because the supports need to be level and reinforced. Beginners should make a full-size paper pattern first and test the location of the dowel with an actual roll. Working slowly through the curved edges will also make the finished project look cleaner.
How large should the finished chicken be? A body around 45–50 cm tall and 34–38 cm wide is a useful starting point, but there is no universal size. Paper towel rolls vary between brands and products, so measure the roll you normally purchase. The most important measurement is the width available between the two dowel supports. Your finished holder should provide enough clearance for the roll to rotate without becoming trapped against the fabric.
Do I need a sewing machine for this pattern? No. The entire Chicken shaped paper towel holder Pattern can be sewn by hand, particularly when felt is used. Blanket stitching with embroidery floss can actually enhance the handmade farmhouse appearance. A sewing machine will make construction faster and can provide stronger reinforcement in high-stress areas. A combination of machine construction and hand-finished decorative stitching is another excellent approach.
How do I make the holder more durable? Reinforcement is the key. Add fusible interfacing or another stabilizer inside the body, use multiple fabric layers where the wooden dowel is supported, and reinforce the upper hanging point. Strong polyester thread is suitable for structural seams. Decorative stitches can then be added separately. Remember that the dowel supports and hanging point receive considerably more stress than the eyes, beak, or other appliqué decorations.
Can I change the colors of the chicken? Absolutely. The cream body, red comb, yellow beak, and black eyes create a recognizable traditional combination, but the design can easily be personalized. Farmhouse neutrals, gingham, floral cotton, red-and-white prints, pastel fabrics, or seasonal combinations can all work. The chicken sewing pattern remains essentially the same; changing fabric colors and prints simply gives the finished holder a different decorative personality.
Conclusion
The Chicken shaped paper towel holder Pattern turns a familiar household essential into a cheerful handmade sewing project. Throughout this tutorial, you learned how to plan the chicken silhouette, determine practical measurements, select appropriate fabrics, reinforce the body, create the red comb, appliqué the eyes and beak, add decorative edge stitching, and build a functional wooden dowel system for the paper towel roll.
The most important lesson is to combine appearance with structure. A beautiful fabric chicken paper towel holder still needs a reinforced body, secure hanging point, strong dowel supports, and enough space for the paper towel roll to rotate comfortably. Testing these elements during construction will help you avoid problems after the project has been completely assembled.
You can also use this basic Chicken shaped paper towel holder Pattern as a starting point for your own variations. Change the printed fabric, enlarge or reduce the comb, experiment with different decorative stitches, personalize the face, or coordinate the colors with your kitchen, craft room, pantry, or farmhouse décor. Keeping the structural elements unchanged while experimenting with decorative details is an easy way to make every version unique.
EASILY FIND THE FREE PDF FOR THIS PATTERN HERE!
Once you have completed the project, take a moment to check the stitching, straighten the paper towel roll, and make sure the hanging hardware is securely installed. The result is a practical handmade accessory that also works as decorative textile art. With careful cutting and consistent stitching, even simple materials can create a polished and inviting finished piece. If you make your own version of this Chicken shaped paper towel holder Pattern, leave your sincere opinion about the project and share any suggestions you have. Your ideas about colors, fabrics, stitching techniques, or useful modifications can inspire new variations and make this fun sewing project even more creative.