
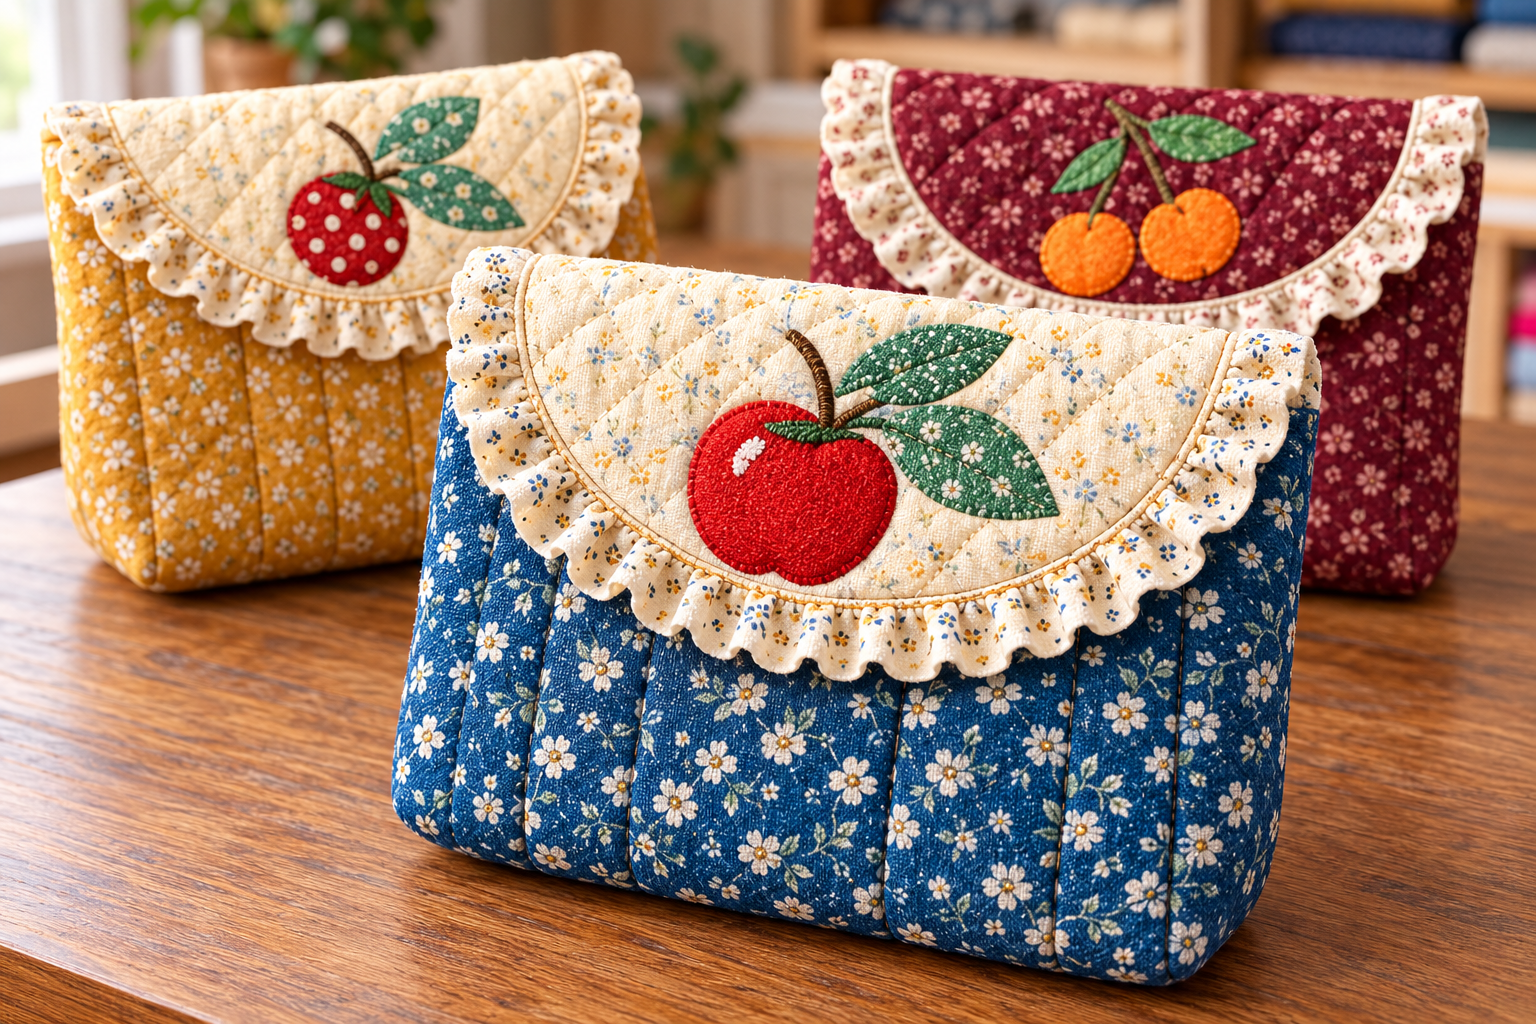
The Small fabric bag with appliqué and a ruffled flap Pattern is a charming sewing project that combines practical construction with the warm personality of handmade fabric art. Inspired by the small quilted bag shown in the reference image, this design features a softly structured floral body, a rounded contrasting flap, delicate ruffles, and a colorful fruit appliqué. The result feels both vintage and cheerful, making it suitable for storing sewing notions, cosmetics, small accessories, craft supplies, or everyday essentials. Although the finished piece looks detailed, the individual techniques are approachable when completed one stage at a time.
One of the most appealing features of this small fabric bag pattern is the opportunity to combine different fabrics without making the finished project look overly busy. Small floral prints work especially well for the main body, while cream or neutral cotton can create contrast on the flap. Scraps in red, green, orange, or brown can then become the appliqué. This makes the project a useful way to transform leftover quilting cotton into something functional. The soft quilting lines also add texture and structure, while the gathered ruffle creates a decorative transition between the flap and the main bag.
This tutorial explains how to recreate the overall style of the photographed project from beginning to end. You will learn how to select materials, cut and stabilize the fabric, make the quilted body, prepare a fruit-inspired appliqué, construct the rounded flap, gather a fabric ruffle, assemble the lining, and complete the final details. The measurements can be adjusted, but a convenient finished size is approximately 15 cm wide, 12 cm high, and 4 cm deep. Read through the entire tutorial before cutting so you understand how the different layers of the Small fabric bag with appliqué and a ruffled flap Pattern come together.
Materials, Measurements, and Fabric Preparation
Start by gathering quilting cotton for the exterior, lining, flap, ruffle, and appliqué. You will also need lightweight quilt batting or fusible fleece, coordinating sewing thread, pins or clips, fabric scissors or a rotary cutter, a ruler, marking tool, iron, sewing machine, and hand-sewing needle. Fusible web is particularly helpful for the fabric appliqué, although it is possible to use a traditional turned-edge method instead. Decorative charms and a handmade label are completely optional.
DISCOVER MORE FREE PATTERNS HERE!
For a bag close to the proportions shown in the photograph, cut two exterior rectangles approximately 16 cm × 14 cm and two lining rectangles of the same size. Cut two thin batting pieces to coordinate with the exterior panels. For the flap, begin with an outer piece and lining piece approximately 18 cm × 14 cm. The bottom portion of these pieces will later be shaped into a smooth curve. Cut a 4 cm × 40 cm strip for the decorative ruffle.
The term Small fabric bag with appliqué and a ruffled flap Pattern refers not only to the visual design but also to the combination of construction techniques that gives this bag its character. “Appliqué” means attaching smaller decorative pieces of fabric to a larger foundation fabric. In this project, the fruit and leaves are positioned on the flap and stitched securely around their edges. The technique is ideal for using colorful scraps while creating a recognizable focal motif.
The ruffled flap is another important part of the pattern. A flap is the section that folds over the opening of the bag, while a ruffle is made by gathering a longer fabric strip into a shorter length. When the ruffle is sewn around the curved flap, it produces the soft decorative edge visible in the reference project. Using lightweight cotton for the ruffle makes gathering easier and prevents the edge from becoming unnecessarily bulky.
Before cutting, press all fabrics carefully. If your cotton is likely to shrink, prewashing and drying it before construction can help prevent distortion later. Straighten the fabric grain and measure each rectangle accurately. Even a small cutting difference can become noticeable when the front, back, batting, and lining are assembled. Good preparation is one of the simplest ways to achieve a professional-looking handmade fabric bag.
Once everything has been cut, arrange the fabrics together before sewing. Place the flap fabric over the exterior body and position your proposed appliqué colors on top. This quick preview lets you decide whether there is enough contrast between the main elements. The appliqué should be easy to distinguish from the flap, while the ruffle should coordinate with both the flap and the floral exterior rather than disappearing into either one.
Creating the Appliqué, Ruffle, and Decorative Flap
Begin the decorative portion by drawing an apple or similar fruit shape onto paper. For an apple design, prepare one main fruit shape, two leaves, and one small stem. The motif should be large enough to become the focal point without overwhelming the flap. Position the paper shapes on the flap before cutting your fabric pieces. This allows you to adjust the scale until the composition feels balanced.
If using fusible appliqué, trace the shapes onto the paper side of fusible web according to its manufacturer’s directions. Rough-cut around the traced shapes, fuse them to the wrong sides of your chosen fabrics, and then cut precisely along the outlines. Remove the backing and arrange the pieces on the right side of the flap. Keep the motif reasonably centered while leaving sufficient room around the curved edge for seams and the fabric ruffle.
Fuse the shapes permanently once you are happy with the arrangement. Stitch around each piece using a narrow zigzag, blanket stitch, satin stitch, or small straight stitch. A satin stitch creates a stronger embroidered appearance, while a blanket stitch emphasizes the handmade quality of the design. Sew slowly around tight curves, especially around the apple and leaves. Shortening the stitch length slightly can make curved sections easier to control.
Next, prepare the ruffled fabric strip. Take the 4 cm × 40 cm strip and fold it lengthwise with the wrong sides together. Press the fold carefully. Sew one or two rows of long gathering stitches near the raw edge, leaving long thread tails at both ends. Do not backstitch these gathering rows because the threads need to move freely. Gently pull the bobbin threads until the strip begins forming small, even gathers.
Shape the flap by rounding the lower corners and creating a gentle curved lower edge. Arrange the gathered ruffle along this curve with the raw edges aligned. The folded decorative edge of the ruffle should face toward the interior of the flap while you sew. Distribute the gathers evenly, pin generously, and baste the ruffle into place. Check the front before continuing to make sure there are no unusually dense or empty sections.
Place the flap lining over the decorated outer flap with right sides together, trapping the ruffle between the two layers. Stitch around the curved perimeter while leaving the straight upper edge open. Carefully clip the curved seam allowance without cutting the stitches, then turn the flap right side out. Shape the curve, press gently, and add a neat row of topstitching approximately 0.5 cm from the finished edge. The decorative flap is now ready to become the signature feature of your Small fabric bag with appliqué and a ruffled flap Pattern.
Quilting and Assembling the Main Fabric Bag
Place batting behind each exterior body rectangle and secure the layers with pins, temporary basting, or quilting spray intended for fabric. The photographed bag uses simple vertical quilting, which is an excellent choice for beginners. Mark parallel lines approximately 2.5 cm apart across the exterior panels. Stitch along these markings through the fabric and batting. Start near the center and gradually work outward to minimize shifting.
After quilting both panels, place the front and back exterior pieces right sides together. Match the edges carefully and pin the side and bottom seams. Sew these three edges with approximately a 1 cm seam allowance, leaving the entire upper edge open. Reinforce the beginning and end of each seam with a few backstitches. Press the seams carefully without flattening the batting excessively.
To give the small fabric bag its dimensional base, create boxed corners. At one bottom corner, manipulate the fabric so the side seam sits directly over the bottom seam. The corner will form a triangular point. Flatten it, check that the seams are aligned, and mark the stitching line required to produce approximately 4 cm of depth. Stitch across the marked line and repeat at the opposite corner.
Prepare the lining in much the same way. Place the two lining rectangles right sides together and sew the sides and bottom. However, leave an opening several centimeters long in the bottom lining seam. This opening is essential because the entire bag will later be turned right side out through it. Create matching boxed corners so the lining has approximately the same depth as the exterior.
Before assembling everything permanently, insert the lining temporarily into the exterior to check the fit. The lining should sit smoothly without excessive bunching. Small variations can occur because quilting slightly reduces the dimensions of the exterior pieces. If the lining is noticeably too large, adjust its side seams gradually rather than cutting away a large amount of fabric at once.
This stage is also a good time to add an optional decorative label to the front exterior. Position it where it will remain visible beneath the closed flap. Stitch around the label with a straight stitch or small hand stitches. You can also prepare a small side loop for a decorative charm. These details are not essential to the Small fabric bag with appliqué and a ruffled flap Pattern, but they can make every finished bag feel individual.
Attaching the Flap, Lining, and Finishing Details
Center the raw straight edge of the finished flap along the upper edge of the back exterior panel. Make sure the decorated side is oriented correctly so that, once folded forward, the appliqué faces outward. Baste the flap to the exterior within the normal seam allowance. Basting is highly recommended because the flap contains several layers and can shift during final assembly.
Keep the exterior right side out and the lining wrong side out. Insert the exterior into the lining so the right sides face each other. Match the upper raw edges and side seams. The flap should now be enclosed between the exterior and lining. Pin or clip thoroughly around the entire opening and stitch around the top using approximately a 1 cm seam allowance.
Reach through the opening previously left in the lining and carefully pull the bag through it. Work slowly around the padded body and ruffled flap instead of pulling forcefully. Once everything is right side out, shape the boxed corners with your fingers. Press the upper seam gently and make sure the flap folds naturally toward the front.
Turn the raw edges of the lining opening inward and close them with a ladder stitch, slip stitch, or a narrow line of machine stitching. Push the lining completely inside the bag and smooth it into the corners. If desired, topstitch around the upper opening where practical. This can stabilize the lining and create a cleaner transition between the interior and exterior.
Now add optional embellishments. A small fabric loop can hold a charm, beaded ornament, key ring, or fabric-covered bead. You may also add a magnetic snap, sew-on snap, or button beneath the flap if you want a more secure closure. Any hardware that needs to be concealed between fabric layers should ideally be installed earlier in the construction process.
Give the completed Small fabric bag with appliqué and a ruffled flap Pattern a final gentle press and inspect every seam. Remove visible basting threads, trim loose thread ends, straighten the ruffle, and check that the flap sits centrally. You should now have a compact quilted pouch featuring a dimensional body, lined interior, decorative appliqué, rounded flap, and softly gathered fabric trim.
FAQ – Frequently Asked Questions
Is the Small fabric bag with appliqué and a ruffled flap Pattern suitable for beginners?
Yes. A confident beginner can complete this project successfully, especially when working slowly. Straight seams, basic quilting, gathering, appliqué, lining, and boxed corners are all useful foundational sewing techniques. The curved flap requires a little patience, but it does not require advanced equipment.
What fabric is best for this small bag?
Quilting cotton is an excellent choice because it is easy to cut, press, quilt, and appliqué. Small floral prints also reproduce the cozy handmade appearance of the photographed project particularly well. Lightweight linen blends may work too, although additional interfacing may be helpful.
Do I need batting?
Batting is not strictly required, but it helps create the softly padded and quilted appearance of the bag. Thin quilt batting or fusible fleece provides structure without making the seams excessively bulky.
Can I make the bag larger?
Yes. The basic construction can be enlarged by increasing the exterior, lining, batting, and flap dimensions proportionally. Remember that increasing the body size may also require a longer ruffle strip so it can comfortably follow the larger curved flap.
What stitch should I use for the appliqué?
A blanket stitch, narrow zigzag, satin stitch, or straight stitch can all work. Satin stitching provides a dense embroidered appearance, while blanket stitching creates a more traditional handcrafted finish. Test the stitch on scrap fabric before sewing the final appliqué.
How do I keep the ruffle even?
Sew long gathering stitches and pull the threads gradually. Divide both the flap edge and ruffle into quarters and match these reference points before distributing the remaining gathers. This simple technique prevents one side from becoming much fuller than the other.
Why should I quilt the exterior before assembling the bag?
Quilting connects the exterior fabric to the batting and stabilizes both layers. It also creates the vertical texture visible on the finished piece. Quilting individual flat panels is considerably easier than attempting to quilt the bag after assembly.
Can I replace the apple with another design?
Absolutely. The appliqué is one of the easiest elements to customize. Flowers, cherries, strawberries, pumpkins, pears, hearts, birds, leaves, or other simple motifs can replace the apple without changing the basic bag construction.
Can the bag be made without the ruffle?
Yes. Simply omit the gathered strip and assemble the outer flap and flap lining directly. The finished project will have a cleaner and more minimalist appearance while retaining the same practical structure.
How can I make the bag stand better?
Use thin batting or fusible fleece, maintain accurate boxed corners, and press the seams carefully. If you want additional firmness, suitable interfacing can be applied to the exterior before quilting.
What can this handmade bag be used for?
Its compact dimensions make it useful for sewing notions, small craft supplies, makeup, jewelry, hair accessories, charging cables, travel essentials, or other lightweight items. It can also make a thoughtful handmade gift.
How do I achieve a professional finish?
Accurate cutting, consistent seam allowances, frequent pressing, slow stitching around curves, evenly distributed gathers, and careful topstitching make the greatest difference. Taking a little extra time during these stages usually produces a much cleaner result.
Conclusion
The Small fabric bag with appliqué and a ruffled flap Pattern brings several enjoyable sewing techniques together in one compact project. Beginning with accurately cut cotton pieces, you learned how to add batting and quilting, create a colorful fruit appliqué, gather a decorative ruffle, construct a curved lined flap, sew the exterior and lining, and form boxed corners for useful depth.
The project is also highly customizable. Different floral fabrics can completely change its personality, while alternative appliqué motifs allow you to adapt the bag for different seasons, gifts, or decorating styles. Once you understand the basic construction, you can experiment with new colors, flap shapes, quilting patterns, closures, labels, and embellishments while following the same essential method.
EASILY FIND THE FREE PDF FOR THIS PATTERN HERE!
Most importantly, this project demonstrates how small details can transform a straightforward fabric pouch into something distinctive. The combination of fabric appliqué, ruffled flap, simple quilting, boxed corners, and a neatly finished lining creates a handmade piece that is decorative as well as practical. If you make your own version of the Small fabric bag with appliqué and a ruffled flap Pattern, leave your sincere opinion about the project and share your suggestions. Which appliqué, fabric combination, or decorative detail would you choose for your next bag?