
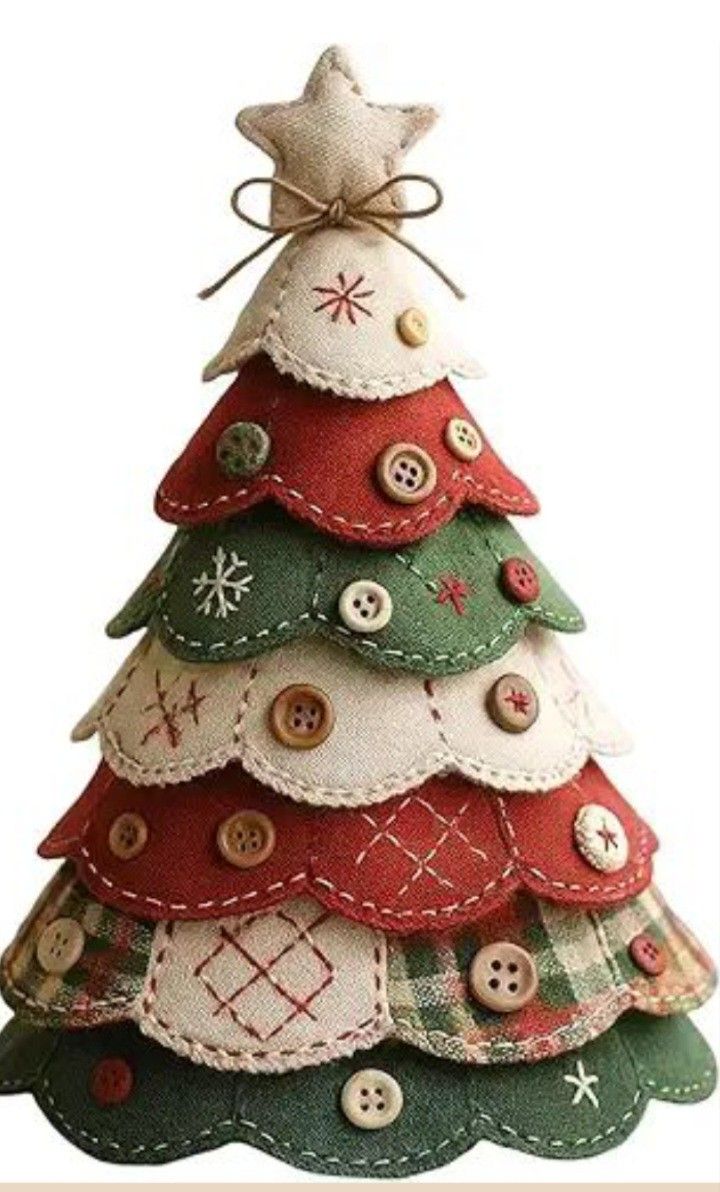
The Fabric Christmas Tree Ornament Pattern is a charming sewing project that combines traditional Christmas colors, layered fabric, decorative buttons, simple embroidery, and a cozy handmade finish. Inspired by the tree shown in the reference image, this design is built from several overlapping scalloped fabric sections arranged from widest at the bottom to narrowest at the top. Shades of deep green, Christmas red, natural beige, and plaid fabric create the nostalgic country-style appearance that makes this project especially attractive. Small buttons, visible hand stitches, embroidered snowflakes, and intentionally rustic details turn an otherwise simple fabric tree into a decorative piece full of personality. It can be displayed on a table, shelf, mantel, entryway console, or incorporated into a larger collection of handmade Christmas decorations.
One of the most enjoyable aspects of this Fabric Christmas Tree Ornament Pattern is that it does not require every stitch or fabric piece to look perfectly identical. In fact, the slightly irregular scallops, contrasting fabrics, hand-sewn edges, and assorted buttons are important parts of its handmade character. The project is also a creative way to use small pieces of cotton, linen-look fabric, homespun material, plaid scraps, and leftover buttons from previous sewing projects. The basic construction method involves creating individual padded fabric layers, decorating them before final assembly, and then stacking the sections to form the familiar triangular silhouette of a Christmas tree. A softly padded star-shaped topper completes the design and gives the ornament additional height.
Before beginning, it helps to study the proportions of the finished tree and prepare all materials in advance. You will need cotton fabric, lightweight linen or linen-look fabric, coordinating Christmas prints, thin batting or polyester fiberfill, sewing thread, embroidery floss, assorted buttons, a hand-sewing needle, fabric scissors, pins or clips, a removable fabric marker, and ribbon, twine, or cord for the bow near the top. A sewing machine can speed up construction, although much of this project can also be completed by hand. Because the original handmade appearance relies heavily on visible stitching, embroidery, and layered textures, even beginners can achieve a beautiful result without complicated sewing techniques.
Preparing the Fabric Christmas Tree Ornament Pattern and Materials
Start by creating paper templates for the different tiers of the tree. The lower tier should be the widest, with each successive tier becoming slightly narrower. A practical medium-size decoration can use approximately six layered sections, although the number can be adjusted according to the desired finished height. Draw each tier with a gently curved upper area and a lower edge divided into rounded scallops. Keep the center portion slightly longer than the outer sections so the layers naturally form the tapered shape of a Christmas tree when stacked.
DISCOVER MORE FREE PATTERNS HERE!
For an ornament approximately 35 to 40 cm tall, consider making the bottom tier around 28 to 30 cm wide, with the next tiers gradually reduced to approximately 25 cm, 22 cm, 19 cm, 16 cm, and 12 to 14 cm. These measurements are guidelines rather than strict requirements because the handmade design works beautifully with small variations. Add approximately 0.7 to 1 cm seam allowance around pieces that will be sewn right sides together. If you prefer raw-edge construction with decorative blanket stitching, the pieces can be cut closer to their finished dimensions.
Choose fabrics before cutting so that the colors are distributed evenly throughout the tree. A classic arrangement alternates dark green fabric, red fabric, natural beige fabric, and plaid Christmas fabric. Avoid placing too many identical colors directly together. Alternating solids and prints gives each tier enough contrast to remain visible once the layers overlap. The image-inspired design works especially well when the fabrics have subtle woven textures because those surfaces complement the rustic hand embroidery and traditional buttons.
Trace every tier onto the fabric using a removable marking pen or tailor’s chalk. For padded sections, cut two matching pieces for each tier so there is a front and back. You can then insert a thin piece of batting between them or lightly stuff the completed shape. Thin padding is usually preferable because heavily stuffed layers may make the tree bulky and prevent the tiers from overlapping naturally. Cut carefully around every scallop, paying particular attention to the curved corners.
Next, prepare the star topper. Draw a simple five-pointed star large enough to remain visually balanced with the tree. A star approximately 10 to 12 cm wide works nicely with a 35 to 40 cm finished tree. Cut two pieces from natural beige or linen-look fabric. The topper can be sewn right sides together, turned, lightly filled with polyester stuffing, and closed by hand. Slightly rounded star points are easier to turn than extremely sharp points and also complement the soft appearance of the fabric tree.
Before sewing the layers together, arrange all the cut pieces on a flat surface. Start with the widest green section at the bottom and work upward, testing different combinations of red, beige, green, and plaid. This dry layout is an important step in the Fabric Christmas Tree Ornament Pattern because it lets you correct color placement before permanent stitching begins. Photographing the arrangement can also help you remember the chosen order while decorating and sewing the individual tiers.
Sewing and Shaping the Layered Fabric Tree
To construct a clean padded tier, place two matching fabric pieces with right sides facing each other. Sew around the perimeter using a short straight stitch while leaving a small opening for turning. Clip carefully around inward curves and trim excess fabric from bulky corners without cutting through the stitching. Turn the piece right side out, gently shape each scallop, press it on a suitable heat setting, and insert a thin layer of batting or a very small amount of polyester filling.
Close the opening using a ladder stitch or another discreet hand stitch. The goal is not to make every layer heavily three-dimensional; instead, you want just enough body to keep the tree from appearing flat. Repeat this process for the remaining tiers. If you are working with thicker fabric, batting may not be necessary. Always test one section first because different cottons, linens, and homespun fabrics behave differently once stitched and turned.
After shaping the pieces, add visible running stitches close to the scalloped edges. Use contrasting embroidery floss such as cream thread against green or red fabric and muted red thread against natural fabric. A running stitch is created by bringing the needle repeatedly up and down through the fabric at reasonably even intervals. This simple technique produces the broken decorative line visible around many edges of the reference project and emphasizes the handmade nature of the ornament.
Some tiers can receive a slightly more textured edge. A blanket stitch works particularly well around raw or felt-like sections because it both decorates and helps secure the edge. You can also add tiny cross stitches or irregular running stitches where you want additional rustic character. The key is consistency without making the decoration appear mechanically perfect. Hand embroidery naturally contains small variations, and those variations fit this style beautifully.
Arrange the completed tiers again, overlapping each upper piece over the tier immediately below it. Approximately one-third of the lower layer can remain covered, but enough of every scalloped edge should stay visible to preserve the layered appearance. Pin or temporarily clip the pieces together. Check the overall silhouette from a short distance before stitching because this makes it easier to notice whether one layer is leaning too far to either side.
Secure the overlapping sections with hidden hand stitches through the backs of the pieces. Alternatively, use small anchoring stitches underneath each upper layer where they will not be visible from the front. Work from the bottom upward and check the alignment after attaching every tier. Once assembled, the Fabric Christmas Tree Ornament Pattern should gradually narrow toward the top while maintaining soft, rounded horizontal layers rather than a rigid triangular outline.
Adding Buttons, Embroidery, and Rustic Christmas Details
Buttons are one of the defining decorative elements in this project. Choose an assortment of wooden buttons, neutral buttons, red buttons, green buttons, and vintage-style buttons in several sizes. Before sewing anything permanently, distribute them across the tiers. Avoid creating perfectly straight rows. A slightly scattered arrangement looks more natural and gives the impression of Christmas ornaments hanging on the branches of the fabric tree.
Sew each button securely using strong thread. Decorative thread can become part of the design, especially when contrasting colors are used. For example, red embroidery floss can look attractive through a cream button, while cream thread provides a pleasing contrast on darker buttons. If the tree will be stored and reused for many Christmas seasons, reinforce larger buttons with several passes of thread rather than relying on only one or two stitches.
Add embroidered snowflakes between the buttons to fill empty areas. A simple snowflake can be created from several straight stitches crossing through a central point, followed by shorter stitches branching from the main lines. You do not need advanced embroidery skills. Small stars, crosses, diamonds, and asterisks can produce the same festive effect. Using hand embroidery instead of printed embellishments keeps the project visually consistent with its traditional fabric construction.
Another attractive technique is crosshatch embroidery. Draw a few faint diagonal guidelines on a solid fabric tier, stitch along them in one direction, and then cross them with lines running in the opposite direction. The result resembles small quilted diamonds. This treatment is particularly effective on a red or natural-colored layer because contrasting embroidery floss remains clearly visible. Do not cover every tier with embroidery; leaving some areas simpler prevents the finished design from becoming visually crowded.
The beige sections offer an opportunity to use slightly more delicate details. Small red stars, crossed lines, tiny snowflakes, or simple geometric motifs can be embroidered before the layers are assembled. When working on thin fabric, secure the thread neatly on the back so knots do not create noticeable bumps. If necessary, use a small piece of lightweight embroidery stabilizer while stitching and remove or trim it afterward according to the material being used.
Once the buttons and embroidery are complete, examine the entire tree and look for visual balance. A large button on one side can be balanced by two smaller decorations elsewhere rather than by another identical button. Similarly, embroidered snowflakes can occupy areas where buttons would make the surface too heavy. This balance between fabric appliqué-style layering, decorative stitching, embroidery, and buttons is what gives the Fabric Christmas Tree Ornament Pattern its rich handcrafted appearance.
Making the Star Topper, Final Assembly, FAQ, and Finishing the Ornament
Sew the two star pieces right sides together, leaving a turning opening along one relatively straight section. Clip carefully around the inner angles and trim the outer points before turning. Turn the star right side out with a blunt turning tool, taking care not to puncture the fabric. Add a small amount of fiberfill until the star feels softly padded but remains flexible. Close the opening with ladder stitch and gently shape the points with your fingers.
For the cone-like section directly beneath the star, cut a small cream or beige fabric piece with a softly flared lower edge. This section should overlap the narrowest tree tier and visually connect the star to the body of the tree. Decorate its bottom edge with hand stitching or a subtle lace-like finish if desired. Add one or two small buttons and an embroidered star or snowflake to echo the decorations used farther down the tree.
Attach the padded star firmly to the top of the beige section. Hidden hand stitches are ideal because they provide control and keep machine stitching from appearing across the front. Wrap thin rustic twine or cord around the narrow area beneath the star and tie it into a simple bow. Adjust both loops and tails until they look balanced. The bow should remain relatively light so it does not overpower the star or hide the upper embroidery.
Now complete the final assembly by checking every tier from top to bottom. Reinforce any loose buttons and make sure all layers are attached securely. Trim visible thread ends and gently press sections that have become wrinkled during handling. If pressing a padded area, use low heat and a pressing cloth rather than applying excessive pressure, which could flatten the filling or damage decorative threads.
If you want the Fabric Christmas Tree Ornament Pattern to stand independently, add a firm backing before completing the final assembly. A piece of heavyweight interfacing, felt, thin foam stabilizer, or another suitable craft stabilizer can provide extra support. For a hanging version, securely sew a fabric or ribbon loop to the back near the top. Make certain the loop is anchored into a strong section rather than only the thin outer fabric.
The completed decoration should have a softly tapered silhouette with visible overlapping scallops, a mixture of traditional Christmas colors, contrasting hand stitches, assorted buttons, small embroidered motifs, and a padded star at the top. Instead of trying to reproduce every irregular detail exactly, focus on the overall construction principles. The beauty of this project comes from combining layered fabric, rustic embroidery, decorative buttons, and intentionally handcrafted finishing into one coordinated Christmas tree.
FAQ – Frequently Asked Questions About the Fabric Christmas Tree Ornament Pattern
What is the best fabric for a Fabric Christmas Tree Ornament Pattern? Medium-weight cotton is one of the easiest choices because it cuts cleanly and is manageable for both machine and hand sewing. Linen-look cotton, homespun fabric, lightweight canvas, and Christmas quilting cotton can also work beautifully. Combining several textures often makes the finished tree more interesting.
Can beginners make this fabric Christmas tree? Yes. The main techniques are basic cutting, straight or curved stitching, turning fabric pieces, simple hand sewing, attaching buttons, and beginner-friendly embroidery. Someone new to sewing can practice the scalloped tier on scrap fabric before cutting the final materials.
How large should the finished Christmas tree be? There is no mandatory finished size. A tabletop version around 35 to 40 cm tall provides enough space for several decorative tiers and buttons. Smaller versions can become hanging ornaments, while larger patterns can be adapted into wall decorations.
Do I need a sewing machine for this pattern? No. A machine makes the construction of multiple padded sections faster, but the project can be sewn entirely by hand. In fact, visible hand stitching is an important part of the rustic appearance, so hand sewing works naturally with this design.
Should every fabric tier be stuffed? Not necessarily. Thin batting gives the layers structure without creating excessive volume. Very small amounts of fiberfill can also be used. If the fabrics are already thick, interfacing or batting may provide enough stability without additional stuffing.
How do I make the scalloped edges look neat? Sew slowly around the curves, use an appropriate seam allowance, and carefully clip the curved seam allowance before turning. Avoid cutting through the seam. Once turned, use a blunt tool to shape each scallop and press gently.
Can fabric scraps be used for this project? Absolutely. This is an excellent Christmas scrap fabric project because each tier can feature a different material. Coordinating leftover red, green, cream, beige, and plaid fabrics can produce a particularly attractive patchwork effect.
What embroidery stitches work best? Running stitch, cross stitch, straight stitch, blanket stitch, and simple snowflake motifs are excellent options. Complicated embroidery is unnecessary. Basic stitches often produce the most authentic rustic effect.
Can I change the colors? Yes. Although red, green, cream, and plaid create a traditional Christmas appearance, the same construction could use white and gold, blue and silver, pastel colors, burgundy and forest green, or another coordinated seasonal palette.
How can I keep the tree from becoming floppy? Use batting, interfacing, felt, or lightweight stabilizer inside the tiers. For a larger standing decoration, a firmer backing can be attached behind the assembled tree. The correct amount of structure depends on the weight of the chosen fabrics and buttons.
Can the buttons be replaced with other embellishments? Yes. Fabric-covered buttons, small bows, embroidered circles, felt shapes, wooden embellishments, or additional stitched motifs can be substituted. For a soft fabric decoration, lightweight embellishments are generally easier to support than heavy ornaments.
How should the finished ornament be stored? Keep it clean and completely dry, then store it flat or in a container that prevents the star and scalloped layers from being crushed. Avoid folding the decoration sharply, particularly if batting or stabilizer has been used inside the tiers.
Conclusion
The Fabric Christmas Tree Ornament Pattern brings together several approachable sewing techniques in a festive project that can be customized year after year. Beginning with graduated scalloped templates, you learned how to select coordinating Christmas fabrics, cut and pad the individual tiers, create decorative edges, assemble the layers, attach buttons, embroider simple seasonal motifs, make a padded star, and finish the top with rustic cord or twine.
The most important idea is to preserve the warm handmade character of the design. Perfectly identical stitches and decorations are not necessary. Thoughtful color placement, secure construction, gentle padding, visible hand stitching, and a balanced mixture of buttons and embroidery are enough to transform ordinary fabric scraps into an eye-catching Christmas decoration.
EASILY FIND THE FREE PDF FOR THIS PATTERN HERE!
Once you understand the construction, you can personalize the pattern with different fabrics, embroidery motifs, button collections, sizes, and color palettes. That flexibility makes the project useful for both beginners and experienced sewing enthusiasts looking for a relaxing seasonal craft. If you make your own Fabric Christmas Tree Ornament Pattern, leave your sincere opinion about the project and share your suggestions. Which colors, fabrics, buttons, or embroidery details would you choose for your Christmas tree? Your ideas can inspire even more creative variations of this handmade holiday design.