
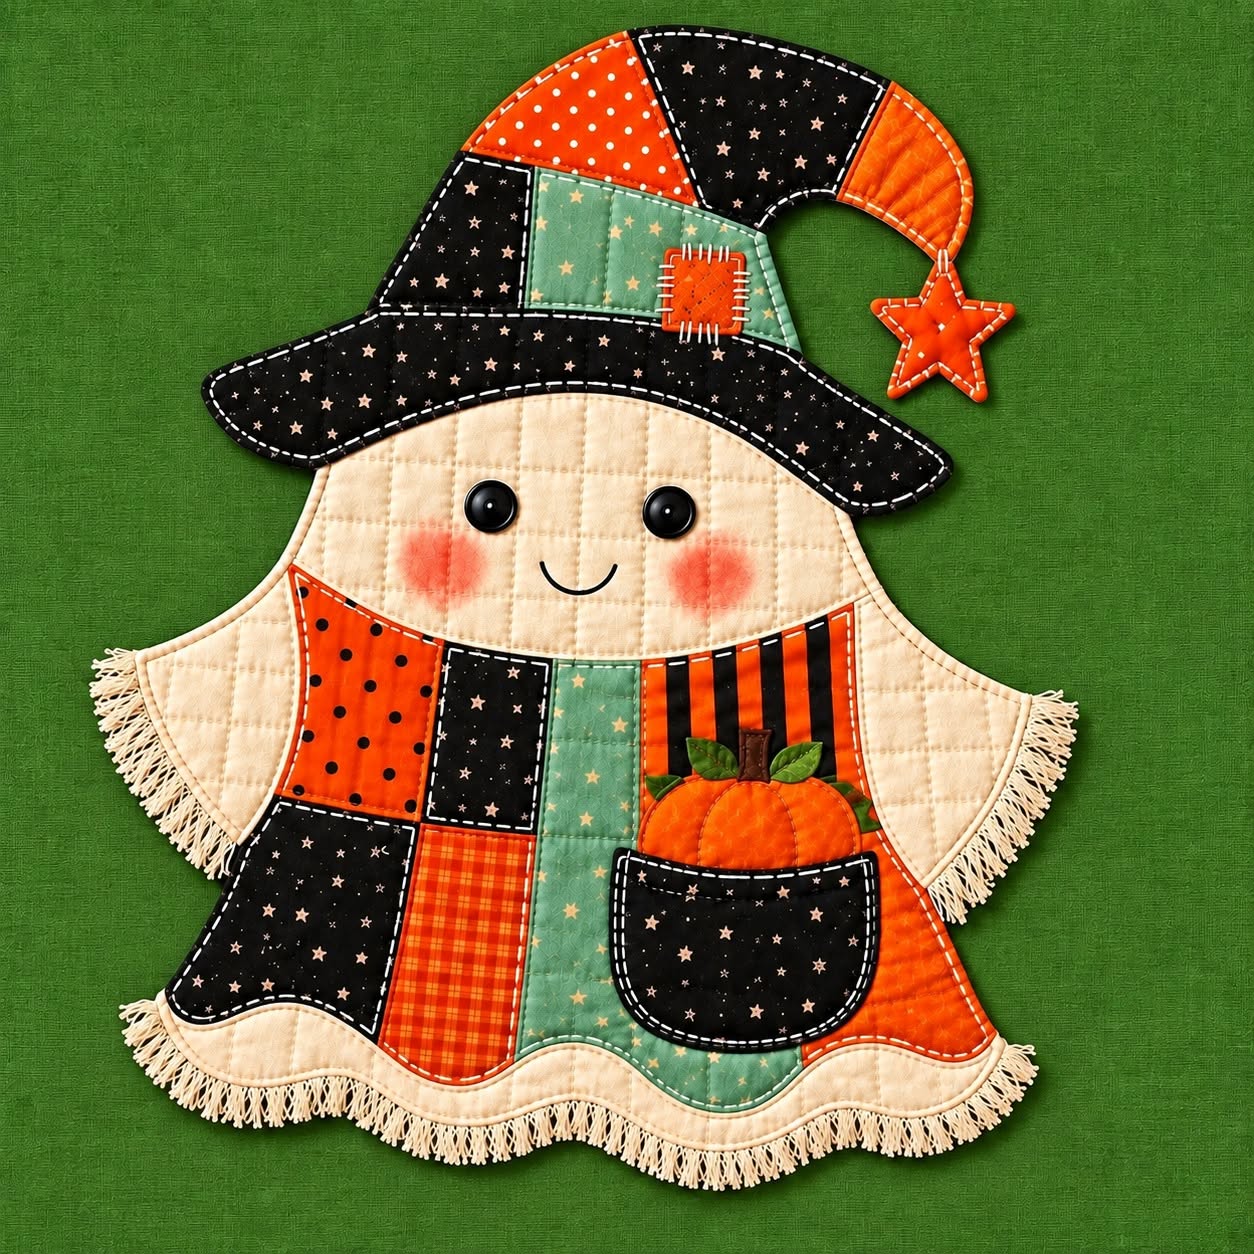
The Scarecrow and Ghost Patchwork Placemat Pattern is a charming sewing project that combines the cozy personality of traditional patchwork with a playful autumn and Halloween-inspired design. The finished piece features a friendly ghost-shaped character wearing a tall, curved patchwork hat, along with a colorful body made from coordinated fabric sections. Small decorative details, including the smiling face, rosy cheeks, star ornament, pumpkin pocket, and textured fringe, give the placemat a handmade personality without making the project look overly complicated. Because the design relies heavily on basic piecing, appliqué, quilting, and decorative stitching, it can be a satisfying project for sewists who want to practice several techniques in one manageable creation. It also offers plenty of opportunities to use fabric scraps that might otherwise remain unused. Once finished, the placemat can become part of a seasonal table setting or simply serve as a decorative textile accent during the fall months.
One of the most appealing features of this Scarecrow and Ghost Patchwork Placemat Pattern is the combination of rustic colors and recognizable shapes. The photographed project uses black, burnt orange, muted green, cream, and warm brown tones, creating a palette that immediately suggests autumn. You do not need to reproduce every fabric exactly, however, because the pattern can easily be personalized with materials already available in your sewing collection. Small prints, dots, stars, stripes, checks, and lightly distressed fabrics work especially well because they add visual interest without hiding the overall silhouette. A lightweight batting layer can give the finished placemat a soft quilted appearance, while backing fabric provides a neat reverse side. Decorative topstitching around individual pieces helps define each patch and contributes to the handcrafted character that makes this design so attractive.
Before beginning the Scarecrow and Ghost Patchwork Placemat Pattern, it is useful to study the project as a collection of simple components rather than one complicated shape. There is a large ghost body, a curved hat and brim, several patchwork sections, two extended arms, a front pocket, a small pumpkin, and decorative facial elements. Making templates from paper first can help you adjust the final size and maintain symmetry. For a medium placemat, a finished size of approximately 42–48 cm wide and 38–45 cm tall works well, although these dimensions can be changed according to your table and intended use. Remember to include approximately 0.7–1 cm seam allowance when a piece will be sewn traditionally. For appliqué components, the allowance depends on whether you plan to use raw-edge appliqué, turned-edge appliqué, or another preferred method.
Materials, Fabric Selection, and Pattern Preparation
To make the Scarecrow and Ghost Patchwork Placemat Pattern, gather several coordinating cotton fabrics, backing fabric, lightweight batting or fusible fleece, sewing thread, embroidery thread, and basic sewing supplies. You may also want paper or template material, fabric scissors, pins or clips, a fabric marking tool, an iron, and a sewing machine. Quilting cotton is particularly convenient because it is stable, widely available, and easy to combine into patchwork sections. Prewashing is optional depending on your usual quilting practice, but fabrics should ideally have similar care requirements.
DISCOVER MORE FREE PATTERNS HERE!
Choose approximately five or six fabrics that create enough contrast for individual sections to remain visible. A useful palette could include cream fabric, black printed fabric, burnt orange fabric, sage green fabric, and a striped orange-and-black print. The cream fabric forms most of the ghost face and arms, while darker fabrics provide strong definition in the hat and body. If you prefer a softer appearance, replace black with charcoal gray or deep brown. The important principle is contrast rather than copying a specific color combination.
Create the main ghost template by drawing a rounded head that gradually expands into two arms before flowing downward into a wide body. The bottom edge can be gently scalloped or wavy to imitate the movement visible in the photographed project. For a placemat around 45 cm wide, make the central body approximately 35–40 cm wide, allowing the arms to extend farther outward. Fold your paper template in half while drawing if you want greater symmetry. Slight irregularity can also look attractive because this is intended to have a handcrafted folk-art character.
Next, prepare the hat templates. Draw a wide curved brim approximately 30–34 cm across, followed by a tall pointed crown that bends noticeably toward one side. Divide the crown into four or five irregular patchwork sections. These separate pieces are important because they create the recognizable patchwork appearance of the Scarecrow and Ghost Patchwork Placemat Pattern. Add a small square patch near the lower crown and draw a separate star template measuring approximately 5–7 cm across for the hanging hat decoration.
The lower body should also be divided into patchwork sections before fabric is cut. Use a mixture of rectangular, slightly curved, and irregular shapes instead of making every patch identical. This creates a more relaxed scrappy patchwork appearance. Label each paper template so you know where it belongs, and mark its orientation if necessary. When using directional prints such as stripes, check the direction before cutting because rotating a piece accidentally can noticeably change the finished composition.
Finally, cut the backing and batting slightly larger than the completed front. An extra 2–3 cm around every edge provides room for adjustments during quilting. Organize all cut pieces on a flat surface before sewing anything permanently. This simple dry layout lets you check the color balance and prevents similar fabrics from becoming concentrated in one area. Taking a quick reference photo of the arrangement can also make reconstruction easier once you begin moving pieces to the sewing machine.
Sewing the Patchwork Ghost Body and Curved Hat
Begin construction with the lower patchwork body. Sew neighboring fabric sections together using approximately a 0.7 cm seam allowance, unless your chosen template system specifies something different. Press each seam carefully as you work rather than waiting until the entire front has been assembled. Pressing toward the darker fabric is often convenient, although pressing seams open may reduce bulk where several pieces meet. Continue joining sections until you have one complete patchwork panel large enough for the lower ghost shape.
Position the cream face section above the patchwork body and join the pieces carefully along their curved or horizontal meeting line. The face should remain visually dominant, so avoid placing overly busy prints close to the facial features. Attach the cream arms according to your template arrangement. If the arms are separate appliqué pieces, secure them using your preferred appliqué technique. Gentle curves are easier to manage when small clips are made into the seam allowance, taking care not to cut through the stitching line.
Construct the curved hat separately. Sew the orange, black, and green crown pieces together one at a time, pressing after each seam. Once assembled, place the crown against the curved brim and sew slowly around the seam. Curves can shift easily, so pins or sewing clips are useful here. After stitching, press the hat carefully without stretching the fabric. The completed hat should have a relaxed, slightly crooked silhouette rather than the precise geometry of a traditional pointed witch hat.
Add the small orange patch near the lower portion of the hat crown. Decorative hand stitching around this patch can imitate the rustic detail shown in the inspiration image. Straight stitches placed around the edges are enough to create the effect. You can use contrasting thread for greater visibility or matching thread for a quieter result. Similar decorative stitches may be repeated around other patchwork areas to visually connect the different sections of the project.
Create the small star decoration from two matching fabric pieces with batting or interfacing between them. Stitch around the star, trim carefully, and turn it if using a turned construction method. Alternatively, use raw-edge appliqué for a flatter star. Attach it near the curved tip of the hat with a short fabric connector or secure it directly against the hat. The orange star introduces another warm accent and makes the long curved hat more visually interesting.
When the hat is finished, position it across the upper portion of the ghost face. The brim should overlap the top of the head and extend slightly beyond the face on both sides. Pin or lightly fuse it into position before stitching around the edge. A narrow topstitch approximately 2–3 mm from the edge can provide a clean outline. For a more rustic result, use slightly longer decorative stitches or hand-sewn accents to emphasize the handmade patchwork placemat style.
Adding the Face, Pumpkin Pocket, Quilting, and Finishing Details
The friendly face is one of the defining elements of the Scarecrow and Ghost Patchwork Placemat Pattern. Mark the eye positions before attaching anything permanently. The eyes should sit evenly on either side of the center line, while the mouth can be created with a simple curved embroidered line. If the placemat may be handled frequently or washed often, embroidered or fabric-appliquéd eyes are a practical alternative to dimensional buttons. Whichever method you choose, keep the expression simple so the character maintains its cheerful folk-art appearance.
To create the rosy cheeks, cut two subtle pink fabric circles or apply a small amount of textile-safe coloring suitable for your chosen fabric. Fabric appliqué provides the most permanent sewn solution. Position the cheeks slightly below and outside the eyes. Embroider the mouth with dark thread using a backstitch or another simple outline stitch. A small curved smile is enough; complicated facial details are unnecessary because the surrounding patchwork already supplies plenty of texture.
The front pocket adds both dimension and an attractive focal point. Cut a rounded pocket from dark printed fabric and add lightweight batting if you want a softly padded finish. Turn the upper edge neatly, then position the pocket on the lower right portion of the body. Stitch around the curved sides and bottom while leaving the top visually open. Decorative contrasting stitches around the pocket can echo the stitching used elsewhere in the Scarecrow and Ghost Patchwork Placemat Pattern.
Make the pumpkin from orange fabric by cutting a compact rounded shape approximately 9–11 cm wide. Add several gently curved stitched lines to suggest pumpkin segments. Small green scraps can become leaves, while a tiny brown or green rectangle works as the stem. Position the pumpkin so that part of it appears to emerge from the pocket. Secure each component with appliqué stitching, keeping bulky layers under control so the placemat can still rest reasonably flat on the table.
Once all decorative components are attached, layer the patchwork front, batting, and backing to form a quilt sandwich. Smooth every layer carefully and secure them with pins, basting spray intended for quilting, or your preferred basting method. Quilt around major patchwork sections and across some larger areas. Gentle straight lines, echo quilting, or simple free-motion lines can provide enough texture without competing with the character. The goal is to stabilize the layers while enhancing the handmade appearance.
Finish the outside edge carefully. The inspiration project has a textured fringe around portions of the arms and lower edge, which contributes strongly to its rustic style. You can recreate this effect using washable cotton fringe or choose traditional fabric binding for easier maintenance. Stitch the finishing trim securely around the perimeter, working slowly around curves. Give the completed Scarecrow and Ghost Patchwork Placemat Pattern a final press according to the requirements of your fabrics and batting, and check all seams and decorative elements before using it.
FAQ About the Scarecrow and Ghost Patchwork Placemat Pattern
Is the Scarecrow and Ghost Patchwork Placemat Pattern suitable for beginners? Yes, an adventurous beginner with basic machine-sewing experience can complete this project. The most useful skills are sewing simple seams, working around curves, pressing patchwork, and attaching appliqué pieces. Beginners can simplify the design by using fewer body sections and embroidered facial features. Working slowly and preparing full-size paper templates before cutting fabric will make the construction much easier to understand.
What fabric works best for this patchwork placemat? Medium-light 100% cotton quilting fabric is an excellent choice because it is easy to cut, press, piece, and quilt. Small-scale prints are particularly effective for the hat and body because the individual motifs remain visible even on relatively small fabric pieces. Combining solids, dots, stripes, stars, checks, and distressed prints can produce the layered country-style appearance seen in the project while maintaining good contrast.
How large should the finished placemat be? There is no mandatory measurement because the design can be resized. A practical decorative version can measure approximately 42–48 cm wide and 38–45 cm tall, including the extended arms and hat. If you intend to use it beneath dinnerware, compare the template with your plates before cutting fabric. Remember that seam allowances, binding, fringe, and quilting can slightly affect the final dimensions.
Can I make this project from fabric scraps? Absolutely. In fact, scrap fabric is particularly suitable because the design depends on many relatively small patches. Save larger cream pieces for the face and arms, then use smaller orange, green, black, brown, or patterned scraps for the body, hat, pumpkin, star, and pocket. Choosing a limited color palette will help unrelated scraps look intentional when assembled into one cohesive project.
Do I need a special quilting machine? No. A regular domestic sewing machine can handle this project when combined with appropriate needles and thread. A walking foot may make quilting multiple layers easier, but it is not essential for every construction method. Many decorative details can even be sewn by hand. The patchwork sewing stage primarily uses basic straight stitching, making the project accessible with ordinary home sewing equipment.
Should batting be added inside the placemat? Lightweight batting is recommended if you want the softly quilted texture visible in the inspiration piece. Cotton or thin polyester batting can both work, depending on the desired feel. Avoid excessively thick batting because the multiple appliqué layers may make the finished project bulky. A thin layer provides definition to the quilting stitches while helping the placemat retain its shape.
What is the easiest appliqué method for this project? Raw-edge fusible appliqué is often one of the simplest methods for beginners. The decorative pieces can be stabilized with fusible web and then stitched around their edges using a straight stitch, zigzag, or blanket stitch. Turned-edge appliqué creates a more traditional finish but requires additional preparation. Either approach can work well, so the best choice depends on your preferred appearance and sewing experience.
How can I make the curved hat easier to sew? First create an accurate paper template and divide the crown into manageable fabric sections. Sew and press those sections before joining the crown to the brim. Use plenty of pins or clips along the curved seam and stitch slowly. Small clips within the seam allowance can help curved edges relax after sewing, but never clip through the seam itself. Careful pressing afterward will help the hat maintain its distinctive bent shape.
Can the colors be changed? Yes. The Scarecrow and Ghost Patchwork Placemat Pattern is especially adaptable to different color combinations. Traditional autumn shades such as orange, black, cream, olive, mustard, and brown create a warm seasonal look. For a softer farmhouse version, consider sage, beige, dusty orange, charcoal, and ivory. The essential design comes from the silhouette, patch arrangement, hat, facial expression, and pumpkin rather than one exact palette.
How should the finished placemat be cared for? Care depends on the specific fabrics, batting, trim, buttons, and decorative materials used. If every component is washable, gentle washing and air drying can help preserve the quilting and appliqué. Dimensional embellishments may require additional care. Prewashing fabrics before construction can also reduce unexpected shrinkage. Always follow the care requirements of the least washable component included in your finished piece.
Can I make several placemats with different designs? Certainly. Once the basic ghost body template has been prepared, it can become the foundation for several coordinated seasonal pieces. Change the patchwork arrangement, pocket fabric, hat colors, facial details, or pumpkin design while keeping the overall dimensions consistent. This is also an effective way to use multiple groups of leftover quilting scraps while creating a coordinated table collection.
What makes this pattern different from a regular rectangular placemat? The main difference is its decorative silhouette. Instead of relying on a conventional rectangle, the Scarecrow and Ghost Patchwork Placemat Pattern uses the character itself to establish the outer shape. The extended arms, curved hat, wavy lower edge, appliqué pocket, pumpkin, and optional fringe transform a practical sewing project into a piece of seasonal textile art. This makes it suitable both for table decoration and for display.
Conclusion
The Scarecrow and Ghost Patchwork Placemat Pattern brings together several enjoyable sewing techniques in one creative autumn project. Starting with a simple paper template, you can build the character from quilting cotton, assemble the colorful body using patchwork piecing, construct the curved hat, add the smiling ghost face, create the dimensional pocket and pumpkin, and finish everything with appliqué, quilting, decorative stitching, and fringe or binding.
The most important part of the process is working in stages. Prepare and label the templates first, test the arrangement of your fabrics, sew the patchwork sections carefully, press as you go, and wait until the main construction is stable before adding the smallest decorative details. This approach makes even the unusual curves and irregular fabric sections much easier to manage.
It is also a wonderfully flexible pattern. Your version does not have to match the original colors exactly. Orange, black, cream, green, stripes, stars, checks, or fabrics already waiting in your scrap basket can all be combined to create a unique Scarecrow and Ghost Patchwork Placemat Pattern. Small variations are part of the charm of handmade patchwork and can give every finished character its own personality.
EASILY FIND THE FREE PDF FOR THIS PATTERN HERE!
With careful cutting, secure seams, thoughtful quilting, and a few playful details, the finished placemat becomes a warm seasonal project that celebrates both traditional patchwork quilting and creative appliqué. It can decorate an autumn table, become part of a Halloween-inspired arrangement, or simply offer an enjoyable reason to transform leftover fabric into something new. If you make your own Scarecrow and Ghost Patchwork Placemat Pattern, leave your sincere opinion about the project and share your suggestions. Which colors, fabrics, quilting stitches, or decorative details would you choose for your version? Your creative ideas can inspire even more ways to personalize this cheerful patchwork design.