
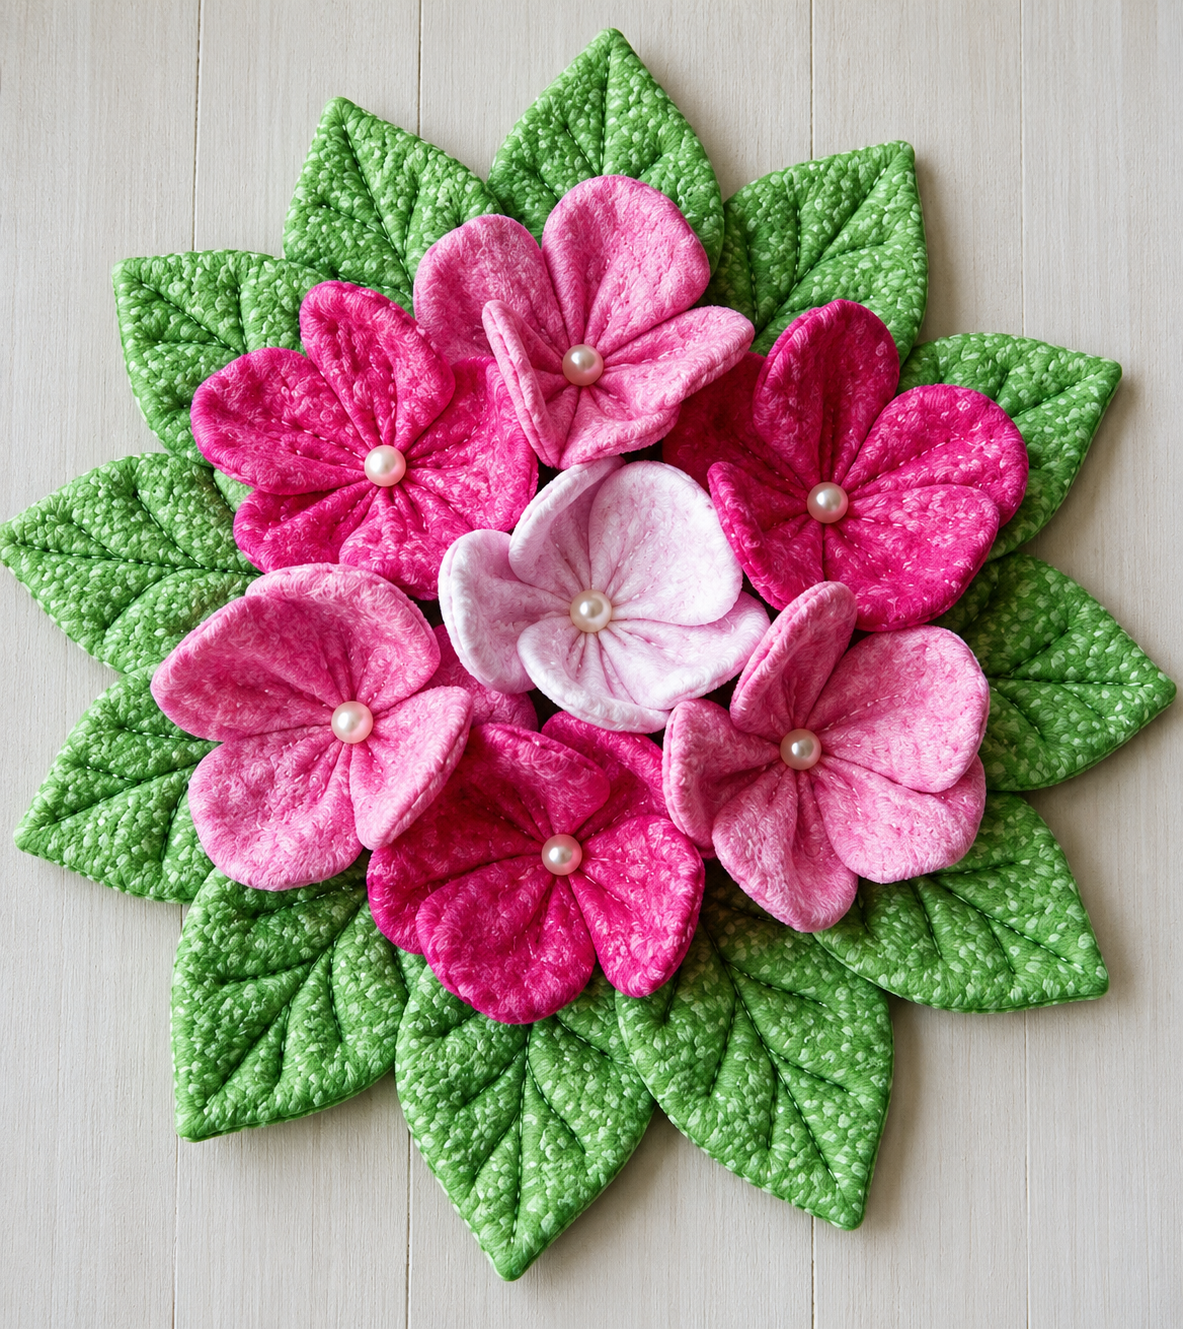
The Fabric Flower Wall Decor Pattern is a beautiful way to transform simple pieces of fabric into dimensional floral artwork that can brighten a sewing room, bedroom, nursery, craft space, or cozy corner of the home. Inspired by the project shown in the photo, this design combines layered green fabric leaves with soft, three-dimensional pink flowers arranged in a full circular composition. The result looks elaborate, yet the construction is based on approachable sewing techniques that can be practiced by beginners and customized by experienced makers. Instead of requiring complicated quilting blocks, the project focuses on shaping, layering, stitching, and arranging individual fabric components until they form one harmonious piece of handmade fabric wall decor.
One of the most attractive features of this Fabric Flower Wall Decor Pattern is the amount of creative freedom it provides. The flowers can be made with several shades of pink, as in the inspiration image, or adapted to completely different palettes such as blue and cream, yellow and orange, lavender and purple, or traditional red and white. The leaves can be made from coordinating green prints, batiks, solids, or small-scale quilting cotton patterns. Because every flower and leaf is constructed individually, this project is also useful for working with fabric scraps left from previous sewing projects. The dimensional petals, softly padded leaves, visible stitching, and pearl-like centers all contribute texture and depth, making the finished arrangement more interesting than a completely flat appliqué.
Creating this fabric flower sewing project is also a wonderful opportunity to combine basic sewing skills with decorative techniques. You will learn how to prepare petal templates, stabilize fabric, create padded shapes, form dimensional petals, define leaf veins with stitching, and arrange several components into a balanced floral composition. Although the exact finished size can be adjusted, a wall piece approximately 35 to 45 cm wide works well for a decorative arrangement similar to the photograph. The most important part is not making every flower perfectly identical. Slight variations in petal shape, color, and placement can actually give the finished piece a more natural handmade appearance while maintaining the polished character of the original inspiration.
Materials and Preparation for the Fabric Flower Wall Decor Pattern
Start by gathering quilting cotton or another medium-weight woven fabric for the flowers and leaves. For a composition inspired by the photograph, choose approximately three or four coordinating shades of pink fabric and one or two shades of green. Small prints and subtle tonal patterns work particularly well because they create visual texture without distracting from the shapes. You will also need lightweight batting or fusible fleece, matching sewing thread, a hand-sewing needle, scissors, pins or sewing clips, a fabric marking tool, and a sewing machine if you prefer machine construction.
DISCOVER MORE FREE PATTERNS HERE!
For the flower centers, small pearl-style beads or fabric-covered buttons can reproduce the elegant appearance of the inspiration. If the finished decoration will be placed where small detachable pieces could present a concern, stitched fabric centers are a practical alternative. The purpose of the center is both decorative and functional because it helps conceal the gathering and joining points of the petals. Choose a center that complements rather than overwhelms the flower.
Next, prepare templates for the petals and leaves. A practical starting size for the larger petals is approximately 8 to 10 cm long, while smaller petals can measure around 6 to 8 cm. Leaves may be approximately 10 to 13 cm long. These measurements are flexible because the Fabric Flower Wall Decor Pattern can be enlarged or reduced according to the wall space available. Draw smooth symmetrical templates on paper or lightweight cardboard before transferring them to fabric.
Each dimensional petal can be constructed from two fabric pieces placed right sides together. Sew around the curved edges while leaving a small opening for turning. Trim excessive seam allowance around tight curves, carefully turn the petal right side out, and press gently. A small amount of lightweight batting or stuffing can be inserted when additional volume is desired. Avoid overfilling because the petals should remain soft enough to fold and shape.
Prepare the leaves using a similar method. Cut two green fabric pieces for each leaf, optionally adding a thin layer of batting between them. Stitch around the outline, turn the leaf, close the opening, and press. Decorative stitching can then be added along the center and branching outward to imitate natural leaf veins. This quilting detail is especially important because it gives the green background the textured appearance visible in the inspiration.
Before permanently sewing anything together, make all or most of the components and arrange them temporarily on a flat surface. The photographed design uses an abundant outer ring of overlapping leaves with flowers concentrated toward the center. Experiment with the orientation of the leaves and flowers until the arrangement looks full from every direction. Taking a quick reference photo of your preferred arrangement can make final assembly much easier.
How to Sew and Shape the Dimensional Fabric Flowers
The flowers are the focal point of the Fabric Flower Wall Decor Pattern, so spend time shaping them carefully. A simple flower can be constructed with four or five individual petals. After sewing and turning each petal, create a small pleat or pinch at its lower edge. Secure the fold with several hand stitches. This technique narrows the base while allowing the upper portion to open outward, producing the curved, three-dimensional appearance associated with sculpted fabric flowers.
Repeat this process for every petal before joining the flower. Place the petal bases beside one another in a circular arrangement and stitch through all layers with strong thread. Pull the thread gently until the bases move closer together. Do not tighten excessively because the petals need enough space to overlap naturally. Secure the thread firmly with several small stitches and a knot on the back.
The photograph shows flowers with softly cupped petals rather than completely flat shapes. You can reproduce this effect by slightly folding the sides of each petal toward the center before securing its base. Light batting inside the petals can make the shape more pronounced. Finger-press the folds first and examine the flower from the front before permanently stitching them. This makes it easier to adjust the volume and direction of each petal.
Use different shades of pink quilting fabric throughout the arrangement. For example, create several deep fuchsia flowers, a few medium pink flowers, and one pale pink flower to serve as a visual highlight. Variation prevents the composition from looking too uniform. You can also combine two related prints within one flower, although keeping each individual flower relatively coordinated often produces a cleaner result.
Once the petals are securely joined, attach the decorative center. A pearl-style bead produces a classic finish similar to the reference project. Bring the needle through the center from the back, pass it through the bead, and return through the fabric. Repeat several times so the embellishment remains secure. Alternatively, sew on a small button or make a tiny padded circle from contrasting fabric for a completely textile-based flower center.
Continue constructing flowers until you have enough to fill the central area. A composition with approximately six to eight flowers can create a lush arrangement, depending on their size. Place the largest flowers first and use smaller ones to fill gaps. Remember that handmade flowers do not have to be mathematically symmetrical. Small differences in the petals can make the arrangement feel more organic and visually interesting.
Creating the Quilted Leaves and Assembling the Floral Arrangement
The leaves provide the structural background for the Fabric Flower Wall Decor Pattern and should be sturdy enough to hold their shape. After turning and pressing each leaf, mark a center vein using a removable fabric marker. Stitch from the base toward the tip. Then add smaller diagonal veins extending toward the edges. Straight stitching works well, although a slightly longer decorative stitch can emphasize the quilting.
Adding thin batting to the leaves produces the raised texture seen in the inspiration image. When the vein lines are stitched through the fabric and batting layers, the surrounding areas become slightly puffed. This creates a miniature quilted leaf effect. Keep the batting thin enough that the leaf remains flexible, since several leaves will overlap during assembly.
Prepare a stable backing for the entire arrangement. A circular piece of sturdy fabric, felt, canvas, or fabric-covered lightweight interfacing can work well. The backing should be slightly smaller than the finished leaf arrangement so it remains hidden from the front. For a wall decoration around 40 cm wide, a backing approximately 22 to 28 cm in diameter can provide a useful starting point, although the ideal measurement depends on the size and number of leaves.
Begin attaching the outermost leaves around the backing. Position their pointed ends outward and overlap their bases toward the center. Stitch or securely hand-sew each leaf in place. Add a second inner layer of leaves between the first layer to cover visible gaps. Rotating each leaf slightly creates the full radial effect that makes this fabric floral wall hanging resemble a large blooming garden.
After the leaves are secure, arrange the flowers without stitching them immediately. Start with one flower near the central area and distribute the remaining flowers around it. Mix light and dark pink tones instead of grouping identical shades together. Overlap some petals slightly so the individual flowers appear connected while still remaining recognizable. Check the arrangement from several angles before attaching anything permanently.
Sew each flower firmly through its center and lower petal area into the backing. Hidden hand stitches are particularly useful because they allow the flowers to retain their dimensional appearance. After every flower is attached, gently reshape the petals and leaves with your fingers. Finally, attach a strong hanging loop to the back, making sure it is anchored to the structural backing rather than only to a decorative leaf.
Finishing, Displaying, and Customizing Your Fabric Flower Wall Decor
Once assembly is complete, examine the entire Fabric Flower Wall Decor Pattern from the front. Look for visible gaps, loose petals, uneven leaves, or areas where the backing can be seen. Small additional leaves can be inserted into empty spaces if necessary. Likewise, a flower can sometimes be rotated slightly to improve the balance of the design without rebuilding the entire arrangement.
Check every decorative center carefully. Because dimensional wall art may occasionally be moved, cleaned, or stored, flower centers should be attached with strong stitching. Also inspect the back of the project and secure loose thread tails. A neat backing improves durability and gives the project a more professional finish, even though that side will normally face the wall.
For a softer cottage-inspired version, combine pale pink flowers with sage green leaves. A brighter spring version could feature yellow, coral, and turquoise flowers. For autumn decor, try rust, mustard, burgundy, and olive fabrics. The construction method remains essentially the same, making this Fabric Flower Wall Decor Pattern adaptable to different seasons, rooms, and decorating styles.
Fabric selection can dramatically change the final appearance. Quilting cotton is beginner-friendly because it cuts cleanly, presses well, and is available in countless colors and prints. Batik fabric creates rich tonal variation, while linen blends can give the flowers a more rustic character. Very stretchy or slippery fabrics are more difficult to shape, so they may require additional stabilizer.
The same flower-making method can also be adapted to other sewing projects. Individual dimensional flowers can decorate cushions, fabric wreaths, tote bags, table decorations, or textile art panels. Leaves can be enlarged for dramatic wall pieces or reduced for smaller arrangements. Once you understand the basic construction, the pattern becomes more of a flexible fabric flower technique than a single fixed design.
Most importantly, allow time for the final arrangement. Sewing the individual components is only part of the project; thoughtful placement is what brings them together. Move flowers and leaves around until the color distribution feels balanced and the silhouette appears full. When the arrangement looks pleasing from both close range and several steps away, the Fabric Flower Wall Decor Pattern is ready for its final stitches and display.
FAQ About the Fabric Flower Wall Decor Pattern
What is a Fabric Flower Wall Decor Pattern?
A Fabric Flower Wall Decor Pattern is a sewing project that uses shaped fabric petals, leaves, stitching, and a backing structure to create decorative textile flowers for wall display. Unlike flat appliqué, this style can use padded and folded components to produce noticeable three-dimensional depth.
What is the best fabric for making dimensional fabric flowers?
Medium-weight quilting cotton is one of the easiest options because it is stable, easy to cut, and simple to press. Cotton blends and lightweight decorative fabrics may also work. Beginners may find highly stretchy or slippery materials more difficult to control.
Do I need a sewing machine for this project?
No. A sewing machine makes repeated petal and leaf construction faster, but the project can also be sewn by hand. Hand sewing is particularly useful during final assembly because small hidden stitches can secure the flowers without flattening their dimensional shape.
How many flowers should I make?
For a medium wall arrangement inspired by the photo, approximately six to eight flowers is a useful range. The exact number depends on the diameter of each flower and how densely you want the center filled. It is often helpful to make one extra flower and decide during assembly whether it is needed.
How many leaves are needed for a full arrangement?
A layered design may require approximately 15 to 25 leaves, depending on their size and degree of overlap. Instead of concentrating on an exact number, make enough leaves to form a complete outer ring and an additional inner layer that covers gaps.
How can I make fabric flowers look three-dimensional?
Use lightweight batting when sewing the petals and create small pleats at their bases. Slightly cupping or folding the petals before stitching them together adds additional volume. Avoid pressing the completed flowers completely flat.
Can I make the project with fabric scraps?
Yes. This is an excellent fabric scrap project because individual petals and leaves require relatively small pieces. Coordinating scraps from previous quilting projects can create a particularly interesting arrangement.
Should batting be added to every petal and leaf?
It is optional. Thin batting adds structure and creates a quilted appearance, especially in the leaves. If your fabric already has enough body, you can use interfacing instead or leave the petals unpadded for a softer result.
How large should the finished wall decoration be?
A finished diameter of approximately 35 to 45 cm creates an eye-catching medium-sized wall piece. However, the pattern is highly scalable. Make smaller petals and leaves for compact decor or enlarge the templates for a statement piece.
How do I attach the finished project to the wall?
Attach a strong fabric hanging loop or another appropriate textile hanging system to the structural backing. Make sure the support is securely sewn through sturdy backing material rather than attached only to petals or leaves. The wall attachment itself should be suitable for the finished project’s weight and the type of wall surface.
Can the colors be changed?
Absolutely. Pink flowers and green leaves reproduce the cheerful botanical appearance of the inspiration, but the Fabric Flower Wall Decor Pattern can be personalized with virtually any coordinated palette. Seasonal colors are an easy way to adapt the same construction method throughout the year.
How can I clean fabric flower wall decor?
Regular gentle dusting is usually preferable to frequent washing because dimensional petals can lose their shape when heavily handled. If cleaning becomes necessary, consider the care requirements of every fabric, batting, thread, bead, and stabilizer used in your particular project.
Conclusion
The Fabric Flower Wall Decor Pattern combines straightforward sewing techniques with creative fabric shaping to produce an impressive piece of dimensional textile art. Throughout this tutorial, you learned how to choose coordinating fabrics, prepare templates, sew and shape dimensional petals, create quilted leaves, add decorative flower centers, prepare a stable backing, and arrange the individual pieces into a full floral composition.
The key to achieving a result similar to the inspiration is layering. Padded leaves create the green foundation, overlapping pink flowers provide depth, and carefully secured centers complete the design. You can follow the pink-and-green palette closely or use the same Fabric Flower Wall Decor Pattern techniques to develop a completely personalized color scheme.
EASILY FIND THE FREE PDF FOR THIS PATTERN HERE!
This is also a project that can grow with your sewing experience. Once you become comfortable making the basic petals and leaves, experiment with different flower sizes, fabric textures, quilting details, color combinations, and arrangements. Each variation can produce a noticeably different piece while using the same fundamental construction process. If you make your own version, leave your sincere opinion about the project and share any suggestions you have for future fabric, quilting, or sewing patterns. Your ideas about colors, flower shapes, leaf styles, and different ways to use this technique can inspire even more creative handmade projects.