
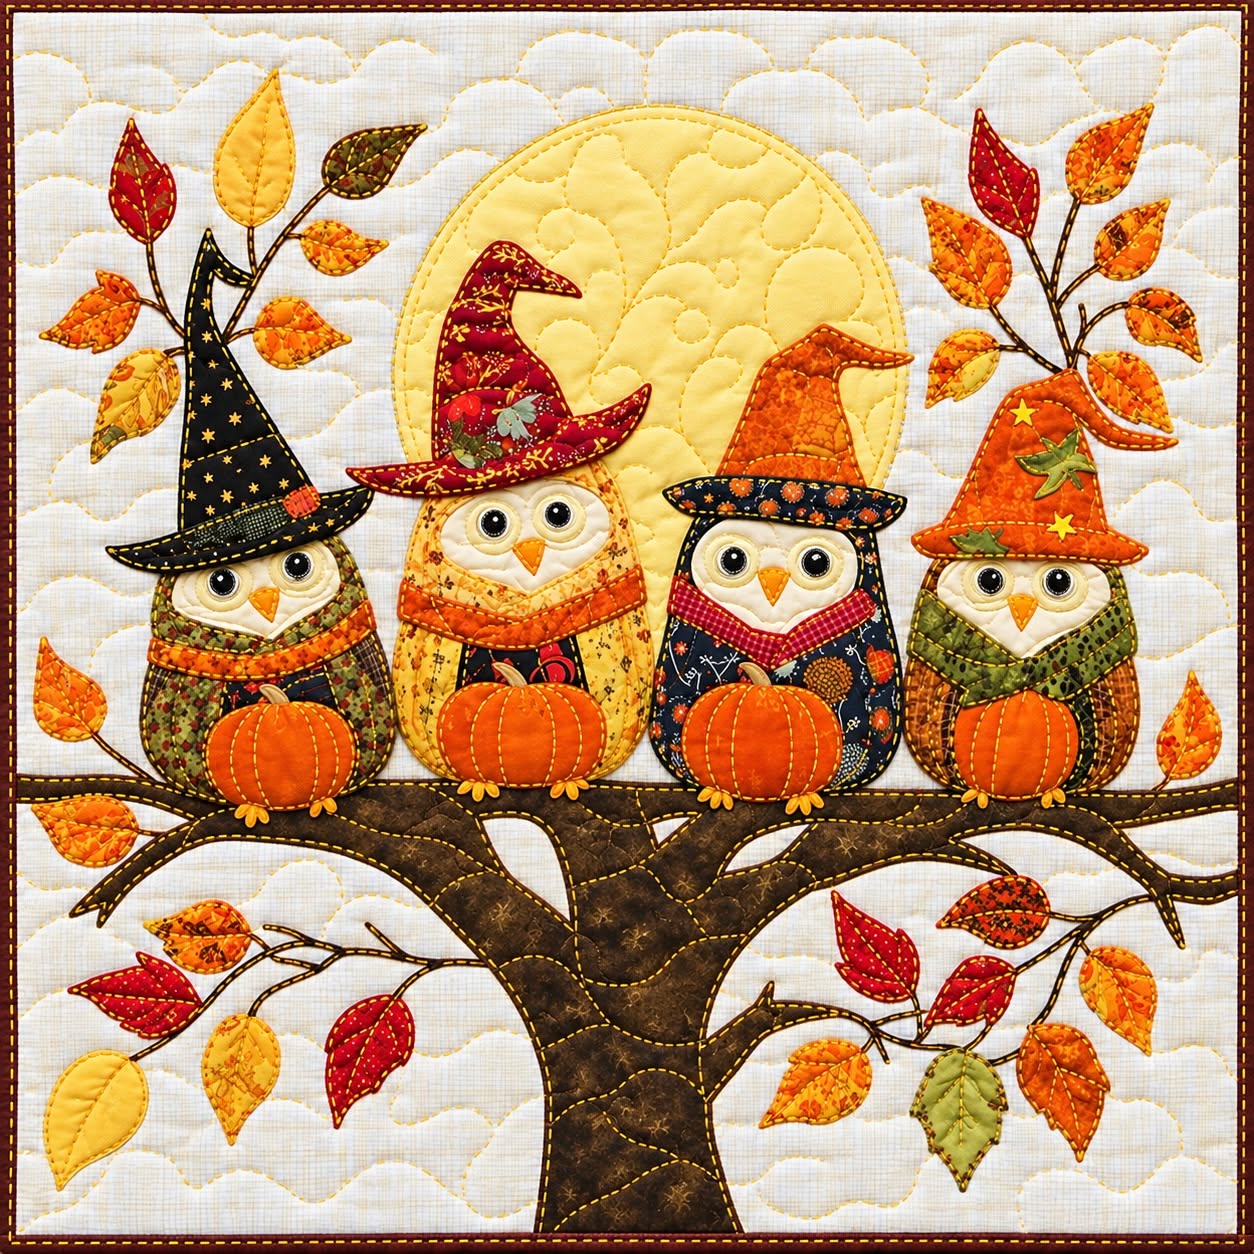
The Owl and Autumn Themed Patchwork Wall Hanging Pattern is a charming sewing project that combines the warmth of fall colors with the playful personality of appliqué owls. Inspired by the wall hanging shown in the reference image, this design features four whimsical owls sitting together on a large tree branch, each wearing a different witch-style hat and holding an orange pumpkin. A large golden moon creates a beautiful focal point behind them, while scattered autumn leaves and branches fill the background with seasonal character. The project is ideal for quilters who enjoy patchwork, fabric appliqué, free-motion quilting, seasonal sewing, and handmade wall décor. Although the finished piece looks detailed, the construction can be divided into manageable sections, making it possible to work carefully from the background to the smallest decorative details.
One of the most appealing characteristics of an Owl and Autumn Themed Patchwork Wall Hanging Pattern is the opportunity to combine many fabric colors and prints in a single project. Earthy brown fabric creates the tree, while orange, mustard yellow, burgundy, black, olive green, cream, and gold fabrics establish an unmistakable autumn palette. Small scraps are especially useful because the owl bodies, hats, scarves, pumpkins, leaves, eyes, beaks, and other details require relatively little fabric individually. This makes the project a practical choice for using leftover quilting cotton from previous projects. The different prints also give each owl a unique personality without requiring complicated piecing techniques. By coordinating the colors rather than trying to make every fabric identical, you can achieve the rich, handcrafted appearance that makes autumn quilts so inviting.
The construction method for this Owl and Autumn Themed Patchwork Wall Hanging Pattern centers on layered fabric appliqué. Instead of piecing every small shape into traditional quilt blocks, individual shapes are prepared and positioned over a background panel. The tree and branches establish the foundation, followed by the moon, owls, pumpkins, hats, leaves, and smaller facial details. After the appliqué is secured, decorative stitching and quilting add dimension to the entire composition. This approach allows you to personalize the project while still following the visual structure of the reference. Beginners can simplify tiny pieces and use straightforward stitching, while experienced quilters can add more elaborate quilting lines, embroidered details, fabric shading, and dimensional accents.
Materials, Fabric Selection, and Preparing the Autumn Background
Start by choosing a sturdy quilting cotton for the background. A lightly textured cream, beige, pale gold, or warm neutral fabric works especially well because it provides enough contrast for the darker tree and colorful owls. For a medium wall hanging, a background approximately 65 x 65 cm is a practical starting size. These measurements can be adjusted according to the space where the finished quilt will hang. Cut the background slightly larger than your planned finished dimensions because quilting can cause minor shrinkage and distortion.
DISCOVER MORE FREE PATTERNS HERE!
Next, organize fabrics for the autumn elements. Collect brown fabric for the tree and branches, golden yellow for the moon, several orange prints for pumpkins and leaves, cream and tan pieces for the owls, and darker prints for wings and clothing. Burgundy, black, olive green, mustard, rust, and deep orange work particularly well for the hats and scarves. Using several prints instead of large areas of solid fabric helps reproduce the layered patchwork wall hanging appearance seen in the inspiration image.
Before cutting appliqué pieces, wash and press the fabrics if that is part of your normal quilting routine. Smooth fabric makes tracing and cutting considerably easier. If you are using fusible web appliqué, follow the manufacturer’s instructions for attaching the adhesive to the wrong side of the fabric before cutting the final shapes. Remember that designs traced onto the paper side of fusible web may need to be reversed when orientation matters.
Prepare the large golden moon as one of the first appliqué shapes. Cut a circle approximately 27 to 30 cm in diameter, depending on your wall hanging size. Position it slightly above the center of the background. The moon should be large enough to appear behind the owls but should not dominate the composition. A warm yellow fabric with subtle texture works beautifully because quilting lines will later give the moon additional visual interest.
The tree requires a wide trunk that rises from the lower edge before spreading into a strong horizontal branch. Instead of creating a perfectly symmetrical tree, draw gentle irregularities along the edges. Natural-looking curves are particularly effective in autumn appliqué quilts. Extend smaller branches toward the sides and lower corners so there are several places where colorful leaves can later be positioned. Brown batik, mottled cotton, or fabric with subtle tonal variations can imitate the visual texture of bark.
Once the moon and tree have been positioned, temporarily arrange them on the background before permanently attaching anything. Check the overall balance from a distance. The main branch must be wide enough to visually support four owls, while enough open background should remain around the top and sides for leaves. When you are satisfied with the placement, fuse or baste these large appliqué pieces according to your preferred method.
Creating the Four Patchwork Owls, Hats, and Pumpkins
The four owls are the heart of the Owl and Autumn Themed Patchwork Wall Hanging Pattern. Begin by making a simple owl template consisting of a rounded body with a slightly narrower upper section. The two central owls can be a little larger than the outer owls to create visual variety. Depending on your finished dimensions, owl bodies around 14 to 18 cm tall work well. Cut each body from a different coordinating fabric so every character has its own appearance.
Create each owl’s face from lighter cream, beige, or pale yellow fabric. Layer two large circular eye patches near the top of the body and place smaller circles inside them to form the eyes. Tiny dark centers create the pupils. Cut a small diamond or triangular piece of orange or mustard fabric for each beak. Before attaching the pieces permanently, position both eyes and the beak together. Small changes in placement can dramatically alter an owl’s expression.
Add wings to both sides of each owl using darker or contrasting fabric. The wings can be elongated teardrop shapes that follow the curve of the body. This is an excellent place to introduce scrap quilting fabrics with tiny floral, geometric, star, or seasonal prints. Secure the wings using a narrow zigzag, blanket stitch, satin stitch, or your preferred appliqué technique. Coordinating thread gives a softer result, while contrasting thread emphasizes the handmade outlines.
Each owl in the inspiration carries a bright pumpkin. Cut four rounded orange pumpkin shapes approximately 7 to 9 cm wide. Add narrow curved fabric sections or stitched vertical lines to suggest the pumpkin ribs. A tiny brown or green stem can be added at the top if desired. Position each pumpkin over the lower portion of its owl so it appears to be held in front of the body. This overlapping technique adds convincing depth without complicated construction.
Now create the four distinctive pointed hats. Use a tall triangular or gently curved cone shape together with a separate brim. Select different fabrics for every hat: black with small motifs, burgundy patchwork, burnt orange, or another rich autumn print. Slightly bend or curve the hat tips instead of keeping them perfectly straight. The uneven silhouettes make the owls look playful and handcrafted. Decorative patches, tiny stars, or contrasting fabric sections can be appliquéd onto the hats.
Complete the characters with scarves, collars, tiny feet, and optional decorative stitching. A narrow strip of burgundy, orange, green, or patterned cotton beneath each face can suggest a scarf. Small gold or brown feet should extend just below the owl bodies and rest visually on the branch. At this stage, place all four finished owl arrangements on the tree before securing them. Keep their spacing relatively close so they appear as one cheerful group rather than four unrelated motifs.
Adding Autumn Leaves, Branches, Appliqué Details, and Quilting
With the main characters assembled, begin building the surrounding autumn patchwork scenery. Create several smaller branches extending upward behind the owls and outward from the main tree. These can be made from narrow strips of dark brown fabric or created with dense decorative stitching. Avoid making every branch identical. A mixture of short and long branches gives the composition a more organic appearance and provides natural locations for the leaves.
Cut numerous leaves from red, orange, gold, mustard, rust, burgundy, and muted green scraps. A simple pointed oval makes an effective leaf template. Vary the leaves from approximately 3 to 7 cm long. Some can be narrow and pointed while others can be wider. Using multiple sizes is important because identical leaves can make the composition appear overly rigid. Autumn foliage naturally contains variations, and patchwork can imitate that effect beautifully.
Arrange clusters of leaves around the upper branches, lower corners, and sides of the tree. Leave intentional gaps between some leaves so the background remains visible. You can also position several individual leaves as though they are falling through the air. Before fusing them permanently, photograph or carefully observe the arrangement so you can recreate it if pieces move while pressing.
After all appliqué pieces are secured, prepare the quilt sandwich. Place backing fabric wrong side up, add a layer of quilting batting, and position the completed appliqué top right side up. The backing and batting should extend several centimeters beyond the quilt top on all sides. Smooth the three layers carefully and baste them using your preferred method. Good basting is particularly important because this project contains many appliqué elements.
Quilting can transform the flat appliqué into a richly textured fabric wall hanging. Quilt around the outlines of the owls, pumpkins, moon, tree, branches, and leaves to emphasize their shapes. Inside the moon, use gentle curves, loops, or free-motion motifs. The tree can receive irregular lines reminiscent of bark, while the background can be quilted with loose meandering stitches. Avoid excessively dense quilting around delicate appliqué pieces unless you specifically want a highly textured effect.
Use thread strategically to enhance the design. Brown works naturally around the tree, while gold, cream, orange, or coordinating shades can highlight the seasonal motifs. Decorative quilting stitches can also create veins inside leaves and curved ribs on pumpkins. When quilting around the owl eyes and faces, sew slowly because these small shapes attract attention. Clean outlines here will help the characters remain expressive after the project is quilted.
Finishing the Wall Hanging, Binding, and Display Preparation
Once the quilting is complete, lay the wall hanging on a large flat surface and check that the edges remain reasonably square. Trim away excess batting and backing, then square the quilt carefully. Do not trim aggressively; removing too much fabric can interfere with nearby branches or leaves. Measure opposite sides before cutting so the finished Owl and Autumn Themed Patchwork Wall Hanging Pattern remains balanced.
Prepare binding from coordinating cotton strips. A dark brown, burgundy, rust, or muted autumn print can frame the composition without competing with the appliqué. Join enough strips to travel around the entire perimeter, press the binding according to your preferred method, and attach it evenly. Mitered corners create a neat traditional quilt finish, but beginners can also use another reliable binding method with which they are comfortable.
If the quilt will be displayed on a wall, consider adding a hanging sleeve to the back before completing the final hand stitching. A fabric sleeve allows a lightweight hanging rod to support the quilt evenly across its width. This prevents the center from sagging and keeps the front free from visible clips or pins. Make sure the hanging system is appropriate for the size and weight of your finished project.
Inspect every appliqué edge before displaying the quilt. Look for loose threads, unsecured corners, or areas that might benefit from an additional stitch. Pay special attention to pointed hat tips, small leaves, beaks, feet, and narrow branches. These areas can receive more handling during construction than larger pieces. Carefully securing them now will improve the durability of the finished wall hanging.
The finished project can be personalized in countless ways while preserving its recognizable autumn theme. You might change the number of owls, use different hat fabrics, add embroidered names, create multicolored pumpkins, or incorporate favorite fabric scraps into the leaves. You could even eliminate the witch-style hats for a purely autumnal version. The fundamental combination of owls, pumpkins, fall leaves, a large moon, and a patchwork tree provides a flexible foundation for creative interpretation.
Finally, give the wall hanging a gentle press from the back when appropriate for the fabrics and appliqué products you used. Avoid crushing heavily quilted areas. Step back and examine the finished composition as a whole. The golden moon should frame the characters, the tree should anchor the lower portion, and the colorful foliage should guide the eye around the design. These relationships are what give the Owl and Autumn Themed Patchwork Wall Hanging Pattern its welcoming seasonal personality.
FAQ About the Owl and Autumn Themed Patchwork Wall Hanging Pattern
Is the Owl and Autumn Themed Patchwork Wall Hanging Pattern suitable for beginners?
Yes, especially for someone who already understands basic sewing and is comfortable operating a sewing machine. The design may appear complicated because it contains many pieces, but most components are based on relatively simple appliqué shapes. Beginners can simplify the number of leaves, decorative patches, and quilting motifs. Working on one section at a time also makes the project much easier to manage.
What fabric is best for an autumn patchwork wall hanging?
Standard 100% quilting cotton is an excellent choice because it is stable, widely available, easy to cut, and suitable for appliqué. Batiks and tonal fabrics are also useful for creating visual texture in the tree, leaves, owl wings, and hats. Very stretchy fabrics are generally more difficult to control when making small appliqué pieces.
Can I make this project using fabric scraps?
Absolutely. In fact, this is an excellent scrap fabric project. The leaves, owl faces, wings, hats, scarves, eyes, beaks, feet, and pumpkins can all be cut from relatively small pieces. Using scraps also increases the variety of prints and colors, which contributes to the traditional patchwork appearance.
Do I need fusible web for the appliqué?
Not necessarily. Fusible web is convenient because it helps keep numerous small shapes positioned correctly before stitching, but other appliqué methods can also work. Traditional turned-edge appliqué, raw-edge appliqué, or temporary fabric adhesive can be used depending on your experience and preferred finish.
How large should the finished wall hanging be?
There is no mandatory finished size. A square around 60 to 65 cm works nicely for a decorative wall quilt inspired by this composition, but you can enlarge or reduce the templates proportionally. If changing the size significantly, remember to adjust the moon, tree, owls, pumpkins, and leaves together so the composition maintains its proportions.
What colors work best for an autumn owl quilt?
Classic autumn palettes include burnt orange, pumpkin orange, mustard yellow, golden yellow, burgundy, rust, brown, olive green, cream, and black. You do not need to use every color. Selecting several warm colors and repeating them throughout the composition is usually enough to create visual harmony.
How can I make each owl look different?
Use different printed fabrics for the bodies, wings, hats, and scarves. You can also slightly vary the eye placement, hat shape, pumpkin fabric, and decorative patches. Small differences give each owl an individual personality while maintaining consistency across the group.
What quilting design should I use in the background?
A relaxed meandering or free-motion quilting pattern works beautifully because it fills empty spaces without distracting from the appliqué. You can also use loops, gentle curves, leaf-inspired motifs, or simple wavy lines. Beginners can choose straight or gently curved quilting instead of complex free-motion designs.
Should I quilt over the appliqué pieces?
You can quilt inside larger pieces, especially the moon, tree, pumpkins, and owl bodies. Smaller elements may only need stitching around their edges. Quilting inside the larger shapes prevents them from appearing overly flat and adds texture that helps distinguish individual areas of the design.
How do I prevent small appliqué pieces from moving?
Secure them before stitching. Fusible web is one of the easiest solutions, but careful basting can also work. Pressing the background first and arranging the quilt on a flat surface will improve accuracy. Work from larger elements toward smaller details so you always have reliable visual reference points.
Can I make this wall hanging without the Halloween-style hats?
Yes. Removing the pointed hats creates a more general fall owl wall hanging suitable for display throughout the autumn season. You could replace the hats with small fabric bows, ordinary caps, additional leaves, or leave the owls without head accessories.
How should I care for a finished patchwork wall hanging?
Because a wall hanging normally receives less wear than a bed quilt, frequent washing is usually unnecessary. Keep it away from prolonged direct sunlight when possible, as strong sunlight can gradually fade fabrics. When storage is necessary, keep the quilt clean and avoid leaving it sharply folded in exactly the same places for extended periods.
Can the same design be turned into a cushion or table runner?
Yes. Individual elements from the Owl and Autumn Themed Patchwork Wall Hanging Pattern can be adapted to other sewing projects. A single owl and pumpkin could become a cushion panel, while leaves, branches, and smaller owl motifs could be rearranged into a seasonal table runner. Just resize the templates to suit the new dimensions.
What is the most important step when assembling the design?
Planning the complete layout before permanently attaching the appliqué is especially important. Position the moon and tree first, followed by the owls and pumpkins, and then arrange the branches and leaves. Looking at the entire composition before fusing or stitching makes it easier to correct spacing and maintain a balanced design.
How long does an autumn appliqué wall hanging take to make?
The time varies considerably according to experience, size, appliqué method, and quilting complexity. Instead of trying to complete everything in one session, divide the work into stages: prepare templates, cut fabrics, assemble the background, construct the owls, add foliage, stitch the appliqué, quilt, and bind. This makes a detailed project much more enjoyable and manageable.
Conclusion
The Owl and Autumn Themed Patchwork Wall Hanging Pattern brings several enjoyable quilting techniques together in one colorful seasonal project. Beginning with a neutral background, you can build the composition gradually with a golden moon, a textured brown tree, four expressive patchwork owls, bright pumpkins, winding branches, and a generous collection of autumn leaves. Careful fabric selection allows simple appliqué shapes to become visually rich without requiring overly complicated construction.
Throughout this project, you also have opportunities to practice fabric appliqué, scrap quilting, layering, decorative stitching, free-motion quilting, binding, and color coordination. The most useful approach is to work from the largest shapes toward the smallest details. Establish the moon and tree first, arrange the owls next, and complete the scene with pumpkins, branches, leaves, and decorative accents. Once everything is secured, quilting brings the separate elements together and gives the wall hanging its characteristic handmade texture.
EASILY FIND THE FREE PDF FOR THIS PATTERN HERE!
Most importantly, this pattern leaves plenty of room for creativity. Your owls do not have to match one another, your leaves can come from leftover fabrics, and your autumn palette can range from bright pumpkin shades to deeper rustic colors. Those individual decisions are what make handmade patchwork special. If you create your own Owl and Autumn Themed Patchwork Wall Hanging Pattern, leave your sincere opinion about the project and share any suggestions or creative changes you would make. Your ideas can inspire new color combinations, appliqué details, and variations for future patchwork projects.