
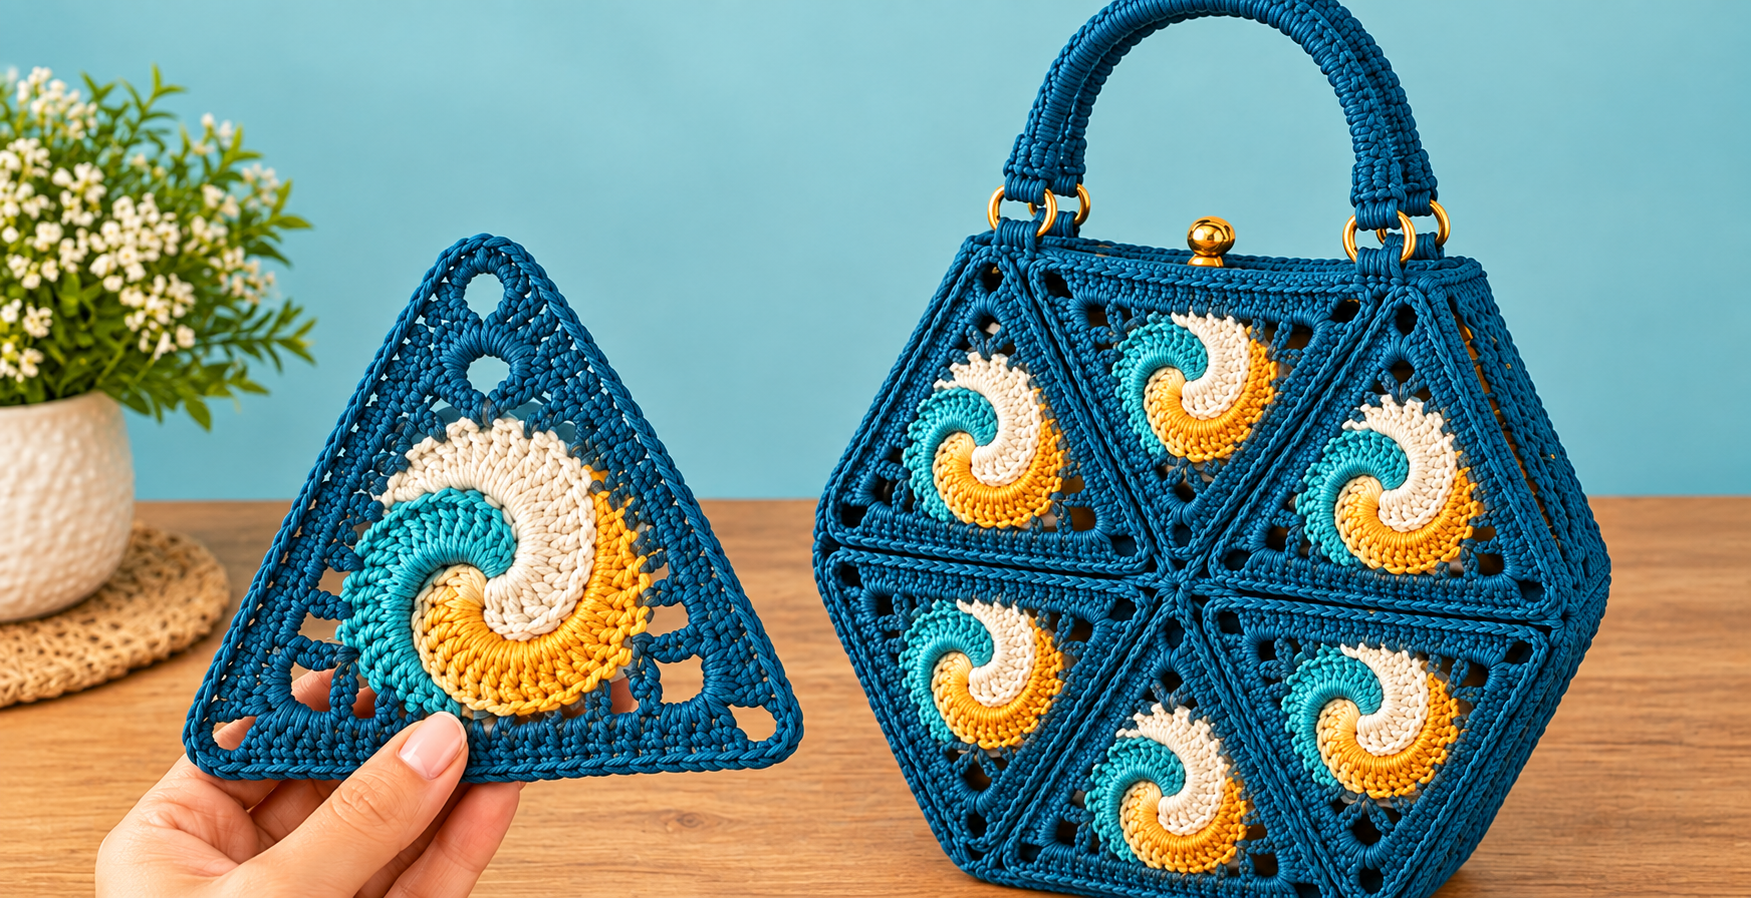
The 3D triangular knit pattern for a bag Pattern is a creative handmade project that combines geometric construction, textured stitches, and colorful spiral details to create a striking accessory. Although the title commonly uses the word “knit,” the construction described in this tutorial is made with crochet stitches, using a crochet hook rather than knitting needles. The main feature is a collection of triangular motifs that are worked separately and later joined to form the body of the handbag. Each triangle can contain a colorful raised spiral in the center, surrounded by a darker openwork border that gives the design its distinctive three-dimensional appearance. Because every motif is made individually, crocheters can easily customize the colors, size, yarn thickness, and final arrangement. The result is a structured crochet bag that looks sophisticated while still being approachable for an adventurous beginner or intermediate crocheter.
One of the most interesting parts of the 3D triangular knit pattern for a bag Pattern is the way simple crochet techniques can create a design that appears much more complicated than it really is. The central spiral can be developed with increases and carefully positioned color sections, while chains and basic stitches create the triangular lace framework around it. Once several triangles are completed, they fit together almost like pieces of a geometric puzzle. A firm joining method helps the bag keep its shape, and optional lining can provide additional durability for everyday use. You can choose bright colors for a playful style, neutral shades for an elegant handbag, or use leftover yarn to create a completely unique scrap-yarn version. Understanding the stitch abbreviations and construction sequence before beginning will make the entire process smoother and more enjoyable.
This tutorial explains the 3D triangular knit pattern for a bag Pattern from the first chain to the final handle, including a practical crochet stitch key, motif construction, joining, finishing, and useful adjustments. Exact stitch counts may be changed depending on yarn weight and the size of bag you want, so the instructions focus on a flexible repeatable method rather than forcing one fixed measurement. Always make one test triangle first because different yarns and hook sizes can dramatically affect the finished dimensions. For a medium handbag, a triangle measuring approximately 14 to 18 cm from point to base is a useful starting range. Keeping every triangle the same size is more important than matching one specific measurement. Careful tension, blocking, and consistent joining will help transform individual crochet motifs into a professional-looking finished bag.
Crochet Stitch Key, Materials, and Preparation
Before starting the 3D triangular knit pattern for a bag Pattern, prepare a medium-weight yarn that has enough body to support a handbag. Cotton, cotton-blend, polyester cord, or a firm synthetic yarn can work especially well because these fibers tend to hold geometric shapes clearly. You will also need a crochet hook suitable for your chosen yarn, scissors, a yarn needle, stitch markers, and optional bag hardware such as rings, a magnetic clasp, or a metal frame. If you plan to add a lining, prepare fabric, matching sewing thread, pins, and a hand-sewing needle or sewing machine.
DISCOVER MORE FREE PATTERNS HERE!
The most useful crochet stitch key for this project is: ch = chain, sl st = slip stitch, sc = single crochet, hdc = half double crochet, dc = double crochet, tr = treble crochet, st = stitch, sp = space, rep = repeat, and inc = increase. An increase normally means working two stitches into the same stitch or space. You may also see ch-sp, meaning chain space, particularly in the openwork section of the triangular border. These are standard U.S. crochet terms, so remember that terminology can differ in patterns written using UK crochet language.
To begin the colorful center, create a small adjustable ring or magic ring. Work a group of single crochet or half double crochet stitches into the ring and close it gently. Rather than immediately making a flat circle with perfectly symmetrical increases, divide the round mentally into three color sections. Pink, yellow, and green create an attractive spiral combination, but any three contrasting colors will work. Place a stitch marker at the beginning of each section so you can easily identify where increases and color changes belong.
The raised spiral appearance develops by progressively increasing the height and width of the stitches. For example, one section can begin with sc, continue into hdc, and then develop into dc stitches as the curve becomes larger. Strategic increases allow each colored section to bend around the center instead of forming straight wedges. Keep the color changes tidy by carrying the unused yarn loosely behind the work or fastening off each color when necessary. Avoid pulling carried yarn too tightly because this can cause the center motif to curl excessively.
Once the spiral center reaches the desired size, begin converting the circular shape into a triangle. Identify three evenly spaced points around the motif. At each point, create a corner using a combination such as dc, ch 2, dc in the same stitch or chain space. Between the corners, work regular stitches or small chain spaces. During the following rounds, always work another corner combination into each previous corner space so the three corners become increasingly defined.
Make one complete sample triangle before producing all the pieces required for the bag. Measure each side and record the finished dimensions, hook size, yarn type, and approximate number of rounds. The sample is extremely important because the 3D triangular crochet bag pattern depends on triangles fitting together accurately. If the motif is too flexible, switch to a slightly smaller hook. If it feels extremely stiff or difficult to work, try a hook that is 0.5 mm larger.
How to Crochet the 3D Triangular Motifs Step by Step
Begin each motif with the three-color spiral center. Create the center ring, distribute your starting stitches evenly, and gradually expand the three colored sections. Instead of turning the work after each section, continue working in the same direction so the colors naturally curve around one another. Use increases at regular intervals to prevent the center from becoming bowl-shaped. A slight texture is desirable because it contributes to the 3D crochet effect, but severe rippling usually indicates too many increases.
When the spiral measures approximately 6 to 8 cm across for a medium-size triangle, prepare to create the surrounding frame. Join your main border color at one point of the circle and work a sequence of taller stitches and chains around the center. For example, work dc stitches separated by ch 1 spaces, spacing them evenly without forcing extra stitches into the round. Mark three positions approximately equal distances apart. These markers will become the three corners of your triangle.
At the first corner marker, work 2 dc, ch 2, 2 dc into the same stitch or space. Continue the side using your chosen combination of double crochet and chain spaces until reaching the second corner. Repeat the same corner sequence, continue toward the third marker, make another corner, and complete the round. Join to the first stitch with a sl st. You should now see a clear triangular outline beginning to surround the colorful spiral.
For the next round, move to the first chain space using slip stitches if necessary. Work dc or sc stitches into each chain space, depending on the density you prefer. In every corner space, repeat a widening combination such as 2 dc, ch 2, 2 dc. Maintaining the same corner construction on every round is essential because it gives the crochet triangle motif its three strong points. If one side begins to appear shorter than the others, carefully recount the spaces before continuing.
To create a more decorative openwork effect, alternate solid rounds with lace rounds. A simple lace repeat is ch 3, skip one or two stitches, sc into the next space, repeated across each side. At the corners, create a slightly larger chain loop, such as ch 4 or ch 5, so the point can expand naturally. On the following round, work stitches directly into those chain loops. This creates visible openings without weakening the outer structure of the motif.
Finish every triangle with a firm border of single crochet. Work one single crochet into each stitch and enough stitches into each chain space to keep the edge flat. At every corner, work sc, ch 1, sc or three single crochet stitches into the same space. Fasten off securely and weave in the yarn ends with a yarn needle. Block each triangle to exactly the same measurements before joining, because consistent blocking is one of the easiest ways to make the final bag look polished and symmetrical.
Joining the Triangles and Building the Crochet Bag
Lay all completed triangles on a flat surface before joining them. Experiment with different arrangements until the geometric design feels balanced. A handbag inspired by the 3D triangular knit pattern for a bag Pattern can use six, eight, ten, or more motifs depending on their size and the intended shape of the bag. Position the colorful spirals in the same direction for a coordinated appearance, or rotate alternating motifs for a dynamic pinwheel effect. Take a quick reference photo of the arrangement before you begin joining so you do not accidentally change the planned placement.
The triangles can be connected using slip stitch joining, single crochet joining, or a yarn-needle seam. For a visible raised seam similar to the geometric structure often seen in this style of bag, place two triangles with their wrong sides together and single crochet through both corresponding edge loops. Work slowly and match stitch to stitch. Avoid adding extra stitches because excessive joining stitches can make the seam buckle. When you reach a corner, secure it firmly before attaching the next triangle.
Continue adding motifs until one complete side panel is formed. Create a matching panel for the opposite side if your chosen construction requires two separate sections. Another option is to join the motifs continuously so they wrap around the sides and bottom. Continuous construction can reduce the number of seams and produce an interesting three-dimensional shape. Whatever method you choose, regularly place the piece flat on the table to check that the joined triangles are not twisting.
After the main body is assembled, crochet a firm top edge. Join the main color and work one or more rounds of single crochet around the opening. If you want a more structured handbag, decrease a few stitches evenly around the top so the opening becomes slightly narrower than the widest section of the bag. A second round of slip stitches can provide extra reinforcement. This upper edge is particularly important because it supports the handles and receives frequent tension during use.
Handles can be handmade or purchased. For crochet handles, make a strong chain to the required length, then work several rounds of tight single crochet around it. A tubular or cord-style handle will generally be stronger than a simple flat strap. Attach each end securely through reinforced sections of the top border. If using metal rings, crochet around the rings several times and sew the yarn tails back through the attachment area for additional security.
A fabric lining is optional but highly recommended for a practical crochet handbag pattern. Trace the finished bag body onto fabric, adding approximately 1 to 1.5 cm for seam allowance. Sew the lining pieces together, leaving the top open, and place the lining inside the crochet shell with the wrong sides facing each other. Fold the raw fabric edge inward and hand-sew it to the upper crochet border using small concealed stitches. Finish with a magnetic clasp, zipper, button, or decorative closure if desired.
FAQ About the 3D Triangular Knit Pattern for a Bag Pattern
Is the 3D triangular knit pattern for a bag Pattern knitted or crocheted? Despite the word “knit” appearing in the popular title, the version explained here is worked with a crochet hook and crochet stitches. The triangular motifs use chains, single crochet, half double crochet, double crochet, slip stitches, and increases. If you are comfortable reading standard U.S. crochet abbreviations, you can follow the construction without needing knitting needles.
What yarn is best for a triangular crochet handbag? A firm yarn usually gives the best results because it helps maintain the shape of the triangles. Cotton yarn, cotton blends, polyester cord, and certain sturdy synthetic yarns are popular choices. Very soft or highly elastic yarn can still be used, but the finished bag may need a strong lining or stabilizer. Before committing to the entire project, crochet one sample triangle and check whether you like its structure.
How many triangular motifs do I need for the bag? There is no universal number because the required amount depends on the size of each motif and your desired handbag dimensions. A smaller project may require about six motifs, while a larger geometric bag can require ten or more. Arrange completed triangles on a table before joining them and measure the planned layout. This is much safer than guessing the final size based only on the dimensions of one piece.
How can I keep all the crochet triangles the same size? Consistent tension is the most important factor. Use the same yarn, hook, stitch counts, and number of rounds for every triangle. Measure your pieces periodically rather than waiting until they are finished. Blocking is also extremely helpful: lightly dampen the motifs, shape them to the same measurements, secure them on a blocking surface, and allow them to dry completely before assembly.
Why is my crochet triangle curling or rippling? Curling often means there are not enough increases, while strong rippling can mean there are too many. However, yarn type and hook size can also influence the result. Check whether each of the three corners contains the same increase sequence and make sure the side stitch counts are equal. Mild curling can usually be corrected through blocking, but significant distortion should be fixed before making the remaining motifs.
Can beginners make the 3D triangular knit pattern for a bag Pattern? A confident beginner can attempt it after practicing chain stitches, single crochet, double crochet, slip stitches, color changes, increases, and joining. The individual techniques are not especially complicated, but combining several colors and keeping triangular shapes consistent requires patience. Making one practice motif first is the best approach. Once you understand the first triangle, the remaining pieces become repetitive and much easier to complete.
Conclusion
The 3D triangular knit pattern for a bag Pattern offers a beautiful way to combine crochet geometry, three-dimensional texture, colorful spiral motifs, and practical bag construction in one project. You learned how to interpret the crochet stitch key, create the colorful center, transform a circular motif into a triangle, add lace sections, reinforce the border, block the pieces, and join multiple triangles into a structured handbag. You also saw how strong handles, reinforced edges, hardware, and an optional fabric lining can make the finished project more suitable for regular use.
The greatest advantage of this 3D triangular crochet bag pattern is its flexibility. Once you understand how the triangle is constructed, you can experiment with different color combinations, yarn textures, motif sizes, joining techniques, handle styles, and bag shapes. Use the instructions as a foundation and allow your own creativity to determine the final appearance. If you make this project, leave your sincere opinion about the pattern and share your suggestions, favorite color combinations, or ideas for improving the design. Your experience can inspire new variations and help other crochet lovers create their own unique geometric bags.