
The Poinsettia Shaped Felt Cutlery Holder Pattern is a beautiful way to combine practical holiday table décor with the warmth of handmade sewing. Inspired by the classic Christmas poinsettia, this project transforms simple pieces of felt into an elegant cutlery pocket decorated with layered red petals, green leaves, golden details, and decorative stitching. The finished holder can accommodate a knife, fork, and spoon while adding a festive focal point to each place setting. Because felt is stable and does not fray easily, the project is approachable for beginners while still offering enough decorative possibilities to interest experienced crafters. The design can be sewn primarily by hand, although a sewing machine may be used for some structural seams. Most importantly, the pattern can be customized to coordinate with traditional, rustic, farmhouse, or modern Christmas décor.
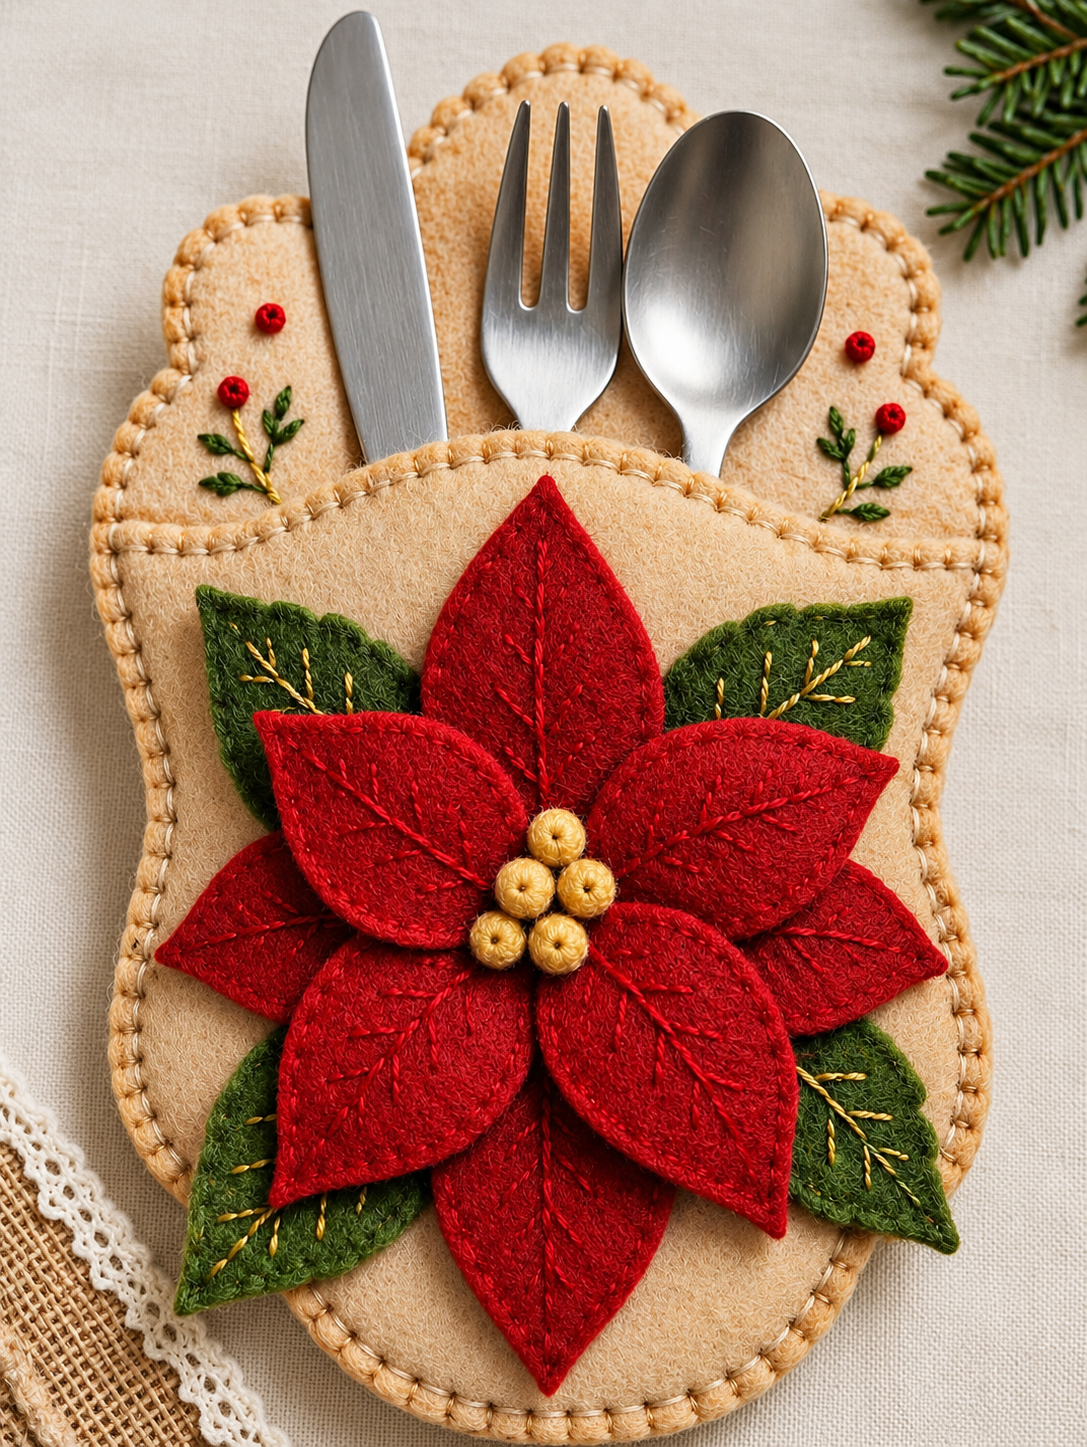
Looking closely at the project, its charm comes from several simple elements working together. The main holder uses a warm beige felt that provides a neutral background for the intense red poinsettia. A rounded, scalloped back section extends above the pocket, while a second felt layer creates the actual compartment for the silverware. The centerpiece consists of overlapping red felt poinsettia petals, with dark green leaves positioned behind them and small golden or yellow centers completing the flower. Decorative stitches around the edges give the piece a carefully finished handcrafted appearance. Small embroidered berry branches near the upper sides add another seasonal detail without competing with the large flower. This combination makes the Poinsettia Shaped Felt Cutlery Holder Pattern especially suitable for Christmas dinners, winter celebrations, and handmade holiday décor.
One of the advantages of making your own felt cutlery holder is the ability to adjust every part of the project. The pocket can be made slightly wider for larger flatware, the poinsettia can contain fewer or more petals, and the colors can be adapted to your existing table decorations. Cream, camel, beige, or light brown felt works particularly well for the foundation, while red, burgundy, forest green, and gold provide recognizable Christmas accents. Before cutting expensive or specialty felt, it is helpful to create a paper prototype and place your actual knife, fork, and spoon inside it. That small preparation step allows you to verify the proportions and pocket depth before sewing. With careful cutting and consistent stitching, you can create a reusable holiday accessory that looks polished while retaining the character of a handmade project.
Materials and Measurements for the Poinsettia Shaped Felt Cutlery Holder Pattern
For one Poinsettia Shaped Felt Cutlery Holder Pattern, gather medium-weight or firm craft felt in beige or camel, red felt for the petals, dark green felt for the leaves, and a small amount of yellow or golden felt or embroidery thread for the flower center. You will also need coordinating sewing thread, embroidery floss, fabric scissors, pins or sewing clips, a hand-sewing needle, paper, a pencil, and a ruler. Fabric-safe marking tools can make positioning the appliqué pieces easier. A sewing machine is optional because the entire project can be completed with hand stitches.
DISCOVER MORE FREE PATTERNS HERE!
A practical finished size for the holder is approximately 14–16 cm wide and 23–26 cm tall, although these measurements should be adapted to your flatware. The back foundation should be tall enough to protect and visually frame the utensils. The front pocket can measure approximately 14–16 cm wide and 14–17 cm high. Add enough room so the utensils slide inside easily rather than fitting tightly. Since felt usually does not require a traditional seam allowance when edges remain exposed, you can work close to the finished dimensions, adding a few millimeters where necessary for stitching.
To create the distinctive top of the holder, draw a paper template with softly rounded scallops. A useful approach is to create one central rounded section with rounded side lobes, producing a shape reminiscent of overlapping petals. Fold the paper template vertically before trimming it so both sides remain symmetrical. The bottom can be gently rounded as well. Place this template on the beige felt and cut the back panel carefully, keeping the curves smooth and continuous.
The front pocket should follow the lower outline of the back panel while ending well below the scalloped top. Its upper edge may be a shallow curve, as seen in the inspiration design, rather than a straight line. This curved opening makes the cutlery easier to access and provides an attractive background for the poinsettia. Cut one pocket piece and temporarily place it over the back panel. Insert your silverware before sewing to make sure the pocket is deep and wide enough.
For the poinsettia, prepare several pointed leaf-shaped templates in different sizes. You can make approximately 7 to 9 red petals, depending on how full you want the flower to appear. Larger petals may measure roughly 7–9 cm long, while smaller upper petals can measure around 5–7 cm. Cut approximately 4 green leaves, each around 6–8 cm long. These measurements are flexible because handmade poinsettias often look more natural when the petals are not completely identical.
Finally, choose your decorative thread thoughtfully. Golden embroidery thread creates an especially attractive contrast against red and green felt and complements the warm beige foundation. Red thread can blend into the petals, while green thread produces subtle veins on the leaves. For the structural edges, beige or golden thread works well. Before beginning the final piece, practice the selected stitches on felt scraps. Even stitches will contribute significantly to the professional appearance of the finished holder.
How to Cut and Sew the Felt Cutlery Holder
Begin by transferring the back-panel template to your chosen felt. Trace lightly so the markings do not remain visible on the finished project. Cut slowly around each scallop, turning the felt rather than making abrupt movements with the scissors. Clean, smooth edges are particularly important with felt because the construction leaves them visible. Once the first panel is complete, use it as a reference when cutting additional holders for a matching Christmas table set.
Next, position the front pocket over the lower portion of the foundation. Align the bottom and side edges, leaving the curved upper edge completely open. Use sewing clips or a few pins to keep the layers from shifting. Test the opening again with your knife, fork, and spoon. The cutlery pocket should hold the utensils securely while still allowing them to be removed comfortably. If the fit is too narrow, correct the pattern before stitching.
Sew around the sides and bottom of the pocket using a blanket stitch, whip stitch, or another decorative edge stitch. Blanket stitch is particularly effective because it reinforces the felt while creating a visible handmade border. Try to keep the distance between stitches consistent. A spacing of approximately 4–6 mm can produce a balanced appearance, although there is no requirement for every stitch to be mathematically identical.
Continue decorative stitching around the exposed outer edge of the back panel. This detail visually connects the pocket and foundation and gives the entire project a finished outline. If you want a more festive effect, use golden thread for this stage. A thicker embroidery floss can create stronger definition than ordinary sewing thread. Avoid pulling the stitches excessively tight, as this may cause the felt edges to curl or become distorted.
The small botanical decorations near the upper portion can be embroidered before or after the pocket is assembled, although doing them before attaching bulky flower layers is generally easier. Create thin stems with backstitch or stem stitch, add small green leaf shapes, and finish them with tiny red berry details. These decorations should remain relatively small because the central poinsettia is intended to be the dominant visual feature.
At this stage, place the cutlery inside the holder and inspect the overall proportions. Make sure the pocket does not lean to one side and that the utensils emerge naturally from the scalloped upper background. If you are making multiple holders, complete all foundation pieces before assembling the flowers. Working in batches can help maintain consistent dimensions and stitching across the entire set.
Creating the Layered Red Felt Poinsettia
The flower is the defining feature of the Poinsettia Shaped Felt Cutlery Holder Pattern, so take time arranging the petals before permanently attaching them. Begin with the green leaves. Position approximately four leaves around the center point, allowing their pointed tips to extend beyond the red flower. Two can angle toward the upper corners while the remaining leaves extend toward the lower sides. Pin or lightly tack them in place once you are satisfied with the arrangement.
Add decorative veins to each green felt leaf using green, yellow, or golden embroidery floss. A central line can run from the base toward the tip, with several smaller diagonal stitches branching outward. These simple lines add texture and make flat pieces of felt look considerably more dimensional. Gold thread provides a particularly festive result and visually connects the leaves with the flower center and outer stitching.
Arrange the largest red petals over the green leaves. Place them around an imaginary center point, overlapping their bases slightly. Rather than positioning every petal in a perfectly flat circle, vary the angles and overlap. Real poinsettias have layered bracts, and this irregular arrangement helps the handmade flower feel more natural. The lowest petals should extend outward and provide the broad silhouette of the flower.
Add the smaller red petals over the first layer. One petal can point upward, two can angle sideways, and additional petals can fill the lower portion. Stitch each petal primarily through its center and near its base rather than sewing every edge completely flat. This technique allows the edges to rise slightly, producing the attractive three-dimensional felt flower effect visible in the project.
Embroider a vein along the center of each red petal. You can use matching red thread for subtle definition or slightly brighter red thread for greater visibility. Small angled stitches branching from the central vein can add additional texture. Keep the embellishment restrained; the goal is to emphasize the shape and handcrafted construction of the petals without covering the felt surface with excessive stitching.
Finish the poinsettia by creating several small golden flower centers. Small circles of yellow or gold felt can be gathered into tiny padded shapes, or compact embroidered knots can be used instead. Arrange approximately five small centers closely together. Their warm color provides a strong focal point against the red petals and completes the recognizable poinsettia appearance. Secure every component firmly because the cutlery holder will likely be handled repeatedly during holiday meals.
Finishing, Customizing, and Caring for Your Christmas Cutlery Holder
Once the poinsettia is attached, examine the back of the holder for loose knots or unsecured thread ends. Tie and trim them carefully without cutting structural stitches. Check the edges of every petal and leaf as well. Because the flower is layered, individual pieces can catch on objects if they are attached too loosely. Reinforce the bases where necessary while preserving some dimension at the tips.
You can customize the Poinsettia Shaped Felt Cutlery Holder Pattern in many ways without changing its fundamental construction. Traditional Christmas colors include bright red, deep green, and gold, but burgundy petals with olive leaves can create a more rustic appearance. White or cream poinsettias paired with gold centers can produce a softer winter theme. For a farmhouse-inspired table, consider camel, oatmeal, or natural beige felt for the foundation.
If you are preparing several holders, create reusable paper or cardstock templates for every component. Label each template with the piece name and quantity, such as Back Panel – Cut 1, Front Pocket – Cut 1, Large Petal – Cut 4, and Green Leaf – Cut 4. This simple organization makes batch production much easier and helps ensure that all your finished place settings have similar proportions.
The project can also be personalized for family dinners. Small initials may be embroidered discreetly near the lower edge, effectively turning each Christmas cutlery holder into a place marker. Another option is to vary the flower-center colors slightly for each guest. Keep personalized elements relatively subtle so they complement rather than overpower the large poinsettia appliqué.
For storage, remove all silverware and place the felt holders flat in a dry container. Avoid folding the poinsettia because persistent creases can alter the three-dimensional petals. If a petal becomes compressed, gently reshape it with your fingers. Care requirements depend on the exact felt fiber you purchase, so follow the manufacturer’s instructions regarding cleaning, moisture, heat, and ironing.
Before placing the holders on the table, inspect them for lint or stray fibers and gently remove these by hand or with an appropriate fabric-care tool. Arrange the knife, fork, and spoon consistently in every pocket for a coordinated presentation. Against neutral napkins, wooden table surfaces, or simple dinnerware, the bold red felt poinsettia can become the central decorative element without requiring elaborate additional ornaments.
Most importantly, treat the measurements in this tutorial as a starting point rather than an inflexible rule. Flatware varies significantly in length and width, and felt also differs in thickness. Creating one prototype is the best way to refine your personal Poinsettia Shaped Felt Cutlery Holder Pattern. Once you are satisfied with that first version, trace its components to produce a coordinated set for your holiday table.
FAQ About the Poinsettia Shaped Felt Cutlery Holder Pattern
What is a Poinsettia Shaped Felt Cutlery Holder Pattern?
It is a sewing and felt-craft pattern used to create a decorative pocket for holding table utensils. The design features a layered poinsettia made from red and green felt, making it particularly appropriate for Christmas and winter table settings.
Is this felt cutlery holder suitable for beginners?
Yes. The basic construction requires straightforward cutting, layering, and hand stitching. Beginners can simplify the decorative embroidery and still achieve an attractive result. Practicing blanket stitch on leftover felt before working on the final holder can make the process easier.
What type of felt works best for this project?
A medium-weight felt with enough structure to support the silverware is a practical choice. Very thin felt may feel floppy, while extremely thick felt can make layered areas bulky. The exact fiber composition can be selected according to your budget, desired finish, and care requirements.
How large should a felt cutlery holder be?
A useful starting range is approximately 14–16 cm wide by 23–26 cm tall, with the front pocket measuring around 14–17 cm high. However, always measure your actual utensils before finalizing the pattern because flatware dimensions vary.
How many red petals are needed for the poinsettia?
Approximately 7 to 9 petals can create a full layered flower. Combining large and smaller petals adds depth. You can experiment with the arrangement on the holder before stitching anything permanently.
Can I sew the entire project by hand?
Absolutely. In fact, visible hand stitching is part of the charm of this design. Blanket stitch, backstitch, running stitch, and simple embroidery stitches can handle virtually every part of the project. A sewing machine is optional rather than essential.
How can I make the poinsettia look three-dimensional?
Avoid stitching every petal completely flat around its perimeter. Secure the petal firmly through the central vein and base while allowing portions of the edges and tips to remain slightly raised. Overlapping petals of different sizes will further enhance the layered effect.
Can I make the pattern without the embroidered berries?
Yes. The berry branches are decorative rather than structural. Removing them creates a cleaner, simpler version and can reduce the amount of embroidery required. Alternatively, you can replace them with small stars, leaves, dots, or other seasonal motifs.
Can the colors be changed?
Definitely. While red poinsettia petals, green leaves, beige felt, and golden accents provide a traditional Christmas palette, the pattern can be adapted to cream, white, burgundy, pink, olive, silver, or other colors that coordinate with your holiday decorations.
Can these holders be reused every Christmas?
They can be designed as reusable decorations when made from suitable materials and stored carefully. Keep them clean and dry, remove the utensils before storage, and avoid crushing the layered flowers. Always follow the care recommendations provided for the particular felt you use.
Should I add a seam allowance to the felt pattern?
Traditional seam allowance is often unnecessary for exposed felt edges because felt generally does not unravel like woven fabric. However, you should leave sufficient space around the pocket for your chosen edge stitch and ensure the final internal width accommodates your utensils.
How can I make several matching holders efficiently?
Create durable templates first and cut all pieces in batches. Prepare all back panels, then all pockets, leaves, petals, and centers. Completing the same sewing step across several holders at once can improve consistency and make a full table set easier to produce.
Can the holder be personalized?
Yes. Initials, names, small embroidered motifs, contrasting stitches, or differently colored flower centers can personalize individual pieces. Personalized holders can also function as decorative place markers during Christmas dinner.
What stitches are useful for this felt project?
The blanket stitch is excellent for exposed edges, while backstitch works well for flower veins and botanical details. Running stitch can provide simple decoration, and small knots or tightly worked stitches can help create textured flower centers.
Why make a handmade felt cutlery holder for Christmas?
A handmade holder combines decoration and function in one compact project. It provides an opportunity to practice felt appliqué and embroidery while creating something that can become part of a recurring holiday table tradition.
Conclusion
The Poinsettia Shaped Felt Cutlery Holder Pattern turns basic felt, thread, and a few straightforward sewing techniques into an eye-catching Christmas table accessory. Throughout this tutorial, you learned how to plan the holder dimensions, create the scalloped foundation, construct a practical cutlery pocket, cut and layer the red poinsettia petals, position green leaves, embroider decorative details, and finish the flower with warm golden centers.
The most important part of the process is careful preparation. Measuring your own silverware, testing a paper template, cutting smooth felt shapes, and arranging the poinsettia before sewing can prevent many common problems. From there, decorative hand stitching, layered appliqué, and thoughtful color choices give the project its distinctive handcrafted character. Once you have completed one holder, the same templates can be reused to create an entire matching set. You can also personalize the Poinsettia Shaped Felt Cutlery Holder Pattern with different colors, embroidery styles, initials, flower sizes, or seasonal details, making every version uniquely yours.
EASILY FIND THE FREE PDF FOR THIS PATTERN HERE!
Whether you make a single piece as a decorative accent or a complete set for Christmas dinner, this project is a lovely opportunity to combine felt sewing, holiday décor, embroidery, and functional handmade design. If you try this pattern, leave your sincere opinion about the project and share your suggestions. What colors, stitches, or creative details would you add to your own poinsettia cutlery holder?