
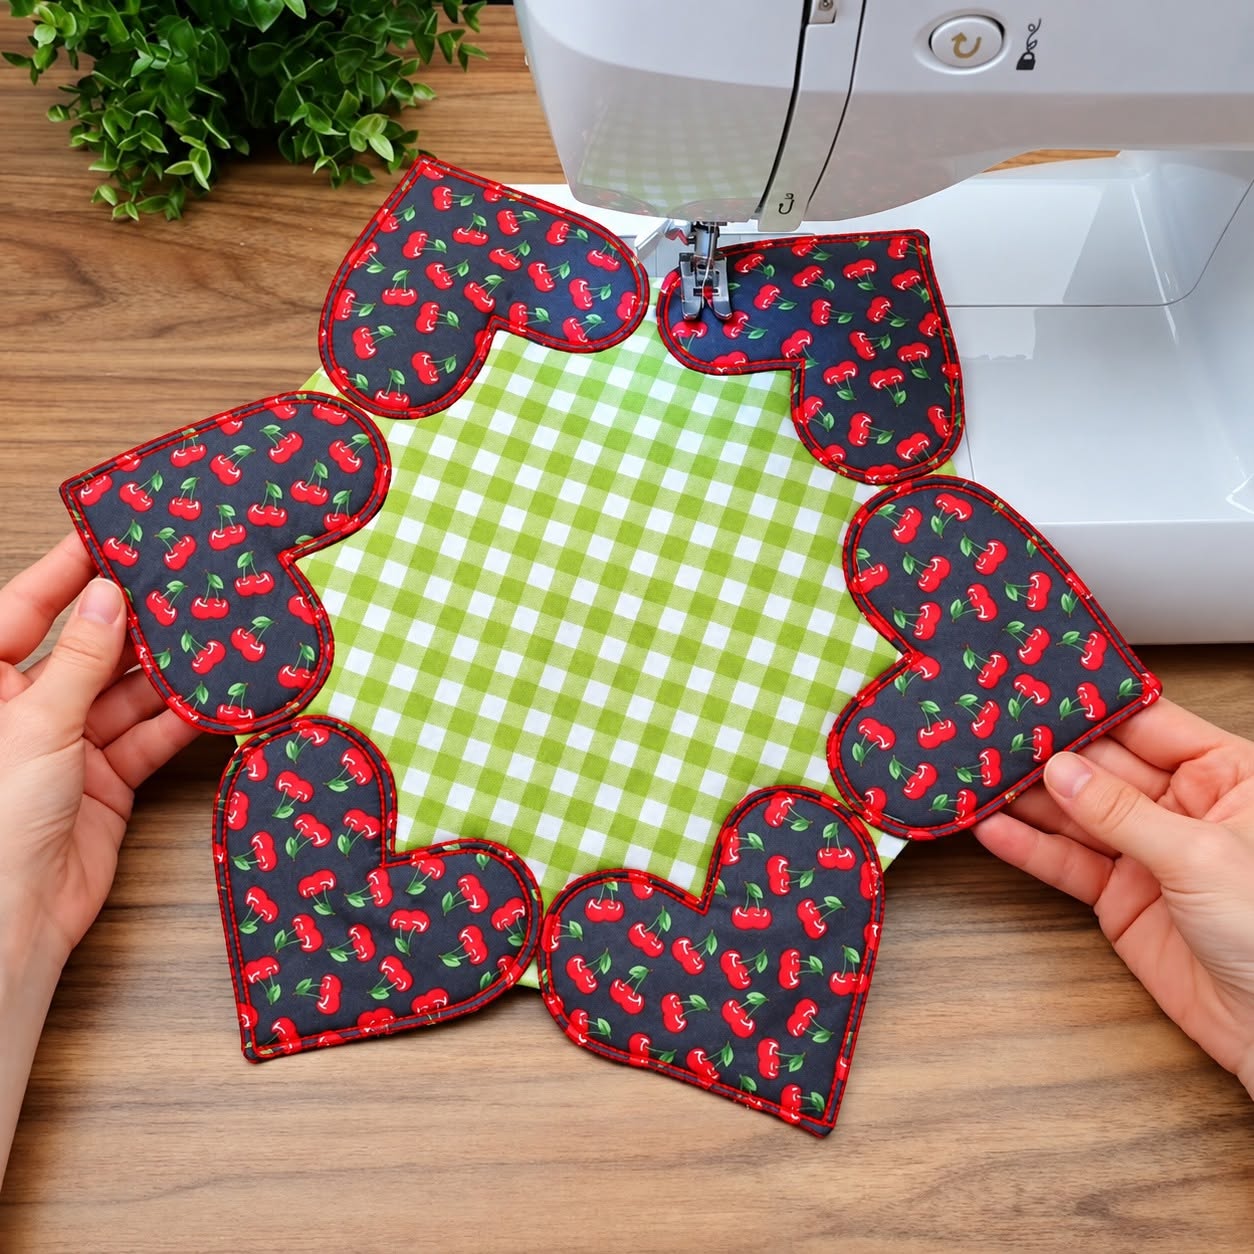
Heart Shaped Placemat Tutorial Pattern is a charming sewing project that combines practical table décor with the warmth of handmade patchwork. Inspired by the placemat shown in the reference image, this design features a central fabric panel surrounded by overlapping heart-shaped fabric pieces, creating a flower-like arrangement around the edges. The combination of contrasting prints makes every heart stand out while keeping the finished project cheerful, cozy, and suitable for everyday use. It is also a wonderful project for using coordinating cotton fabrics or carefully selected scraps left from previous sewing projects.
One of the most appealing features of this Heart Shaped Placemat Tutorial Pattern is that the design looks elaborate while being constructed from relatively simple shapes. Instead of relying on complicated quilt blocks, the project uses repeated heart units arranged around a central panel. Beginners can use the tutorial to practice template cutting, sewing curved seams, turning fabric pieces, topstitching, pressing, layering, and accurate placement. More experienced sewists can personalize the design with decorative stitching, quilting, seasonal prints, or different fabric combinations.
The finished placemat can be adapted for breakfast tables, family dinners, seasonal decorating, or handmade gifts. A green gingham center paired with dark fabric and small red motifs creates a lively country-inspired appearance similar to the reference project, but the same construction can work with florals, solids, fruit prints, farmhouse fabrics, or holiday collections. The key to a successful Heart Shaped Placemat Tutorial Pattern is maintaining consistent heart shapes, a balanced arrangement, and neat stitching so the individual pieces come together as one cohesive handmade table accessory.
Materials, Fabric Choices, and Preparation for the Heart Shaped Placemat Tutorial Pattern
Start by selecting 100% quilting cotton or another stable, medium-light woven cotton. Quilting cotton is particularly convenient because it is easy to cut, press, sew, and topstitch. For a design inspired by the photo, choose one fabric for the center and a contrasting print for the hearts. A small-scale print works especially well on the hearts because the motifs remain visible even after the pieces are cut into relatively small shapes.
DISCOVER MORE FREE PATTERNS HERE!
You will also need lightweight batting or fusible fleece if you want the placemat to have a soft, lightly padded structure. Prepare coordinating or contrasting sewing thread, fabric scissors or a rotary cutter, pins or sewing clips, an iron, a sewing machine, and paper for creating the heart template. A removable fabric marker can be useful for transferring placement marks and stitching guides.
For a practical starting size, create a symmetrical paper heart approximately 14–16 cm wide and 13–15 cm high. These dimensions can be adjusted according to your desired finished placemat size. The important detail is consistency: every surrounding heart should be cut from the same template so that the repeated shapes form an even decorative border. Remember that the dimensions in this tutorial are adaptable rather than exact measurements taken from the photograph.
Each padded heart can be made using two fabric layers plus a thin batting layer. Place the fabric pieces with right sides together and position the batting against the wrong side of one fabric piece. Sew around the shape using approximately a 0.7–1 cm seam allowance, leaving a small opening for turning. Carefully clip the curved seam allowances without cutting through the stitching so the heart turns smoothly.
Turn each heart right side out and gently shape the curves and lower point. A blunt turning tool can help define the edges without damaging the fabric. Press each heart flat, folding the raw edges of the turning opening inward. Finish with topstitching approximately 2–3 mm from the edge, which closes the opening while giving the heart a crisp and professionally finished outline.
Before assembling anything permanently, make all of the required hearts and arrange them on a flat surface. The reference design uses a repeated circle of hearts around the center, so test the spacing carefully. Rotating each heart around the central area allows the pointed ends to extend outward while the rounded sections visually connect with neighboring pieces. This preparation stage helps you identify spacing problems before sewing the final assembly.
Step-by-Step Sewing and Construction of the Heart Pieces
To create your reusable heart template, fold a piece of paper in half and draw half of a heart along the folded edge. Cut through both layers and unfold the paper. This simple method creates a symmetrical template. Place it over your chosen fabric and trace around it using a removable marker. For every finished heart, cut two mirrored fabric pieces and, when desired, one matching batting piece.
Place the two heart fabrics right sides together. If you are adding batting, position it underneath or on top of the fabric sandwich according to the batting type you are using. Pin or clip the layers so they do not shift. Sew slowly around the heart, paying special attention to the upper indentation and the rounded sides. Slowing down around curves gives you much greater control than trying to sew the entire shape at one constant speed.
Leave a turning opening of approximately 4–5 cm along one of the straighter portions of the heart. Once the seam is finished, trim excess bulk and carefully clip the seam allowance around the curves. Make a precise clip toward the stitching at the upper heart indentation, stopping just before the seam. This helps the fabric spread properly after turning and prevents excessive puckering.
Turn the heart through the opening and gently push out its lower point. Shape the rounded sections with your fingers before pressing. Fold the opening’s seam allowance inward so it follows the original sewing line. Pressing is particularly important in this project because the repeated heart units need similar dimensions and smooth edges to create an attractive final arrangement.
Topstitch around the entire heart using a short, even straight stitch. A 2–3 mm edge distance generally provides a neat result while securing the layers. Decorative thread can also become part of the design. For example, gold, red, cream, or another contrasting thread can emphasize the heart outlines and give the Heart Shaped Placemat Tutorial Pattern additional visual definition.
Repeat this process until you have enough hearts to surround your center comfortably. The exact number depends on the dimensions of your heart template and center panel, so arrange the completed units before deciding that you have enough. Repetition is what gives this project its distinctive character, and taking the time to make the hearts consistently will noticeably improve the finished placemat.
Creating the Center and Assembling the Heart Shaped Placemat
The central section provides structure and visually connects all of the hearts. Start with a square or gently shaped fabric panel large enough to cover the inner edges of the surrounding hearts. A gingham fabric, as seen in the inspiration image, creates strong contrast against darker printed hearts. You could also choose solid cotton, small florals, farmhouse checks, fruit prints, or subtle geometric fabrics.
For extra body, layer the central fabric with thin batting and a backing fabric. Depending on your preferred construction method, you can sew the layers right sides together and turn them, or quilt the center before finishing its edges. Keep the padding relatively light because an excessively thick placemat can make cups and plates less stable. The goal is a soft but reasonably flat finished surface.
Lay the finished center on your work surface and position the hearts evenly around it. Point the lower tips outward while allowing the rounded upper portions to overlap or meet the central area. Work around the design gradually rather than attaching pieces immediately. Check the placemat from several angles and make small adjustments until the hearts appear evenly distributed.
Once you are satisfied with the arrangement, secure the hearts using pins or sewing clips. If the layers are difficult to manage, temporary basting stitches can make final sewing easier. Attach the hearts individually or in small sections, keeping your stitching neat and consistent. The central panel should cover or visually integrate the inner joining area so that the construction looks intentional rather than crowded.
After assembly, inspect every heart to make sure no edge has folded underneath during sewing. Check the center for puckering and verify that all layers are securely attached. If necessary, add another line of decorative topstitching around the central area. This can reinforce the construction while creating a subtle quilted appearance that complements the stitched outlines of the hearts.
Give the completed placemat a careful final press, following the temperature recommendations for your fabric and batting. Avoid aggressively stretching the heart points or curved edges. Once pressed, place the Heart Shaped Placemat Tutorial Pattern project flat and check its overall balance. Small handmade variations are completely natural, but the center should sit comfortably and the surrounding hearts should create a harmonious radial arrangement.
Finishing Ideas, Customization, Care, and FAQ
Customization is one of the strongest advantages of this pattern. A romantic version could combine pink, cream, and red fabrics, while a farmhouse placemat might feature gingham, denim-look cotton, and small floral prints. Autumn versions can use orange, brown, gold, and green, while Christmas versions can incorporate traditional red, green, cream, and festive motifs. The construction remains essentially the same while the fabric selection completely transforms the appearance.
You can also use fabric scraps to make every heart different. This creates a scrappy patchwork appearance and makes the project useful for reducing leftover fabric. To keep a multicolor version visually balanced, repeat one or two colors throughout the arrangement or use the same fabric for the central panel. That recurring element helps connect otherwise different prints.
Decorative stitching provides another opportunity for personalization. Standard straight topstitching creates a clean finish, but compatible decorative machine stitches can emphasize the edges. Contrasting thread makes the stitching part of the design, while matching thread produces a softer effect. Whatever option you select, test the stitch on scrap fabric first to confirm the tension and appearance.
If you want additional quilting, keep it relatively simple. Straight lines, diagonal quilting, gentle grids, or stitching that follows the gingham pattern can add texture to the center without competing with the hearts. The surrounding heart units already provide considerable visual interest, so restrained quilting often creates the most balanced result.
For regular care, washing recommendations should follow the requirements of the specific fabrics, batting, and thread used in your project. Prewashing cotton before construction may help reduce unexpected shrinkage, especially if the placemat will be washed frequently. After washing, reshape the placemat while damp if necessary and press it carefully to restore its flat appearance.
Most importantly, treat the Heart Shaped Placemat Tutorial Pattern as a flexible foundation rather than a rigid formula. Adjust the heart size, central dimensions, prints, padding, and stitching to suit your table and sewing style. Making a test heart from scrap fabric before cutting the entire project is an excellent way to confirm your seam allowance, finished dimensions, batting thickness, and preferred topstitching.
FAQ: Frequently Asked Questions About the Heart Shaped Placemat Tutorial Pattern
What fabric is best for a Heart Shaped Placemat Tutorial Pattern?
Quilting cotton is an excellent choice because it is stable, widely available, easy to press, and simple to sew. Medium-light woven cotton also works well. If you combine different fabrics, try to choose materials with similar weights so the hearts remain consistent.
Do I need batting inside the hearts?
Batting is optional, but a thin layer can give the hearts more structure and make the placemat feel pleasantly padded. Avoid extremely thick batting if the finished piece will be used under plates, glasses, or mugs because a flatter surface is generally more practical for table use.
How large should each heart be?
A heart approximately 14–16 cm wide is a useful starting point, but the ideal dimensions depend on your central panel and desired finished placemat size. Create one test heart first, place it against the planned center, and adjust the template before cutting all the remaining pieces.
How many hearts are needed for one placemat?
There is no universal number because it depends on the dimensions and overlap of your individual hearts. The reference design creates a full radial arrangement around the center. Make a paper mock-up first or position your fabric hearts without sewing them down to determine the best quantity for your version.
How do I sew smooth curves around a fabric heart?
Sew slowly, shorten the stitch length slightly if necessary, and stop with the needle down whenever you need to reposition the fabric. After sewing, carefully clip the curved seam allowance before turning. Pressing and topstitching will further define the finished curve.
Why does the top indentation of my heart look puckered?
The seam allowance around the indentation may need additional clipping. Carefully clip toward—but never through—the seam at the center notch. Removing excess bulk from this area allows the seam allowance to spread more naturally when the heart is turned right side out.
Can beginners make this heart-shaped placemat?
Yes. The repeated construction makes it particularly useful for practicing fundamental sewing techniques. Beginners should work slowly around the curves and create one complete test heart before cutting all the pieces. Each additional heart generally becomes easier as you become familiar with the construction.
Can I make matching table accessories from the same pattern?
Certainly. The heart motif can inspire coordinating mug rugs, table toppers, decorative mats, or other sewn table accessories. Keeping the same fabric collection and stitching style helps create a coordinated handmade set.
Can I use leftover fabric for this project?
Yes. A scrap fabric placemat can be especially attractive because every heart can feature a different print. Arrange your colors before sewing so the finished piece feels balanced rather than having similar colors concentrated in one section.
Should I prewash my fabric?
Prewashing is helpful when you expect the finished placemat to be washed regularly or when you are combining cotton fabrics that may shrink differently. Follow the care recommendations for all materials being used, including batting and decorative threads.
How can I make all the hearts the same size?
Use one durable template for every piece and maintain the same seam allowance throughout construction. Consistent cutting, stitching, trimming, turning, and pressing are more important than sewing quickly. You can also compare each completed heart with your first finished unit before beginning assembly.
Can I change the colors shown in the inspiration image?
Absolutely. The Heart Shaped Placemat Tutorial Pattern works with virtually any coordinated palette. Red and cream can create a romantic look, yellow and blue can feel cheerful, green and neutral fabrics can create a farmhouse effect, and multicolored scraps can produce a lively patchwork design.
How can I make the placemat look professionally finished?
Focus on accurate templates, smooth curves, careful pressing, consistent seam allowances, and even topstitching. Before final assembly, arrange every component on a flat surface and check the spacing. These relatively simple details often have a greater impact on the finished appearance than complicated decorative techniques.
Can the pattern be enlarged?
Yes. Enlarge both the central section and heart template proportionally. Before cutting expensive fabric, create paper versions of the enlarged components and arrange them together. This allows you to confirm the overall dimensions and spacing without wasting fabric.
What is the main purpose of topstitching around the hearts?
Topstitching serves both functional and decorative purposes. It closes the turning opening, helps flatten and define the heart edges, reinforces the layers, and creates a polished outline. A contrasting thread can make this detail especially visible.
How can I prevent the finished placemat from becoming bulky?
Choose thin batting, trim seam allowances carefully, and avoid excessive overlap where several fabric layers meet. Press each heart individually before assembly. Managing thickness during each stage is much easier than trying to flatten excessive bulk after the placemat has been completed.
Conclusion
The Heart Shaped Placemat Tutorial Pattern turns a collection of simple fabric shapes into an eye-catching handmade table accessory. By creating a consistent heart template, sewing and turning padded heart units, preparing a contrasting center, arranging the hearts evenly, and finishing everything with careful topstitching, you can reproduce the main construction concept shown in the inspiration image while still making the design uniquely your own.
Throughout this tutorial, you learned how to choose suitable quilting cotton, prepare the heart pieces, manage curved seams, clip and turn the shapes, add lightweight batting, create the central panel, arrange the individual components, and complete the project with neat finishing details. These techniques are useful far beyond this single placemat and can help build confidence for many future patchwork and sewing projects.
EASILY FIND THE FREE PDF FOR THIS PATTERN HERE!
The most enjoyable part is experimenting with fabrics. You can preserve the gingham-and-print character of the original inspiration or create something entirely different using florals, solids, farmhouse checks, seasonal prints, or colorful scraps. Once you understand the construction method, the Heart Shaped Placemat Tutorial Pattern becomes an adaptable design that can be recreated for different seasons, celebrations, gifts, and home décor styles. If you make your own version, leave your sincere opinion about the project and share your suggestions. Which colors, fabrics, or stitching details would you choose for your heart-shaped placemat? Your ideas can inspire new combinations and creative variations of this cheerful handmade sewing project.