
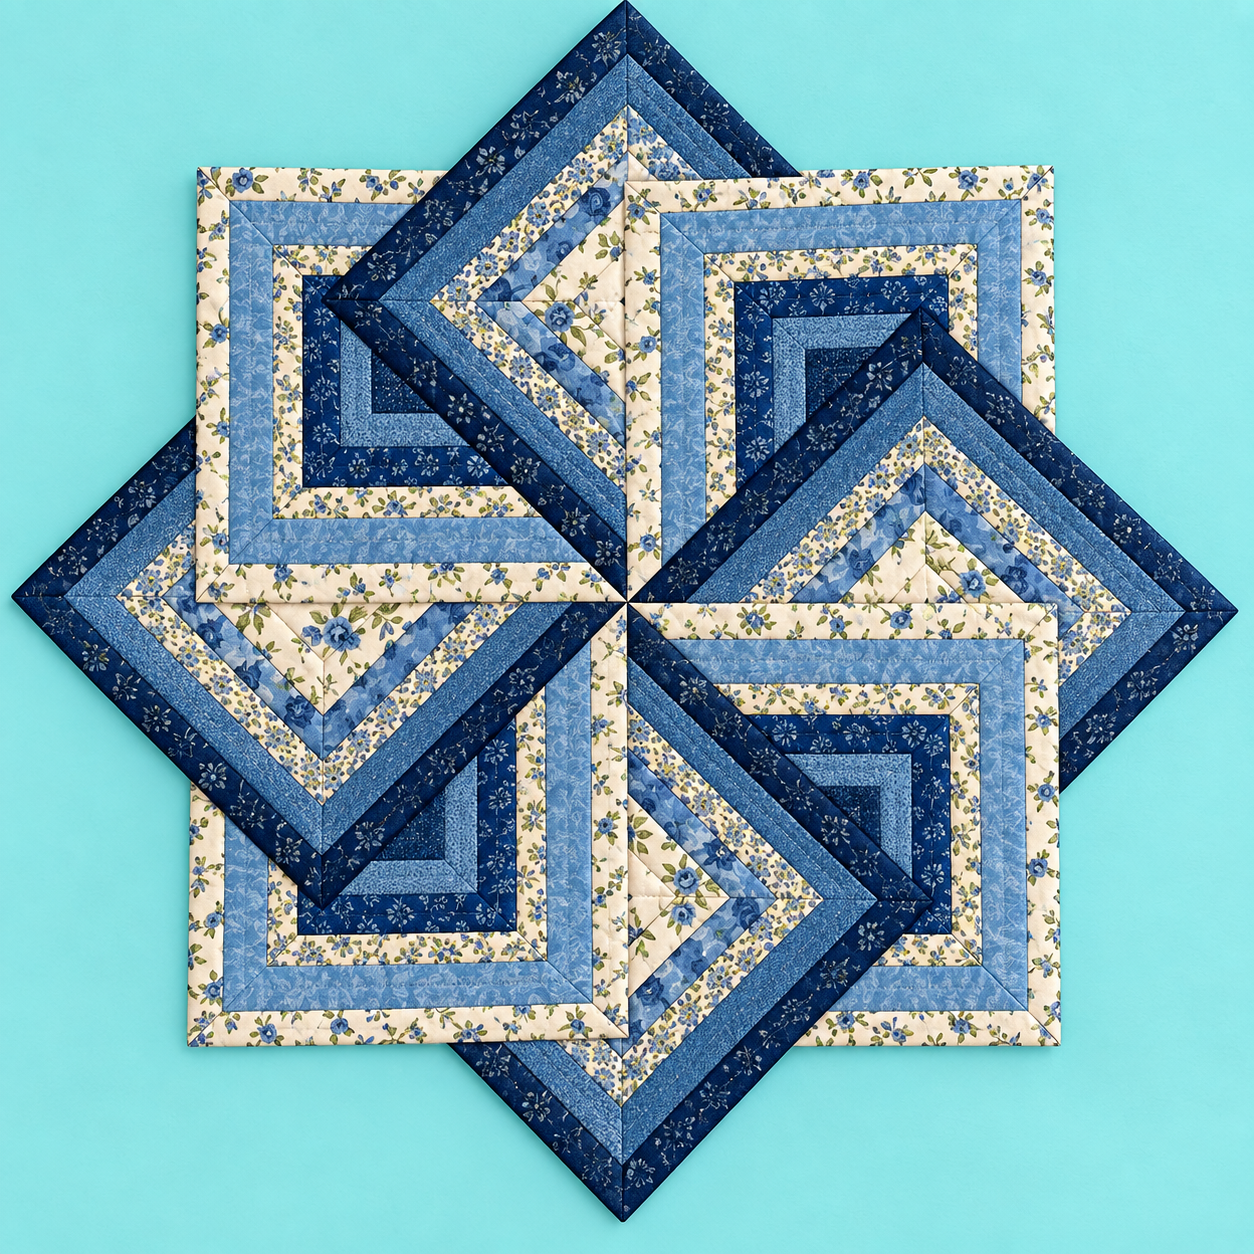
The “Log Cabin Star” Quilt Block Tutorial Pattern is a beautiful way to combine one of quilting’s most recognizable construction methods with a striking geometric star layout. Inspired by the project shown in the photo, this design uses nested fabric strips in coordinated shades of blue, cream, and delicate floral prints to create strong visual movement. The individual blocks have the familiar layered appearance associated with a Log Cabin quilt block, but their arrangement transforms those simple lines into a much more elaborate star. Although the finished piece looks complex, the construction becomes approachable when you work carefully, build one section at a time, and maintain consistent seam allowances. This tutorial explains the complete process so that both confident beginners and experienced quilters can recreate the overall appearance while adapting the colors and dimensions to their own needs.
One of the most appealing features of the “Log Cabin Star” Quilt Block Tutorial Pattern is the interaction between light and dark fabrics. In the pictured project, deep navy blue provides definition along the strongest edges, medium and light blues create gradual transitions, and cream floral fabric brightens the composition. This contrast is essential because it allows each nested strip to remain visible even after several blocks are positioned close together. The design is especially effective when some completed square blocks are rotated 45 degrees, creating diamond shapes that extend outward and form the points of the star. Instead of relying on complicated curved piecing or difficult appliqué techniques, the dramatic result comes mainly from straight seams, accurate cutting, fabric placement, and block rotation.
Before beginning, remember that quilting is flexible and the measurements can be adjusted according to the finished size you want. For an easy practice version, this tutorial uses approximately 25 cm finished blocks, making the individual sections large enough to handle comfortably while still showing the layered Log Cabin effect. You can make a smaller table topper, a decorative wall quilt, or expand the idea into a larger quilt by producing additional blocks. The most important principle is consistency: every block should use the same strip widths and construction sequence. Accurate pressing and careful alignment will make the final Log Cabin Star quilt pattern look balanced, crisp, and professionally assembled.
Materials, Fabric Selection, and Cutting Preparation
Begin by selecting a coordinated fabric palette. To achieve an appearance similar to the reference project, choose approximately five or six fabrics: dark navy blue, medium blue, light blue, cream floral, blue floral, and another subtle blue print. You do not have to copy these exact colors. The important idea is to establish clear differences between your dark, medium, and light values. A well-planned value progression helps the nested strips remain distinct and makes the final star shape easier to recognize from a distance.
DISCOVER MORE FREE PATTERNS HERE!
For a medium decorative project, approximately 0.5 meter of each primary fabric is a practical starting amount, although the exact yardage will depend on the number and size of blocks you decide to make. You will also need quilting cotton for the backing, batting for the middle layer, coordinating thread, and fabric for the final binding if you plan to finish the composition as a quilted panel. Basic tools include a rotary cutter, quilting ruler, cutting mat, sewing machine, iron, pins or clips, and sharp fabric scissors. High-quality cotton is especially convenient because it presses cleanly and maintains accurate edges.
The strips create the visual structure of this project, so accurate cutting deserves extra attention. For a beginner-friendly version, cut strips approximately 4 cm wide, allowing for seam allowances and leaving a visible finished band after sewing. You can use narrower strips for a more intricate design or wider strips for a bolder contemporary appearance. Whatever width you select, use that measurement consistently throughout all matching blocks. Inconsistent strip widths can distort the geometry and make neighboring sections difficult to align later.
Prepare a collection of strips from every fabric before sewing. Longer strips can be trimmed after attachment, which is often easier than calculating the precise length of every piece beforehand. Organize them according to value, such as dark blue strips, medium blue strips, light strips, and cream floral strips. This simple preparation prevents accidental color changes during construction. It is particularly helpful when several blocks are being chain-pieced at the same time.
For the center of each block, cut a small square approximately 5 cm x 5 cm. This center becomes the starting point around which the remaining strips are constructed. Depending on the variation you want, the center can be dark blue, medium blue, or a contrasting floral print. The photograph suggests strong alternating color placement rather than a completely random arrangement, so planning your color sequence before sewing will produce a cleaner and more intentional result.
Finally, test your 6 mm (approximately 1/4-inch) seam allowance on scrap fabric. This is a standard quilting seam allowance and is particularly important for Log Cabin construction because tiny inaccuracies accumulate as additional strips are attached. Sew two test pieces, press them open, and measure the result. Once your machine is correctly positioned, keep the same seam allowance throughout the project. This small preparation step can significantly improve the accuracy of the finished star.
Building the Log Cabin Blocks Step by Step
Start with the center square and attach your first strip along one side, placing the fabrics right sides together. Sew using the consistent 6 mm seam allowance, then press the strip away from the center. Trim the ends so they align precisely with the center square. Attach the next strip along the adjacent side, again sewing and pressing outward. These first pieces establish the direction in which the entire Log Cabin quilt block will grow.
Continue adding strips around the center in sequence. Traditional Log Cabin construction often travels around the center like a spiral, with every new strip extending the previous side. For this star-inspired variation, pay special attention to color placement. Position darker fabrics predominantly toward selected sides and lighter or floral fabrics toward the opposite sections. This controlled arrangement produces the diagonal visual movement needed when the blocks are eventually rotated and combined.
After every strip is sewn, press before adding the next strip. Pressing is not merely a finishing step in quilting; it is part of construction. Place the block on the ironing surface, set the seam carefully, and press the new strip outward without stretching it. Avoid aggressively moving the iron back and forth because that can distort the fabric. Flat seams allow the next strip to sit accurately against the previous edge and help maintain square corners.
As additional rounds are added, alternate your fabrics intentionally. For example, a sequence might move from dark navy to medium blue, cream floral, light blue, and another navy print. The precise sequence can change, but repeating similar combinations among your blocks gives the project cohesion. The blue floral quilt pattern shown in the inspiration image succeeds because neighboring values are different enough to define each band while still belonging to the same overall color family.
Continue building outward until the block measures approximately 25.5 cm square unfinished, which will give you close to a 25 cm finished section after assembly. Square the block using a quilting ruler rather than relying only on the raw fabric edges. Place the ruler over the center, check the diagonal lines, and carefully trim excess material from each side. A properly squared block makes the star assembly considerably easier.
Repeat the same procedure to create the number of blocks required for your chosen layout. For a composition similar to the photographed arrangement, prepare enough coordinated units to experiment with both square and diamond orientations. Before permanently joining anything, place all blocks on a large table, floor, or design wall. Rotate them until the dark and light bands connect visually. This preview stage is essential because simply rotating one Log Cabin block can completely change the direction of the pattern.
Creating and Assembling the Log Cabin Star Layout
Once your blocks are completed, begin arranging them around an imaginary center point. Some blocks should remain in their normal square orientation, while others can be turned 45 degrees to create diamond-shaped sections. The diamonds naturally produce the extended points associated with the star effect. Pay attention to the navy bands: when those dark lines point toward or away from the center in a deliberate sequence, the eye begins to see a large star rather than several independent Log Cabin blocks.
The reference design uses overlapping visual geometry to create a pinwheel-like central intersection. You can recreate this effect through careful block placement without literally overlapping finished fabric pieces. Arrange the units so their corners meet closely and their bands appear to continue from one block into another. Take a photo of your preferred arrangement before moving the blocks to the sewing machine. That simple reference can prevent confusion when several nearly identical pieces are involved.
When joining blocks that form conventional rows, place neighboring units right sides together and match the important seam intersections. Pin or clip those intersections first, then secure the remaining edge. Sew with your established 6 mm seam allowance. Press adjoining seams in opposite directions whenever possible so that intersections can nest together. Where several seams meet, pressing them open may reduce bulk and help the finished quilt lie flatter.
Diamond-oriented sections require additional planning if you want them incorporated into one continuous quilt top. Depending on your chosen final shape, you can add setting triangles around diagonal blocks to convert the arrangement into straight outer edges. Another option is to preserve the dramatic pointed outline and treat the piece as a decorative star-shaped table topper. Both approaches maintain the fundamental appearance of the “Log Cabin Star” Quilt Block Tutorial Pattern, so choose the finishing method that best matches how you intend to use the project.
After completing the quilt top, prepare the quilting sandwich by placing the backing fabric wrong side up, followed by the batting and then the quilt top right side up. Smooth each layer carefully to eliminate wrinkles. Baste with quilting pins, temporary basting methods, or your preferred technique. For the quilting itself, stitching in the ditch along the Log Cabin seams is an excellent beginner-friendly option because it emphasizes the geometric structure without competing with the floral fabrics.
Finish by trimming the batting and backing neatly around the outer edge and adding binding. A dark navy binding can frame the project strongly, while cream or medium blue will create a softer finish. If your design retains prominent star points, take additional time around each corner so the binding remains smooth. Give the completed quilt a gentle final press. At this stage, the separate fabric strips should visually merge into a unified Log Cabin Star quilt design with strong contrast and repeated geometric movement.
Frequently Asked Questions About the “Log Cabin Star” Quilt Block Tutorial Pattern
What is a Log Cabin quilt block? A Log Cabin quilt block is a traditional patchwork construction based on fabric strips sewn progressively around a central square or shape. Each new strip increases the size of the block. Different arrangements of light and dark fabrics can create diagonal lines, diamonds, zigzags, stars, and many other secondary patterns. In this tutorial, the contrast is deliberately controlled so that rotating the finished blocks contributes to the larger star effect.
Is the “Log Cabin Star” Quilt Block Tutorial Pattern suitable for beginners? Yes, a simplified version is very approachable for someone who already understands basic straight sewing. The individual seams are not complicated, but accurate cutting and consistent seam allowances are important. Beginners should work slowly, press after each seam, and square every completed block. Making one practice block from scrap cotton before cutting the main fabrics is also a useful way to become familiar with the construction sequence.
What fabrics work best for this quilt pattern? Standard 100% quilting cotton is one of the easiest materials to use because it cuts accurately, presses well, and is available in many coordinated prints. Small floral prints, tone-on-tone designs, solids, and subtle textures all work beautifully. More important than the exact print is value contrast. Combining very dark, medium, and pale fabrics makes the layered geometry much easier to see.
How can I make the star shape more noticeable? Increase the contrast between the fabrics that define the outer star and those used inside the Log Cabin sections. For example, combining deep navy blue with cream and pale blue creates a much clearer boundary than using several fabrics of almost identical value. You should also preview the blocks from a distance before sewing the final layout. If the star disappears visually, rotate individual blocks or rearrange the darkest strips until the geometry becomes stronger.
Can I change the size of the Log Cabin Star blocks? Absolutely. The approximate measurements in this tutorial are intended as a practical starting point rather than a mandatory size. Wider strips create larger blocks more quickly, while narrow strips produce additional detail and allow more rounds around the center. When resizing the Log Cabin Star quilt pattern, keep strip widths consistent within corresponding blocks and remember to include your seam allowance when calculating unfinished dimensions.
How do I keep my Log Cabin blocks from becoming crooked? Accuracy at every stage is the best solution. Use a sharp rotary cutter, cut strips with a reliable quilting ruler, maintain the same 6 mm seam allowance, and press every seam before continuing. Avoid stretching strips while sewing or ironing. Measure the block periodically rather than waiting until the final round. If a small discrepancy appears early, correcting it immediately is much easier than trying to square a severely distorted block after all the strips have been added.
Conclusion
The “Log Cabin Star” Quilt Block Tutorial Pattern demonstrates how relatively simple strip piecing can produce an impressive geometric quilt design. Starting from a small center square, you gradually build each block with coordinated strips, balancing dark navy, medium blue, light blue, and cream floral fabrics to establish contrast. Accurate cutting, a consistent seam allowance, careful pressing, and regular squaring are the foundations that keep the individual units precise.
Once the blocks are completed, their orientation becomes just as important as their construction. Rotating selected units into diamond positions and directing the darkest bands strategically allows several independent Log Cabin blocks to visually interact and form the larger star. This is one of the most enjoyable aspects of the pattern because changing the position of only a few blocks can dramatically alter the finished composition.
The project can also be personalized in many ways. Try country florals for a traditional appearance, bright solids for a modern quilt, pastels for a softer decorative piece, or seasonal fabrics for a special table topper. Regardless of the palette, maintaining strong differences between light, medium, and dark values will preserve the recognizable geometry of the “Log Cabin Star” Quilt Block Tutorial Pattern.
EASILY FIND THE FREE PDF FOR THIS PATTERN HERE!
With patient piecing and thoughtful fabric placement, this pattern can become a striking table topper, wall hanging, decorative panel, or the foundation for a much larger quilt. Most importantly, enjoy experimenting with the arrangement before committing to the final seams. Leave your sincere opinion about this Log Cabin Star project and share your suggestions—your ideas about colors, fabrics, block arrangements, and future quilt patterns are always a wonderful source of inspiration for the quilting community.