
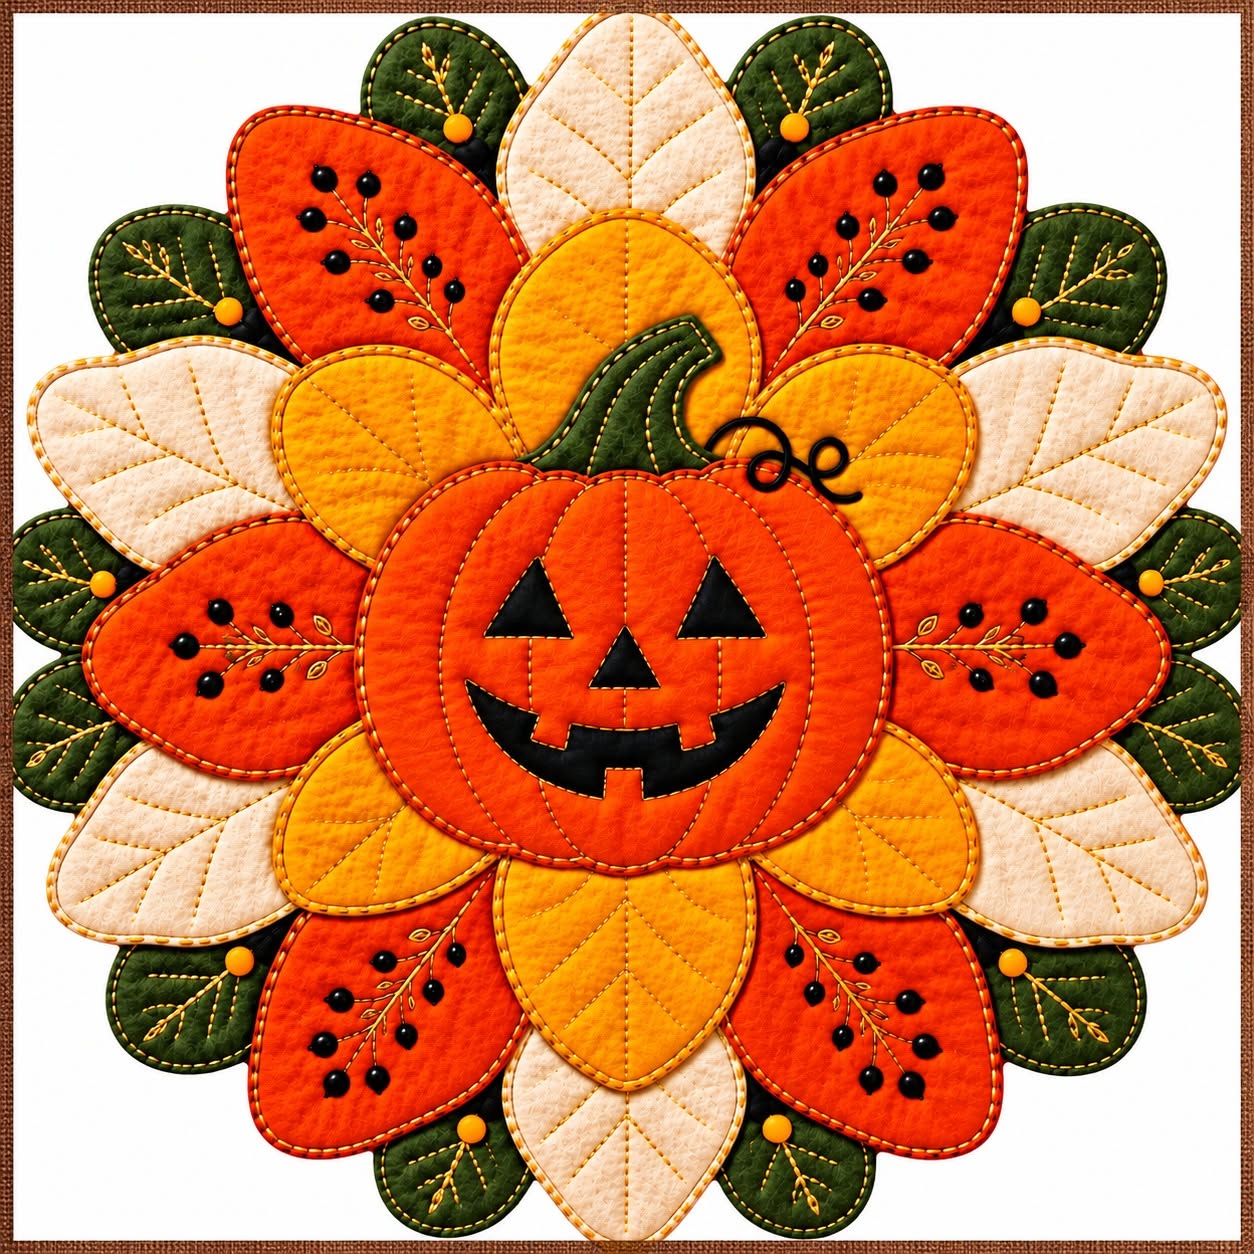
The Pumpkin Blossom Placemat Pattern is a cheerful seasonal sewing project that combines the warmth of autumn colors with the charm of a handmade quilted decoration. Inspired by the project shown in the photo, this design places a smiling pumpkin at the center of several overlapping layers of fabric petals and leaves, creating the appearance of a large fall blossom. Orange, golden yellow, cream, and deep green fabrics work together to give the placemat its rich harvest-inspired palette, while decorative quilting and small botanical details make every layer more interesting. Although the finished piece looks elaborate, the construction can be approached as a sequence of manageable shapes. By preparing the petals individually and building the project from the outer layer toward the center, even a sewist who has never made this exact design before can understand the process. The result can be used as a fall placemat, decorative table centerpiece, seasonal mat, or handmade accent for a kitchen or dining room.
One of the most appealing features of the Pumpkin Blossom Placemat Pattern is the way simple shapes create a surprisingly detailed composition. The project does not depend on complicated traditional quilt blocks. Instead, it uses elongated petals, rounded leaves, a layered pumpkin, a curved stem, and simple appliqué pieces for the jack-o’-lantern face. Each component can be cut separately from fabric, stabilized with batting, quilted, and then assembled into the final flower. This construction method also provides plenty of opportunities for personalization. You can select subtle farmhouse fabrics for a rustic look, brighter orange and yellow cottons for a playful Halloween table, or textured solids for a more modern interpretation. The key is maintaining enough contrast between the layers so that the flower shape remains clearly visible after everything is assembled.
This tutorial explains how to recreate a project inspired by the photograph while allowing you to adapt the measurements to your preferred finished size. The central pumpkin is the visual focal point, so the surrounding petals should support rather than overwhelm it. A practical finished diameter for a decorative table mat is approximately 43 to 48 cm (17 to 19 inches), although you can enlarge or reduce the templates proportionally. Throughout the process, accuracy matters most when creating matching petal pairs and positioning the concentric layers. Minor variations, however, can actually enhance the handmade character of the piece. The Pumpkin Blossom Placemat Pattern is therefore a wonderful project for practicing fabric appliqué, layered quilting, topstitching, decorative stitching, template cutting, and seasonal sewing while creating something that looks impressive on an autumn table.
Materials and Preparation for the Pumpkin Blossom Placemat Pattern
For the main fabrics, choose quilting cotton or another stable woven fabric that is comfortable to sew. To reproduce the general appearance of the photographed project, prepare orange fabric, golden yellow fabric, cream or ivory fabric, and dark olive green fabric. Small pieces of black fabric will be needed for the pumpkin’s eyes, nose, and mouth. You can use coordinating scraps for the backing because most of it will not be visible once the placemat is displayed.
DISCOVER MORE FREE PATTERNS HERE!
You will also need thin cotton batting or low-loft quilt batting, coordinating sewing thread, black embroidery thread or a dark decorative thread, fabric scissors, a rotary cutter if available, pins or sewing clips, a fabric marking tool, and your sewing machine. Fusible web is especially helpful for securing the small facial appliqué pieces before stitching. If you plan to embroider the branches by hand, prepare an embroidery needle as well.
Begin by deciding on the overall dimensions. For a placemat approximately 45 cm wide, make the largest outer petals about 14 to 16 cm long and approximately 7 to 9 cm wide at their broadest point. The second and third layers should gradually become smaller. These measurements are guidelines rather than rigid rules because the proportions can be adjusted depending on the table and the amount of fabric available.
Create paper templates before cutting your good fabric. Draw one elongated oval or teardrop for the orange petals, another slightly wider rounded petal for the cream pieces, and smaller rounded shapes for the yellow petals. For the green foliage, use oval leaf templates with softly pointed ends. Fold each paper template vertically before cutting it so both sides remain symmetrical. Clearly label each template with its color and approximate placement.
For every padded petal, prepare a fabric top, a thin batting layer, and a backing piece. You can cut the backing and batting slightly larger than the finished template and trim them after stitching. This technique gives you more control around curved edges. If you prefer a flatter quilted placemat, use very thin batting; slightly thicker batting produces the plush appearance visible in the inspiration photo.
Before beginning the final construction, arrange all of the paper shapes on a flat surface. This simple rehearsal is valuable because the Pumpkin Blossom Placemat Pattern depends on balanced layering. Check that the outer leaves remain visible, that the cream petals separate the stronger orange tones, and that the central pumpkin will cover the inner raw edges. Once you are satisfied with the proportions, you can confidently begin sewing the individual components.
Cutting, Quilting, and Decorating the Fabric Petals
Start with the outer green leaves because they form the background of the blossom. Cut enough pieces to distribute the leaves evenly around the circumference. Sandwich the backing, batting, and green top fabric together, then stitch each leaf. Depending on your preferred construction method, you can sew right sides together and turn the shape through a small opening, or finish the perimeter with close topstitching after carefully trimming the layers.
Add quilting lines to each green leaf. A simple central vein with diagonal branches produces a recognizable leaf texture without requiring complicated free-motion quilting. You can also echo the outer edge with one or two lines of stitching. The quilting should secure the layers while preserving some softness. Press gently rather than flattening the batting completely, especially if you want the dimensional appearance of the photographed Pumpkin Blossom Placemat Pattern.
Next, prepare the large orange petals. These create the strongest burst of color around the center. Quilt each petal with simple lines following its natural shape. For additional decoration, stitch a delicate branch motif on selected orange petals using black or dark brown thread. A curved central stem with small branches and round berry-like ends is enough to create the botanical appearance. You do not need to make every petal identical; small differences make the finished mat feel handcrafted.
Construct the cream petals in the same way. Their purpose is partly decorative and partly structural because the pale color visually separates the stronger orange and green sections. Use cream, beige, or warm ivory thread for subtle quilting. Long curved lines radiating toward the edge work particularly well. Keep the decoration quieter on these petals so the orange botanical motifs and central pumpkin remain the main points of attention.
The golden yellow petals form an important intermediate layer. Make them slightly smaller than the largest orange and cream pieces. Quilt around the perimeter and add one or two internal lines if desired. Golden yellow provides a transition between the bright pumpkin and the darker outer petals, which is why it contributes so much to the characteristic pumpkin blossom appearance. Warm mustard or amber fabric can be substituted for a more rustic fall palette.
After all petals have been sewn, trim loose threads and press each component carefully. Lay them on your work surface and experiment with the order before attaching anything permanently. The blossom should look full but not crowded. Portions of every color should remain visible. This is also the best moment to correct a petal that looks too large, replace an uneven piece, or add extra quilting before the layers become difficult to access.
Assembling the Blossom and Creating the Pumpkin Center
Begin assembly with the largest outer components. Arrange the dark green leaves in a circular formation, spacing them as evenly as possible. Place the large cream and orange petals over them, alternating colors and allowing the green tips to remain visible between the larger shapes. Pin or clip the overlapping sections temporarily. Check the design from several angles because an uneven circle becomes much more noticeable once the center is attached.
Add the next layer of orange and golden yellow petals. Position these pieces so they cover the inner ends of the first layer while leaving most of the decorative portions exposed. Think of the project as a flower opening toward the viewer: every new layer becomes slightly smaller and moves closer to the center. Secure the overlapping areas with stitching where they will eventually be concealed by the pumpkin.
Now create the central pumpkin. Draw a rounded pumpkin approximately 20 to 24 cm wide, depending on the overall size of your placemat. Divide the shape visually into several curved vertical sections. You can construct these sections from individual orange pieces or use one orange base and create the segmented effect with curved quilting lines. Slight variations in orange shades can make the pumpkin look even more dimensional.
For the stem, cut a curved piece from dark green fabric and position it at the top of the pumpkin. Secure it with fusible appliqué or close edge stitching. Add several curved quilting lines to imitate the ridges of a natural pumpkin stem. A narrow black fabric strip, cord, or dense decorative stitching can be used to create the playful curling vine beside it. Keep this detail relatively small so it complements rather than competes with the pumpkin face.
Cut two triangular eyes, a triangular nose, and a smiling mouth from black fabric. Place them on the pumpkin before fusing anything so you can adjust the expression. Once the proportions look balanced, apply the pieces according to the instructions for your fusible web and stitch around their edges. A narrow zigzag, blanket stitch, or straight appliqué stitch can all work. The black features provide the strong contrast that gives this Halloween pumpkin placemat its friendly personality.
Finally, position the completed pumpkin over the middle of the layered flower. It should hide most of the construction stitches and raw inner ends of the petals. Pin carefully, making sure all layers remain flat, then sew around the pumpkin perimeter with secure topstitching. Inspect the entire Pumpkin Blossom Placemat Pattern, reinforce any loose overlapping areas, remove visible marking lines, and give the finished project a gentle final press from the back.
Pumpkin Blossom Placemat Pattern FAQ and Final Tips
What is the best fabric for a Pumpkin Blossom Placemat Pattern? Quilting cotton is one of the easiest choices because it is stable, widely available, and simple to cut into accurate appliqué shapes. Cotton also handles decorative stitching and quilting well. For a textured appearance, you can mix compatible woven fabrics, but extremely stretchy or bulky materials may make the layered petals harder to control. Prewashing cotton is optional, but it can be useful when you expect the finished placemat to be washed regularly.
Do I need batting for this pumpkin placemat? Batting is strongly recommended if you want the soft, quilted dimension associated with this design. A low-loft cotton batting is particularly suitable because it adds structure without making the numerous overlapping layers excessively thick. If the project will be used mainly as decorative table art, you can experiment with slightly more loft. For an everyday placemat that needs to sit relatively flat beneath tableware, thinner batting is usually easier to manage.
Can beginners make the Pumpkin Blossom Placemat Pattern? Yes, especially when the project is divided into individual components. Beginners can first practice making one leaf or petal before cutting the complete set. The most important skills are accurate template tracing, sewing curved edges, basic quilting, appliqué, and careful layering. There is no need to rush. Constructing all similar pieces in batches—green leaves first, then cream petals, orange petals, yellow petals, and finally the pumpkin—can make the process more organized.
Can I change the colors of the pattern? Absolutely. The orange, cream, yellow, and green combination produces the recognizable autumn appearance, but the same structure can support many different palettes. Burgundy, rust, ochre, olive, and natural linen shades would create a sophisticated farmhouse version. Brighter oranges and greens can make the design playful, while softer pumpkin, sage, and beige fabrics produce a more understated fall decoration. Maintaining contrast between adjacent layers is more important than copying exact colors.
How should a quilted pumpkin placemat be cleaned? The safest method depends on the fabrics, batting, appliqué adhesive, and decorative materials you used. For an all-cotton version with securely stitched appliqué, gentle washing may be appropriate, but always follow the care recommendations for your specific materials. Avoid aggressive twisting or wringing because the layered petals can become distorted. Reshape the placemat while damp and allow it to dry flat whenever possible. Press from the reverse side with an appropriate temperature if it needs refreshing.
Conclusion
The Pumpkin Blossom Placemat Pattern transforms basic fabric shapes into a colorful piece of seasonal quilted décor. The process begins with templates and a coordinated autumn palette, continues through individually quilted green leaves, orange petals, cream petals, and golden yellow petals, and finishes with the distinctive appliquéd pumpkin at the center. Decorative botanical stitching, dimensional batting, contrasting layers, and careful topstitching give the finished project much of its personality.
EASILY FIND THE FREE PDF FOR THIS PATTERN HERE!
More importantly, the method is flexible: dimensions, colors, quilting patterns, facial details, and the number of petals can all be adjusted to create your own interpretation. Whether you use the finished piece as a Halloween placemat, fall table mat, pumpkin quilt project, autumn centerpiece, or seasonal handmade decoration, the layered blossom construction offers plenty of room for creativity. If you make your own version, leave your sincere opinion about the pattern and share any suggestions or creative changes you would add—your ideas may inspire an entirely new variation of this Pumpkin Blossom Placemat Pattern.