
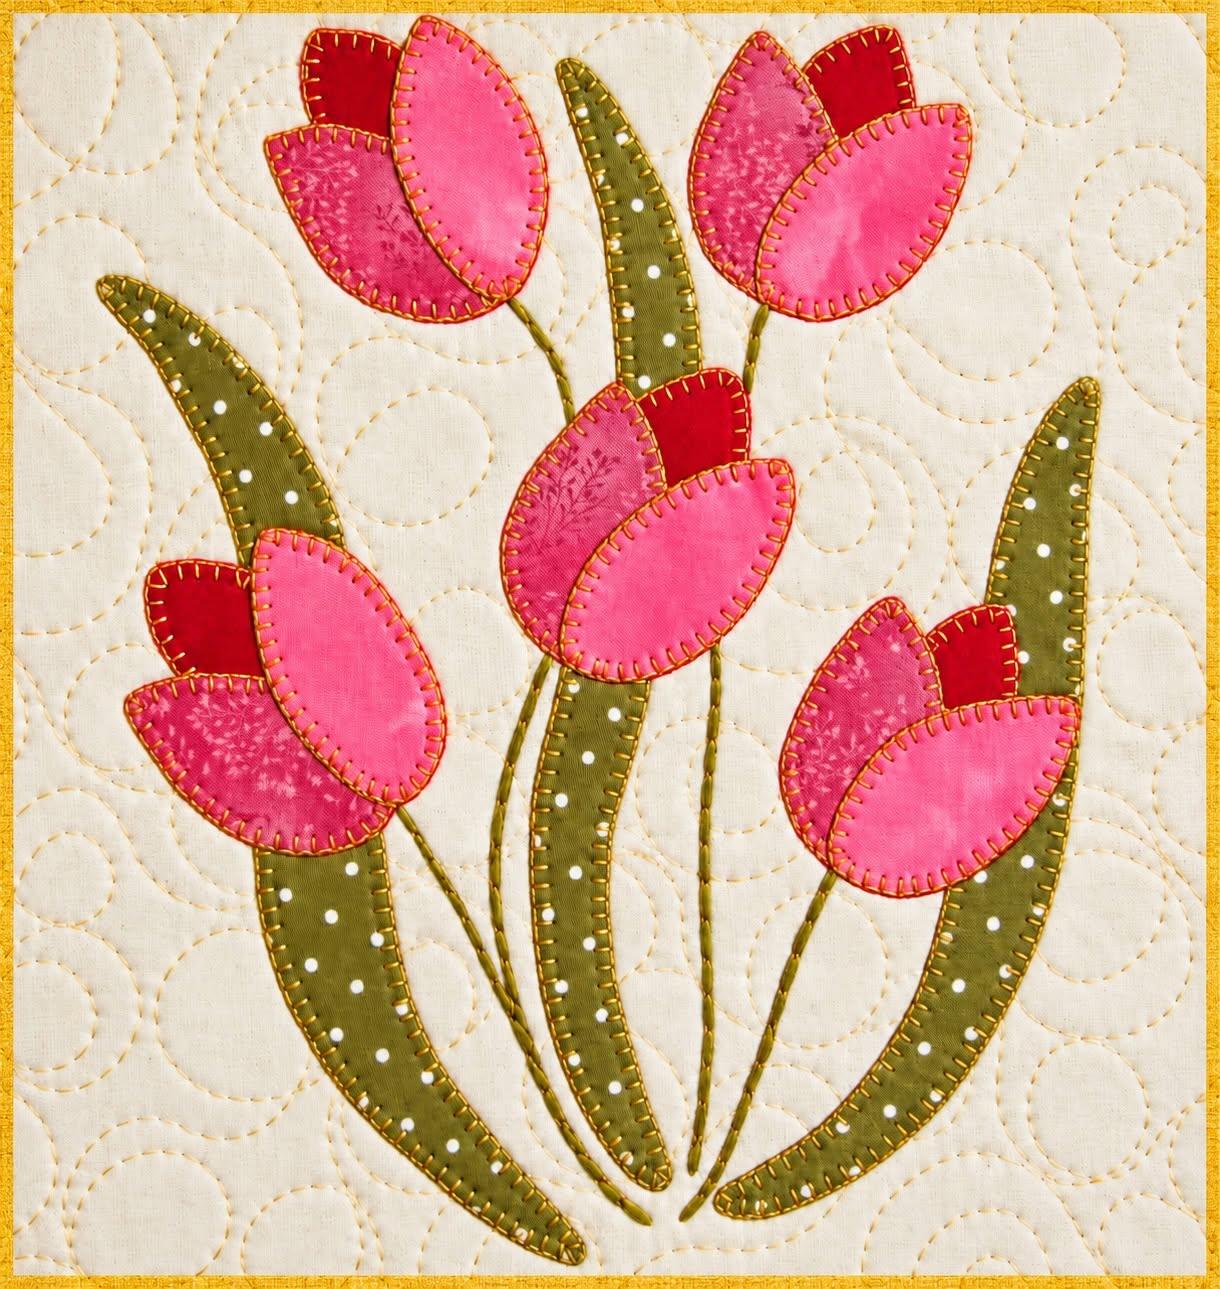
The Quilt Panel with Tulip Appliqué Pattern is a charming sewing project that combines traditional quilting with the soft, dimensional beauty of floral appliqué. Inspired by the handmade panel shown in the reference image, this design features several stylized pink tulips surrounded by long green leaves and delicate embroidered stems. The simple shapes make the composition approachable for beginners, while the combination of different fabrics gives experienced quilters plenty of opportunities to personalize the finished piece. A neutral quilted background allows the flowers to become the visual focus without making the project feel overly complicated. This type of tulip appliqué quilt can be displayed as a small wall hanging, incorporated into a larger quilt, transformed into a cushion front, or used as the centerpiece of another sewing project. Throughout this tutorial, you will learn how to recreate the overall look while adjusting the measurements, colors, and fabrics to suit your own creative style.
One of the most appealing characteristics of the Quilt Panel with Tulip Appliqué Pattern is its combination of organic shapes and uncomplicated construction. Each tulip is assembled from a few overlapping fabric pieces, including rounded petals and a smaller contrasting section near the top of the flower. Long, slightly curved leaves rise naturally around the blossoms and help create movement across the panel. Thin stitched stems connect the flowers visually to the lower portion of the arrangement, making the entire composition feel like a small bouquet growing from the background. Because appliqué pieces do not need to be perfectly identical, subtle differences between the flowers can actually enhance the handmade character of the project. Beginners can therefore concentrate on clean cutting, careful positioning, and consistent stitching rather than worrying about achieving machine-perfect symmetry.
Choosing the right materials is another important part of creating a successful floral quilt panel. The reference design uses several shades of pink for the tulips, muted olive green for the leaves, a light neutral fabric for the background, and darker thread for the narrow stems. You can recreate this palette or develop your own combination using scraps already available in your sewing collection. Small-scale prints, tone-on-tone cottons, solids, and subtle polka dots are particularly effective because they provide visual variation without overwhelming the simple flower shapes. 100% quilting cotton is an excellent choice for most of the appliqué pieces because it is easy to cut, press, position, and stitch. Before beginning construction, wash and press fabrics when appropriate for your preferred quilting method so that every piece lies smooth and is ready for accurate cutting.
Materials, Measurements, and Preparing the Tulip Appliqué Pieces
Start by gathering the basic materials for your Quilt Panel with Tulip Appliqué Pattern. For a manageable decorative panel, a background approximately 40 cm x 40 cm provides enough room for an arrangement similar to the photograph, although the project can easily be enlarged or reduced. You will need light-colored quilting cotton for the background, several pink or red fabric scraps, green fabric for the leaves, batting, backing fabric, and coordinating sewing thread. It is also useful to have small sharp fabric scissors, pins or appliqué clips, an iron, a fabric marking tool, and a sewing machine if you plan to quilt the background by machine. Embroidery floss or heavier decorative thread can be used for the slender stems.
DISCOVER MORE FREE PATTERNS HERE!
Prepare the background before working on the flowers. Cut the background fabric slightly larger than your intended finished dimensions so that you have room to square the panel after quilting. For example, if you want a finished panel close to 36 cm x 36 cm, beginning with a piece around 40 cm x 40 cm gives you useful trimming space. Place the backing fabric wrong side up, position the batting over it, and put the background fabric right side up. Smooth the three layers carefully to eliminate wrinkles. Baste them temporarily with your preferred quilting method so that the layers remain stable while you work.
The tulip appliqué pattern is based on pleasantly simple shapes. For each flower, create a rounded lower petal approximately 7–9 cm wide and 6–8 cm high, depending on the size of your panel. Add a second curved petal of a similar or slightly smaller size and a small upper petal or rectangular-rounded section approximately 3–4 cm across. These measurements are guidelines rather than strict requirements because handmade appliqué flowers look attractive when their proportions vary slightly. Draw the shapes first on paper and cut them out to create reusable templates. Place each template on the fabric and trace carefully with a removable fabric marker.
Create approximately five tulips if you want a composition close to the reference panel. Instead of cutting every flower from exactly the same pink fabric, combine light pink, deep pink, raspberry, rose, and subtle printed cotton. The contrast between these pieces makes the overlapping petals easier to distinguish. Try arranging different combinations before sewing anything permanently. One flower might feature a pale pink front petal with a darker printed back petal, while another can reverse the combination. This controlled variation gives the finished appliqué quilt panel depth while maintaining a cohesive floral palette.
Next, prepare three prominent elongated leaves and, if desired, a few smaller pieces. Each major leaf can measure approximately 18–28 cm long and 4–6 cm wide at its broadest point. Draw the leaves with gentle curves rather than perfectly straight edges because the curves create the natural flowing appearance visible in the inspiration image. Green cotton with a small print, such as subtle dots, works beautifully for this part of the design. Remember that these dimensions are flexible and should be adjusted according to your panel size and flower placement.
Before stitching, arrange every component on the background. Position the tallest leaves toward the center and outer edges, then distribute the five flowers at different heights to create a balanced bouquet. Leave enough negative space around the outer perimeter for quilting and finishing. Step away from the arrangement and look at the entire composition before committing to the placement. You can also take a quick photograph of your preferred layout so you have a reference while sewing. This design-before-stitching approach makes it much easier to maintain the intended arrangement once individual pieces begin moving on and off the panel.
How to Sew and Assemble the Quilt Panel with Tulip Appliqué Pattern
Begin construction with the elements that visually sit behind the flowers. In the Quilt Panel with Tulip Appliqué Pattern, the long green leaves form an important background layer, so position and secure these first. Depending on your preferred technique, the raw edges can be stabilized with fusible web or temporarily held with pins or fabric-safe appliqué adhesive. Smooth each leaf from the center toward the edges before stitching. Avoid stretching the fabric along the curved edges, since distortion can make the leaf appear uneven. Check the placement again before permanently attaching each piece.
For a handmade appearance similar to the reference project, use blanket stitch appliqué around the edges. Blanket stitching creates a decorative line while simultaneously securing the fabric to the quilt background. Keep the stitches as evenly spaced as possible, particularly around narrow tips and curved sections. If you are sewing by machine, select a suitable appliqué or blanket stitch and test the settings on scrap fabric first. If sewing by hand, work slowly and maintain comfortable, consistent stitch spacing. Either method can produce a beautiful result, so choose the technique that suits your equipment and experience.
Once the leaves are attached, start assembling the fabric tulips. Place the rear petal pieces first and stitch their visible edges securely. Add the contrasting upper section and then position the larger rounded front petal over the lower portion of the flower. This layering creates the recognizable tulip silhouette and provides the slightly dimensional appearance that makes the design interesting. Repeat the process for each blossom while varying the fabric combinations. Before completing every edge, compare the flowers with one another to ensure that the overall arrangement remains balanced rather than becoming visually heavy on one side.
The thin stems can be created using hand embroidery, decorative machine stitching, narrow bias strips, or couching. Hand embroidery is especially effective for achieving the delicate appearance shown in the inspiration. Draw gentle curved guidelines from the flowers toward the lower center of the arrangement using an erasable fabric marker. Follow these lines with a stem stitch, backstitch, or another simple embroidery stitch using brown, olive, dark green, or coordinating thread. Keep the curves relaxed instead of perfectly straight. Natural-looking variations in the stems complement the rounded appliqué shapes and reinforce the handmade quality of the panel.
After all the appliqué pieces and stems are secured, inspect the surface carefully. Trim loose threads and make sure no petal or leaf edge has been accidentally left unsecured. You can then add background quilting to create texture around the flowers. Simple straight lines, gentle curves, echo quilting, or free-motion quilting can all work well. The inspiration panel has a subtle quilted texture that supports the appliqué without competing with it. For beginners, a restrained quilting design is often the easiest option because the flowers remain the dominant visual element.
Finally, square the quilt panel to your chosen finished dimensions and prepare the edges. A narrow quilt binding can create a traditional finish, while an envelope-style or turned finish may work well if the panel will become a cushion or another sewn item. If you plan to make a wall hanging, add a hanging sleeve to the back before completing the final binding stitches. Press the project carefully from the back or according to the requirements of the materials you used. Once finished, the combination of textured quilting, layered tulips, curved leaves, and embroidered stems should create a cheerful handmade botanical design.
FAQ About the Quilt Panel with Tulip Appliqué Pattern
Is the Quilt Panel with Tulip Appliqué Pattern suitable for beginners? Yes. This project is particularly approachable because the flowers consist of relatively large, uncomplicated shapes. A beginner can practice essential skills such as tracing templates, cutting fabric, arranging appliqué components, creating blanket stitches, and working with a basic quilt sandwich. There is also considerable freedom in the flower placement, so minor variations do not spoil the design. If this is your first appliqué project, practice the blanket stitch on a scrap sandwich before working on the finished panel.
What fabric is best for tulip appliqué? Quilting cotton is one of the easiest and most versatile choices. It is available in countless colors and prints, presses well, and generally remains manageable when cutting curved appliqué shapes. Small scraps are enough for most petals, making this project an excellent opportunity to use leftover fabrics. Tone-on-tone pinks and small prints create subtle visual differences between overlapping petals. For the leaves, olive, sage, moss, or other natural greens can produce a soft traditional appearance.
Do I need fusible web for this appliqué project? Not necessarily. Fusible appliqué can make positioning easier, particularly for beginners, but traditional hand appliqué and other securing methods are also possible. Fusible web holds the shapes in place while their edges are stitched, reducing movement during construction. Always follow the instructions supplied with the specific fusible material you choose because products can have different application requirements. If you prefer a softer and more traditional hand-sewn result, you may choose a non-fusible method instead.
Can I resize the tulip pattern? Absolutely. One of the advantages of a simple tulip appliqué design is that the shapes can be enlarged or reduced proportionally. Larger flowers work beautifully for cushion fronts and wall quilts, while smaller versions can decorate table runners, bags, mini quilts, or larger patchwork blocks. When changing the size, remember to adjust the leaves and stems as well so that the bouquet maintains pleasing proportions. Making paper templates first is a convenient way to experiment with several sizes without wasting fabric.
Should the appliqué be added before or after quilting? Both approaches are possible, but quilting the layered panel while attaching or after positioning the appliqué can create the integrated appearance associated with many decorative art quilts. Another method is to complete the appliqué on the quilt top first and then assemble the top, batting, and backing for quilting. The best sequence depends on your chosen appliqué technique and the appearance you want. Beginners often find it straightforward to finish the appliqué top first, check every edge, and then move on to the final quilting stage.
How can I make the tulip panel look more professional? Focus on accurate cutting, smooth fabric placement, consistent appliqué stitches, balanced spacing, and careful pressing. Avoid rushing around tight curves because these areas are where uneven stitching is most noticeable. Keep the flower palette coordinated while including enough contrast for the individual petals to remain visible. It also helps to keep background quilting relatively subtle so it does not compete with the flowers. Most importantly, inspect the entire panel from a short distance several times during construction; overall balance is often easier to evaluate from farther away than from directly over the sewing table.
Conclusion
Finishing Your Handmade Tulip Quilt Panel
Creating a Quilt Panel with Tulip Appliqué Pattern is a rewarding way to combine quilting, appliqué, embroidery, and creative fabric selection in one manageable project. The design begins with a simple quilted background and gradually develops into a colorful floral composition through carefully layered fabric shapes. Because the tulips use uncomplicated curves, the project can also serve as practical training for anyone who wants to become more comfortable with appliqué. Each stage introduces a useful sewing skill without requiring an overly complex construction process. The result is decorative enough to display while still offering many opportunities for personalization. It is a project that can be revisited in different colors and sizes whenever you want to experiment with a new fabric combination.
The most important preparation happens before the first appliqué stitch is made. Creating templates, selecting coordinating cotton fabrics, cutting the background generously, and arranging the complete bouquet in advance can prevent many common construction problems. Taking a few extra minutes to evaluate the position of the tulips and leaves can dramatically improve the final composition. The tall leaves should guide the eye through the panel rather than crowd the flowers, while the stems should visually connect the separate blossoms. Balanced appliqué placement does not require mathematical perfection; it simply requires attention to spacing, direction, and visual weight. This is one reason the pattern remains accessible even to relatively new quilters.
The flower construction also demonstrates how layering can transform a collection of simple fabric pieces into a recognizable botanical motif. Combining two or three pink fabrics within each tulip creates dimension without complicated piecing. A darker accent near the top provides additional contrast, while the rounded front petal establishes the characteristic tulip shape. Repeating this basic construction throughout the tulip quilt pattern creates unity across the project. Small changes in fabric print, shade, orientation, or petal position keep the flowers from looking mechanically identical. Those subtle differences are part of the beauty of handmade textile art.
Stitching is equally important because it contributes both structure and decoration. A visible blanket stitch can outline the flowers and leaves, emphasize their silhouettes, and protect the appliqué edges at the same time. Embroidered stems add another texture without requiring additional fabric pieces. When these details are combined with understated background quilting, the finished panel gains depth while maintaining a clean floral appearance. Beginners should prioritize steady, comfortable stitching rather than speed. Consistency generally improves naturally as each additional leaf and flower is completed.
Once you understand the construction method, this Quilt Panel with Tulip Appliqué Pattern can become the starting point for many original projects. Try changing pink tulips to yellow, red, purple, coral, or even a mixture of spring colors. Experiment with different green prints for the leaves or replace the neutral background with a very subtle pastel fabric. The completed appliqué section can also be incorporated into a pillow, tote bag, table runner, wall hanging, or larger patchwork quilt. Keeping the basic flower shapes while changing the surrounding format is an easy way to create coordinated handmade pieces without repeating exactly the same project.
EASILY FIND THE FREE PDF FOR THIS PATTERN HERE!
Most of all, enjoy the process of turning individual scraps into a complete handmade tulip appliqué quilt. From preparing the templates and arranging the leaves to stitching the layered petals and adding the final quilting, every stage contributes something visible to the finished piece. The techniques covered here can also be transferred to many other floral appliqué patterns, making this project useful beyond a single panel. Save your templates if you would like to make another version later, and experiment with your favorite fabric combinations to give the design your own character. If you make this project, leave your sincere opinion about the tutorial and share any suggestions that could make the pattern even more useful. Your ideas and creative variations can inspire new ways to interpret this beautiful Quilt Panel with Tulip Appliqué Pattern.