
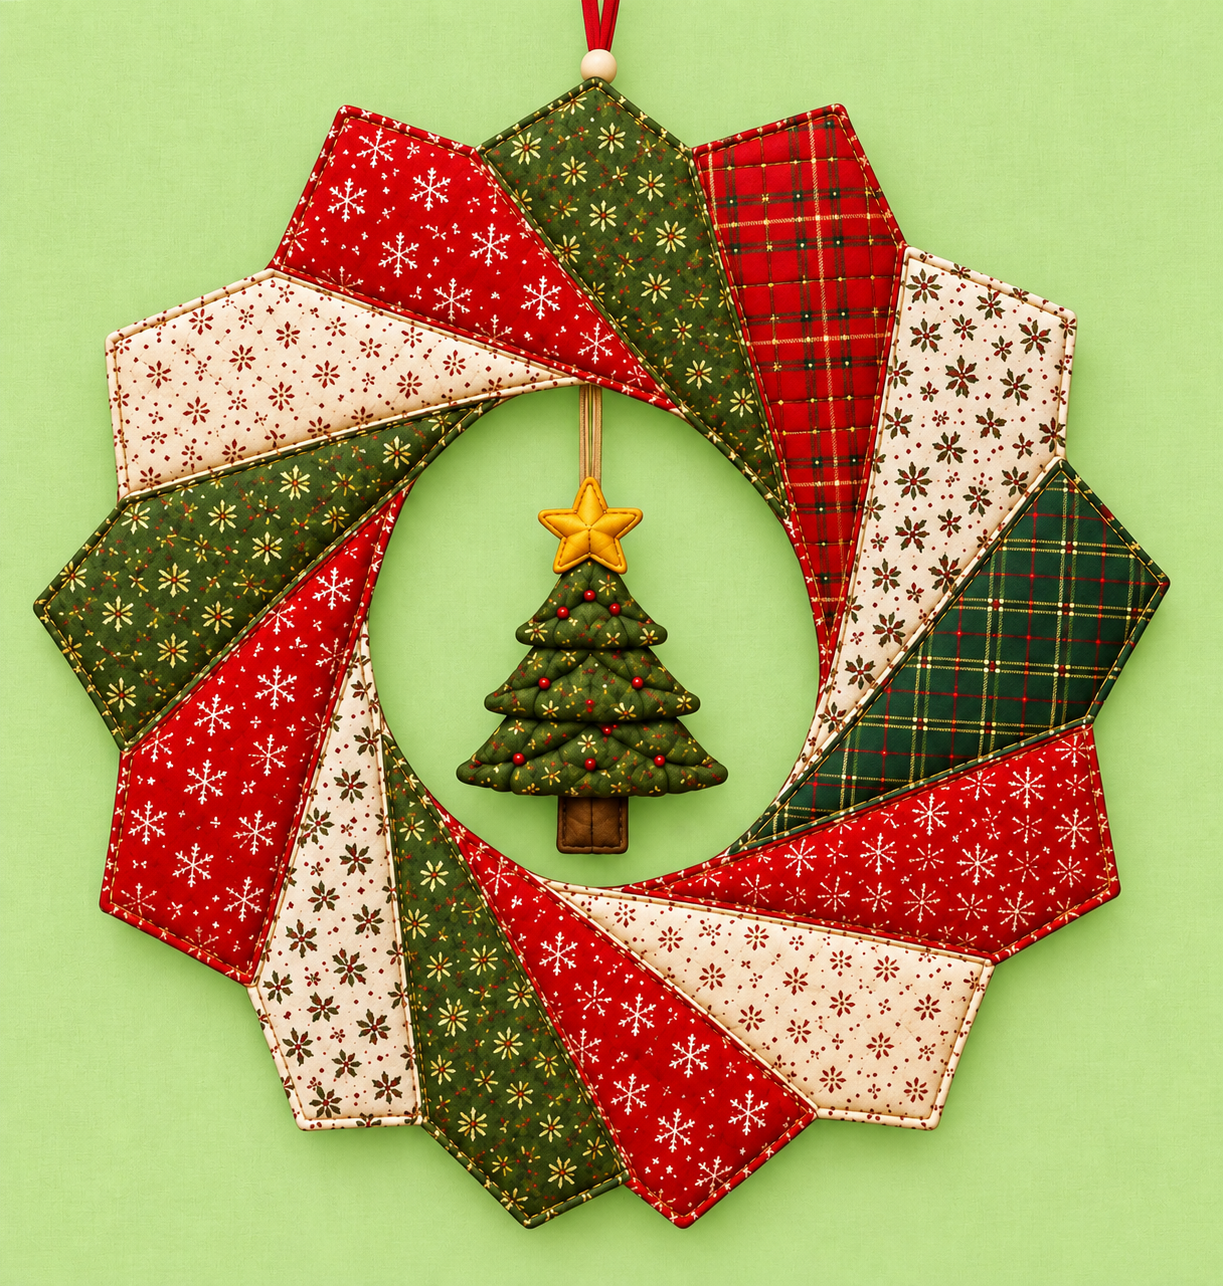
The Patchwork Christmas Wreath Pattern is a charming sewing project that combines the warmth of traditional patchwork with the unmistakable colors and shapes of the Christmas season. Inspired by the photographed wreath, this design is built from overlapping padded fabric sections arranged around an open circular center, creating movement and dimension without requiring an overly complicated construction method. Red snowflake prints, deep Christmas greens, cream fabrics, and classic plaid patterns work together beautifully, while the small hanging Christmas tree in the center gives the finished decoration an especially festive personality. Whether displayed on a wall, interior door, sewing-room cabinet, or seasonal display, this project can become a handmade piece that returns year after year.
One of the best things about making a Patchwork Christmas Wreath Pattern is the opportunity to use several coordinating fabrics in one relatively compact project. Instead of relying on a single Christmas print, the wreath gains visual interest through alternating cotton fabric, plaid, snowflake motifs, small floral prints, and traditional red-and-green combinations. The photographed design also demonstrates how careful placement can make simple fabric pieces look much more elaborate once they overlap. For sewists who have leftover Christmas fabric from quilts, table runners, stockings, or previous holiday projects, this is also an excellent way to turn those smaller pieces into a coordinated decoration rather than leaving them unused.
Although the finished wreath appears intricate, its construction can be approached as a sequence of manageable sewing steps. The main skills involved include accurate cutting, layering, topstitching, pressing, arranging fabric sections, hand stitching, and making a simple padded appliqué-style ornament. Beginners can take their time preparing identical templates, while experienced quilters can customize the dimensions, quilting, embellishments, and color placement. The instructions below explain how to recreate the overall appearance of the photographed project rather than providing a factory-produced template, so measurements can be adjusted to suit your preferred finished size. The key is maintaining consistent proportions and repeating the same construction method throughout the circular arrangement.
Materials, Fabric Selection, and Preparing the Patchwork Pieces
Begin by selecting approximately four to six coordinating Christmas quilting cottons. To resemble the inspiration, choose a bright or traditional red print, a dark green print, a cream background print, and at least one red or green plaid. Small-scale patterns are especially effective because more of the design remains visible after the fabric is cut into relatively narrow wreath sections. Try laying the fabrics next to one another before cutting anything to confirm that there is enough contrast between neighboring pieces.
DISCOVER MORE FREE PATTERNS HERE!
You will also need lightweight batting or fusible fleece, coordinating sewing thread, a hand-sewing needle, fabric scissors or a rotary cutter, a cutting mat, quilting ruler, pins or sewing clips, an iron, and a sewing machine. For the hanging mechanism, prepare ribbon or a sturdy fabric loop. Small amounts of brown, green, and yellow or gold fabric can be reserved for the Christmas tree ornament positioned in the center.
A practical starting point is to create one paper template measuring approximately 23 cm long and 9 cm wide, tapering or angling one end so that the pieces can overlap naturally around a circle. The exact geometry can be modified because the photographed wreath uses an intentionally layered appearance rather than a rigid traditional quilt block. Before cutting your best fabrics, make two or three test pieces from scrap material and arrange them in a circle. Adjust the angle until the ring closes comfortably.
Once the template is satisfactory, cut approximately 12 to 14 main fabric units, depending on their width and the diameter you want. Cut a matching backing piece and a slightly smaller piece of batting for every unit. Keeping the batting a few millimeters away from the seam allowance can reduce unnecessary bulk, particularly around pointed or angled corners. Consistent cutting is important because irregular units become more noticeable when repeated around a circular design.
Pair the prints strategically rather than arranging identical colors next to each other. For example, place a cream section between darker green and red pieces, then introduce plaid before repeating another print. This creates the lively alternating rhythm visible in the Patchwork Christmas Wreath Pattern. You do not need every segment to be unique; repeating fabrics around the circle actually helps unify the overall design.
Before sewing, mark a seam allowance of approximately 0.7 to 1 cm around each piece. If your chosen construction uses turned fabric units, place the front and backing fabrics right sides together with the batting against the wrong side of one layer. Leave a small opening for turning. Preparing all units as a batch before moving to the sewing machine can make construction faster and help maintain consistent dimensions.
Sewing, Turning, Topstitching, and Building the Wreath
Sew around each layered section using the marked seam allowance, leaving a turning opening of approximately 4 to 5 cm along one relatively straight edge. Shorten the stitch length slightly as you approach angled corners. Backstitch gently at both sides of the opening so the seams remain secure while the fabric is turned. Repeat exactly the same procedure for all the pieces.
Trim excess batting and fabric at bulky corners without cutting through the stitching. Clip inward curves when necessary and carefully turn each piece right side out. A blunt turning tool can help shape the corners, but avoid pushing so forcefully that the tool damages the fabric. Roll the seams gently between your fingers before pressing each unit flat.
Pressing makes a major difference in this project. Use a temperature appropriate for your quilting cotton and batting, and press rather than aggressively sliding the iron. Turn the seam allowance at the opening inward so that it follows the finished edge. After pressing, every padded segment should have a clean, crisp outline and approximately the same thickness.
Topstitch around each fabric piece about 2 to 3 mm from the outer edge. Besides closing the turning opening, this stitching creates the attractive outlined finish visible in the inspiration. A contrasting golden, cream, red, or green thread can make the edge more decorative, while matching thread creates a quieter appearance. Sew slowly around angled corners to maintain a consistent distance from the edge.
Now place all finished segments on a large flat surface and begin forming the patchwork wreath. Arrange them clockwise with each piece partially overlapping the previous one. The narrow or angled portions should generally move toward the center opening while the wider areas define the outside circumference. Do not permanently sew anything until the entire circle looks balanced.
When you are happy with the arrangement, use clips or pins to secure the overlapping sections. Check the wreath from a distance before sewing because small placement differences are easier to see when viewing the complete circle. Attach neighboring pieces at their concealed overlap points with strong hand stitches or carefully placed machine stitching. The attachment should be secure enough to prevent sections from shifting while preserving the dimensional, layered character of the wreath.
Creating the Center Christmas Tree and Finishing Details
The central fabric Christmas tree ornament gives this project much of its personality. Draw a simple tree silhouette approximately 13 to 16 cm tall, depending on the size of your wreath opening. A three-tiered evergreen shape works particularly well. Cut two green fabric pieces from this template and cut a slightly smaller piece of lightweight batting for padding.
Place the tree fabrics right sides together with the batting positioned against one wrong side. Sew around the shape while leaving a small turning opening. Clip carefully around inward corners and trim excess fabric at outward points before turning. Once turned, shape the tree gently, press it, and topstitch close to the edge. You can add a little extra quilting through the layers to give the branches additional definition.
Create the trunk from a small rectangle of brown fabric. A finished size of around 3 cm wide by 4 cm tall works well for a medium wreath. The trunk can be lightly padded and topstitched just like the tree. Position it behind the bottom of the tree and secure it with hand stitches, making sure the raw attachment area remains hidden.
For the star, draw a five-pointed shape approximately 5 to 6 cm across. Cut two pieces from yellow or gold cotton and add thin batting between them. Sew, turn, press, and topstitch the star before attaching it to the top of the tree. The photographed inspiration uses a dimensional star, so light padding is preferable to a completely flat appliqué.
Small red beads, fabric circles, buttons, or stitched French knots can represent Christmas ornaments on the tree. If the wreath will be used around small children or pets, securely stitched fabric circles may be preferable to loose decorative pieces. Keep embellishments relatively simple because the surrounding patchwork already provides plenty of pattern and color.
Finally, attach a narrow cord or ribbon to the top of the tree and suspend it from the upper inside portion of the wreath so it hangs approximately in the center. Add a second, stronger hanging loop to the outer top edge of the wreath. Check the finished decoration vertically and make any small adjustments necessary so that the tree hangs straight and the wreath maintains a balanced circular shape.
Customizing, Displaying, and Caring for Your Patchwork Christmas Wreath Pattern
Once you understand the basic Patchwork Christmas Wreath Pattern, there are many ways to customize it. Traditional red, green, cream, and gold create an unmistakably classic Christmas appearance, but the same construction can work with burgundy and forest green, Scandinavian red and white, farmhouse neutrals, or even icy blue and silver. What matters most is maintaining enough contrast to distinguish the overlapping sections.
Fabric texture can also change the character of the project. Standard 100% cotton quilting fabric is generally the easiest choice because it cuts accurately, presses well, and is available in countless seasonal prints. Experienced sewists can introduce small amounts of linen-look cotton or other stable woven fabrics, but mixing materials with dramatically different weights may cause the wreath pieces to hang unevenly.
Decorative stitching provides another opportunity for personalization. Straight topstitching creates a neat traditional finish, while subtle quilting lines can emphasize individual segments. Metallic-looking thread can add a festive accent, but test specialty thread on scraps first because machine tension may need adjustment. Even ordinary cream or gold-colored polyester thread can create an attractive decorative outline without overwhelming the prints.
The center ornament does not have to be a Christmas tree. Once the basic wreath is complete, you could create interchangeable padded ornaments such as a star, bell, snowman, gingerbread figure, heart, or simple gift box. Attaching the ornament with a removable ribbon allows the same wreath structure to be refreshed from one Christmas season to another.
For display, keep the wreath indoors or in a protected location because ordinary quilting cotton and batting are not designed for prolonged exposure to rain, snow, or strong sunlight. A fabric wreath works particularly well on an interior door, above a mantel, on a sewing-room wall, or as part of a holiday craft display. Because it is lightweight, it usually requires much less support than a traditional branch wreath.
At the end of the season, remove surface dust carefully and store the Christmas patchwork decoration flat whenever possible. Avoid crushing it beneath heavy holiday decorations because prolonged compression can distort the padded sections. If folding is unavoidable, place clean tissue or soft fabric between layers and avoid sharp creases. Proper storage will help preserve the dimensional appearance and crisp topstitched edges for future Christmas celebrations.
FAQ About the Patchwork Christmas Wreath Pattern
Is the Patchwork Christmas Wreath Pattern suitable for beginners?
Yes. A beginner who is comfortable with basic straight stitching can complete this project successfully. The most important skills are accurate cutting, sewing consistent seam allowances, turning fabric pieces, pressing, topstitching, and assembling the units evenly. Making a few practice pieces from scrap fabric before cutting the Christmas prints can make the process easier.
What is the best fabric for a Christmas patchwork wreath?
Quilting cotton is one of the most practical options. It is stable, easy to cut and press, and widely available in coordinating Christmas prints. Red snowflakes, tartan plaids, cream motifs, tiny stars, and dark green prints can produce a look similar to the photographed project.
How much fabric do I need?
This depends on the dimensions and number of sections. Because each visible section is relatively small, the project is excellent for fabric scraps, fat quarters, and leftover quilting cotton. If buying new material, several coordinating fat quarters should provide plenty of variety for a medium decorative wreath, especially when prints are repeated.
Does the wreath need batting?
Batting is strongly recommended if you want the soft dimensional appearance shown in the inspiration. Lightweight batting or fusible fleece gives each section enough body to hold its shape without making the overlapping areas excessively bulky.
How many fabric pieces should I make?
Approximately 12 to 14 sections are a useful starting range, but the correct number depends on the dimensions and angle of your template. The best approach is to create a paper template and arrange paper copies in a circle before cutting fabric. This allows you to modify the overlap and overall diameter easily.
Can I sew the entire wreath by machine?
Most components can be constructed by machine. However, discreet hand stitching can be especially useful when connecting overlapping pieces because it lets you control exactly where the layers are attached without creating visible seams across decorative areas.
Can I make the wreath larger or smaller?
Absolutely. Scale the main template and central ornament proportionally. When enlarging the wreath, test the pieces with paper first because changing their length without changing the angle may affect how neatly they form a circle.
How can I make the wreath look more professional?
Focus on consistent cutting, even seam allowances, careful pressing, smooth corners, and uniform edge topstitching. Also spend extra time arranging the fabric colors before permanently attaching the pieces. A balanced distribution of light, medium, and dark prints often makes a handmade patchwork project appear much more polished.
Can Christmas fabric scraps be used for this project?
Yes, and this is one of the strongest advantages of the design. Small remnants from previous quilts and seasonal sewing projects can be coordinated into a new decoration. Repeating two or three fabrics around the circle helps even a varied scrap collection look intentional.
Can I wash a fabric Christmas wreath?
Spot cleaning is generally safer for a dimensional decorative wreath, particularly when it contains batting, beads, buttons, specialty threads, or several hand-sewn attachment points. If you expect the decoration to require frequent cleaning, prewash the cotton fabrics before construction and choose washable embellishments.
What can I use instead of the Christmas tree in the center?
A padded star, bell, heart, snowflake, gingerbread figure, miniature stocking, or other seasonal appliqué can work beautifully. Keeping the center ornament removable is also a clever way to create several variations from one Patchwork Christmas Wreath Pattern.
How long does this project usually take?
The time varies with experience and the amount of embellishment. Cutting and preparing the repeated units is usually the most methodical part, while arranging the final circle requires patience rather than advanced sewing skills. Working in stages—cutting first, sewing all units together, pressing, topstitching, and then assembling—can make the project more efficient.
Conclusion
The Patchwork Christmas Wreath Pattern transforms relatively simple sewing techniques into a dimensional holiday decoration filled with color, texture, and handmade character. By preparing coordinated Christmas fabrics, cutting consistent padded sections, sewing and turning each unit, adding neat topstitching, and overlapping the finished pieces around a circular opening, you can reproduce the distinctive layered structure shown in the inspiration.
The central padded Christmas tree completes the design with an additional handmade detail, while the star, miniature ornaments, decorative stitching, and hanging ribbon provide opportunities for personalization. More importantly, the basic construction method can be adapted to different sizes, fabric collections, color palettes, and center ornaments, making this patchwork Christmas project useful far beyond a single version.
EASILY FIND THE FREE PDF FOR THIS PATTERN HERE!
Careful preparation is the secret to achieving a polished result. Test the template with paper or scrap fabric, maintain consistent seam allowances, press every section carefully, and experiment with the arrangement before permanently joining the wreath. These simple habits can dramatically improve the symmetry and finish of the final piece. If you make your own Patchwork Christmas Wreath Pattern, leave your sincere opinion about the project and share your suggestions for future variations. Which fabric combination would you choose—traditional red and green, rustic neutrals, elegant gold tones, or something completely different? Your ideas and creative suggestions can inspire even more beautiful handmade Christmas projects.