
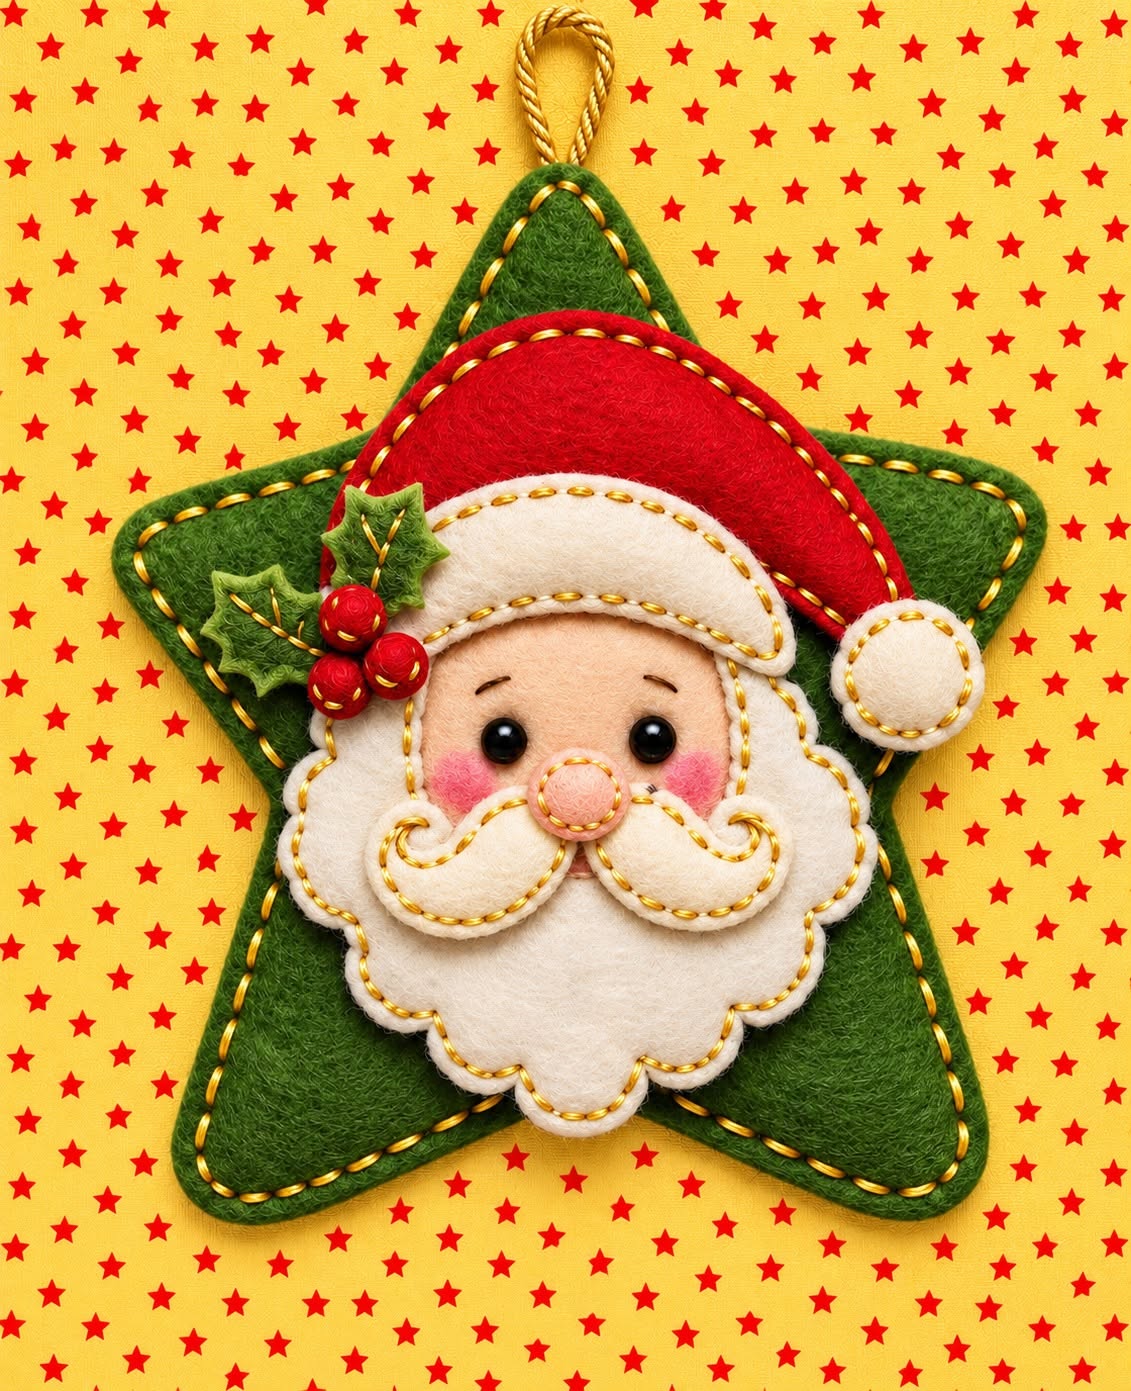
The Felt Star Ornament with Santa Claus Pattern is a charming handmade Christmas project that combines the warm texture of felt with one of the most recognizable holiday characters. Inspired by the ornament shown in the reference image, the design features a large green star, a layered Santa face, a bright red hat, soft white beard and mustache pieces, holly leaves, berries, and a rustic hanging loop. Visible hand stitching gives the ornament an especially cozy appearance, making it look like a traditional keepsake rather than a mass-produced decoration. It is a wonderful project for anyone who enjoys felt crafts, Christmas sewing projects, appliqué, or handmade seasonal decorations. Although the finished ornament contains several individual pieces, the construction process is approachable because most elements are created from simple shapes that can be cut, layered, and stitched together gradually.
One of the biggest advantages of making a Felt Star Ornament with Santa Claus Pattern is the freedom to personalize the project. The green, red, cream, and peach tones in the reference design create a classic Christmas palette, but they can easily be adjusted to coordinate with an existing holiday theme. Wool-blend felt is particularly attractive for this style because it has a dense, slightly textured surface and generally holds small shapes well, although good-quality craft felt can also be used. Decorative stitching around the edges is another important part of the design. Instead of hiding every seam, this project intentionally makes the stitches visible. That simple detail defines the shapes, reinforces the handmade character, and gives the finished Santa felt ornament a polished appearance without requiring complicated sewing equipment.
This tutorial explains how to recreate the project from beginning to end, including preparing a reusable felt ornament pattern, selecting materials, cutting the individual components, building the star, assembling Santa’s face, adding the hat and facial details, and completing the decorative finishing. Because the exact dimensions cannot be determined from a photograph alone, the measurements below are practical suggested dimensions that can be scaled according to the desired finished size. A star approximately 18 to 20 cm across provides enough space for all of Santa’s facial details while remaining suitable for hanging on a Christmas tree, wall hook, door arrangement, or holiday display. The key is to maintain consistent proportions when resizing every pattern component.
Materials and Preparing the Felt Star Ornament Pattern
Begin by gathering the materials for your Felt Star Ornament with Santa Claus Pattern. You will need green felt for the star and holly leaves, red felt for Santa’s hat and berries, cream or ivory felt for the beard, mustache, hat trim, and pom-pom, and peach or light tan felt for the face and nose. You will also need embroidery floss or strong sewing thread, stuffing, scissors, pins or fabric clips, a hand-sewing needle, paper for making templates, and approximately 15 to 20 cm of cord or twine for the hanging loop.
DISCOVER MORE FREE PATTERNS HERE!
For the main star template, draw a symmetrical five-pointed star measuring approximately 19 cm from the top point to the lowest points. The width can also be around 18 to 19 cm, depending on the shape you prefer. Draw the star on sturdy paper or lightweight cardstock so it can be reused. Cut two identical green felt stars because the finished base should have a front and back layer. Using two layers gives the ornament more body and makes it possible to add a small amount of stuffing.
The Santa Claus pattern should be designed as several overlapping components instead of one complicated piece. Prepare separate templates for the face, beard, mustache halves, nose, hat, hat band, pom-pom, holly leaves, and berries. A face approximately 8 cm wide works well on a 19 cm star. The beard can measure roughly 10 to 11 cm wide and extend downward far enough to create the characteristic scalloped Santa silhouette.
When cutting felt, trace the templates lightly on the reverse side whenever possible. Sharp embroidery or fabric scissors make a noticeable difference when working with small curves. Instead of making many short, hesitant cuts, rotate the felt gradually while keeping the scissors moving smoothly. Clean cutting is especially important around the beard, mustache, holly leaves, and curved hat pieces because these edges remain visible in the finished Christmas felt ornament.
The reference design uses contrasting decorative stitches around most major components. Cream embroidery floss works beautifully against dark green and red felt, while a slightly darker cream or tan thread can define the ivory pieces. A running stitch is an excellent choice for the star and larger appliqué pieces. For areas that require stronger edge protection, a blanket stitch can be substituted. Try to maintain similar stitch lengths and spacing throughout the project.
Before sewing anything permanently, place all the cut components on one green star. Position Santa approximately in the center, leaving the five star points visible around his head and beard. Arrange the red hat behind the cream trim, place the beard beneath the face, and test the mustache and nose positions. This dry assembly is one of the most useful steps because small adjustments are much easier before stitching begins.
Sewing the Green Star Base and Adding the Hanging Loop
Place the two green felt star pieces together with their edges perfectly aligned. If the felt stretches easily, secure the layers temporarily with fabric clips or a few pins placed well away from the stitching line. Begin sewing around the perimeter approximately 4 to 6 mm from the edge, using an evenly spaced running stitch similar to the visible stitching in the reference ornament.
Before closing the top point, prepare the hanging loop. Fold the cord or twine in half and place both raw ends between the two star layers. Approximately 2 to 3 cm of cord should remain inside the ornament so the loop cannot easily pull free. Sew through the felt and cord several times with strong thread. This reinforced attachment is important because the loop will support the entire finished Santa Claus ornament.
Continue sewing around the star, but leave an opening approximately 4 to 5 cm wide. Insert a small amount of polyester fiberfill through this opening. The goal is to create gentle dimension rather than a heavily stuffed toy. Push a little filling into each star point with a blunt tool or the closed end of a pen, taking care not to stretch or puncture the felt.
Check the star from the front before closing the opening. It should remain relatively flat in the center because the Santa appliqué will be attached there. If the base becomes too rounded, remove some stuffing. A lightly padded star creates the attractive dimensional effect seen in many handmade felt Christmas ornaments while still providing a stable surface for the decorative layers.
Close the remaining opening using the same stitch spacing as the rest of the perimeter. Tie off the thread securely on the back and conceal the end between the felt layers. Examine all five points and gently redistribute the stuffing if necessary. The finished star should have clearly defined points and a consistent outline.
At this stage, you have completed the structural foundation of the Felt Star Ornament with Santa Claus Pattern. Lay the Santa pieces over the star again and verify the placement. The top of the hat can extend toward the upper-right section of the star, while the beard should occupy much of the lower center. Maintaining visible green space around Santa helps preserve the star silhouette.
Creating Santa’s Face, Beard, Hat, and Christmas Details
Start Santa’s appliqué by positioning the peach-colored face in the center of the star. Place the large cream beard behind or slightly underneath the face so its upper section is hidden while the scalloped lower edge remains visible. Stitch the beard securely using small running stitches approximately 3 to 4 mm from the edge. Smooth the felt frequently while sewing to prevent puckering.
Next, secure the face. A small amount of stuffing can be placed underneath the center before completing the stitching if you want a softly raised effect. Keep the padding subtle. Add two black eyes using small beads, safety-style craft eyes suitable for decorative use, or embroidered circles. If the ornament may be handled by very young children, embroidered eyes are preferable because they eliminate detachable small pieces.
Create the Santa beard and mustache from cream felt. Cut two mirrored mustache pieces with curled outer ends and overlap them slightly beneath the nose. Stitch around their outer edges while leaving the central overlap visually clean. The nose can be made from a small peach or pale pink felt circle approximately 2 cm in diameter. A tiny amount of stuffing beneath it produces the rounded appearance visible in the inspiration image.
For the hat, position the large red felt section above the face and slightly toward one side. Sew around its curved outer edge with cream embroidery floss. Add the wide ivory hat band across Santa’s forehead, overlapping the bottom edge of the red section. The band may be lightly padded to produce more dimension. Finish the hat with a round ivory felt pom-pom attached at the drooping tip.
Santa’s cheeks can be created with a very light application of fabric-safe blush or textile coloring. Use only a small amount and build the color gradually. Alternatively, cut two tiny pale pink felt circles and stitch them beneath the eyes. The goal is a warm expression that complements the soft handmade texture without overwhelming the facial features.
Complete the Christmas decoration with felt holly leaves and berries near one side of Santa’s hat. Cut two or three small green leaves with pointed edges and arrange them in a cluster. Add three small red felt circles for berries. They can be stitched flat or lightly stuffed for dimension. This detail connects the red hat to the green star and gives the entire ornament a balanced traditional Christmas color scheme.
Finishing, Customizing, and Displaying Your Santa Felt Ornament
Once all the appliqué components are attached, inspect the Felt Star Ornament with Santa Claus Pattern carefully. Look for loose thread ends, uneven edges, or areas where one layer has shifted. Small corrections at this stage make a significant difference. Secure every thread knot on the back or hide it beneath overlapping felt pieces whenever possible.
Decorative stitching can now be added wherever the design appears too plain. A line of cream running stitches around the red hat emphasizes its shape, while similar stitching around the beard and star creates visual consistency. Avoid adding excessive embroidery to every available area. The simple combination of felt texture and visible hand stitching is part of what makes this project appealing.
If you prefer a rustic Christmas look, keep the green, deep red, cream, and natural cord palette. For a brighter style, consider replacing dark green with mint, turquoise, or light blue and using brighter red accents. A Scandinavian-inspired variation could use red, white, and neutral beige. Whatever colors you select, keeping strong contrast between Santa and the star helps the facial details remain easy to see.
The same Santa Claus felt pattern can also be enlarged or reduced. A smaller version can become a tree ornament, gift tag, or package decoration, while a larger version can become a door ornament or wall hanging. When resizing, change every pattern component by the same percentage so the face, beard, hat, and star retain their original proportions.
Storage is another consideration for handmade felt decorations. At the end of the holiday season, keep the ornament flat or loosely supported in a dry container. Avoid placing heavy decorations directly on top because prolonged pressure can flatten the stuffing and distort the star points. Felt should also be stored away from moisture so its texture and shape remain attractive for future Christmas seasons.
The completed Felt Star Ornament with Santa Claus Pattern should feel intentionally handmade. Perfectly machine-like stitches are not necessary; consistent hand stitching is enough to create an attractive result. Slight variations in the beard curves, holly leaves, or Santa’s expression can actually make each ornament unique, which is one of the most enjoyable aspects of creating your own DIY Christmas felt decorations.
FAQ About the Felt Star Ornament with Santa Claus Pattern
What is the best felt for a Felt Star Ornament with Santa Claus Pattern?
Wool or wool-blend felt is an excellent option because it is dense, attractive, and generally holds detailed cuts well. Quality craft felt can also work successfully, especially for beginners or when making several ornaments. Choose felt that is firm enough to maintain the star points and small facial details.
How large should the finished Santa star ornament be?
A practical size is approximately 18 to 20 cm across. This provides enough room for the layered Santa face while remaining suitable as a decorative hanging ornament. You can resize the pattern as long as every component is scaled proportionally.
Do I need a sewing machine for this project?
No. The design is especially suitable for hand sewing. Running stitch, blanket stitch, and a few simple securing stitches are enough to assemble the project. Hand stitching also creates the decorative appearance that gives felt ornaments their traditional character.
Should the star be stuffed?
Light stuffing is recommended if you want the ornament to have dimension similar to a soft decorative piece. Use only enough fiberfill to gently raise the surface. Excessive stuffing can distort the star points and make attaching the Santa appliqué more difficult.
How do I make the stitches look even?
Use a consistent distance from the felt edge and try to maintain the same stitch length. Beginners can place tiny removable guide marks before sewing. Working slowly around curves and star points also helps produce cleaner results.
Can I make the ornament without beads or plastic eyes?
Absolutely. The eyes can be embroidered with black thread or cut from tiny circles of black felt. Embroidery is an especially practical solution when you want all decorative components to remain textile-based.
What sewing stitches work best for felt ornaments?
The running stitch works well for decorative outlines and attaching larger pieces. Blanket stitch is useful around exposed edges, while small whip stitches can secure tiny appliqué components. These basic techniques are sufficient for most of the project.
Can beginners make this Santa felt ornament?
Yes. Beginners may want to simplify some smaller elements, such as the holly leaves or curved mustache, for their first version. The construction itself mainly involves tracing templates, cutting felt, layering pieces, and using straightforward hand stitches.
How can I personalize the Felt Star Ornament with Santa Claus Pattern?
You can change the felt colors, embroidery thread, hanging cord, hat decoration, or Santa’s facial expression. You could also embroider a year or short name on the back of the star, turning the ornament into a personalized Christmas keepsake.
How long does a handmade felt Santa ornament take to make?
The time varies according to sewing experience and the amount of detail included. Cutting carefully and arranging the layers before stitching generally saves time later. Rather than rushing, focus on clean edges and consistent stitches, since these are the details that most influence the finished appearance.
Can the same pattern be used for other Christmas projects?
Yes. The star base can support many different appliqué designs, including snowmen, reindeer, Christmas trees, gingerbread figures, or winter flowers. Santa can also be placed on a circular or heart-shaped felt base, making the basic pattern useful for creating an entire coordinated collection.
How should I clean a felt Christmas ornament?
For minor dust, gently brush or wipe the surface without soaking the felt. Spot cleaning is usually more appropriate than machine washing because water, agitation, and heat may affect the felt, stuffing, embroidery, and dimensional components.
Conclusion
Creating a Felt Star Ornament with Santa Claus Pattern is a rewarding way to combine simple hand sewing with traditional Christmas imagery. Starting with two green felt stars, you can build a lightly padded foundation, attach a secure hanging loop, and gradually layer the face, felt Santa beard, mustache, nose, red hat, ivory trim, pom-pom, holly leaves, and berries. Decorative running stitches around the individual pieces bring the entire design together and reinforce its warm handmade character.
The most important lessons are to create accurate templates, cut the felt carefully, test the complete arrangement before sewing, work from the larger background pieces toward the smaller foreground details, and maintain consistent stitching. These straightforward techniques make the project accessible while still leaving plenty of opportunities for creative customization.
EASILY FIND THE FREE PDF FOR THIS PATTERN HERE!
Once you understand the construction of this Christmas felt ornament, the same methods can be adapted to many other seasonal designs. Change the colors, resize the star, modify Santa’s expression, or create coordinating characters to build a complete handmade Christmas collection. Most importantly, enjoy the creative process and allow the small handmade details to give your finished ornament its own personality. If you make your own Felt Star Ornament with Santa Claus Pattern, leave your sincere opinion about the project and share your suggestions. Which colors, stitching details, or Christmas characters would you like to see adapted into the next felt pattern?