
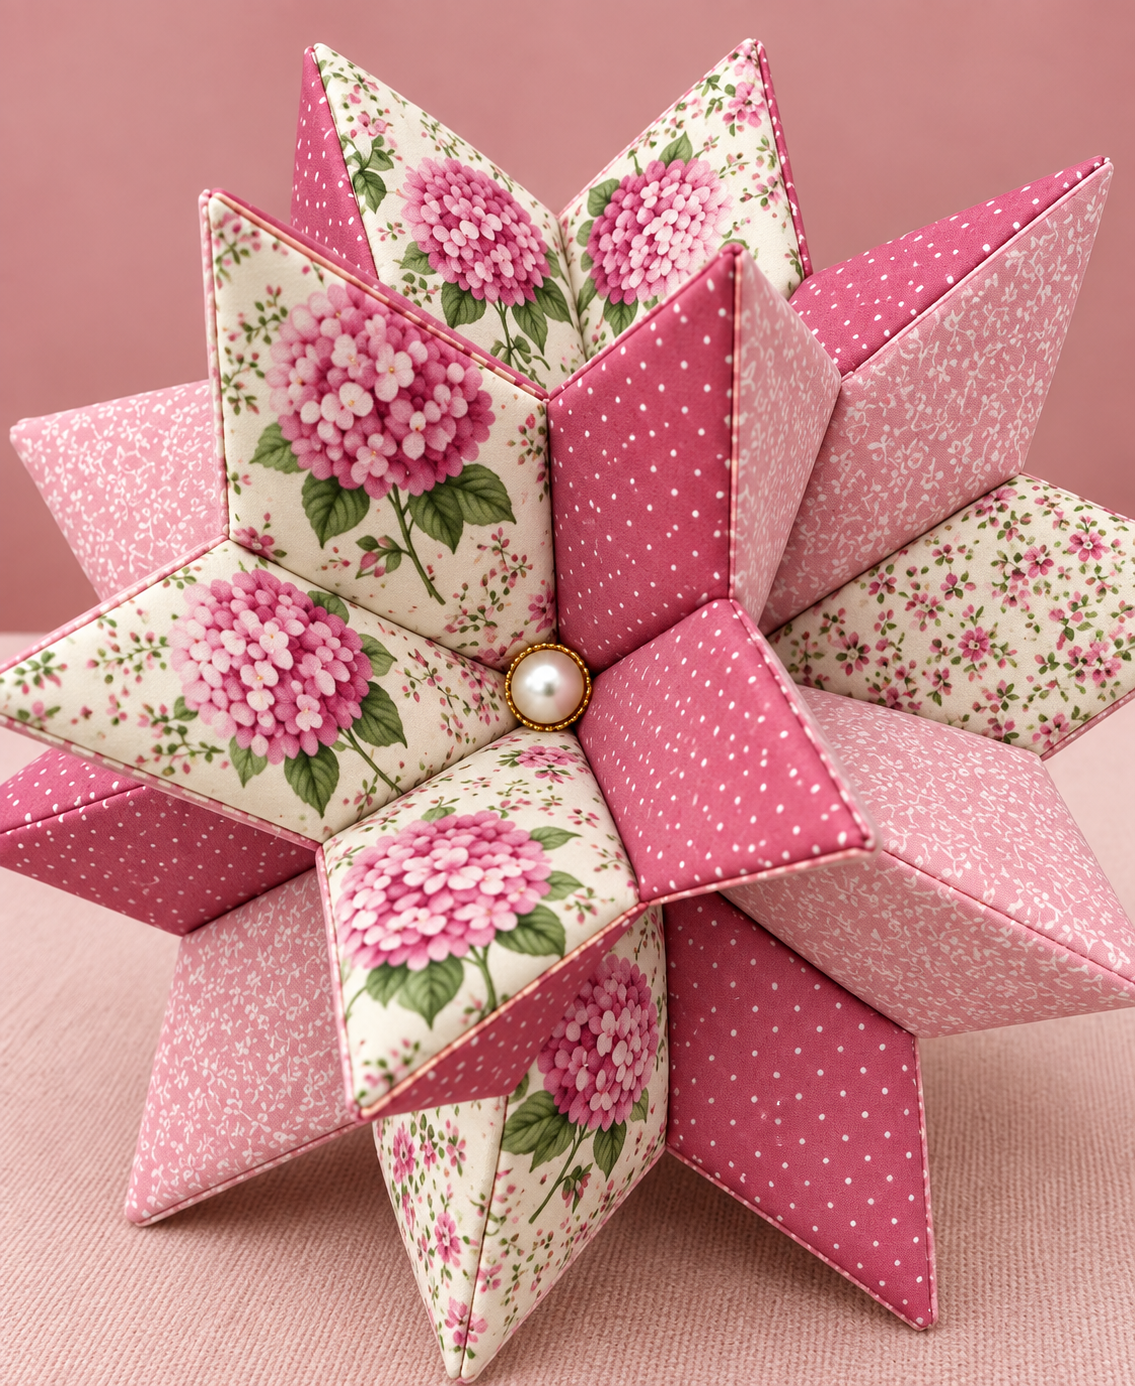
The Fabric Star Ornament Pattern is a beautiful sewing project that transforms simple pieces of cotton fabric into an elegant three-dimensional decoration. Inspired by the photograph, this design combines folded and padded fabric points arranged around a decorative center, producing a full star or flower-like shape. The combination of pink floral prints, tiny dots, and coordinating tonal fabrics gives the finished piece a romantic handmade appearance. Although the construction looks elaborate at first, the project becomes much easier when it is divided into repeated steps. Once you understand how to prepare one fabric point, the remaining sections follow essentially the same method.
One of the most appealing things about a Fabric Star Ornament Pattern is the opportunity to work with small pieces of fabric and create something that looks sophisticated without needing complicated garment-sewing techniques. Quilting cotton, floral fabric, coordinating prints, lightweight interfacing, batting, thread, and a decorative button are suitable materials for recreating this style. Accurate cutting and consistent seam allowances are particularly important because the individual points eventually meet in the center. For a balanced result, choose fabrics with similar weights and coordinate the colors before beginning construction.
The finished fabric star ornament can be adapted for many decorative purposes. It can become a seasonal ornament, fabric centerpiece, wall decoration, gift embellishment, or handmade accent for a sewing room. The photographed version uses several shades of pink and cream, but the same construction can work with Christmas fabrics, farmhouse prints, patriotic colors, pastels, scraps from a quilt, or a completely modern palette. The key is maintaining enough contrast between neighboring pieces so that every folded point remains visually distinct while still belonging to the overall design.
Materials, Fabric Selection, and Preparing the Pattern
Begin by selecting approximately three coordinating cotton fabrics. A practical combination is one statement print, one small-scale print, and one simpler coordinating fabric. The photograph demonstrates this principle effectively: larger pink flowers provide focal areas, while dotted and delicate tonal prints create contrast. Pre-press the fabric before cutting so wrinkles do not affect the dimensions of your pieces.
DISCOVER MORE FREE PATTERNS HERE!
For a medium-size ornament, you can begin with squares measuring approximately 12 x 12 cm. This measurement can be adjusted depending on the desired finished size. Make a paper or cardstock template first rather than measuring every fabric piece separately. A reusable template improves consistency, which is essential when constructing a symmetrical Fabric Star Ornament Pattern.
Cut enough squares to create the number of dimensional points you want in the finished star. A full ornament similar to the photographed project benefits from multiple repeated units arranged in layers. If you are experimenting with this technique for the first time, prepare one or two extra squares. They allow you to practice the folding process before assembling your best pieces.
To give each point more body, cut matching pieces of lightweight batting or thin fusible interfacing slightly smaller than the fabric pieces. Avoid very thick batting because excessive bulk can make the center difficult to assemble. The objective is to create a softly structured point that holds its shape while remaining easy to sew.
Choose a strong coordinating polyester or cotton-polyester thread. A standard sewing-machine needle suitable for quilting cotton should work well, although a fresh needle is helpful when several layers overlap. You will also need sharp fabric scissors or a rotary cutter, a cutting mat, ruler, pins or sewing clips, an iron, hand-sewing needle, and a decorative button or embellishment for the center.
Before sewing the entire ornament, arrange the unsewn fabrics on your work surface. Alternate the floral and coordinating prints to preview the final color distribution. This simple planning stage helps prevent identical fabrics from clustering together and creates the balanced appearance that makes a fabric star sewing project especially attractive.
Sewing and Shaping the Dimensional Fabric Points
Start with one fabric square and place the layers according to the construction method you have chosen. If you are using two fabric pieces for a reversible or fully enclosed unit, place them right sides together with the lightweight stabilizing layer positioned appropriately. Sew around the required edges using approximately a 0.7 cm seam allowance, leaving an opening for turning whenever the piece needs to be turned right side out.
Trim excess bulk carefully at corners before turning the piece. Do not cut through the stitching. Turn the fabric right side out and gently push the corners into shape using a blunt turning tool. Avoid using a sharp object that could puncture the fabric. Press the piece carefully so its edges are crisp and even.
Next comes the characteristic folding stage of the Fabric Star Ornament Pattern. Fold the prepared piece so opposite corners create a pointed dimensional form. The exact depth of the fold can be adjusted, but every unit should be folded in the same way. A ruler can help you check that the center line and outer edges remain symmetrical.
Press the folds gently and secure them temporarily with clips or pins. Stitch the necessary sections to prevent the folds from opening. A short reinforced seam is usually sufficient. If visible topstitching is part of your design, keep it consistently spaced from the edge. This small detail gives a handmade ornament a cleaner and more professional finish.
Repeat this procedure with every fabric square. Try to make each fabric star point approximately the same width, length, and thickness. Place completed points beside one another as you work. Comparing them frequently makes small differences much easier to correct before the final assembly.
When all the units are finished, arrange them loosely into a circle without permanently attaching anything. Alternate floral and geometric or dotted prints and rotate each point toward the center. You should now begin to see the dimensional flower-star structure shown in the inspiration photograph. Make any adjustments to folds or placement before moving to final assembly.
Assembling the Fabric Star Ornament Pattern
Place the first group of prepared points on a flat work surface with their narrow ends directed toward the center. Arrange them evenly around an imaginary circle. Symmetry is more important than speed during this stage. Measure the distance between neighboring points if necessary so the finished Fabric Star Ornament Pattern does not lean noticeably toward one side.
Join neighboring units securely at the areas that will be hidden beneath overlapping layers. Depending on the thickness of your ornament, this can be done by machine or by hand with strong thread. Hand sewing can be especially useful near the center because it gives you greater control over several bulky fabric layers.
Add the next group of points between or over the first set, following the layered appearance of the photographed ornament. This overlapping arrangement is what creates the dramatic dimensional effect. Rather than flattening the points, allow them to retain their padded structure. Check the ornament from directly above every few stitches to make sure the design remains centered.
Continue adding pieces until the 3D fabric star looks full and evenly distributed. If one area appears noticeably heavier than another, adjust it before permanently securing the center. The repeated mixture of floral and smaller prints should travel naturally around the ornament rather than forming isolated blocks of the same fabric.
Once you are satisfied with the arrangement, sew firmly through the central joining areas. Use several secure stitches and knot the thread well on the concealed side. The middle receives considerable tension from the surrounding dimensional points, so strong construction here helps the ornament maintain its shape during handling and storage.
Finish the center with a decorative button, covered button, fabric yo-yo, bead-style embellishment, or another securely attached decorative element. The inspiration image uses a pearl-like centerpiece with a gold-toned surround. A center embellishment is both decorative and practical because it conceals the joining stitches while creating a polished focal point for the Fabric Star Ornament Pattern.
Finishing, Decorating, and Customizing Your Fabric Star
Inspect every edge after assembly. Remove visible basting threads, trim loose fibers, and check that all openings are securely closed. If one point has become compressed during construction, reshape it gently with your fingers. A light press can be used when appropriate, but avoid crushing the dimensional structure with heavy pressure from the iron.
If you want to hang the project as a fabric Christmas ornament or year-round decoration, add a narrow ribbon loop to the back. Attach the loop securely to the central structural area rather than to the tip of a single point. This distributes the weight more effectively and helps the ornament hang evenly.
The color palette can completely transform the character of the project. Red, green, cream, and gold create a traditional Christmas style, while blue and silver can produce a winter-inspired ornament. Pink floral fabrics like those in the photograph create a romantic cottage-style effect. Scraps from previous quilts can turn the project into a meaningful scrap fabric ornament.
You can also experiment with scale. Smaller squares produce delicate ornaments suitable for trees and gift packages, while larger pieces can create dramatic wall decorations or table accents. Whenever you change the original dimensions, make every component proportionally identical. Consistency matters more than the exact measurement.
For an especially coordinated result, consider the direction of printed motifs before cutting. Large flowers can be centered intentionally within selected pieces, while tiny prints are more forgiving. Fussy cutting is the quilting term often used for deliberately positioning a specific motif within a fabric shape, and it is particularly effective for showcasing flowers like those visible in this star.
Finally, remember that handmade projects do not need to look factory-produced. Small variations can contribute to their character. The goal is clean construction, secure seams, balanced proportions, and a pleasing arrangement. With careful cutting and patient assembly, the Fabric Star Ornament Pattern becomes an approachable project that can be recreated in countless fabric combinations.
FAQ About the Fabric Star Ornament Pattern
What is a Fabric Star Ornament Pattern?
A Fabric Star Ornament Pattern is a sewing design used to create a star-shaped decorative object from individual fabric sections. In this version, folded and lightly padded units are arranged around a central point to produce a three-dimensional appearance.
What fabric is best for making a fabric star ornament?
Medium-light 100% quilting cotton is an excellent choice because it cuts accurately, presses well, and is available in countless coordinating prints. Extremely heavy fabrics may create too much bulk where the pieces overlap.
Can beginners make this project?
Yes. A beginner with basic cutting, pressing, hand-sewing, and straight-stitch skills can complete it. Making one practice point before cutting or assembling the entire ornament is a good way to understand the folding technique.
How large should the fabric squares be?
For a medium ornament, approximately 12 x 12 cm fabric squares provide a useful starting point. The dimensions are flexible, however. Smaller squares make smaller stars, while larger squares create more substantial decorative pieces.
Do I need batting inside the ornament?
Batting is optional, but a thin layer helps produce the soft dimensional appearance seen in the inspiration project. Lightweight interfacing is another option when you want structure with less bulk.
Can I sew the Fabric Star Ornament Pattern by hand?
Yes. Although a sewing machine makes repeated seams faster, the ornament can be constructed with careful hand stitching. In fact, hand stitching can make final center assembly easier when several layers become thick.
How do I make all the star points the same size?
Use one accurate template for every piece, maintain the same seam allowance, press each unit consistently, and use the first finished point as a reference when folding the others.
Why does my fabric star look uneven?
Uneven cutting, inconsistent folds, different seam allowances, or attaching the pieces at different depths can affect symmetry. Arrange every completed point before final sewing and adjust the spacing while the units can still be moved.
Can I use leftover quilting fabric?
Absolutely. This is an excellent fabric scrap project because the individual sections require relatively small pieces. Scraps can also give each star a unique appearance and help coordinate the ornament with an existing quilt or sewing project.
What can I use for the center decoration?
A decorative button is one of the easiest choices. You can also use a covered button or another lightweight sewing embellishment. Whatever you select should be attached securely, particularly if the ornament will be handled frequently.
Can the pattern be enlarged?
Yes. Enlarge every pattern component by the same percentage so the proportions remain consistent. Larger versions can work as wall decorations, table accents, or dimensional textile art.
How should a finished fabric star be stored?
Store it flat or in a container with enough room to protect the dimensional points. Avoid placing heavy objects directly on top because prolonged pressure can flatten the padded folds.
Can different prints be mixed in the same star?
Yes, and mixing prints is one of the strengths of this project. Combining a larger focal print with small-scale florals, dots, and tonal fabrics creates contrast without making the ornament visually chaotic.
How can I give the project a professional finish?
Accurate cutting, careful pressing, uniform seam allowances, balanced fabric placement, neat hand stitching, and a securely finished center make the biggest difference. Taking time during assembly is usually more valuable than adding extra decoration.
Conclusion
The Fabric Star Ornament Pattern combines simple sewing techniques with clever folding to create an impressive three-dimensional decoration. The process begins with choosing coordinating quilting cotton fabrics, preparing consistently sized pieces, adding lightweight structure, sewing and pressing each unit, and carefully folding them into dimensional points. Those individual points are then arranged symmetrically, layered together, securely stitched, and finished with an attractive center embellishment.
EASILY FIND THE FREE PDF FOR THIS PATTERN HERE!
Once you understand the basic construction, the same Fabric Star Ornament Pattern can be customized in countless ways. Floral pinks can create the romantic appearance of the photographed project, while Christmas colors, modern prints, pastels, patriotic combinations, or treasured quilting scraps can give the design an entirely different personality. Changing the size also makes it possible to create anything from small hanging ornaments to larger decorative textile pieces. Most importantly, take your time with accurate cutting, consistent folding, careful pressing, and symmetrical assembly. Those details are what transform simple fabric pieces into a polished dimensional star. If you make this project, leave your sincere opinion about the tutorial and share your suggestions for colors, fabrics, or variations you would like to see in future fabric sewing patterns.