
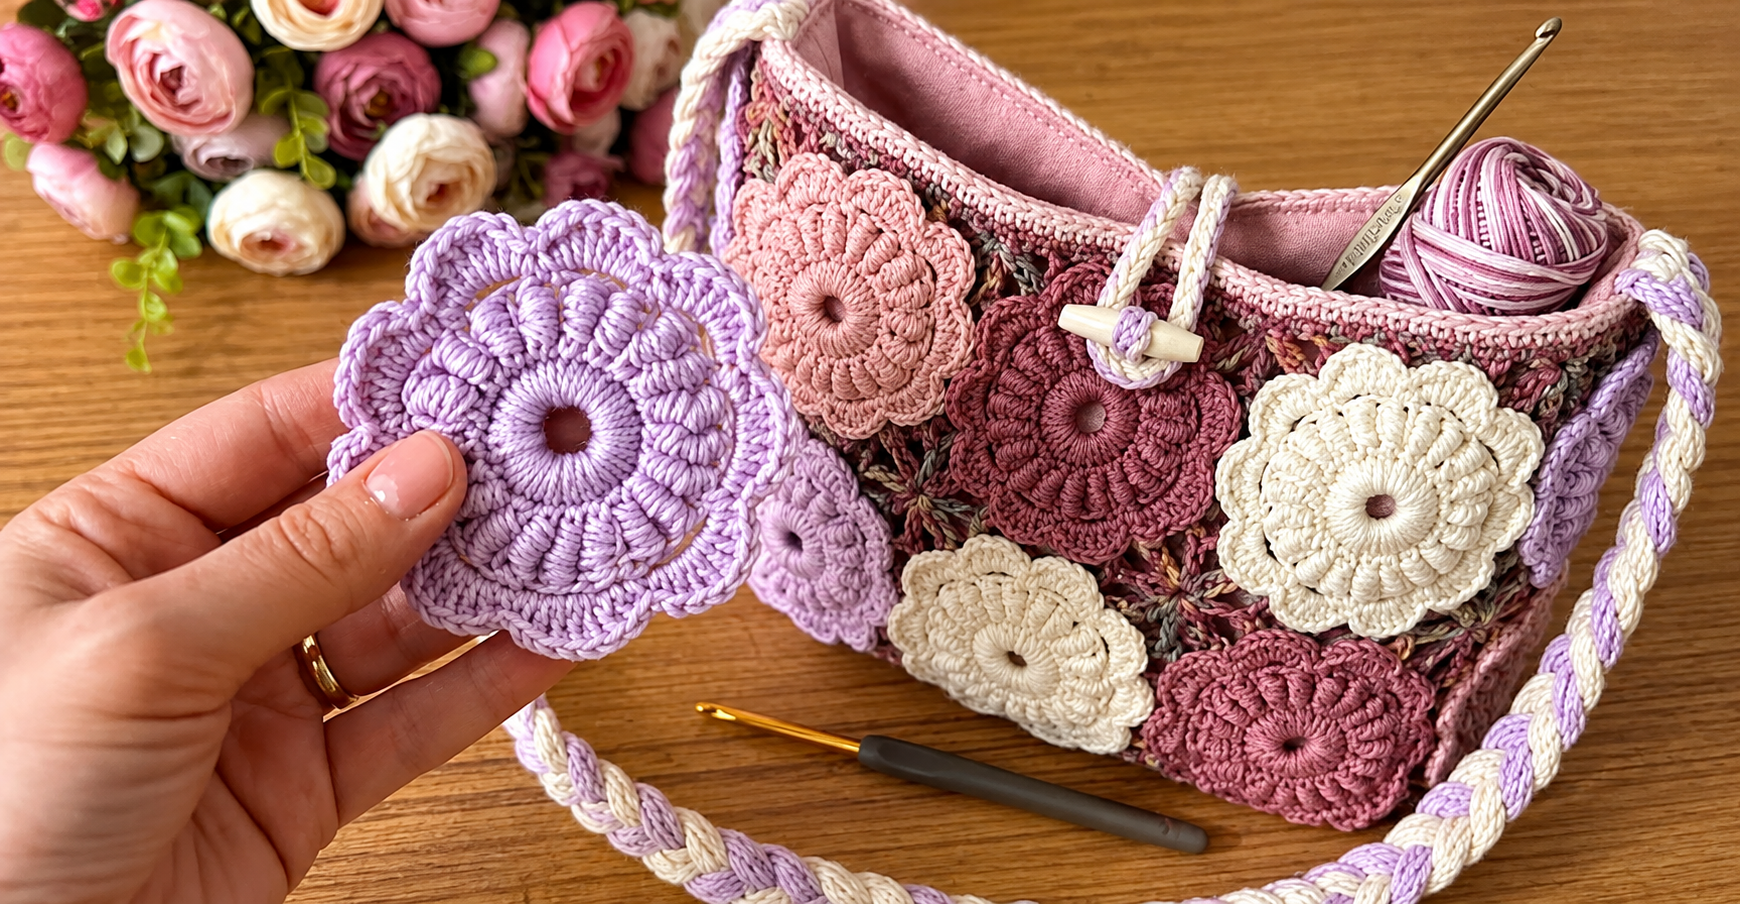
Beautiful 3D crochet flower motif for a bag Pattern is a charming crochet project for anyone who loves combining texture, color, and handmade details in a practical accessory. The raised petals give each flower a sculptural appearance, while the circular construction makes the motif easy to adapt for handbags, shoulder bags, tote bags, cosmetic pouches, and decorative panels. Instead of relying on complicated shaping, this design is built gradually in rounds, making it approachable for crocheters who already know a few basic stitches and want to explore more dimensional crochet techniques. The most important elements are a stable center ring, carefully spaced stitches, layered petals, and a neat finishing round that helps each motif maintain its shape when attached to a bag.
One of the most attractive features of the Beautiful 3D crochet flower motif for a bag Pattern is how easily the flowers can be customized. Soft pink, lavender, cream, dusty rose, burgundy, and neutral shades create an elegant romantic look, while brighter colors can transform the same construction into a cheerful summer accessory. Cotton yarn is particularly useful for this type of project because it provides good stitch definition and helps the petals remain visible rather than becoming too soft or flattened. The crochet hook should match the chosen yarn closely enough to create firm stitches, especially when the finished motifs will become part of the structure of a bag.
Before beginning, it is helpful to understand the basic crochet terminology used throughout the pattern. A chain stitch (ch) creates the foundation and spaces between groups of stitches. A slip stitch (sl st) joins rounds without adding noticeable height. A single crochet (sc) creates compact areas, while a half double crochet (hdc) and double crochet (dc) gradually increase the height of the petals. A treble crochet (tr) can be used for taller sections when a more dramatic flower is desired. The pattern also uses stitch groups worked into the same space, which creates the rounded, raised appearance associated with a 3D crochet flower motif. Understanding these simple stitch keys makes the entire project easier to follow from the center outward.
Materials, Crochet Stitch Key, and Preparation
For the Beautiful 3D crochet flower motif for a bag Pattern, choose a medium-weight cotton or cotton-blend yarn with enough structure to highlight the petals. Depending on the size you want, a crochet hook between approximately 3 mm and 4 mm works well with many common cotton yarns. You will also need scissors, a yarn needle, stitch markers if desired, and the yarn intended for joining the completed motifs. For a coordinated floral bag, selecting three to five complementary colors usually creates more visual depth than using only one shade.
DISCOVER MORE FREE PATTERNS HERE!
The main crochet stitch key used in this project is: ch = chain, sl st = slip stitch, sc = single crochet, hdc = half double crochet, dc = double crochet, tr = treble crochet, and st = stitch. When the instructions say to work several stitches into the same stitch or space, those stitches should all enter the same location. This technique increases the stitch count quickly and creates the fullness necessary for rounded petals.
Start each flower with a magic ring if you are comfortable using one. A magic ring allows the center opening to be tightened after the first round, creating a tidy floral center. An alternative is to chain four or five stitches and join the first chain with a slip stitch to form a small ring. Both methods work, although the magic ring generally creates a more polished center.
The yarn tension should remain consistent but not overly tight. Extremely tight crochet can make raised petals difficult to shape, while loose crochet may cause the flower to look floppy. Practice several stitches before starting if you are using an unfamiliar yarn. The goal is to create a fabric that feels substantial enough for a bag while remaining flexible enough for comfortable assembly.
It is also useful to make one sample motif before beginning the full bag. Measure the finished flower from one outer petal edge to the opposite side. Depending on yarn weight and hook size, a motif may measure approximately 8 to 12 cm across. Knowing the finished size helps determine how many motifs you will need to cover the front, back, and possibly the sides of the bag.
Finally, organize your colors before crocheting multiple motifs. A balanced arrangement might include one dominant shade, two secondary shades, and a light neutral color. The 3D flower crochet pattern looks especially attractive when neighboring motifs vary slightly in color, because the raised petals cast natural shadows and help each flower stand out individually.
Step-by-Step Crochet Pattern for the 3D Flower Motif
Begin Round 1 by creating a magic ring. Chain 2, which acts as the initial height, then work approximately 12 double crochet stitches into the ring. Pull the ring closed gently and join the final stitch to the first stitch with a slip stitch. This creates the compact circular foundation of the Beautiful 3D crochet flower motif for a bag Pattern. If you prefer a smaller center, you may use single crochet stitches instead, but double crochet gives more space for the following petal round.
For Round 2, create the first petal foundations. Chain 3, then skip one stitch and slip stitch into the next stitch. Repeat this sequence around the circle. You should create evenly spaced chain loops around the center. These small arches become the spaces where the first layer of petals will be worked. Try to keep each loop approximately the same size because uneven chain tension can produce petals of different widths.
To form the first petal layer, slip stitch into the first chain space. Work 1 sc, 1 hdc, 3 dc, 1 hdc, and 1 sc into the same chain space. This combination gradually increases and then decreases the stitch height, naturally forming a rounded petal. Repeat the same sequence into every chain space around the motif. Finish by joining with a slip stitch.
The raised effect begins with the second petal foundation round. Turn the flower slightly and work behind the first row of petals. Insert the hook around the posts or connecting spaces between petals and create new chain loops. A practical sequence is sl st around the connecting stitch, ch 4, then move to the next connection and repeat. These loops should sit behind the existing petals so the next layer rises independently rather than covering the first one completely.
For the second layer of petals, work a taller stitch sequence into each new chain loop. A good combination is 1 sc, 1 hdc, 2 dc, 2 tr, 2 dc, 1 hdc, 1 sc. This creates larger petals that extend beyond the first layer. Repeat carefully around the entire flower. Because several stitches enter each chain space, gently slide the stitches together after finishing each petal so they remain compact and rounded.
To complete the flower, work one final slip stitch and cut the yarn, leaving a tail approximately 10 to 15 cm long for weaving in or sewing. Use your fingers to arrange the petals so the layers remain visible. The finished motif should have a clearly defined center, a smaller inner petal layer, and a larger outer layer that creates the recognizable 3D crochet flower effect.
How to Join the Crochet Flowers and Build the Bag
Once several motifs are complete, place them on a flat surface before joining anything permanently. This step is essential because the color arrangement strongly influences the appearance of the finished bag. Position darker flowers beside lighter motifs and alternate the main colors. Photographing the arrangement can be useful so you can recreate the same layout while joining.
The easiest joining method for beginners is sewing the motifs together using a yarn needle. Place two flowers side by side and identify two or three points where the outer petals naturally touch. Thread a matching yarn color through the needle and sew through the back loops or lower parts of the petals. Avoid sewing directly across the decorative surface because visible stitches can interrupt the dimensional look.
Another option is a slip stitch join. Hold two motifs with the wrong sides together and insert the crochet hook through corresponding edge stitches. Pull the joining yarn through both layers and make a slip stitch. Continue across a short section where the flowers meet. This creates a stronger connection and is useful when the bag will carry heavier items.
For a structured handbag, consider creating separate front and back floral panels. Arrange enough motifs to form a rectangle or slightly trapezoidal shape. Join the motifs securely and place the finished panel over a crocheted or fabric base. The base supports the weight of the contents while the 3D crochet flower motifs remain decorative rather than carrying all the structural tension.
You can also crochet a simple solid panel behind the flowers. Start with a foundation chain equal to the desired width and work rows of single crochet or half double crochet until the panel reaches the required height. Attach the flower motifs over this background using small stitches. This method is particularly helpful when the spaces between circular motifs would otherwise leave openings in the bag.
When both sides are complete, join them along the bottom and side edges. Single crochet is a simple decorative joining technique: hold the panels together, insert the hook through both layers, and work single crochet stitches evenly around the sides and bottom. Leave the upper edge open. A lining can later be added if you want a polished interior and additional durability.
Finishing the Bag, Handles, Lining, and Professional Details
The upper edge of the bag should be reinforced before adding handles. Attach yarn at one side and work at least two or three rounds of single crochet around the opening. This creates a stable band and helps prevent the weight of the bag from stretching the flower motifs. Keep the stitch count consistent so the opening remains flat instead of becoming wavy.
A crocheted cord makes an attractive handle for the Beautiful 3D crochet flower motif for a bag Pattern. One simple method is to create several long chains and braid them together. For example, crochet three cords approximately 80 to 120 cm long, depending on whether you want a handbag or shoulder bag. Braid the cords tightly and secure both ends firmly to the reinforced upper edge.
For a thicker strap, crochet a foundation chain to the desired length and work several rows of single crochet. A width of approximately 3 to 5 cm creates a comfortable shoulder strap. You can also combine two or three yarn colors in the strap to reflect the colors of the floral motifs. Reinforce the attachment points by sewing through several stitches rather than attaching the handle to only one petal.
Adding a fabric lining greatly improves the usability of a crochet bag. Measure the completed bag and cut two pieces of cotton fabric slightly larger than the interior dimensions, leaving approximately 1 cm for seam allowance. Sew the sides and bottom of the lining, fold the upper edge inward, and hand-stitch it to the reinforced crochet opening. The lining prevents small objects from catching on the crochet stitches.
A drawstring closure can be created by crocheting a long chain and reinforcing it with slip stitches on the return row. Thread the cord through evenly spaced openings near the upper edge. Small crocheted loops, wooden toggles, or decorative knots can help hold the drawstring in place. A zipper or magnetic closure may also be used when a more structured finish is preferred.
Before using the bag, weave in every yarn end securely and inspect all joined areas. Gently reshape the flowers with your fingers and lightly block them if necessary. Avoid pressing the raised petals flat. A carefully finished crochet flower bag should maintain the dimensional character of the flowers while remaining strong enough for everyday lightweight use.
FAQ About the Beautiful 3D Crochet Flower Motif for a Bag Pattern
Is the Beautiful 3D crochet flower motif for a bag Pattern suitable for beginners?
It is most comfortable for confident beginners who already know chain stitches, slip stitches, single crochet, half double crochet, and double crochet. The individual stitches are not especially difficult. The main challenge is learning how to work the second layer of petals behind the first layer.
What yarn works best for a 3D crochet flower?
Cotton and cotton-blend yarns are excellent choices because they provide clear stitch definition. A smooth yarn makes the petal structure easier to see and helps the completed motif retain its shape. Very fuzzy yarn may hide the detailed stitch work.
How large should each crochet flower motif be?
There is no required size. Many bag motifs work well at approximately 8 to 12 cm across. Smaller flowers create a more detailed appearance and require more motifs, while larger flowers can cover the same surface with fewer pieces.
How many flower motifs do I need for one crochet bag?
The number depends on the motif size and the final bag dimensions. A small handbag might require approximately 10 to 16 motifs, while a larger tote may need 20 or more. Making one sample flower and arranging paper circles of the same size can help estimate the total.
Why are my crochet petals curling?
Minor curling is normal in dimensional crochet. Excessive curling may happen when the stitches are too tight or when too many stitches are placed into a small chain space. Try using a slightly larger crochet hook or reducing the number of tall stitches in each petal.
How do I make the petals more three-dimensional?
Create each additional petal layer behind the previous layer rather than directly on top of it. Using progressively larger chain loops and taller stitches also increases dimension. After finishing, shape the petals gently with your fingers.
Can I make the flower with only one layer of petals?
Yes. A single-layer flower is faster to crochet and creates a flatter surface. However, the signature appearance of the Beautiful 3D crochet flower motif for a bag Pattern comes from layering the petals.
Can different flower sizes be combined in the same bag?
Absolutely. Combining large and small motifs can create an organic floral arrangement. Small flowers are particularly useful for filling spaces between larger motifs.
Should I block the finished crochet flowers?
Light blocking can help even out the stitches, but avoid flattening the petals. Place the motifs on a blocking surface, shape the outer edges, and allow them to dry naturally while keeping the raised sections lifted.
Do I need to line a crochet flower bag?
A lining is not mandatory, but it is highly recommended for practical use. It supports the crochet fabric, protects the motifs from stretching, and prevents small belongings from slipping through spaces between stitches.
What is the strongest way to join crochet flowers?
Sewing the motifs together through several edge stitches provides excellent control and durability. Slip stitch joining is also strong. Whichever method you choose, avoid relying on a single petal or single stitch as the only attachment point.
Can this flower motif be used for projects other than bags?
Yes. The same 3D crochet flower motif can decorate cushions, blankets, wall hangings, scarves, table runners, baskets, garments, and handmade gifts. The pattern can also be adapted by changing yarn weight, hook size, and the number of petal layers.
Conclusion
The Beautiful 3D crochet flower motif for a bag Pattern combines basic crochet techniques with layered construction to create an impressive handmade accessory. By beginning with a secure center, forming evenly spaced chain loops, building the first petal layer, and adding larger petals behind it, you can create a flower with attractive depth and texture. Understanding the crochet stitch keys—ch, sl st, sc, hdc, dc, and tr—makes each stage easier to follow and gives you the freedom to modify the design later.
After mastering one motif, the project becomes highly customizable. You can experiment with different colors, increase or decrease the flower size, combine several floral styles, or arrange the motifs over a solid crochet foundation. Joining the motifs carefully, reinforcing the upper edge, adding a comfortable handle, and including a fabric lining can transform decorative flowers into a practical and durable crochet flower bag.
The most enjoyable part of this pattern is that every finished bag can look different even when the same basic instructions are followed. Color placement, yarn texture, flower size, strap style, and arrangement give each project its own personality. Take your time with the petals, keep your tension consistent, and enjoy watching individual crochet circles gradually become dimensional flowers and finally a complete handmade accessory. If you try this Beautiful 3D crochet flower motif for a bag Pattern, leave your sincere opinion about the project and share your suggestions. I would love to know which colors you would choose, whether you prefer larger or smaller flowers, and what creative changes you would make to personalize your own crochet flower bag.