
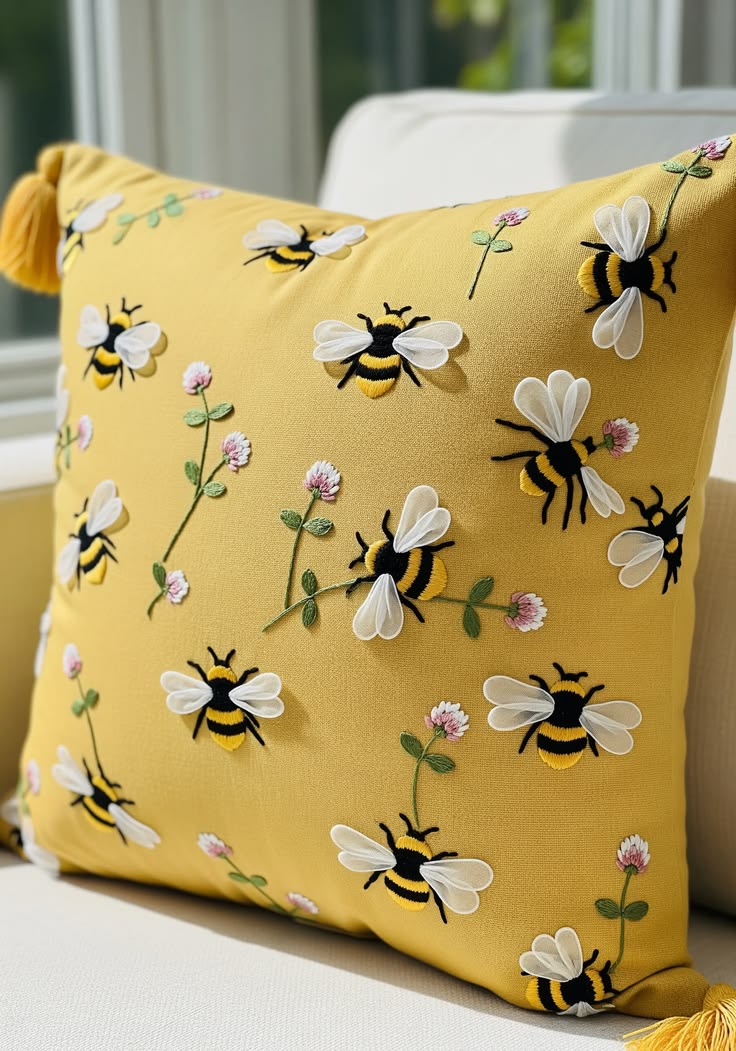
Embroidered Cushion with a Little Bee Pattern is a charming sewing project that combines decorative embroidery, soft home décor, and nature-inspired details in one cheerful handmade piece. The design shown in the reference image features a warm mustard-yellow cushion decorated with dimensional little bees, delicate flowers, green stems, and soft white wings. The contrast between the golden fabric, black-and-yellow bees, pink blossoms, and green leaves creates an inviting country-style appearance that works beautifully in living rooms, bedrooms, reading corners, porches, and craft-inspired spaces. Although the finished cushion looks detailed, the project becomes much easier when it is divided into manageable stages, from selecting the fabric to creating the embroidered motifs and assembling the final pillow cover.
Making an Embroidered Cushion with a Little Bee Pattern is also a wonderful opportunity to practice several essential sewing and embroidery techniques. Beginners can learn how to transfer a design onto fabric, stabilize the embroidery area, create simple decorative stitches, attach dimensional fabric wings, and sew a professional-looking cushion cover. More experienced makers can personalize the project by changing the flowers, adjusting the number of bees, experimenting with thread thickness, or adding additional botanical elements. Because every bee and flower can be positioned individually, the finished cushion does not need to look perfectly symmetrical. In fact, a slightly scattered arrangement often creates the natural garden feeling that makes this type of bee embroidery pattern so appealing.
Another advantage of this project is its versatility. The same embroidery techniques can be used for tote bags, table runners, wall hangings, quilt blocks, decorative panels, and other handmade accessories. For the cushion itself, a finished size of approximately 45 x 45 cm is practical for many standard decorative pillow inserts, although you can easily adapt the measurements to your preferred size. The most important part is planning the placement of the embroidery before sewing the cushion together. By working carefully and building the design layer by layer, you can create a handmade embroidered bee cushion with beautiful texture, personality, and visual depth.
Materials, Fabric Choices, and Preparing the Bee Cushion Design
The first step in making an Embroidered Cushion with a Little Bee Pattern is selecting a suitable base fabric. Medium-weight cotton, linen, cotton-linen blend, canvas, or home décor fabric are excellent choices because they provide enough structure to support embroidery. A mustard yellow or golden fabric creates the sunny appearance shown in the reference project, but soft beige, cream, pale green, dusty blue, or even denim can also work beautifully. Avoid extremely thin fabric unless you plan to reinforce it with interfacing, because dense embroidery may cause lightweight fabric to wrinkle or distort.
DISCOVER MORE FREE PATTERNS HERE!
For a finished cushion measuring about 45 x 45 cm, cut one front panel approximately 47 x 47 cm, allowing a 1 cm seam allowance around each side. For a simple envelope-style back, cut two rectangles approximately 47 x 32 cm each. The overlapping pieces will create an opening for inserting and removing the cushion form. If you prefer a zipper closure, you can instead cut two full-size panels and install a zipper along one edge. Always press the fabric before measuring and cutting so that the pieces remain accurate.
You will also need embroidery floss or thread in black, golden yellow, white, green, and soft pink. Additional shades of green and yellow can create more natural-looking details. For the dimensional wings, use small pieces of white organza, voile, lightweight cotton, or another slightly translucent fabric. Embroidery needles, fabric scissors, pins or clips, an embroidery hoop, removable fabric marker, tracing paper, stabilizer, sewing thread, and a sewing machine are also helpful. Hand sewing is possible, but a machine makes assembling the cushion faster.
Before transferring the pattern, decide how many bees and flowers you want on the front panel. The reference style uses bees distributed throughout the surface rather than placed in strict rows. This scattered arrangement is important because it gives the little bee embroidery design a natural, playful appearance. Some bees can face upward, others sideways, and a few may appear to be approaching flowers. Leave enough empty fabric between the motifs so that each bee remains visually distinct.
Lightly sketch the motifs using a removable fabric marker. A typical bee body can measure approximately 3 to 5 cm long, depending on the scale of your cushion. Draw an oval body, a rounded head, two antennae, small legs, and two wing placement marks. Flowers can measure approximately 1.5 to 3 cm, with stems varying between 5 and 12 cm. Keep the lines delicate because they are only guides for the embroidery.
Once the layout is complete, attach lightweight embroidery stabilizer behind the front panel, especially in areas containing dense stitching. Stabilizer supports the fabric and helps prevent puckering. Place the first section of fabric inside an embroidery hoop, making sure it is comfortably taut but not stretched excessively. Preparing the fabric carefully is one of the most important steps in achieving clean, polished results in any embroidered cushion project.
How to Embroider the Little Bees, Flowers, Leaves, and Dimensional Wings
Begin each bee by embroidering the black outline of the body. A satin stitch works very well for the filled sections because it creates a smooth, slightly raised surface. Start with the bee’s head using black thread, then embroider alternating black and golden-yellow stripes across the body. Keep the stitches close together and follow the shape of the oval. If you prefer more texture, you can use multiple strands of embroidery floss or combine satin stitch with short-and-long stitch.
Next, embroider the bee’s antennae and legs using backstitch or stem stitch. These stitches are excellent for thin curved lines and allow you to create the delicate appearance of insect legs without making them too heavy. Use one or two strands of black embroidery floss for these details. Slightly changing the position of the legs and antennae on each bee gives every motif its own personality while preserving the overall bee embroidery pattern.
The white wings are one of the most distinctive features of the Embroidered Cushion with a Little Bee Pattern. To create a dimensional effect, cut two small wing shapes from white organza or lightweight fabric. Each wing can be approximately 2.5 to 4 cm long. Fold the raw edges inward slightly or use fabric that does not fray easily. Position the wings near the top of the bee’s body and secure only the base with several small stitches. Leaving most of the wing unattached allows it to lift naturally from the cushion surface.
You can also create embroidered wings instead of fabric wings. Outline each wing with a fine stem stitch and fill the shape using loosely spaced satin stitches or long stitches. White thread creates a clean appearance, while ivory or pale cream produces a softer vintage effect. For additional dimension, combine embroidered outlines with a small piece of transparent organza. This technique creates the impression of delicate translucent wings without making the motif excessively bulky.
For the flowers, begin with thin green stems made using stem stitch. Add leaves with lazy daisy stitches, fishbone stitch, or small satin stitches. Pink and white flowers can be created using short straight stitches radiating outward from the center. French knots are another beautiful choice for flower centers because they introduce subtle texture. Keep some flowers small and others slightly larger to make the arrangement feel organic.
Repeat the process across the cushion front until the composition feels balanced. Avoid filling every empty area simply because space remains. Negative space is an important part of the design because it helps the bees and flowers stand out against the background. Periodically remove the fabric from the hoop and place it on a flat surface to evaluate the full composition. This simple habit can prevent overcrowding and ensures that the hand embroidered cushion remains visually balanced.
Step-by-Step Assembly of the Embroidered Cushion Cover
After completing all embroidery, carefully remove any visible pattern markings and trim excess stabilizer from the back. Follow the instructions provided with your specific stabilizer if it is water-soluble or tear-away. Press the embroidered panel from the wrong side on top of a soft towel. This protects the raised stitches and dimensional wings from becoming flattened by the iron. Use moderate heat appropriate for your fabric.
Next, prepare the two back panels for an envelope closure. Fold one long edge of each back rectangle approximately 1 cm toward the wrong side and press. Fold the same edge again by approximately 1.5 cm to enclose the raw edge. Stitch close to the inner folded edge. Repeat the process on the second back piece. This creates two clean finished edges that will overlap at the center of the cushion.
Place the embroidered front panel right side facing upward. Position the first back panel on top with its right side facing the embroidered panel. Align the raw edges. Place the second back panel from the opposite direction so the two finished edges overlap in the center. The entire embroidered front should now be covered by the two back pieces. Pin or clip carefully around all four sides.
Sew around the entire perimeter using approximately a 1 cm seam allowance. When you reach each corner, stop with the needle down, lift the presser foot, rotate the fabric, and continue sewing. Reinforce areas where the envelope sections overlap because these points receive additional stress when the cushion insert is removed or replaced. A straight stitch length of approximately 2.5 mm is suitable for most medium-weight fabrics.
Trim the corners diagonally without cutting through the stitching. This small step reduces excess fabric and helps create sharper corners when the cushion cover is turned right side out. If your fabric frays easily, finish the raw seam allowances with a zigzag stitch, overlock stitch, or serger. Turn the cover through the envelope opening and carefully push out each corner using a blunt turning tool.
Insert a 45 x 45 cm cushion form and adjust the corners until the pillow looks evenly filled. A slightly fuller cushion insert can create a more luxurious appearance, while a softer insert produces a relaxed country style. Gently arrange the dimensional wings after inserting the pillow so they sit naturally. At this stage, the Embroidered Cushion with a Little Bee Pattern should display a lively combination of texture, embroidery, and soft decorative details.
Finishing Techniques, Customization Ideas, and Care Instructions
One of the easiest ways to personalize your bee cushion pattern is by changing the background fabric color. Mustard yellow creates a bright garden-inspired appearance, but sage green gives the design a botanical feeling, pale blue creates a spring atmosphere, and natural linen offers a more rustic farmhouse style. The embroidery colors can remain similar because black, yellow, white, green, and pink coordinate with many neutral backgrounds.
You can also adjust the number and size of the bees. A minimalist version might feature only three large embroidered bees surrounded by simple flowers. A more detailed version could contain ten or more smaller bees scattered across the surface. When changing the number of motifs, maintain enough space between them. A well-planned embroidered bee pillow often looks more sophisticated than one where every area has been filled with decoration.
Decorative edging provides another opportunity for customization. Small tassels can be added to each corner, similar to the playful detail visible in the reference style. You could also add piping around the outer edge of the cushion. For a 45 cm cushion, prepare a continuous piping strip long enough to go around all four sides plus additional length for joining. Choose piping in mustard, cream, black, green, or another color found in the embroidery.
If you want additional texture, consider adding a few small appliqué flowers. Cut tiny petal shapes from cotton fabric, secure them with fusible web, and stitch around the edges using a small blanket stitch. Keep these appliqué elements limited so that they complement rather than compete with the bees. Combining embroidery and appliqué can create a beautiful handcrafted effect and is especially suitable for decorative cushions.
Caring for the finished cushion requires a little extra attention because of the dimensional wings. Remove the cushion insert before cleaning. Hand washing in cool or lukewarm water is generally the safest approach for delicate embroidery. Avoid aggressive rubbing or twisting. Press excess water gently with a towel and allow the cover to dry flat. If machine washing is necessary, place the cushion cover inside a laundry bag and use a gentle cycle.
Once dry, press only from the wrong side and avoid placing the iron directly over the wings or raised stitches. Store the cushion away from prolonged direct sunlight to reduce fading. With thoughtful care, an Embroidered Cushion with a Little Bee Pattern can remain attractive for years and become a distinctive handmade accent within your home décor.
Frequently Asked Questions About the Embroidered Cushion with a Little Bee Pattern
What fabric is best for an Embroidered Cushion with a Little Bee Pattern?
Medium-weight cotton, linen, cotton-linen blends, canvas, and home décor fabrics are excellent choices. The fabric should be stable enough to support the embroidery without excessive stretching. Lightweight fabric can still be used when combined with appropriate stabilizer.
What size should I make the cushion?
A finished size of approximately 45 x 45 cm is a versatile option for decorative cushions. However, the pattern can be adapted to 40 x 40 cm, 50 x 50 cm, rectangular cushions, or other dimensions. Simply adjust the front and back fabric pieces while maintaining your chosen seam allowance.
How do I stop the embroidery fabric from puckering?
Use embroidery stabilizer behind the fabric and work with an embroidery hoop. The fabric should be taut but not overstretched. Avoid pulling embroidery stitches too tightly because excessive thread tension is one of the most common causes of puckering.
Which embroidery stitches are easiest for beginners?
Several basic stitches work well for this project. Satin stitch is useful for filling the bee bodies, backstitch works for legs and antennae, stem stitch is excellent for flower stems, and lazy daisy stitch can create leaves and petals. French knots are helpful for small flower centers.
How can I make the bee wings look three-dimensional?
Cut the wings from organza, voile, or another lightweight fabric. Attach only the base of each wing to the cushion using small hand stitches. Leaving the remaining section loose allows the wing to lift slightly from the surface and creates the dimensional effect.
Can the bee wings be embroidered instead of made from fabric?
Yes. Draw each wing shape and outline it with stem stitch or backstitch. Fill the interior using long stitches, satin stitch, or lightly spaced straight stitches. Using white or ivory embroidery floss creates a soft wing effect.
Do I need a sewing machine to make this cushion?
No. The embroidery itself is generally completed by hand, and the cushion cover can also be assembled using hand sewing. However, a sewing machine produces the outer seams more quickly and usually provides stronger, more consistent stitching.
Can beginners make this bee embroidery cushion?
Yes. Beginners can simplify the design by using fewer bees and flowers. Practice each stitch on a scrap piece of fabric before working on the final cushion. Completing one motif at a time makes the project much easier to manage.
How many bees should I add to the cushion?
There is no fixed number. Depending on the cushion size and bee dimensions, approximately 7 to 14 bees can create a visually rich design. The key is to distribute the motifs naturally rather than placing them in perfectly straight rows.
What colors work best for the little bee pattern?
Traditional combinations include black and golden yellow for the bee body, white or cream for the wings, green for foliage, and pink, white, lavender, or red for flowers. These colors can be adapted to match the room where the cushion will be displayed.
Can I use the same pattern for other sewing projects?
Absolutely. The little bee pattern can be adapted for tote bags, table runners, quilt blocks, wall panels, kitchen linens, fabric baskets, nursery decorations, and handmade gifts. Simply resize the motifs according to the dimensions of the new project.
How should I wash an embroidered cushion?
Whenever possible, remove the cushion insert and gently hand wash the cover using mild detergent. Avoid scrubbing the embroidered areas or twisting the fabric. Dry the cover flat and press it from the reverse side to protect the embroidery.
Conclusion
Creating an Embroidered Cushion with a Little Bee Pattern is an enjoyable way to combine practical sewing skills with decorative hand embroidery. Throughout this project, you learned how to choose a supportive cushion fabric, prepare approximately 45 x 45 cm panels, transfer a balanced bee and floral design, stabilize the embroidery area, and use basic techniques such as satin stitch, backstitch, stem stitch, lazy daisy stitch, and French knots.
You also learned how dimensional white wings can be created from lightweight fabric and attached to the embroidered bees for a realistic raised effect. Small flowers, leaves, and stems help connect the motifs and transform the surface into a cheerful garden-inspired composition. Careful spacing and the use of negative space are important because they allow every embroidered detail to remain visible and attractive.
The construction stage showed how to transform the finished embroidery into a practical cushion cover using a simple envelope-style back. By allowing seam allowances, finishing the overlapping edges, reinforcing stress points, trimming the corners, and carefully turning the cover right side out, even a relatively simple construction can produce a polished handmade result.
One of the best features of this embroidered bee cushion is the freedom to customize it. You can change the background color, increase or reduce the number of bees, use different flower shades, add tassels, introduce piping, or combine embroidery with appliqué. These changes allow every maker to create a version that feels personal while still preserving the recognizable charm of the original bee-inspired concept.
EASILY FIND THE PDF FOR THIS PATTERN HERE!
With careful stitching and appropriate washing, the finished cushion can remain beautiful for a long time. More importantly, the techniques learned while making an Embroidered Cushion with a Little Bee Pattern can be transferred to many future sewing and embroidery projects, making this design both decorative and educational. What do you think about this little bee cushion design? Leave your sincere opinion and share any suggestions you would use to personalize the pattern. Your ideas may inspire new combinations of colors, stitches, flowers, and creative details for future handmade projects.